


vintage6t
-
Posts
389 -
Joined
-
Last visited
-
Days Won
5
Content Type
Links Directory
Profiles
Articles
Forums
Downloads
Store
Gallery
Blogs
Events
Everything posted by vintage6t
-
Time permitting, I may be able to get you some dimensions over the weekend. 50 Desoto Convertible, X frame under the passenger compartment but I believe from the crossmember back is the same. The tank is out but I can quickly fit it to measure.
-
Mine, time to part with it. https://hartford.craigslist.org/cto/d/south-windsor-1941-plymouth-convertible/7754005845.html
-
Wow, really nice work. Seems like you're really flying through this project. I have to admit I'm a bit jealous of your progress!.
-
Just a thought, maybe it doesn't like the type of gear oil in it. It's worth checking for compatibility.
-
You can polish the journals but not cut them. Cut strips of Silicon carbide sand paper, lubricate the paper with wd40 or whatever your favorite is. Wrap around the journal with a wide flat shoe lace, and work it back and forth. Work from 600 up to 1200 grit in using a grit like 800 or 1000 in between. Clean well when done, especially the oil passages in the journal.


-
In Portland, ME https://maine.craigslist.org/cto/d/south-portland-1951-plymouth-cambridge/7730673265.html
-
In Amesbury MA https://boston.craigslist.org/nos/cto/d/amesbury-1953-dodge-coronet/7725826150.html
-
In Cambridge, MA https://boston.craigslist.org/gbs/cto/d/cambridge-1949-chrysler-windsor/7732720331.html
-
On CL. https://baltimore.craigslist.org/pts/d/york-1949-desoto-desoto-desoto-only-805/7733339368.html Not sure the add is accurate as to numbers built. I found this info on another site: "The DeSoto DeLuxe (not Custom) Carry-All, introduced in mid-1949, used the regular trunk opening. DeSoto built 2,690 Carry-All sedans for 1949. Seat upholstery choices included all vinyl or broadcloth and vinyl. Chrysler would introduce its version of the Carry-All, the Traveler, in 1950. In July, 1949 DeSoto started production of the DeLuxe woody wagon – a 3-seat, 9 passenger affair with the third seat in the rear area of the wagon. 850 were built."
-
Had accident with my newly completed 52 Dodge Coronet
vintage6t replied to Marty C's topic in P15-D24 Forum
Sorry about your accident. Painful all around, but looks fixable. If you were trying to post an add, it cost $5. Maybe that's why it asked for a CC? -
If you just want the joy of cruising in a classic, and not the pain, cost and time of making something roadworthy then I'd sell it. Buy a finished car to enjoy and do minor tinkering on when needed. Sad to say but in the long run you'll come out ahead in every respect. Given that there is not a huge general interest in those old mopars, with a little patience and a lot of looking I'd but you'd find something different for a very good deal.
-
Looks decent for the price. https://www.facebook.com/marketplace/item/1123627562143507/?ref=category_feed&referral_code=undefined&referral_story_type=listing&tracking={"qid"%3A"-2522754316317032757"%2C"mf_story_key"%3A"7501326719912749"%2C"commerce_rank_obj"%3A"{\"target_id\"%3A7501326719912749%2C\"target_type\"%3A0%2C\"primary_position\"%3A6%2C\"ranking_signature\"%3A2616896740624196427%2C\"commerce_channel\"%3A504%2C\"value\"%3A0.00039975133397034%2C\"candidate_retrieval_source_map\"%3A{\"7501326719912749\"%3A111}}"%2C"ftmd_400706"%3A"111112l"}

-
The bushings are held in with a spring clip. The clip locates in a groove in the shaft I.D. and has "wings" that are positioned on the outer edge of the shaft. Squeeze the wings together to remove the clip. You can see one of the clip wings in the circled part of the attached picture.

-
Posted on the HAMB. https://www.jalopyjournal.com/forum/threads/1949-plymouth-doors.1310429/
-
Vintage Edmunds Speed Parts
vintage6t posted a topic in Ebay, Craigslist and External Site Referrals
On the HAMB. $2,200 yikes! https://www.jalopyjournal.com/forum/threads/chrysler-desoto-vintage-edmunds-engine-speed-parts.1256806/ -
Looks great as is. It depends on what aesthetic your going for but if wanted they can be made to look more like the original rubber. Spray on Plasti Dip or even a bed liner coating would probably hold up well in that location.
-
On the HAMB https://www.jalopyjournal.com/forum/threads/1949-51-dodge-3-window-wayfarer-nos-tail-lights-lower-price.1238647/
-
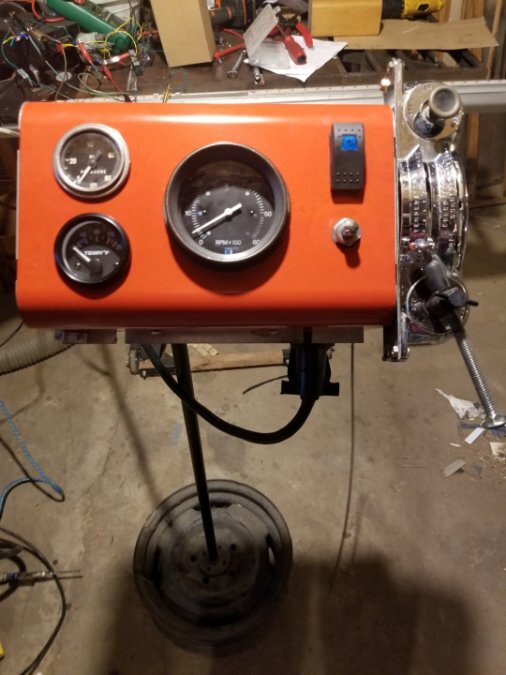
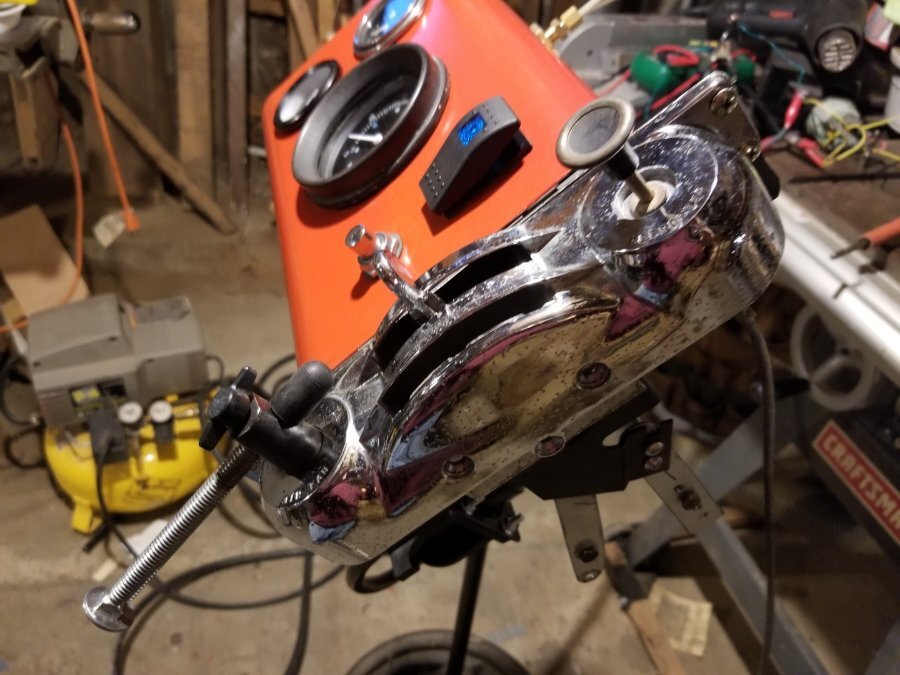
I decided to build a proper control panel for my engine run stand. I usually just connect various loose switches, gauges and wiring to the engine. I'm upgrading my stand so time to unclutter the control as well. The new control panel is made from scavenged parts. I gutted an old broken charge contoller from my RV for the gauge panel case and used existing gauges and switches for that. All external wiring connections are quick connect via a 7 blade trailer socket and cable. For the hand throttle I considered a bunch of solutions. Old bike hand brake levers, motorcycle throttles and so on. Nothing seemed satisfactory. Finally I came across an old heater control in my Mopar parts. Nice chrome housing, temperature slide lever used for the hand throttle and holes in the housing from defrost and heater controls for a choke cable and throttle lock. Perfect! I did have to extend the cable end of the temperature lever to get a long enough pull for full throttle operation but that was just a minor mod.
- 1 reply
-
- 1
-

-
IMO it adds complexity and therefore additional points of potential failure when you're out on the road. I'd add one more component. Either carry a jumper wire or permanently wire in a switch across the the relay power terminals. Jumper of proper gauge or switch of proper amp rating to carry full amp load for your car. Then If you have a failure in your new disconnect circuit while on the road just install the jumper or simply close the switch and you'll be able to drive on.
-
On the HAMB https://www.jalopyjournal.com/forum/threads/1956-dodge-boyertown-body-milk-truck-delivery-panel.1307998/
-
As mentioned above, the center is spring loaded. Push in to disengage the retaining tabs then turn CCW. It may be a tight fit due to dirt trapped around the outside of the metal retaining ring so a bit of WD40 may help


-
41 Dodge - what’s this switch/ ignition lock question
vintage6t replied to GTfastbacker's topic in P15-D24 Forum
The switch is dash lights. My 41 Plymouth has a stomp starter, Dodge could be the same. Look for a round pedal just above the gas pedal. If it's there you push it in with your foot to engage the starter. -
On the HAMB https://www.jalopyjournal.com/forum/threads/1937-38-original-mopar-fender-skirts.1307587/
-
BTW - What's not mentioned before is that as a baseline for clearance, the engine should be installed offset to the passenger side. That's a common factory configuration on many Mopar V8s. Mine is installed with a 2+" offset. If your engine is centered in the frame you probably have unsolvable clearance issues on the driver's side.
-
No. I didn't change the column drop at the dash. If measured the steering wheel horizontal is at a slight angle in relation to the dash but it's not really perceptible to the eye.

