John-T-53
-
Posts
1,696 -
Joined
-
Last visited
-
Days Won
21
Content Type
Links Directory
Profiles
Articles
Forums
Downloads
Store
Gallery
Blogs
Events
Everything posted by John-T-53
-

Leave pedals on to pull motor? Really?
John-T-53 replied to Dan Babb's topic in Mopar Flathead Truck Forum
The truck clutch fork and cross shaft are (is) one piece on the stock setup. -
With the black paint scheme, I can see why he chromed what he did. If the bumpers and running boards were black too, it would be very monotone and prone to invisibility on the road. Still, I can't say I'm a fan of the chrome running boards, and I'll bet they cost a pretty penny to have done. The grill would have been a better place to put chrome, I agree.
-
Leave pedals on to pull motor? Really?
John-T-53 replied to Dan Babb's topic in Mopar Flathead Truck Forum
Here's how I did it when I reinstalled my engine: Remove the floor boards. Remove the tranny, then remove the two bolts that hold the clutch fork/shaft bushing collar to the bell housing (left side of BH next to brake pedal). Slide the bushing collar out of the BH hole, and slide the fork shaft to the left so it's out of the bushing on the right side of the BH. Now you can wiggle it in all directions, and slide it back in at an angle so you can slip of the pedal. If you get the shaft at just the right angle, you can slide the brake pedal off with the engine in the truck. It's tight, but it's possible. -
Does the hood rest on top of the radiator
John-T-53 replied to Dan Babb's topic in Mopar Flathead Truck Forum
The B-3 and B-4 had a different baffle than the B-1 and B-2. The big upper baffle pictured in the parts diagram linked below was only used in the earlier models, and replaced with a smaller one - roughly a 5" x 12" piece of sheet metal, shown in the lower left of my pic below. -
Does the hood rest on top of the radiator
John-T-53 replied to Dan Babb's topic in Mopar Flathead Truck Forum
Mine rests right on the top tank overflow hose. The hood is kind of flimsy in that area, so the radiator helps keep it from saggin'. The core extends above the front baffle about an inch, rendering that section not very effective, so maybe this is not the original that was in this truck?
-
It's 72 up here today - a little nicer than the beach down yonder....but still, Gorebal warming was cancelled this year in California.
-
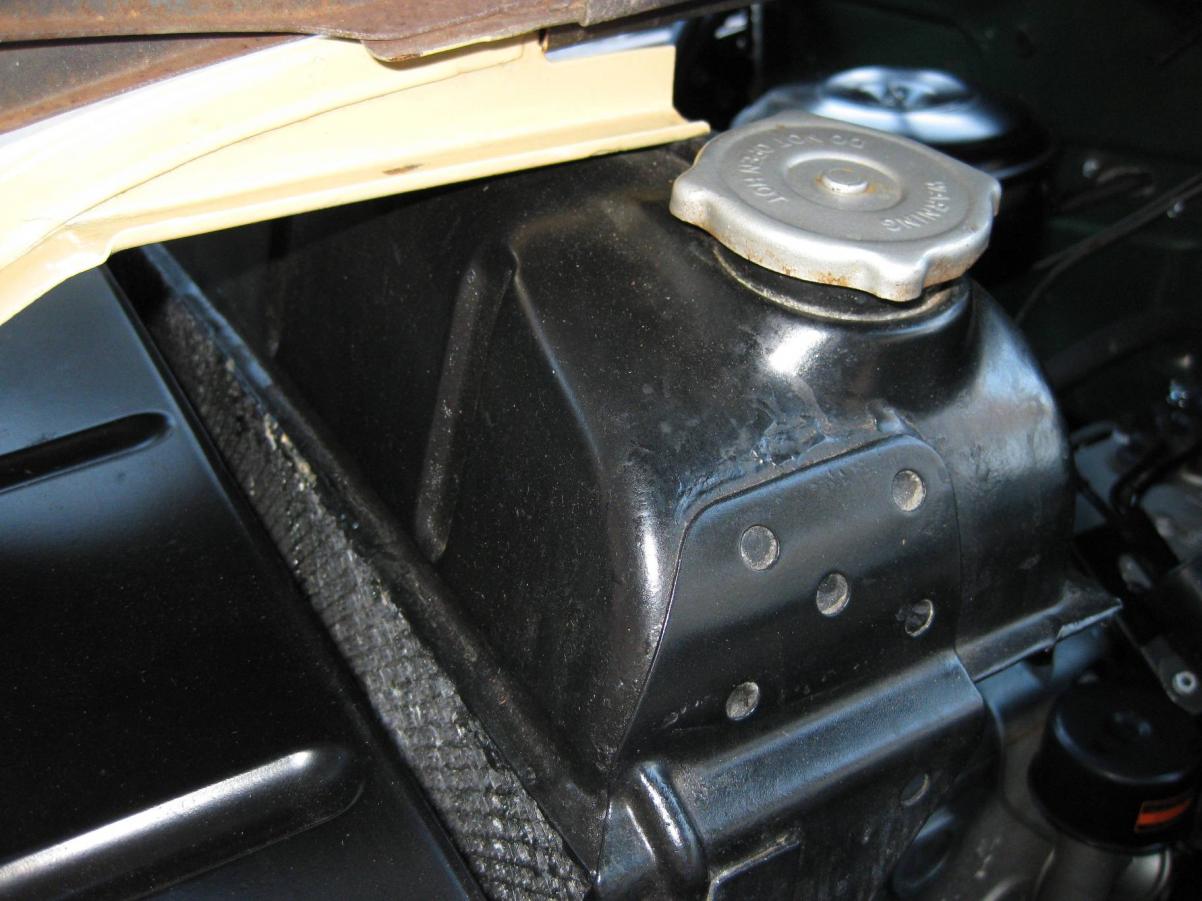
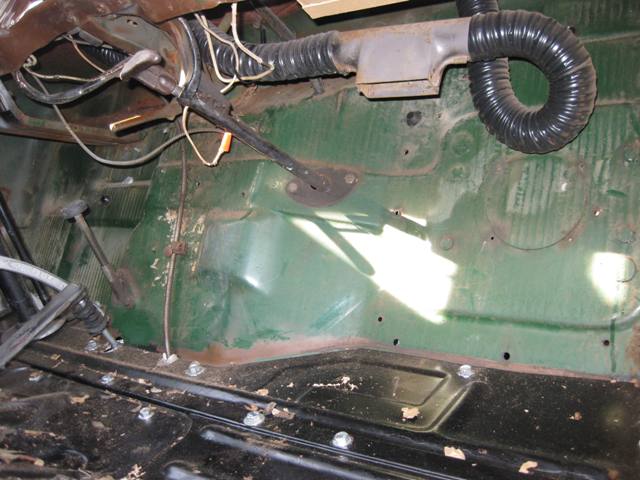
I'll add the Mopar 70 doesn't fit snugly under the dash. Someone drilled mounting holes through the firewall above the gutter on the outside, and the holes for the water tubes were drilled through the upper left corner of the firewall, if you're facing it from the engine side. The bolts are long as the back of the unit doesn't fit within the flat area of the firewall on that side. I'm not a big fan of the heater-mounted defroster control knob either, since it's hard to reach while driving, especially at night. The defroster don't work that well, either!
-
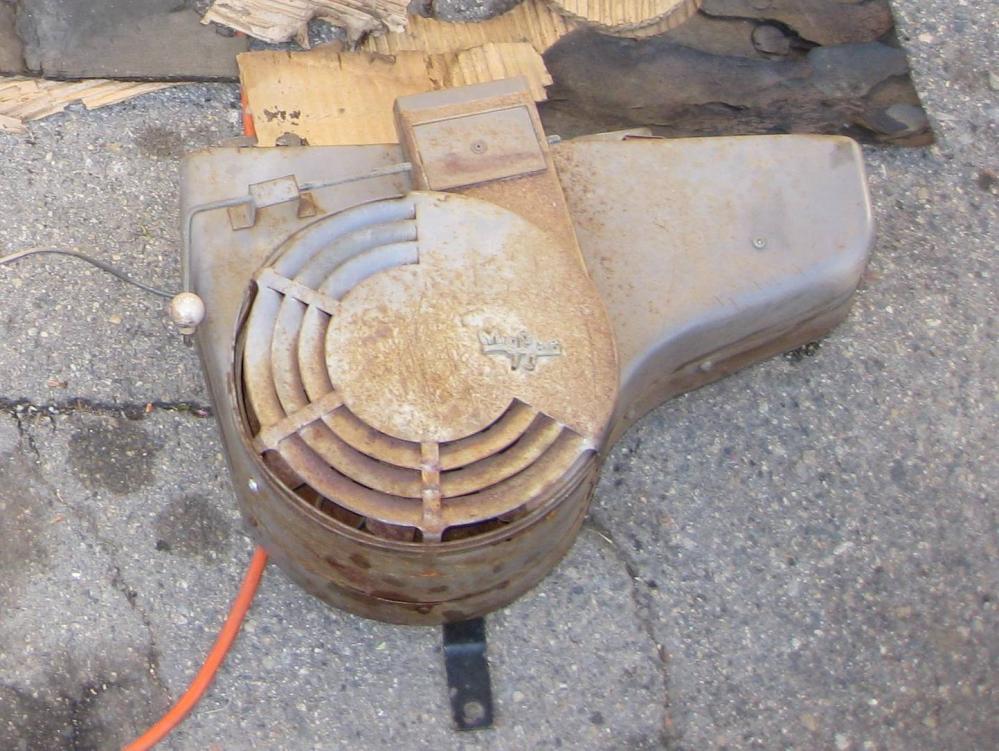
Here's another version of a heater that's in my rig...a "Mopar 70". Not sure if this is the one you have, Tom, but I'd guess chances are slim since there's no stainless on this box (if there's stainess on yours, it's probably polished). But it's an interesting unit that someone put in mine long ago because this California truck never came with a heater in the first place, as the firewall hasn't been punched out for one. (Maybe a new transplant from the midwest or east coast came out here and bought a truck, and didn't think he'd need a heater in CA...only to find out that it indeed gets cold in the winter!!!) Anybody know what a Mopar 70 goes in? I got 2, and one is up for grabs right now if someone wants it. I just got a truck master heater from Mr. Van Note through ebay and plan on putting that in, along with the fresh air kit aquired from Reg a few months back. All that's still needed are control cables and switches.

-
John & Horace Dodge history.
John-T-53 replied to Fernando Mendes's topic in Mopar Flathead Truck Forum
Since Dodge made most of the parts for the early Fords, I wonder if that's how the acronym for F.O.R.D. came about?? (F*'d Over Rebuilt Dodge) -
Tips for improving the ride/handling
John-T-53 replied to Dan Babb's topic in Mopar Flathead Truck Forum
If you've already put radials on the truck, replace the shocks next. They would be a big factor in affecting your ride quality (like on any car or truck), and they're responsible for keeping your tires on the ground. I've seen many cars going down the freeway with bad shocks, and on a bumpy section of pavement, I've watched tires literally bounce up and down, leaving the pavement momentarily each time. No contact = no control. As said earlier too, lubricate all the zerk fittings around the chassis and loosen up the springs with some penetrating oil. My 1/2 ton has all original suspention that's well broken in and has never been disassembled, but with 8 year-old radials and new shocks and it rides almost as good as a '74 Newport. -
Anybody restoring a U.S. Navy Truck?
-
You guys are talking about the crankshaft pulley right? Those marks are pretty shallow, and are easily concealed by rust and paint. Turn the engine by hand so #6 is at TDC (remove the small pipe plug in the head above #6 and insert an 8" straight piece of coat hanger wire and watch its movement up and down), then try some paint stripper or 220 grit sand paper in the area under the pointer on the pulley. The marks should be down there somewhere.
-
Follow your wire from the #1 spark plug to the distributor cap and that's where it should point. I believe the usual location for #1 on the distributor is in the 7 o'clock position, but it could also be at 1 o'clock if your distributor shaft is rotated 180 deg.
-
Operating the Eaton 2-Speed Vacuum Shift Control
John-T-53 replied to KJ's Dodge's topic in Mopar Flathead Truck Forum
That's some cool stuff. Thanks for posting the information! -
What will be towing or pushing it at that speed? Any events this summer you know of in the bay area? My truck is back on the road and eager to get out and meet other lost cousins!
-
Better pack a 9mm or bear spray to avoid getting mugged while picking up a bumper! Even in the nicest of towns, the Greyhound Depot is always in the ghetto.
-
Lookin' good bud. Looks like you're using 2x6's or 8's for the bed floor. This bed will be able to take a hell of a beating when you git-r-dun. Dogs and old pickups go hand in hand. Cats will probably jump out, and (roosters), well not sure....haha.

-
Sweet! How do you shift the rear end...and is that usually shifted with the tranny gears or just for special occasions?
-
Why I will not buy fron Andy Bernbaum again
John-T-53 replied to insaneradio's topic in P15-D24 Forum
I bought a complete set of wheel cylinders from Bernbaum a few months ago - they were for a '37 P-8 coupe I was working on for a friend. I'm glad I checked the bores, because they all had surface rust! Had to take some sandpaper and scotchbrite to them and reassemble before installing in the car. Also, the inlet on the fronts was on the wrong side of the cylinder. We're still looking for a longer brake hose. This was the only place we could find these cylinders new, other than resleeving. -
Nice shots of the motor. That thing is beautiful! The side profile shot would make a great picture to blow up and put in a frame, and hand in the living room (at least in a bachelor pad). Have you got any more pics of the motor?
-
Those big engines make the little 6 look like a go cart motor. How is it for finding parts for the big block 6's and rebuilding them? I found it very interesting reading about the bigger trucks in Don Bunn's "B Series" book, and today they must be a really scarce. Dodgeb4ya, could you post some pics of your truck on here? I haven't seen any pics of the big dogs other than in Bunn's book.
-
A spark indicator/analyzer? Screw it into the #6 cylinder timing plug on the head and see the colors light up in the glass. ?????
-
Sent PM....when you get your replacement maybe you could chuck this one up my way?
-
bypass to full flow conversion?
John-T-53 replied to 41/53dodges's topic in Mopar Flathead Truck Forum
That looks like a NAPA 1080, which will work on most of the bypass filter housings we have. My housing looks like yours Hank, with the inlet on the bottom and outlet on top. The 1080 is pleated paper and doesn't filter down to the level that the sock 1011 filters do, but it's a lot easier to change, and cheaper to buy. The only thing you need to do when using this filter is install metal washers that fit tightly over the center tube, at each end of the filter element, to get a good seal and prevent the spring from tearing up the fiber on the bottom. You also need about a 1/2" spacer to hold the element down from the top. -
Yup, the inside diameter of the friction surface, or the diameter of the center section.