47heaven
-
Posts
1,213 -
Joined
-
Last visited
-
Days Won
2
Everything posted by 47heaven
-

Gas Gauge Sending Unit Not Registering Below 1/2 Mark
47heaven replied to 47heaven's topic in P15-D24 Forum
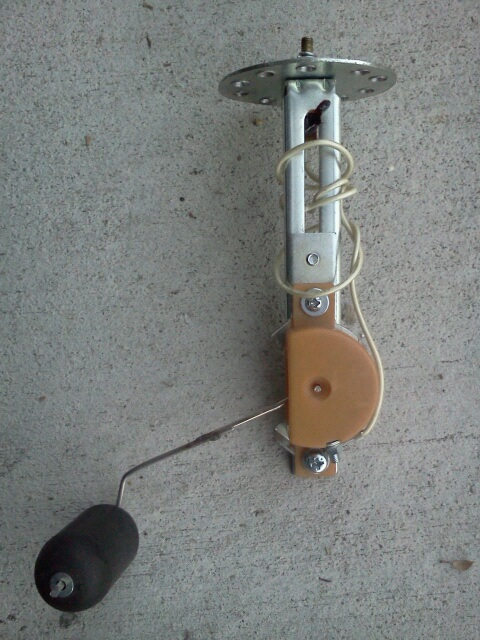
Tested the fuel sender unit yesterday, and of course it failed past the 1/2 position, as expected. Took the unit apart to see what what was hanging it up and clearly saw that some of the wire sensors had come apart and bent back. Anyway, will be purchasing a new unit this afternoon and install it. Will be good to finally close the book on this chapter. -
Well, if you get radials, you can save money and get black walls, but still have that original white wall look by putting those white wall beauty rings that were offered as an alternative to regular white walls in late-1946. I have them on my P15, and many people seem to think they are white walls until I point them out. They were very common on Mopar cars of that era, as well as on Fords and Chevys. Even the ads featured them on the cars as well.
-
Larry....I switched to radials after my bias ply wide whites wore down. I also like to do a lot of driving in my '47 P15, not just take it out on a country road on Sundays. Anyway, I got tired of the tires getting caught in the ruts along the freeways and roads, causing my car to pull to one side. So I looked into radials for my 15" rims. I still wanted the whitewall look, so I bought some original white beauty rings that were an optional item for cars as of 1946 and on. Though the tires are a tad bit wider than the bias ply, I now have a more comfortable and safer-feeling ride, and no longer have to worry about being pulled to one side when driving over a rut in the road. This is a must for people who like to drive places. If you just take your car to shows and enter it in contests, then wide white bias plies would be more feasible.
-
Gas Gauge Sending Unit Not Registering Below 1/2 Mark
47heaven replied to 47heaven's topic in P15-D24 Forum
No problem. I noticed that you had caught on to what I had originally said, but no biggie. I think we're on the same page now, and your advice sounds accurate to me. -
Gas Gauge Sending Unit Not Registering Below 1/2 Mark
47heaven replied to 47heaven's topic in P15-D24 Forum
Merle...yes, I saw your advice, and I will use that when my buddy comes by to help me test the voltage. I guess the initial beginning of that last post was meant for Don and Alshere59 because I think that they thought that I was reinstalling the old gauge and two wire system and was referring me to post links that had nothing to do with what I am working with. Darin -
Gas Gauge Sending Unit Not Registering Below 1/2 Mark
47heaven replied to 47heaven's topic in P15-D24 Forum
Tim, I had already checked and adjusted the sending unit's height so that the float touched the bottom of the tank just before it would have been at total empty position on the unit. Also, when I install it, it won't hit the baffle because the float arm will go to the right instead of the left, where the baffle is. -
Gas Gauge Sending Unit Not Registering Below 1/2 Mark
47heaven replied to 47heaven's topic in P15-D24 Forum
Gentlemen...I believe I stated in the original post that the gauge and the sending units are both of a one wire system now. Don, there was no need to go back and reference what I posted in the past about what I had inquired regarding the sending unit because that was referring to the original two-wire system, which doesn't do me any good...whole different system to work with now. I was merely asking why the sudden drop after 1/2. I did forget to mention that as I moved the float arm, I noticed there was kind of a rough, lull feeling as it hit the 1/2 mark, but only at that mark. I could still hear brush moving along the sensors inside when I moved it towards empty. Also, this one-wire hook up worked when it was first installed with the original tank. Once again, the gauge is a new one-wire unit with the original face on it. The sending unit is also a newer, one-wire unit, as well. Somewhere on here I may have posted when I fabricated that, but not sure. As Alshere said, I have given all the info I could on the issue. Just trying to understand what is going wrong. A buddy of mine will be stopping by with his Ohm meter to do some more testing. Also, another question I have....if I hold the unit straight up and down, hold the float arm up then let go, should it move down by itself or is it supposed to have some give in it so that it has to be moved physically, like I have been having to do. It just feels like it may be too tight to move when the gasoline is being filled into the tank, and there is no way to adjust it. Just another thing I'm wondering about. -
Was testing the one-wire aftermarket gas gauge sending unit today to see if it was registering with the gas gauge which I replaced with an aftermarket one to replace the old two-wire assembly that I never had luck with. I connected the sending unit outside the tank, grounded it and moved the arm to the full position. Then, I turned on the ignition switch, and it registered full...which was a good sign. I went back to the trunk and moved the arm down slowly. The needle on the gauge followed accordingly, but when I got passed the 1/2 mark, the needle would drop to empty. When I moved it back up past the 1/2 mark it would register again as I would move the arm all the way to full. I repeated it numerous times, but the same thing would happen. If I moved the arm back and forth between 1/2 and empty, nothing would register on the gauge until I passed the 1/2 mark towards full. I checked to see if any of the wires behind the gauge were loose, but they were tight. Any ideas what could be causing this?

-
My Salvation And Strengthening Of The Original Fuel Tank Straps
47heaven replied to 47heaven's topic in P15-D24 Forum
DJ...the bolts barely touch the tank, but I have since put rubber in between the bolt head and the tank. That tank is in there nice and tight, and I don't expect it to move around. What I like about using the original straps is the way they insert and hook into behind the gas tank. Don't use this procedure if you think your straps might be a little on the rusty side. Better to use the ones that come with it and fabricate those. -
Listen to Neil. That's the same thing I did.
-
My Salvation And Strengthening Of The Original Fuel Tank Straps
47heaven replied to 47heaven's topic in P15-D24 Forum
Yes, Don...you are right ... it's the fuel gauge sending unit. Sorry...had a small brain fart there. Sometimes I try to post fast and leave things out. I will try what you say about the gas caps. Thanks for the advice. -
My Salvation And Strengthening Of The Original Fuel Tank Straps
47heaven replied to 47heaven's topic in P15-D24 Forum
Anyway...problem solved. With a pencil sketch over the tank hole and gas line flange onto paper, I was able to take them to my buddies at Car Quest and we figured out the dimensions. Thread on the tank is 3/8 and the thread on the gas line is 5/16. So, as you can see, I have the same set up as shown above. Now, on to the fuel sending unit and calibration. Maybe with this new tank I shouldn't have anymore problems with that...let's hope. -
Need Pic Of How Original Trunk Mat Looks Installed For P15
47heaven replied to 47heaven's topic in P15-D24 Forum
Cool! It's worth a try. -
My Salvation And Strengthening Of The Original Fuel Tank Straps
47heaven replied to 47heaven's topic in P15-D24 Forum
The reason I start different threads is because sometimes I have different questions, that even though they might be related, they tend to go unanswered because maybe they are not scene. I find that when I do start a different topic it gets scene and I get a faster response. For example, no one answered the question about the gas caps because they are now mixed in with the thread about the gas tank straps. -
Need Pic Of How Original Trunk Mat Looks Installed For P15
47heaven replied to 47heaven's topic in P15-D24 Forum
Thanks, Robert! I can now see that it was entirely molded up and over the hump, and up along the left wheel well, which will be impossible to do, but at least it gives me a good idea of how it was and how close I can get it to look somewhat decent. -
Hey guys...would like to see how the original trunk mat looks installed in the back of a P15 Special Deluxe coupe, if anyone has one. Since they aren't manufactured anymore, would like to make my own. They sell similar rubber matting in rolls at Orchard Hardware Supply, so I can use that. Also, does any one have any specs of the piece that goes in between the backseat and trunk? I have the cardboard material, but don't have much of the original left to make a pattern. Wasn't someone putting out replicas of that piece a while back?
-
My Salvation And Strengthening Of The Original Fuel Tank Straps
47heaven replied to 47heaven's topic in P15-D24 Forum
Started to connect the gas line to the new tank I bought, but ran into a problem. Turns out that the bolt at the end of the line is too small for the threads of the inlet to the tank. The bolt was replaced when I had a new line installed a few years back, and it screwed into the original tank. It's flanged on the end, of course, so I can't remove it, and I definitely do not want to remove the tank again. So what I need to know is what was the size of the opening of the original tank? . I'll have to call Tanks Inc. to see what the size of the opening on the tank so I can get some kind of adaptor to make it fit, I guess. -
My Salvation And Strengthening Of The Original Fuel Tank Straps
47heaven replied to 47heaven's topic in P15-D24 Forum
Managed to get the filler neck positioned and connected today. The soap trick on the rubber worked great. Now, since I'm not using the venting system that came with the new tank, I need to know which one of these is the correct vented cap? -
My Salvation And Strengthening Of The Original Fuel Tank Straps
47heaven replied to 47heaven's topic in P15-D24 Forum
The tank is pretty much where it has to stay because the hole where the sending unit goes is in line with the whole on the bottom of the trunk. I'm just going to have to work with it somehow. If anyone knows any tricks to this, please let me know. -
My Salvation And Strengthening Of The Original Fuel Tank Straps
47heaven replied to 47heaven's topic in P15-D24 Forum
Now that I have the new fuel tank installed, I'm running into problems with trying to get the filler neck to align and angle out the hole correctly, as well how to get the rubber grommet to stay on the body of the car. Is there a secret or trick to this? -
My Salvation And Strengthening Of The Original Fuel Tank Straps
47heaven replied to 47heaven's topic in P15-D24 Forum
Okay...I went back to the drawing board and made new extenders for the straps. The steel framing brackets that I had previously used weren't long enough, due to a miscalculation on my part. Went and bought some longer brackets and fabricated those to reach. Below are pics of the tank strapped into place with the finished strap extenders. I decided not to cut the bolt ends so that I will be able to remove them in case I ever have to remove the tank. Again, I'm not concerned on how pretty it needs to look. I just want then to hold. Before I tightened them to the body, the extenders were about 1/2 inch from touching the bottom of the trunk. I wanted to make sure that the strap ends would have enough space so that the straps could be pulled tight when I tightened them. I used locknuts on all the bolts shown. I feel this makes the straps a lot stronger in the areas where they take on most of the stress. In fact, I think they are more secure now than they were originally. Looking from inside the trunk. A view showing the fuel tank strapped in. This baby is staying put. I will repaint the straps and tank again, as well as paint the new extensions. This is the reason I had to reconstruct the strap ends. -
My Salvation And Strengthening Of The Original Fuel Tank Straps
47heaven replied to 47heaven's topic in P15-D24 Forum
Brian, before you do that let me get back to you with the exact measurements of the parts you need to get because I have had to get longer extenders from the ones I first showed in the pics, along with the bolt and nut sizes, as well. I will post more pics and info tomorrow. Darin -
Praying for you, Bob. I know how scared you must be. I also want to thank you for posting your story and giving your advice about not smoking so that others, who smoke, will get the hint and give it up. Darin
-
My Salvation And Strengthening Of The Original Fuel Tank Straps
47heaven replied to 47heaven's topic in P15-D24 Forum
Wow...you guys are right about the Grade 8 bolts. I didn't even think of that. Okay...off to the auto parts store. Most of the mom and pop hardware stores here are closed on Sunday, especially today. -
Some of you know that sometime back I purchased a new fuel tank from Tanks Inc. I figured that I was just going to use the original straps, instead of the aluminum ones that came with it because they were in good shape, so I thought. The original ones worked, but the only problem is that they barely tightened into the long bolt head that is used to attach and tighten the tank to the bottom of the trunk. As seen in this photo, this is as far as I could get it to tighten with the new tank. Though the tank felt tightly snug, I didn't like the idea of the bolt end not being able to go in all the way. When I did the other side, the bolt snapped from where it was riveted to the strap. I must have tried to tighten it too tight. Of course, this tank is a bit taller than the original. This bummed me out because I really wanted to stay with the originals because of the way they attached behind the fuel tank to the body of the car, as if they locked in place. So I tried to see what I could do with the new ones that were sent with the tank, but I didn't like the fact that they were aluminum, and not steel. I tried to get those to work, but ended up messing them up. So I thought on how I could still salvage the old ones and make them stronger, as well, based on the design of the new straps. So here is what I came up with... I figured that I had to extend the ends of the straps that the bolt ends were riveted to by a few inches so that it would fit around the tank just right. Since I don't have my own machine shop to fabricate things, I decided to go to Lowe's and look around for something that might work. So I found this below. Not sure what it's called, but I found it in the construction section of the store. I took the original and the new strap with me to see if it would be long enough to work as an extension, and it did. So I got that, new bolts, nuts and lock washers, as well as new bolts to connect it to the original strap. Then, I drilled out the old rivets that were holding the bolt end piece to the strap. After that, I took the ends of the original pieces and pounded them straighter. Then, I took the new angled pieces and drilled the bottom hole a little bigger, then one above it to match, according to how the holes were on the strap. Then, took the other side and drilled a 3/8" hole. Then, I cut the end off where the bigger hole was drilled and removed the burrs and sharp edges with a flat file. Then, I bolted the new piece to the old strap. Later today, I will clean it up, paint it black and put rubber back on the inside of it, then hook install the tank. Not the prettiest thing, but I'm sure it will do the job. I will get back and let you know how the installation goes.