-
Posts
888 -
Joined
-
Last visited
-
Days Won
2
Content Type
Links Directory
Profiles
Articles
Forums
Downloads
Store
Gallery
Blogs
Events
Everything posted by harmony
-
I know that they do offer tubes for radials, but I'm not sure about the principal behind that. If you have a way of getting the existing tires off the rims, I'd suggest inspecting them closely and getting any corrosion and rust, off the lips and any other place you see rust, yourself. The tire shop will probably do that if they are a good shop, and charge you the extra labour of course. But if they have a greenhorn working the tire machine they might forget to do that., and one day you might be on the side of the road waiting for a tow truck. If you decide to go with bias ply tires, and get tubes, I suggest you get the flaps for them as well. It helps protect the tubes. Go with the 7" flaps as opposed to the 5" flaps. When ordering the tubes, check to make sure you order the correct stem for your rims, and when the order arrives, double check to make sure they sent the right tubes. There is usually one letter or number difference between a straight stem and an offset stem. First go round they sent me the wrong ones. Even though the correct part number was on the work order. Whoever picked the order at Coker, just wasn't paying attention. I was just noticing your close up picture of the sizing on your tire. It kind of looks like a 5 to me and not a 6 for the width.
-
It's quite possible,,,, however,,,, It's best to try and follow the wires on the car and compare them to the wiring diagram. One thing to keep in mind. That slot screw on the relay actually doesn't look loose. Also the forked style terminal end on that wire is the type that makes a bend at the end of the two prongs. This means the terminal screw where it mounts to has to be really loose for it to simply fall off. What I'm getting at is if that wire is supposed to be connected to the terminal on the horn relay, it looks to me like it was deliberately taken off. So if you're any good with a multi-meter, I'd snoop around a little bit. Maybe it kept blowing fuses, or maybe something started to smoke, or maybe it was grounding out somewhere. I'd check around a bit before I hooked it up to what looks like a simple solution.
-
Like Dan Hiebert just pointed out. Any auto glass shop is your best bet. Try to source out a local one that is good with vintage cars. Sometimes if the "fuzzy" is worn out, rain water drips down the outside of the window and forms rust along the bottom track that holds the window in place. When the new window is set in that track, it needs to be in good shape and bonded well. It might be worth considering handing everything over to the Auto Glass shop. Sometimes they will even sandblast and prep that track for you if it needs it.
-
Everyone's likes and dislikes are different. I drive vintage cars because I like everything about the looks and experience. Well, driving in an ice storm, up hill while trying to keep the windshield clear with vacuum wipers isn't actually an enjoyable experience, but for the post part, I like and enjoy older technology. I prefer bias ply tires over radials, because they are part of the experience. They are a rough ride, and going down the road with one fingertip control, just doesn't happen. "Hang on for the ride". As already mentioned, bias ply are much easier for parking. Like comparing rolling a soccer ball vs a balloon full of water. But since they retain a stiff profile, if you do happen to get a slow leak, once it becomes noticeable to the eye, you probably only have about 5 lbs. of pressure in the tire.
-
Yep, that's the 802 Model. It's maybe not a priority for you right now. But when the time comes, let me know and I can walk you through it. It might be a very simple fix. The selection of buttons on the right, as you have already discovered select the stations. The top button is the OFF button and the bottom button DIAL, is not only the button you select to gradually go up and down the dial to find stations, but it's also the ON button. It's quite possible that the contacts are just corroded and they just aren't making a good contact. I'm assuming that you have checked to make sure that you have power going to the radio. I'm also going to assume that you have checked to make sure that the speaker works. These radios take a bit of time to warm up, but only a minute or so. So after pushing the DIAL button to turn it on, and letting it warm up, try pushing it in just a bit further and holding pressure on it, and also try wiggling it around as you apply pressure. If you get a crackling noise, then it's probably the contacts. If that's the issue, I can explain how to get at those contacts and how to clean them.
-
I can't justify paying for an ultra sonic cleaner, big enough to hold a carb body, that will sit collecting dust most of it's life. So I soak my parts. I've tried Simple Green and Pine Sol. They do an ok job. But I found that they both leave a film on the parts that's really hard to get out of all the tiny corners after words using carb or brake cleaner. They both take a lot of scrubbing after soaking. Granted an Ultra Sonic cleaner might produce new looking parts after cleaning. The best solution I've found is 4 parts water to one part muriatic acid. I check it about every 30 minutes or so. Within about one minute it's bubbling and forming a scum of dirt and srud on the top. So after 30 minutes I pull the parts out, and pour the solution through a fine screen to get rid of most of the crud, then I wash everything with water and then soak the parts again. Wear goggles and gloves and when mixing, and always add the muriatic acid to the water, slowly. Not the other way around. I had a broken carb body part, so I left it in the solution overnight, and it looked fine the next morning. But I'd still recommend checking the parts every 30 minutes or so. Why through caution to the wind with hard to find old carb parts.
-
Welcome aboard. Is your Radio the 802 model? Good time to point out to you sometimes pictures load sideways on this forum. If this is the radio that you have I might be able to help you out.
-
Good to hear that you're keeping the family car on the road. There is a lot of information on this forum that might help you out. Look at the top under download, resources, and technical. Just keep asking questions here and try not to take offense at some of the comments you might get. There are a lot of really knowledgeable and experienced guys who know their stuff here, but I think sometimes people forget what it was like when you're just learning something new. Just remember, as the saying goes, the only dumb question is the one that wasn't asked.
-
I totally agree. The local sewing machine store has one of those servo motors in stock, that will bolt right on to my Pfaff. But they want $350. If I was using the machine regularly these days, I'd do it. I've managed to sort of control the speed out of the whole, by holding onto the wheel and gradually turning it as I alter my foot pressure ever so little. But I'm still holding my breathe, and sometimes without warning, it's going 100 miles an hour, within one second.
-
That's a good question. I'd say it depends on how bad the replaceable parts are in, once you take them out and inspect them. Those carb kits are hugely expensive and most of the pieces you never use since they fit a few different models. My car has the Carter B&B EV1. I have 3 of those carbs and I bought one complete rebuilt kit. I was shocked at the landed price of that kit. So for the other two carbs, for most of the gaskets, I reproduced myself. The only part I really couldn't revive was the accelerator pump and the dashpot pump, on one of the spare carbs. If you get lucky, sometimes the leather on those pumps will come back to life after soaking them in a fine oil. I used sewing machine oil. As for the tiny flat redish/orange washers under some of the jets, etc. Those are pretty tricky to reproduce with a punch, but here in Canada we have Princess Auto, which I believe is similar to Harbour freight for some stuff. You can buy a variety pack of tiny similar washers for under $10. They work fine. I was missing one of the tiny steel balls in one of my carbs. It is 5/64" diameter. Mike's Carb, wanted about $20 for that ball once it landed with all the taxes and shipping. I went to a local bicycle shop and they had a drawer full of them. The guy at the counter asked how many I wanted. I said I might as well get a few while I'm here, incase I drop one. NO CHARGE!! So I suggest you improvise, be creative, and shop around.
-
Yep that's a great trick. I used that same method when replacing the exhaust manifolds on my twin 454 marine engines in my boat. Man those things are heavy, and once you get them lined up, as you all know, on V8's the matching surfaces are angled down. So you have to have arms like Popeye, to hold the exhaust manifold exactly in place while you fumble around, with your other hand, blindly I might add, to line up the first bolt, with the holes in the block, all at the same time while trying not to move the exhaust gasket. For sure, threading in a couple extra long bolts with the head cut off is a life saver. Having said that, after installing my starter on my spare engine just a few days ago. There is very little room to get the end of the starter past the oil filter lines. Then once I got it in the hole, it seemed like I had to wiggle it clockwise/counter clockwise a bit for everything to line up inside. But it would sure be worth a try.
-
I feel that good sewing is under appreciated for the most part. Most people will comment on how nice the upholstery is on a car at a car show. But they really don't know just how good it really is. The whole process of the accuracy of taking the patterns and then reproducing that flawlessly, is really remarkable once you try going through that process yourself. When I was a wooden boat builder, my mid 1940's Pfaff 145 H3 with a walking foot, was just another very important tool in my shop. I made many boat covers. Bimini's, boom covers, etc. over the years. That machine would plow through a stack of Sunbrella fabric folded over at least 1/2" thick without working up a sweat all day long. I still have that machine and it still comes in handy. I did the interior upholstery on a '47 Chrysler I reconditioned a few years ago. I was reminded how difficult it was to reproduce the small armrests, from what was left of the originals once the rodents were done with them. When you get into a lot of inside tight turns it's always a concern not to step on your toes. In other words, not sew something you're not supposed to. If you think giving a car a tune up is difficult, you ought to try giving a sewing machine a tune up. You can still drive a car if it has a miss. Not "sew" with a sewing machine.
-
So with the information Sniper provided. The only way to narrow it down any more, would be to calculate the years the Power Streak II were made coupled with when the 7/8" wide whitewalls were made or at least when they were popular. I could google myself to the grave trying to figure that one out. I'm guessing somewhere from mid 70's to late 80's. Key word there is "guessing".
-
I know that now days you can read the code off a tire to determine when it was made. I'm wondering if that also applies to the tires of the good old days. My spare tire is a G78-15. Goodyear Power Streak II. Bias ply, polyester cord, 7/8" whitewall. The code under where it says DOT is PFVV YH0345. It's in really good shape. Lots of tread, no cracks anywhere on it and it has never lost any pressure since I've owned the car (4 years) .
-
The place in Surrey is Senco Brake & Machine works. I've already talked to them about relining my spare brake shoes for both my '48 Chrysler and my '30 Hudson. They said I could ship the shoes over to them (I'm on Vancouver Island), but I want to head over there to see their outfit. But I just haven't fitted it into my schedule yet. I don't know anyone who has had it done by them. However they have been in business since 1983. I also mentioned that the shoes for the '30 Hudson look like they might be asbestos. He wasn't concerned at all and said they would deal with. He said he would either bond or rivet, whatever I wanted or was required. http://www.sencobrake.com/
-
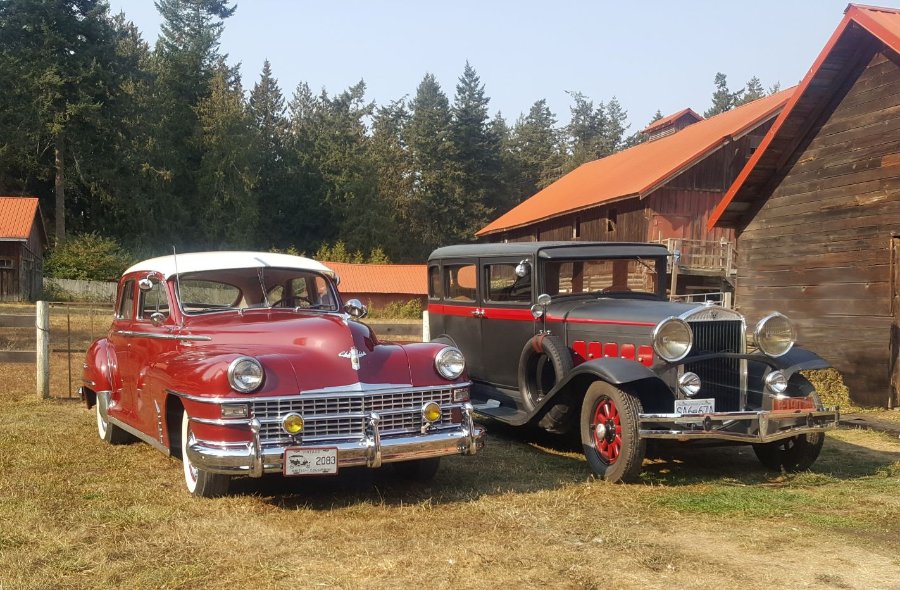
That's a good point that 9 foot box made about the smiles we create. When I'm out and about in my '48 Windsor ( Harmony) I get lots of dignified smiles and thumbs up, with a sense of wow in their smiles. But when I'm out and about in my 1930 Hudson (Surmod) you'd think I was in a parade. I'd say at least 80% of the people I see, pedestrians, bicyclists, and drivers, acknowledge the car. Some with just a smile, some thumbs up, some pedestrians stop in their tracks and spread their arms, I've even had a few people bow. Many applaud, and I've had a few very young kids, probably preschoolers tug on their parents sleeve and point at the car. Some people jump up and down and cheer. I travel the same route through town to get to my shop each morning and return each afternoon. Many of the regular people simply smile and wave now, like we're old friends. It sure keeps me on my toes, because I feel I need to acknowledge their appreciation of days gone by, with a return wave or a blast of the horn. It's rewarding and comforting to see teenagers look up from their phones and wave and take pictures of these two cars. They can still appreciate an old car even though they probably have no connection with it. For the most part teenagers can only connect with that rectangular gadget in the palm of their hand. I go past a couple high schools and middle schools on my short daily journeys and it just feels good to see them take the time to appreciate these Oldtimers.
-
Absolutely, she should be designated with that status. I think we should get special licence plates like collector plates, and get a discount on insurance. It would cut down on accidents due to road rage. I drive my 1930 Hudson (Surmod) almost everyday, except when it snows or it's icy during the winter months. Then they cover the roads with salt and I park it until we get a heavy rain to wash all that salt away. Before I bought Surmod, Harmony, my '48 Windsor, was my pleasure car. But since I have Vintage plates and not Collector plates, legally I'm only allowed to drive her on special occasions. Anyway I got her out for the first time this year a couple days ago and it felt soooooo good and relaxing. Like you said, all the problems in life seem to evaporate, when you're behind the wheel. The entire time I'm driving her, I can't wipe the smile off my face. It's also very rewarding driving the old relics after those long winters in the shop wearing lined coverall and scraping knuckles, and figuring out how to approach the next project. That process is therapy in itself. Then the payoff is when you firing it up and go cruising.
-
.thumb.jpg.d599d4c13e08899474e0348bd9baed3b.jpg)
New question regarding firing up my 251 on the run engine stand.
harmony replied to harmony's topic in P15-D24 Forum
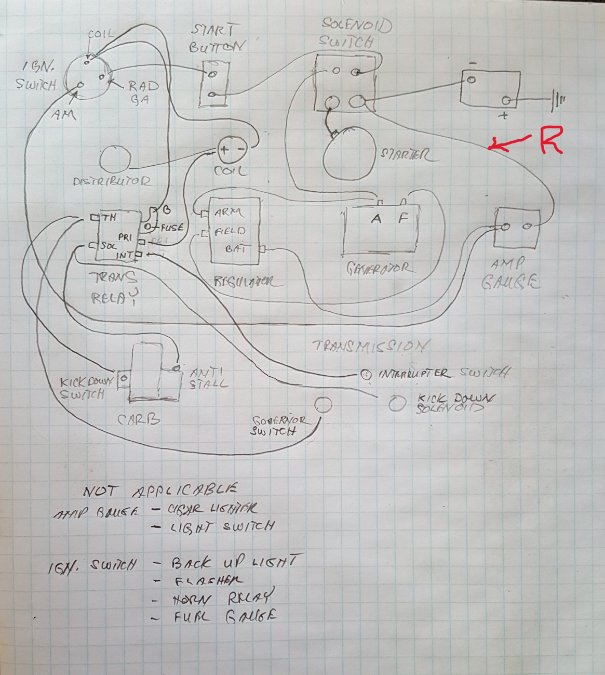
Lets try this from another angle. How about I install a resistor where I have shown it in my wiring diagram below (red R)? My wiring is the same as the factory wiring diagram without any bells and whistles like horn relay, lights, cigar lighter, etc etc. I have no idea what I'm talking about, but my idea sort of resembles that page from the reference book that shows a resistor. If that would work, what size resistor do I need? Awhile back my odometer wasn't lighting up on my modern car. A few resistors had become unattached from the dash circuit board. So I removed the dash and soldered in new ones which were 150 ohms. I think I have some left over. Will one of those work? -
.thumb.jpg.d599d4c13e08899474e0348bd9baed3b.jpg)
New question regarding firing up my 251 on the run engine stand.
harmony replied to harmony's topic in P15-D24 Forum
How would I know if it is the "only" load? -
.thumb.jpg.d599d4c13e08899474e0348bd9baed3b.jpg)
New question regarding firing up my 251 on the run engine stand.
harmony replied to harmony's topic in P15-D24 Forum
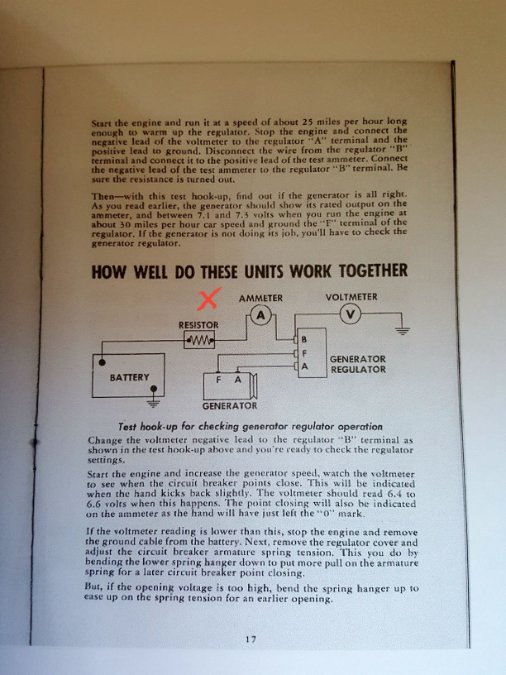
I have a half a dozen of those gizmos I think. I get tired of trying to find the one I lost in my shop so I go buy another. Then one day I seem to spot 4 of them, by tripping over them. Then the next day I can't find one, so I go buy another one,,,, and on and on it goes. I was thinking about your suggestion, when I came across the illustration in the "service reference book" that I mentioned before, that shows the resistor ( see x in the illustration). The volt meter is wired in after the ammeter at the B terminal on the regulator. At that point I was thinking, "why not use a multimeter? Then the whole idea slipped my mind until you just mentioned it. Getting old is such a fun journey,,, hahahaha! -
.thumb.jpg.d599d4c13e08899474e0348bd9baed3b.jpg)
New question regarding firing up my 251 on the run engine stand.
harmony replied to harmony's topic in P15-D24 Forum
I'm not sure if I did this right Sniper. But here is that film clip. It's mentioned around the 15:30 mark. -
.thumb.jpg.d599d4c13e08899474e0348bd9baed3b.jpg)
New question regarding firing up my 251 on the run engine stand.
harmony replied to harmony's topic in P15-D24 Forum
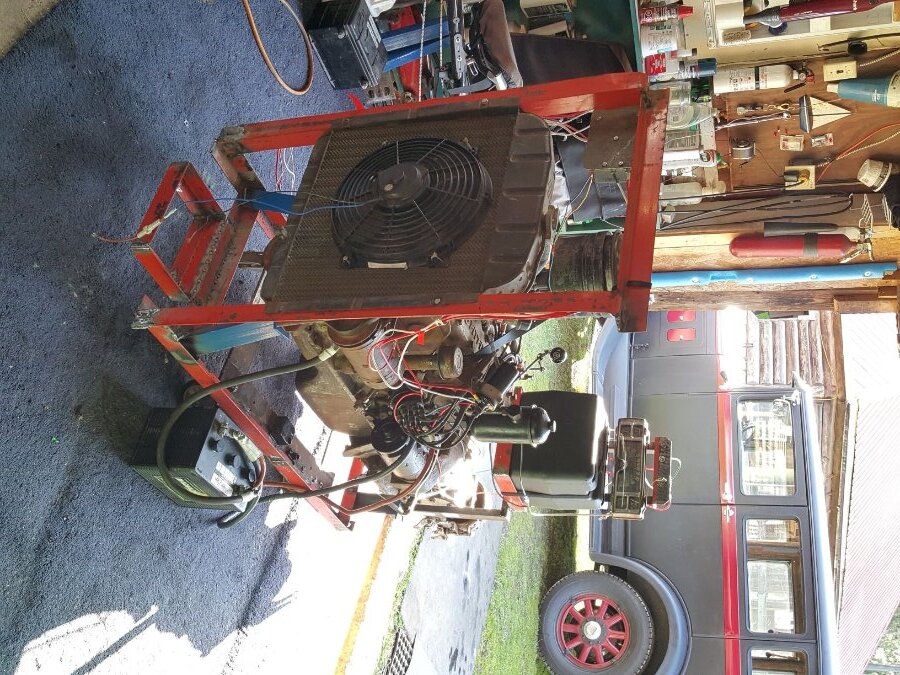
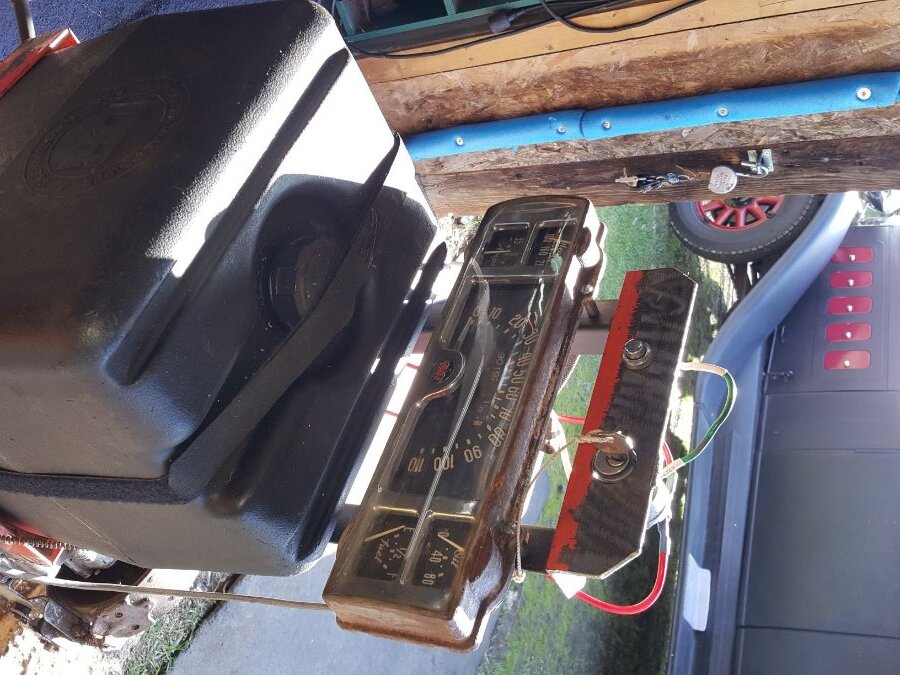
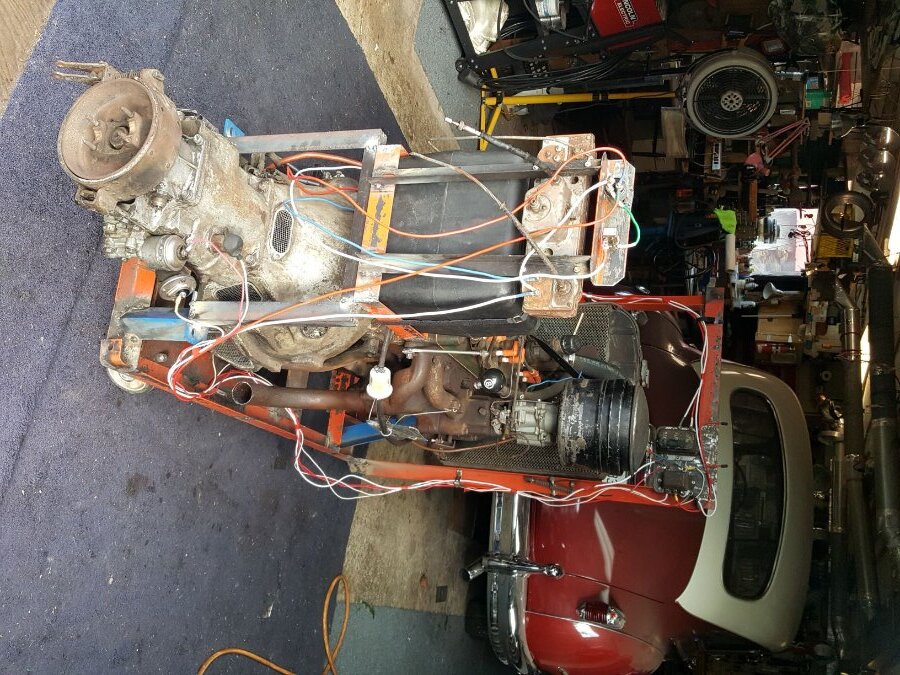
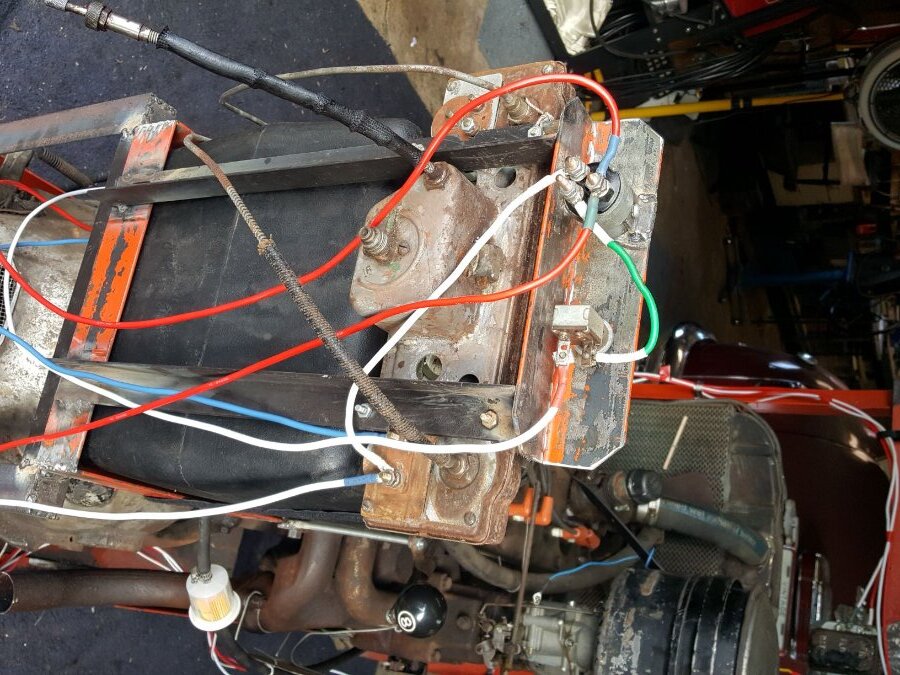
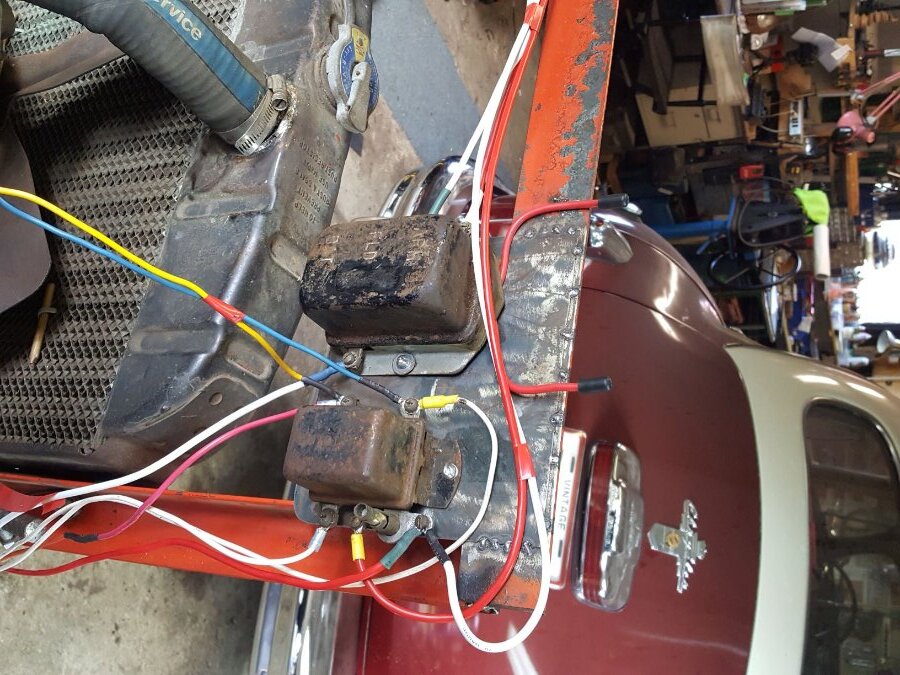
D35 Torpedo: That's exactly what I was thinking. If all the accessories (so to say) are turned off, then it's basically the same set up as I have. greg g & Sam Buchanan. I agree, I've always felt more comfortable looking down at the instruments and seeing a volt meter as opposed to an ammeter. However,,,, This '46 was equipped with an ammeter. I don't happen to have a volt meter kicking around the shop. Plus I've wired in the original instrument panel, which makes economic sense to me. As I've mentioned before I'm pretty thick headed when it comes to auto electrics so I don't really see the difference between what I've set up and the way it was when the engine, fluid drive and transmission were operating in the car, except for a bunch of body steel surrounding what I have here. But when "Master Tech" said the ammeter would basically blow up without a load on it, I got confused, which is why I've enquired here. I've added a few pictures of my set up,,,,, and yes,,,,, the wiring will be tidied up in a loom once I'm finished. Yes,,,,, I've only got a few different wire colours, but I didn't want to spend about $120 plus, just so I could have a rainbow of colours. Instead, I used different colours of heat shrink on the #10 wire ends that I did have, to tell them apart. Yes,,,,, the battery is on the floor and not in the battery box that I built for it. That's because I borrowed it from my '48 Chrysler. I'll buy a designated battery for it once I getting it running. Yes,,,,, I have two battery leads for the negative side of the battery. That's because I didn't have enough 0/0 cable to run both positive and negative. But I did have a couple of long 12 volt cables (4/0) so I just doubled up on the negative side of the battery. Finally, yes,,,,, if this project is a success, I'll give the framework a coat of paint so it's all one colour. Once again, as in the past, I'm sorry for giving everyone a stiff neck, but I'm not about to keep altering the dimensions of regularly shot, run of the mill pictures taken from my run of the mill phone, just so they won't show up laying on their side on this forum, which seems to happen more often than not, at least for me. -
I've sorted out most of my issues thanks to you guys. I've got my 251 with fluid drive all wired up and everything sort of checks out. I can hit the start button and the engine turns over and I have spark to the plugs. I've also polarized the regulator. Basically all I have to do is add some fuel. I've filled the cooling system and no leaks there. But I'm trying to cross all my "T's" and dot all my "I's" and make sure I've got it right. I was re-watching an old "Master-Tech film clip "1948 Volume 1-6 Volts Amps and Ohms". Something was said in that film clip caught my attention. Remember I'm just running the essentials on this run engine stand. Well a little more than essentials because I want to test all the circuits. So I've wired in the Regulator, Trans Relay, Governor switch, Trans Solenoid switch and the Interrupter switch. But normally, as in the complete wiring diagram, coming off the Ammeter you have a wire going to the cigar lighter, and another wire going to the light switch. Also on the ignition switch on the one post you have a wire going to the back up light, turn signal flasher, horn relay, and the fuel gauge. So that's a total of 6 wires that I'm not running, because I don't have any of those items. So in the Master-Tech film clip they say when doing a test "An ammeter has very little resistance, so if you connect it so it carries the full battery current itself without any resistance, it will burn out instantly". To add to that though, I was reading the "Service Reference Book" Vol 1 No.7 " reference to the Generator Regulator", and on page 17 there is an illustration of a test being performed and it shows a resistor on one side of the ammeter. " So my question is, since I'm not running any accessories (those 6 wires), do I need to protect the ammeter with a resistor?


