

NickPickToo
-
Posts
661 -
Joined
-
Last visited
-
Days Won
15
Content Type
Links Directory
Profiles
Articles
Forums
Downloads
Store
Gallery
Blogs
Events
Everything posted by NickPickToo
-
Beautiful
-
Thank you good sir. It seems clear as day now that you've described it. Can you confirm that the picture attached is the exit of the tube. then I get to go fishing.

-
Does anyone have a picture of the horn wires coming into, through and out of the column for reference? My 47 had no horn wires and the horns were in a box in the trunk when we took delivery ?
-
Nice. I hear someone make Tatterfield finned heads once he's cleared to do so. Just saying. Cant afford Edgy but maybe someday I'm pretty sure we are going to end up rigging some CN lines for fuel to give it a vintage, early rat rod look. Just trying to find the right fitting to make it work right and still look right.
-
Thanks. Speaking of outside help. We live about 5 miles away from a local modification team here in Brighton MI, Diversified Creations. They helping us a bit on this issue too.
-
We did splurge on a few fun tricks, but we are getting reasonable cost on most of the work were not doing, and were still doing a lot so the line is a little fuzzy, but still there.
-
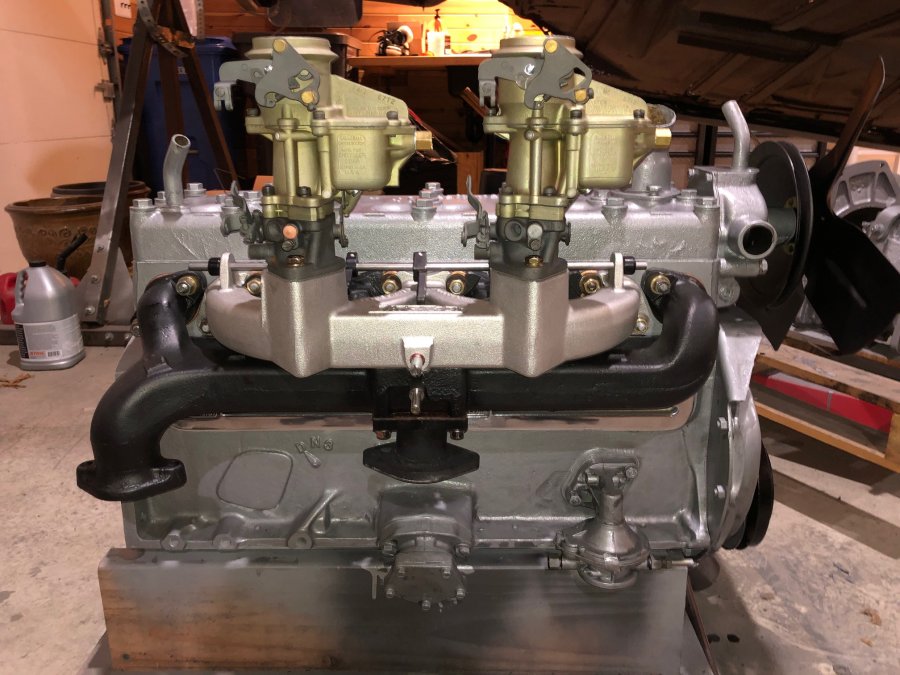
Sporting the same Thickstun. Only regret is getting those shinny valve cover plates that will never see sunlight under the exhaust manifold. But I know its there and yes, it looks like art. Also need to reweld the manifold mod so it pitches to the rear a bit. Tight fit the way we have it here. Heads up, the throttle can be a bit catchy when carbs are faced the way you have them (and like have them here). Much smoother turned the other way, but a pain in the neck for plumbing fuel lines. How do yo plan to plumb the fuel lines to the the carbs. That is what fittings are you using and where will you find them?
-
Cant speak for entire organization, but the Detroit Spring shop was competitive for what I was looking for. And the leaf springs and coils were much better quality than that dredge you can get from other suppliers. Now shipping may be an issue for most, but we were able to visit the shop and pick up ourselves.

-
Detroit Spring, Eaton right off Rosa Parks Blvd in Detroit. will make springs that fit exactly and will adjust the hight up or down based on your instructions. They will ask you a few questions about other modifications you may have made to understand any other weight changes that may have occurred before fabricating. Highly recommended. You could at least get a quote.
-

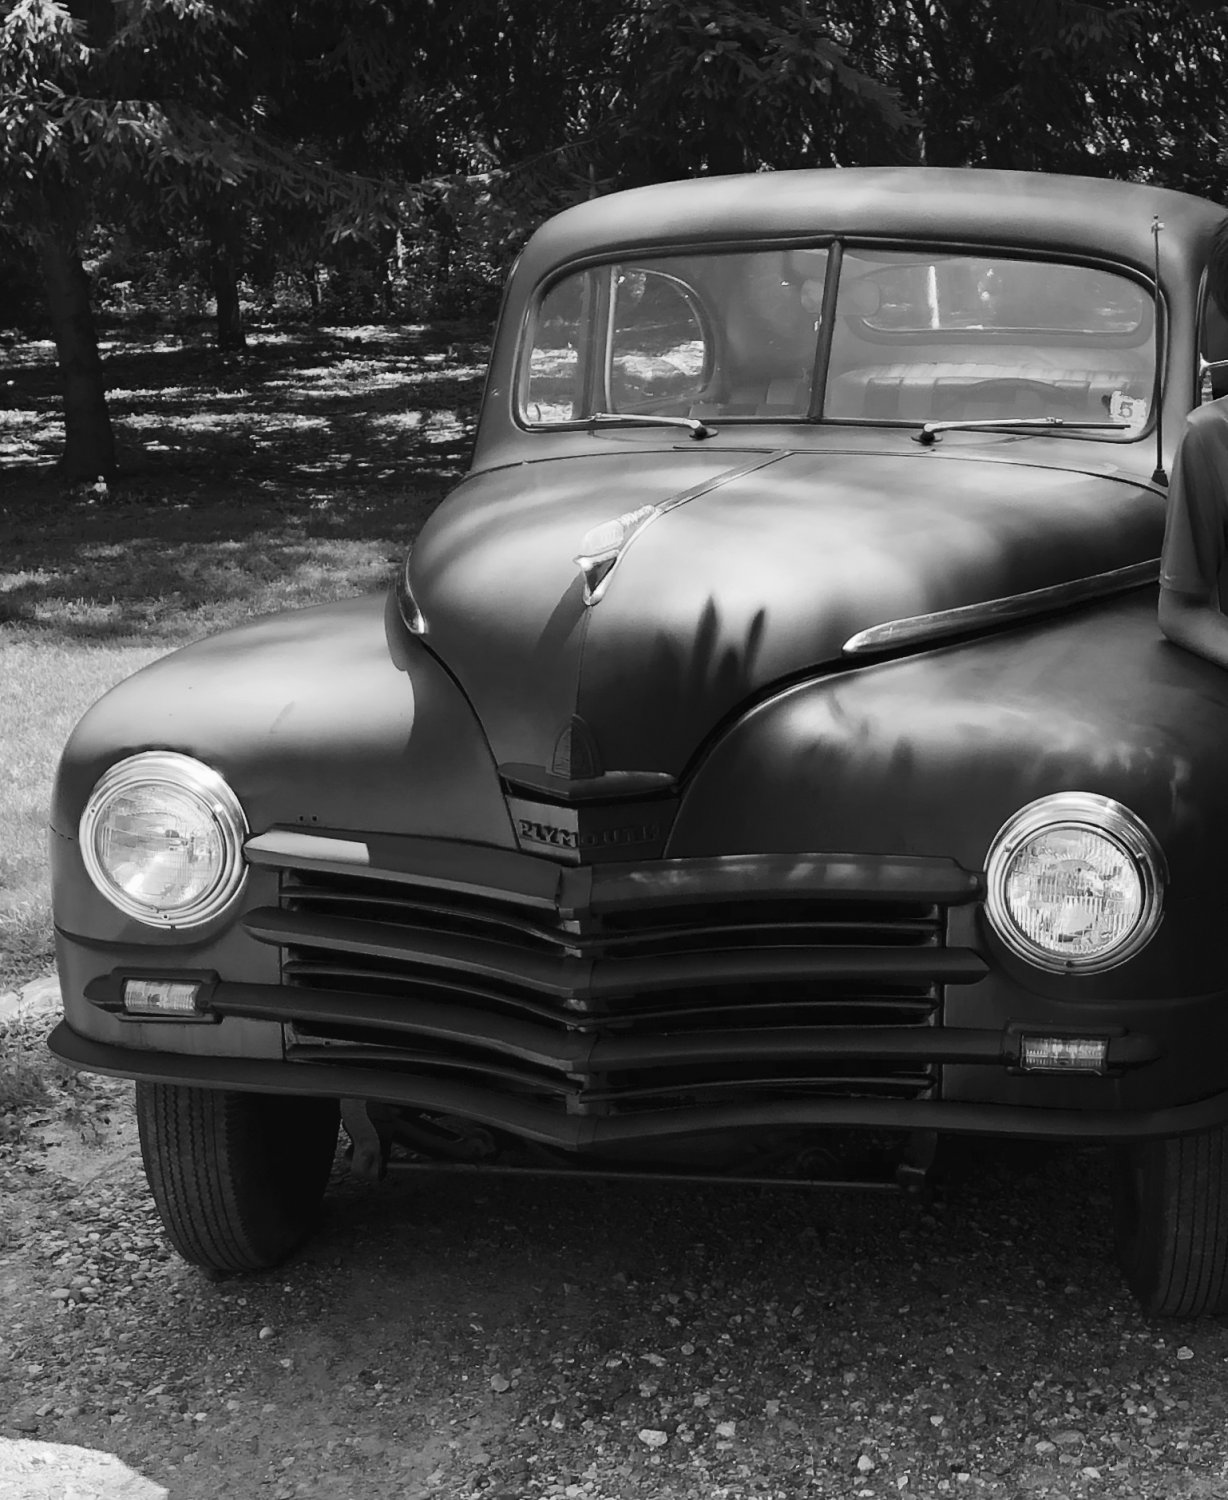
My First Car -- P15 1947 Plymouth Deluxe
NickPickToo replied to NickPickToo's topic in P15-D24 Forum
So the replacement bolts came and the primary difference other than color was the taper and the head size. Our new bolts are ABN and the same total length and the same amount of thread as the previous, but the taper starts up near the top making them narrower for most of the unthreaded shaft. The head size for the new bolts is 11/16 vs. 5/8 for the ones we replaced. the new bolts are still grade eight -
My First Car -- P15 1947 Plymouth Deluxe
NickPickToo replied to NickPickToo's topic in P15-D24 Forum
It jumps alright and needs to be help firmly. But he thinks the toothed gear in starter should be moving forward and backwards as well. It does move forward when engaged but then doesn't move back on its own after we take the power away. We can then push it back in pretty easily so we believe it would simply be pushed back by the flywheel in any case, but we are wondering if that's how it should work. Should the gear retract more on its own when we take the power away? -
My First Car -- P15 1947 Plymouth Deluxe
NickPickToo replied to NickPickToo's topic in P15-D24 Forum
Question, So we bench tested the starter today and it spun well when we applied current. However, my dad had mentioned that he believed the teeth should have a more defined extension and retraction as power is applied and removed. How sharply should the teeth be moving back and forth as we engage and disengage the current? -
My First Car -- P15 1947 Plymouth Deluxe
NickPickToo replied to NickPickToo's topic in P15-D24 Forum
I think it looks good overall, but I'm a bit worried about how tight the front mount is relative to the front pulley. We'll see. I think the black head bolts and grey throttle linkage are a good accent to the silver engine.
-
My First Car -- P15 1947 Plymouth Deluxe
NickPickToo replied to NickPickToo's topic in P15-D24 Forum
Nice day today so we were able to work outside. I'm actually enjoying this despite the look on my face.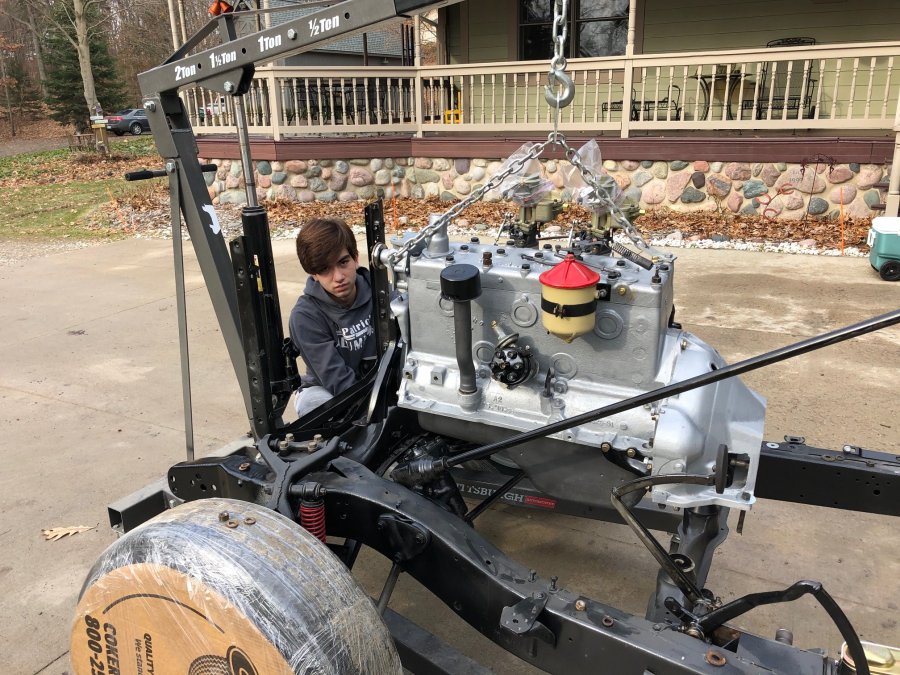
-
My First Car -- P15 1947 Plymouth Deluxe
NickPickToo replied to NickPickToo's topic in P15-D24 Forum
So should I block off the port on the second carb? -
My First Car -- P15 1947 Plymouth Deluxe
NickPickToo replied to NickPickToo's topic in P15-D24 Forum
Question about the vacuum advance: I have a few options here but would like to understand the pros and cons of each. 1) I could connect the vacuum advance to one of the two carbs or 2) I could connect the vacuum advance to the intake manifold directly, or 3) I could just ignore the vacuum advance all together. I understand how the VA works. It basically impacts the mechanical timing slightly as the engine goes from idle to full throttle. Not using the VA at all means the mechanical timing doesn't change at all which will work but also gives up power and fuel efficiency in certain driving speeds. What I don't understand is how the choice of where to connect the advance impacts this whole process. What are the pro's and con's of each choice? If I connect it to the manifold, should I cap off the connections on the carb? If I connect to a single carb, will it cause unwanted variation in performance between he two carbs? -
Merry Christmas. All I want for christmas is knowledge...preferably about about vacuum advances (see most recent on My First Car...)?
-
My First Car -- P15 1947 Plymouth Deluxe
NickPickToo replied to NickPickToo's topic in P15-D24 Forum
Never mind. This is a mute point now. I filed it out a bit. Didn't take much. Thank you spit. -
My First Car -- P15 1947 Plymouth Deluxe
NickPickToo replied to NickPickToo's topic in P15-D24 Forum
Thank you, I may have to do the same, but does anyone know if there is actually variation by application and if there is a better fit if I ask the supplier the right questions? -
My First Car -- P15 1947 Plymouth Deluxe
NickPickToo replied to NickPickToo's topic in P15-D24 Forum
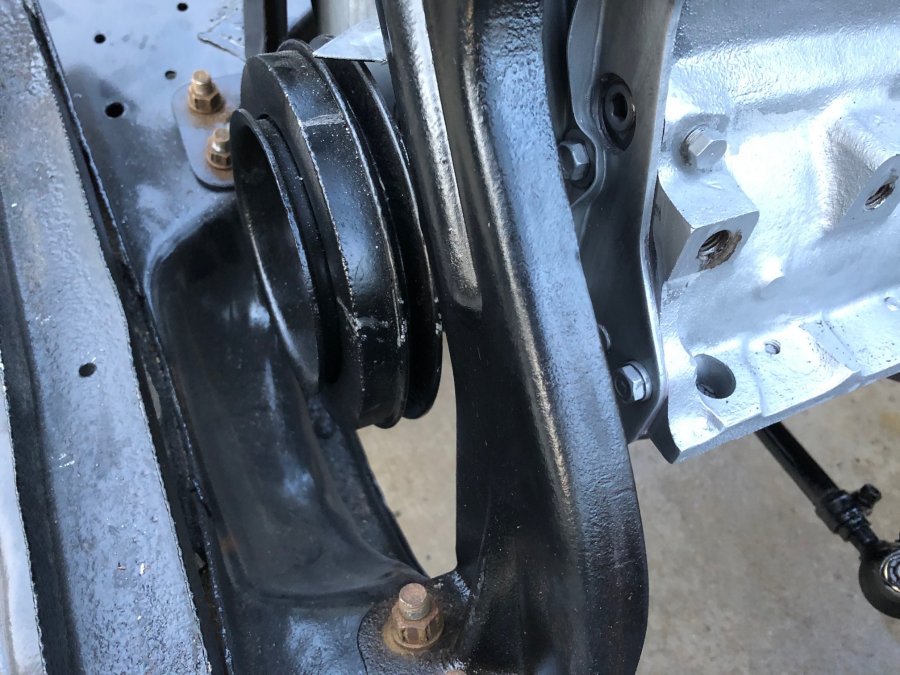
Question: Attachment bolts on an aftermarket front motor mount are too wide by just a fraction of an inch (maybe 1/16th or so), but its enough to keep it from fitting the two holes on both sides. The rubber on this product is sandwiched between two steel plates so there is no play to try and squeeze it together and in. Is this just a faulty product, is it the wrong product (is there variation) or am I missing something about how to get this to fit? Thank you for your help in advance -
My First Car -- P15 1947 Plymouth Deluxe
NickPickToo replied to NickPickToo's topic in P15-D24 Forum
Hey, I turned 100 this week ? That means I've spent more time with my phone in my hand than with a wrench in my hand. -
My First Car -- P15 1947 Plymouth Deluxe
NickPickToo replied to NickPickToo's topic in P15-D24 Forum
Had the same thought, but we ordered real head bolts just before I painted. I'll be changing these out so it will have the same effect. -
My First Car -- P15 1947 Plymouth Deluxe
NickPickToo replied to NickPickToo's topic in P15-D24 Forum
Now am starting to itch for that original heater. I guess we just need a resistor to bring the 12 back to 6 and then clean up the heater we inherited. It looks different than yours, but it matches the photos in the parts manual. Here is a picture from when I was in teardown mode.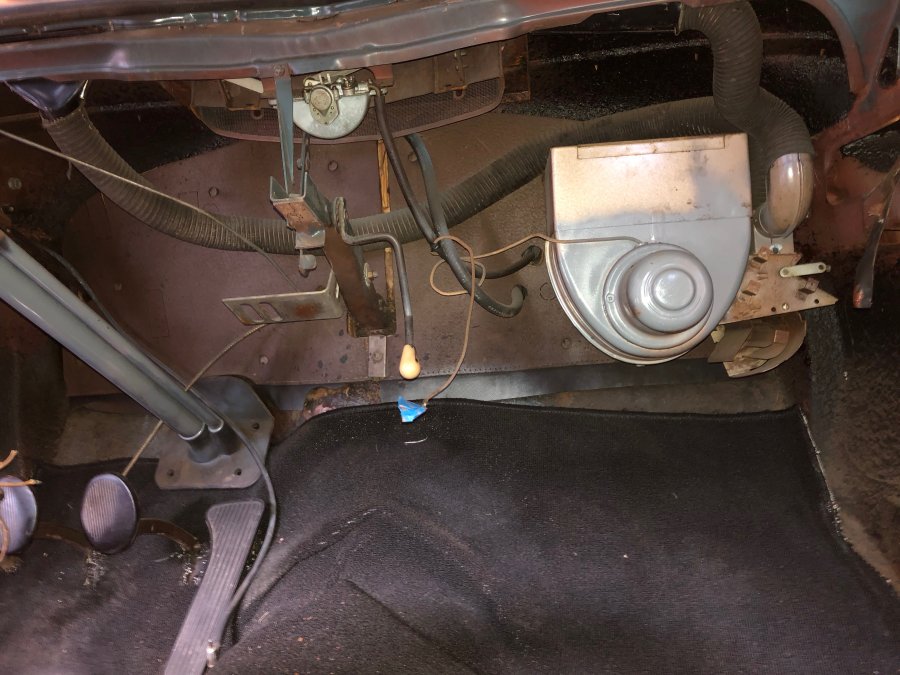
-
My First Car -- P15 1947 Plymouth Deluxe
NickPickToo replied to NickPickToo's topic in P15-D24 Forum
It's hard to go by deluxe or super deluxe as this engine came out of a '55 P26. When we got it, the small house on the water pump went to the heater and the pipe at the back of the head, passenger side also went to the heater. There is also a whole on the side of the head, diver side that had a fitting but the fitting was completely clogged and no hose on it. Why yes, there is small bump on the front just behind the water pump. What should I make of that? If I change out the thermostat housing and add the elbow, will it change anything negatively? Will it change the type of thermostat I have to buy? As far as the heater goes, not sure yet we will put the original back in. We may upgrade to heat and cooling. How well did these old heaters work on really cold days? -
My First Car -- P15 1947 Plymouth Deluxe
NickPickToo replied to NickPickToo's topic in P15-D24 Forum
I know right, So by the time we fab heat shields and and put the front clip back on, we'll be the only ones who can see this piece of industrial art