falconvan Posted June 14, 2011 Author Report Posted June 14, 2011 Hmmmm....if I were going to do that I'd need a straight axle, a blown hemi, and some slicks on the back, too! Quote
Adam H P15 D30 Posted June 15, 2011 Report Posted June 15, 2011 No, just look at it as necessary to free up space for steering linkage. Quote
falconvan Posted June 25, 2011 Author Report Posted June 25, 2011 Just got back yesterday from a weeks vacation at Lake of the Ozarks. Very relaxing, just a week of fishing and reading. No email, internet, TV, or work; I feel like a new man. I spent today on the car before I have to go back to work tomorrow. Just did a couple small things but it took most of the day. I built a drop and a floor mount for the steering column along with figuring out the mount for the master cylinder and finished modifying the brake pedal bracket. Quote
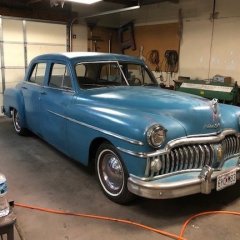
falconvan Posted June 28, 2011 Author Report Posted June 28, 2011 After 4+ years of working on this, we're finally ready to shoot some primer on it. I'm cleaning up half the garage to hang plastic and we're going to shoot it over the holiday weekend. I went and bought all the paint, primer, etc to do the whole car today. Going with a 95 Porsche color; Grand Prix White. Also got my Lokar shifter mounted so I can measure where to cut the whole in the floor. Quote
falconvan Posted July 1, 2011 Author Report Posted July 1, 2011 Ready for the weekend; priming Saturday morning Quote
falconvan Posted July 1, 2011 Author Report Posted July 1, 2011 Thanks, Tommy I'm so ready to see some color on this thing even if it is primer gray. We were taping the body last night and talking about what life was like when this car was coming off the assembly line. WWII had only been over a short time, rock n roll hadn't been invented, if you were gay it meant you were happy and a pair of boobs referred to a couple of dumb guys. Times sure have changed..... Quote
Greenbomb Posted July 3, 2011 Report Posted July 3, 2011 Oh, yeah! The light at the end of the tunnel. i admire your perseverance! It's looking real good! Quote
falconvan Posted July 4, 2011 Author Report Posted July 4, 2011 Yeah, it's coming along. Still a ways to go but it's starting to feel like there's more behind me than ahead of me. Today I made a bracket for the A/C/heater unit that will stay bolted in but allow me to slip the unit in and out with just removing a few screws. Here's where the A/C lines and heater hoses will exit the firewall. Quote
falconvan Posted July 8, 2011 Author Report Posted July 8, 2011 Firewall and wheelwells done; ready to go back on the chassis as soon as I finish plumbing the brake and fuel lines. Quote
falconvan Posted July 9, 2011 Author Report Posted July 9, 2011 Time to clean up the floor, add some seam sealer and paint, and cut a hole for the shifter before it goes on the frame. Quote
falconvan Posted July 18, 2011 Author Report Posted July 18, 2011 We set the body back on the frame and bolted 'er down over the weekend. Quote
falconvan Posted July 18, 2011 Author Report Posted July 18, 2011 Plumbing is done and I hung the fenders on it with a couple of bolts just to see what it looks like. Quote
falconvan Posted July 20, 2011 Author Report Posted July 20, 2011 Yes it is! Starting tonight on building a decklid from the two junk ones I have. Quote
falconvan Posted July 24, 2011 Author Report Posted July 24, 2011 The tough part about building a car you didn't take apart is figuring out how it all goes back together. I've got parts from several different cars so I've spent some time this week going through them to pick out what I want to use and doing some trial assembly. Here's the bumpers and fillers panels, and the dash. I also think I'm going to do a recessed license plate where the big third brake light used to be on the decklid. Quote
BobT-47P15 Posted July 25, 2011 Report Posted July 25, 2011 You could put a more modern third brake light in the rear window. Doesn't hurt to have plenty of lighting on the rear of these old cars. Quote
falconvan Posted July 25, 2011 Author Report Posted July 25, 2011 That's a great idea, Bob. I sure dont want the rear of this thing getting clobbered after all the work going into it. Quote
mrwrstory Posted July 25, 2011 Report Posted July 25, 2011 If you gotta do a recessed license detail, the original trunk light would would be a great "topper" for the detail. I think it would make the rear look a little more stock like, while being up to date. And, make that a functional third brake light. Maybe even an eyebrow for the license light. Quote
falconvan Posted July 25, 2011 Author Report Posted July 25, 2011 Ok, I'm sold. The light stays. Quote
Young Ed Posted July 26, 2011 Report Posted July 26, 2011 Follow Bills example and move it down. I've heard from others behind me its fairly hard to see in the stock location because its angled up. I did put a double filament bulb in mine to help some. Quote

Recommended Posts
Join the conversation
You can post now and register later. If you have an account, sign in now to post with your account.