mrwrstory Posted July 30, 2012 Report Posted July 30, 2012 I had the same issue so what I had to do was slice the firewall, fold it flat, and weld it back together. That point in the middle of the firewall was hitting the back of the heads. As far as mounts, I just made some simple triangle mounts from some 3/16" steel plate with 3/8" steel tubing for the bolts to slide through. I welded them to the frame but also put a 1/2" bolt through the frame and the mount just to be safe. I did the same modification to my firewall,.....twice:o After patting myself on the back for doing a nice job, with plenty of clearance for the valve covers, I found I still couldn't lift them clear of the rocker assembly, So I did it again. Quote
Suess Posted July 30, 2012 Report Posted July 30, 2012 Thanks for thi pics. I do not want to hack into my firewall I spent so much time making it flat. I will slide the mounts back 2.5. And worse case scenario I will do what don coatney did and cut my cross. Seems like a lot of work for a serpentine kit but damnit I like it. Quote
mrwrstory Posted July 30, 2012 Report Posted July 30, 2012 With all due respect,....you're at a good point to consider modifying the firewall. Using the stock reinforcing ribs as a starting point, it's not a big deal to relieve the interfering areas and still retain the bulk of your firewall restoration and the stock appearance. As I said earlier, I did it twice, (that's the dumb part)...second time even after I finish painted it. With engine installed, you don't even notice that it's not stock. And with the Chevy in the engine bay, most folks will focus on that anyway Sorry, couldn't help myself Nice job! Note the slightly relieved area on the driver side too. Decided to "clearance" that a little more while I was at it. Quote
Niel Hoback Posted July 31, 2012 Report Posted July 31, 2012 That is some mighty fne work there. I wish I could do that. Quote
mrwrstory Posted July 31, 2012 Report Posted July 31, 2012 It's not rocket science. It's amazing what you can get away with if you just go for it. Quote
falconvan Posted October 28, 2012 Author Report Posted October 28, 2012 We got some time in on this one the last few days. The door and trunklid jambs are painted and we hung them back on the car. Over the next few weeks we'll finish up a little work on them and get them painted; then start on the front clip. 1 Quote
Plymouthy Adams Posted October 28, 2012 Report Posted October 28, 2012 I like the white...!!!!!! Quote
littlemo Posted October 29, 2012 Report Posted October 29, 2012 I like his "tenacity" !! Cass, alias littlemo... Quote
falconvan Posted November 23, 2012 Author Report Posted November 23, 2012 It's time to get the front clip done and painted so the first order of business was to figure out how it all what parts to use and how it all went together. I've got tons of parts for this thing but I wasnt the one who disassembled it. I had the fenders on it before but never had the full clip together with all the little inner panels and braces. I painted the insides of the fenders and grill with POR 15 a few days ago. After rooting through several boxes I got all the good parts sorted and figured out which ones were going on the car. I also made a trip to Lowes and bought all new bolts rather than trying to clean up the old ones. Finally it's all together and we can start getting it ready for paint. I think I'm just going to build new inner fendrs and mount the battery in the trunk. The factory ones wont even come close to fitting around the engine. Quote
Robert Horne Posted November 24, 2012 Report Posted November 24, 2012 Falconvan, your car is coming together very nice. I just painted my hood, and still have alot of work to do the front fenders, before I can paint them. I moved my battery to the trunk, just over the rear axle, I figure it could balance the car a little also. Quote
marcello7x Posted January 7, 2013 Report Posted January 7, 2013 Have you had a chance to drive it at all yet? Really curious how it handles with the rack and 5.3l and stock suspension? I'm trying to plan out my suspension and motor now. Either a 5.3l or 6.0. Quote
falconvan Posted January 9, 2013 Author Report Posted January 9, 2013 No, unfortunately Im probably a good year away from a road test. There's lots of guys out there who have done the rack-n pinion setup on these, though. I've seen several on the HAMB if you want to ask over there. Good choice on the LS motor! Quote
falconvan Posted February 28, 2013 Author Report Posted February 28, 2013 (edited) I was going through the remaining parts for the front and realized Im missing the brace that runs across the rear underside of the hood by the hood hinges like in this picture. Anyone out there have one they would part with? Edited February 28, 2013 by falconvan Quote
mrwrstory Posted February 28, 2013 Report Posted February 28, 2013 Many later P-15s did not have that brace. It's is a desirable piece however. I will be making one for my car. Quote
Robert Horne Posted February 28, 2013 Report Posted February 28, 2013 I was going through the remaining parts for the front and realized Im missing the brace that runs across the rear underside of the hood by the hood hinges like in this picture. Anyone out there have one they would part with? That brace looks very close to the brace I took out from under the headliner of a Mustange II. I used the brace for trunk supports.. I used the Mustange II roof to make fender skirts... Quote
falconvan Posted March 3, 2013 Author Report Posted March 3, 2013 It's been a while since I got to put some time in on this one; I spent a few hours wet sanding the front clip and had to rebuild one of the hood hinge mounting edges. Feels good to see a little progress again. Quote
falconvan Posted March 13, 2013 Author Report Posted March 13, 2013 Been working on the hood several nights this past week; finally got it to where I could put some etching primer on it. I'll do the other side in a day or so. Quote
falconvan Posted March 16, 2013 Author Report Posted March 16, 2013 I went looking for the rear hood brace and found it was missing; bummer! After checking around one of the HAMB members came up with one for a Desoto. The curve was right but the end where it bolted to the hinges was different so after welding on some short tabs I think we're good. Got a coat of etching primer on and hopefully we'll get a trial fit with the hinges bolted on done this week. Quote
falconvan Posted March 22, 2013 Author Report Posted March 22, 2013 I moved the car to the other side of the garage today to make it easier to get my 51 in and out. Here's a trial fit on the hood; it's close but will need some work for a better fit in the front. This is actually the hood off the 47 parts car; the 48 hood was ate up. Quote
jcmiller Posted March 22, 2013 Report Posted March 22, 2013 It's looking good. Thanks for the updates. Quote
falconvan Posted March 23, 2013 Author Report Posted March 23, 2013 Thanks, it's been a slow process on this one but its making headway. My buddy has had a hard time finding the time to get the body and paint done but its ok. He and his wife lost their three year old daughter to cancer a little over a year ago and they are both trying to finish college to get better jobs while they raise their son. I told him just work on it when you can, no hurry. It'll get there and taking the time to do a good job will be worth it. Quote
dragracer Posted March 24, 2013 Report Posted March 24, 2013 Thanks for the information on the dolly. In looking at your build thread, i'm excited about starting on my 47 Coupe project in the near future. Quote
falconvan Posted May 7, 2013 Author Report Posted May 7, 2013 No problem, make sure you post some pictures as you go. The hood was almost 1/4" too long in the front. I cant figure out how it was that far off but after we trimmed the back of the hood it finally started fitting right. We also re-primed and blocked the passenger door and decklid so it's finally starting to get really close to painting the front clip and doors. Quote
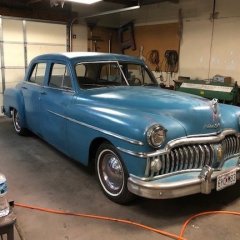
falconvan Posted May 29, 2013 Author Report Posted May 29, 2013 (edited) Been waiting a long time to see this! Now just the hood and gravel pans left to paint and it's all reassembly from there. all I need is lots of $$$$! Edited May 29, 2013 by falconvan 1 Quote
falconvan Posted June 3, 2013 Author Report Posted June 3, 2013 Got it unwrapped over the weekend. Quote

Recommended Posts
Join the conversation
You can post now and register later. If you have an account, sign in now to post with your account.