Search the Community
Showing results for tags 'Suspension'.
-
I had my buddy Ryan who owns Ballis Welding in Fresno, work on my stalled '52 Suburban project yesterday. It took us about 4 hours to relocate and install Rusty Hope's front shock setup, where the top shock mount is attached to the frame, not the upper A-arm. Everything went pretty smoothly- we had to do some minor alterations like drilling out the lower eyelet bushings from 1/2" to 5/8", and tack weld - check clearances - cycle suspension up and down, then cut out tacks and reposition. Since Rusty says to find the center of travel on the shock and the motor was out, (not at the normal ride height), we set the wagon on front jack stands and used the heavy front bucket on my tractor to artificially move the front end up and down. That worked great! It seemed to me that it would be so much easier to do the work with the motor out and the front clip off. Although his instructions were very good, it wasn't clear to me exactly what issues would come up until we got into it. Depending on the angle we positioned the mount, the side of the shock would bind up at certain ride heights. We were able to make certain that wouldn't happen by using the tractor bucket. You can see the finished system in the short video. Pretty fun stuff! My Movie.mp4
- 4 replies
-
- 1
-
- shocks
- suspension
-
(and 1 more)
Tagged with:
-
I'm wanting to upgrade the shocks in the front end without swapping to a kit. Are there newer control arms that will bolt in?
- 9 replies
-
- dodge
- suspension
-
(and 2 more)
Tagged with:
-
I am about to try to rebuild the front end on my 1954 Plymouth Suburban. I noticed in the manual that several "special" tools were mentioned. Are they REQUIRED? If so, are they available? Does anybody have a video of this process or a series of pictures with do's and don'ts or recommendations?
-
Hello to everyone I have an opportunity to purchase a front suspension from a 1951 Plymouth Cranbrook with all new components at a good price Can someone tell me if it would fit my 1940 Dodge business coupe It looks the same except for the upper control arms , on my Dodge they are a cast steel and on the Plymouth they stamp steel welded together
-
I've done this before, but forgot how to do it. I was surprised that the shop manual doesn't say what to do. I put a floor jack under the lower control arm and jacked it up. Do I remove the four bolts holding down the upper control arm pivot bar, or should I remove the upper control arm pin and nut first? Or do something else?
-
I am replacing my king pins on my '49 Woodie. I knew it was coming because I wanted to get it aligned a couple years ago and the guy told me I had to do the king pins for him to do an accurate job. last year I started to get a good amount of vibration at about 70 MPH, so, now that our Governor has again shuttered Ca., I figure i have plenty of time on my hands. This does not look extremely hard, but, the shop that was going to do the pressing and reaming for me is out because the guy who does this kind of work is "down for the count" according to his son, and thinks he'll be out for several weeks. I have located a machinist here on the central coast who is willing to do the job, but is not really a car guy. I need to disassemble the king pins from the knuckles so he can "see what we are dealing with". My first problem is removing the lock pins so i can get the king pins out. It looks like they are threaded, but i think this is only because they are peened over. One side has the little wedge missing, the other is essentially flush with the hole. I assume i should be able to pound these out. I also assume that the fully round side is the side that comes out first, so I should pound on the wedged side to push the pin out. Judging from the amount of dirt, grease and crud, I am not sure the front end of this car has even been apart. The pins do not appear to want to budge. But I wanted to make sure i was not doing anything drastically wrong before really getting serious. Any suggestions on removing the lock pins is appreciated. Once i get the pins out, I think my machinist will press out the bushings and install the new ones and ream them. I should be able to take it from there.
-
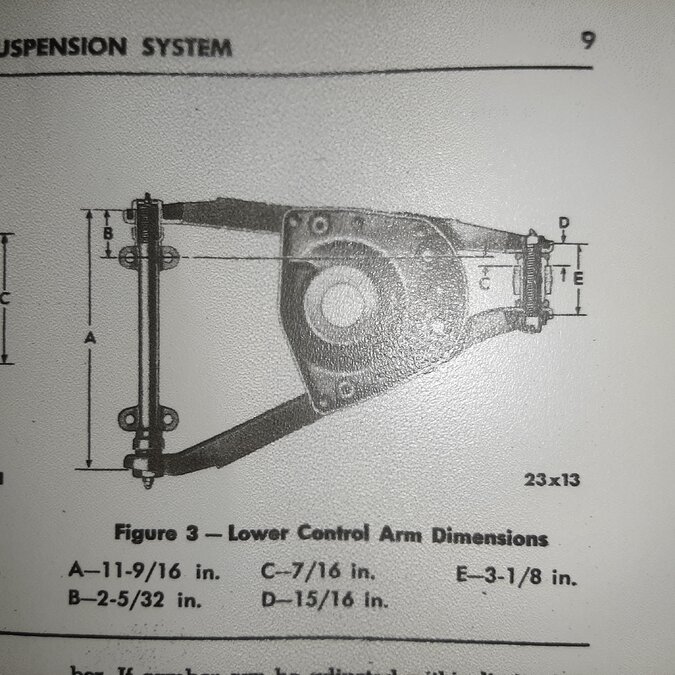
I am replacing the king pins in my '49 Woodie. I am not disassembling the A-Arms or replacing the bushings/seals. While cleaning the lower A-Arm, I might have allowed the pivot bar to rotate. I am not sure, but I used a small guage wire through the pivot bar to attach to the A-Arm to maintain the orientation and one came off during the cleaning/painting process. My manual has the attached diagram showing the correct positioning of the pivot to the A-Arm. I have a couple laser tools that I am using try to check that my readings are as desired from the layout. I have a couple problems. First, the actual width of my A-Arm (measurement "A" in the diagram), which the diagram shows should be 11 9/16 inches is actually 11 3/4 inches, so 3/16 off. Second, trying to get measurement B, which looks like the key measure to determine the correct position of the pivot, can be either 2 13/64 or 2 8/64. I can not land exactly on the measurement. I think the goal of this is to get the pivot bar centered as much as possible between the forks of the A-Arm. In other words, to align the center of the pivot bar to exactly the halfway point of measurement A. Is that correct? would that mean that measurement "B" (shown here to be 2 5/32) should simply be made to be as equal as possible on both sides of the A-Arm? I am assuming if this is off, it might affect the Caster? If that is the case, and i can not get these to be exactly where the manual says they should be, I probably want to err of the side of moving the lower A-Arm to the front, supplying a bit more positive caster?
- 5 replies
-
- front end
- suspension
-
(and 1 more)
Tagged with:
-
Hello All, first time poster, first time builder, looking for some help on a new '51 Suburban project. My grandfather and I are working on this one together; he's lending me his expertise and shop space and I'm giving him a chance to spend some more time in the garage, "grandma-approved". He's been hot rodding Chevys and Fords since he was 14, but when looking for a project to take on we fell in love with this era of Suburbans and it's the first MOPAR he's worked on. We're sticking pretty traditional with our plans for modifications, including a Mustang II style IFS kit. I've seen a lot of debate regarding Fatman products on here, and that was the original direction we were leaning towards as he has two completed projects with their Stage II kit (50 and 31 Chevy pickups). However, the cost of their frame stub has us a bit wary, as it would nearly double the overall price of the kit. My grandpa thinks we can do the measurements and fab work for the stub ourselves, then use a universal kit from Heidts, Fatman or similar and save about $2k. Has anyone gone this route? Any advice would be appreciated.
-
Here I am again! I beginning to think that the help I need is mental for starting this project.. Here it goes: I am working on my front suspension starting with the kingpins. Then on to the coils, control arms, etc. I am following the shop manual and have gotten to the point where I need to remove the locking pins and top seals again, according to the manual. It was fairly easy getting to this point. Now, following the obscure directions in the book, I got the locking pin on the first one(driver's side ) to move approximately a 1/4 inch and it won't budge from there. Likewise, following the book again, I can't get the top tin seal out, no matter what I try. I'm afraid to use too much force for fear of damaging irreplaceable parts. HELP!!! Additionally, I am soliciting any other guidance concerning replacing the coils, and rebuilding the control arms.
- 6 replies
-
- kingpins
- suspension
-
(and 1 more)
Tagged with:
-
Excessive play was found in the upper control arm joint. I am preparing to replace the upper outer bushings as they seem to had worn loose. However, I'd like to learn from you, are there any other issues in the front suspension I should check at the same time? Also the best way to do the replacement to avoid pitfalls, Obviously I will be messing the camber angle when replacing the bushings - any tricks to do it smart way? Any tips to adjust the camber without special tools?
-
The springs on my woody are no longer as springy as they should be. Basically it rides like a truck! I have removed the #2 leaf from all the stacks and it still rides pretty rough. Part of the problem is I think the springs have lost some of their arc, and they also have pretty serious grooves worn in them. My Dad drove used the wagon on an almost daily basis from 1949 until 1987, and has a LOT of miles on the original springs (and everything else!) I have replaced everything except the leaf springs themselves, so it is not any of the other parts. Does anyone know of a source for replacement springs? Or given the fact that replacing original equipment always seems to drive the cost up, is there a possible replacement from a more modern vehicle? If I can find something to fit, I don't mind sourcing from a junk yard. Maybe even something that will fit, but provide a little softer ride. I don't intend to carry any heavy loads, so heavy duty is not necessary. I really puzzles me how modern trucks can ride like a Cadillac, and still get the job done. Mike
-
These " wedges " were under the bolts on the LCA pivot bar. I thought I took more photos during disassembaly but this one is the best view. WHERE DO THEY GO ? ( oh and what are they for ? ) None of my parts , or shop books show or mention them. I believe they were on the driver side, rear set of bolts, but cannot recall. I was too concerned that day about the coil springs killing me. :-) Thanks ! Clay
- 9 replies
-
- 1
-
- Lower Control Arm
- Suspension
-
(and 1 more)
Tagged with:
-
I removed the rear fenders in prepping for paint and found this: The tire is rubbing as the suspention travels. The car has new shocks installed about a year ago. Any thoughts as what to do???
-
So I really have no Idea if this is going to affect the ride to much but I hope it works! Almost complete with the front end and I found a pair of air shocks from O'reillys Auto Parts. Had to press a metal sleeve out of one end and modify the size of the rubber hole with my drill. Got one on tonight and hope to have the other one on tomorrow! I'm looking for a little bit lower ride and stance on the truck and thought this may work. My plan is to rob an air tank off one of my old big rigs and install a small 12V air compressor in the truck. When I'm out cruising I'll try to have enough air in them to keep the tires on the ground and when we go to cruise night every month drain the air and drop the truck a few inches???? Took two leafs out of the spring pack and slicked them up a little! If you have any thoughts on how this might work I'm ready for the heat! Will slap a set on the back when I get there soon! Landon
- 27 replies
-
- air shocks
- shocks
-
(and 7 more)
Tagged with: