rb1949
-
Posts
770 -
Joined
-
Last visited
-
Days Won
4
Content Type
Links Directory
Profiles
Articles
Forums
Downloads
Store
Gallery
Blogs
Events
Everything posted by rb1949
-
Besides the Studebaker Museum in South Bend, Indiana, there is still another remnant of the company at their old proving grounds in New Carlisle, IN. But one not visible from the ground, you have to be airborne. It's the name STUDEBAKER, spelled out with trees. 20,000 pine trees were planted in 1937 to accomplish the feat. Rather than steal someone's picture, here's a link to a good shot of the name during WW2. http://usautoindustryworldwartwo.com/studebakerprovingground.htm Tree Damage occurred over the years, and in 2015 efforts were made to raise funds to restore the sign and replace many trees. It's on record as the oldest, largest, living sign in the world. The proving grounds are still in use, sold to Bosch in 1966, who donated 188 acres for a county park. It was bought by Navistar in 2015. Ambitious for a current view? Use Google Earth to find Bendix Woods Park, New Carlisle, IN.
-
Here's a different one.
-
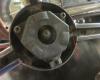
HMMMM #99, back to my #34 post above. A connection from the 'gizmo' (having the horn wire) to the metal in the steering wheel, under the horn ring. Then touch that to ground and it honks. The theory works, or at least with a few jumper wires. (That pot metal is conductive). In the short time it was proven, I was freezing. Need to make a thin 'strap' to establish the connection, attached via existing screws. Then re-assemble, and test. Glad there are only 3 easy screws. Fingers are crossed. What a goofy project.
-
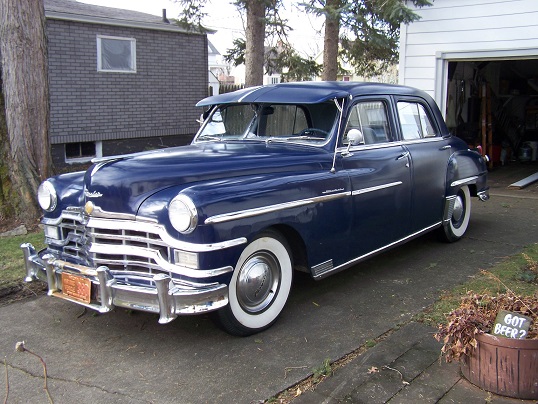
Nice ride. I noticed the classic, with the narrow WW tires. Are they Radial, on stock rims?
-
Don, as mentioned, that last picture is YOURS, of the 1950 parts you posted. The horn ring does not screw to the gizmo, it just sits on it, held in place by the center cap. So no, you cannot assemble only the ring to see what's going on under it. I totally agree with the original simple technique. Push down on the right side of the ring (spring), and the left side should rise up to contact the gizmo for the connection. And I believe all that, but, it doesn't work. The HMMMM'S are indeed annoying. Something is broken, missing or worn. Thinking will continue to fabricate a solution to this stupid horn. Wait til I get into a project with more than 2 PIECES!! Ha.
-
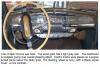
Spotted something unusual up in your pix of the 1950 assembly. That 'gizmo' is slightly different, but notice it has what looks like a 'strap' going from the gizmo and attached to the metal UNDER the horn ring. Hmmmm. Mine doesn't have that. You say the pot metal horn ring material IS conductive? If so, makes me think. The horn ring is touching the spring, making contact. Pressing the ring, it comes in contact with the metal underneath it. From the picture, this metal is connected to the gizmo, and by touching it, would complete the circuit to ground and honk the horn. Maybe rocking (pressing) does NOT attempt to make the spring alone touch the gizmo?? I can probably fabricate, or jump these pieces, to see if the theory works.
-
On another window channel discussion, http://p15-d24.com/topic/40579-window-fuzzies/page-2 a poster appears to have bought his correct length, with photo.
-
Of course. Change the clocks for more daylight. Enjoy a Reuben Sandwich. And finally welcome in Spring. Cheers.
-
Right, no modifications beyond return! But I have a dumb idea to try next time. Again, comparing current pictures, nothing seems to be missing in there. And snooping does not find a parts diagram. I contemplated that is was the horn ring itself (which is touching the spring) then by rocking, touching the metal under it. But the pot metal is non-conductive. More dumb thinking.
-
Traveller...... is this Coker page of any use for 16's? http://www.widewhitetires.com/coker.html
-
A spring in the crank handle? Never would have guessed that trivial item. Noticed both front door windows are 'tight'. May have to pull panels and check/grease linkages. Spotted a front parking lamp out. Removed lens. It's the 1158 bulb, 6V. Specs say same bulb for all lamps. While out and about, three places did not carry the 1158. Quick search found a place that has them, for 50¢ !! With shipping, can order 6 for less than the price of 3. Then see local NAPA has them. They also have the 12" wiper blade, plastic. Rock Auto has the metal replacement. Did not see anyone offer the handy slide in replacement blade. Had a longer one that I was going to cut to 12", but wouldn't fit the 'grips". Picked up oil for a change soon. For the filter, you open the canister and replace a cartridge? Isn't my trivial stuff boring.
-
Re-examined situation, but no clever solution. Gosh, how long can you sit there and look at 2 parts? Something is going to have to be modified, but not sure what/how. Maybe the spring is being compressed to far from the gizmo. By rocking the ring (with it's limited motion), the gap is too big to allow the spring to tilt enough and contact the gizmo. Just thinking out loud.
-
Plymouthy, do you possibly have a picture of the clip you used, and how it was attached to the channel. Did it have a name?
-
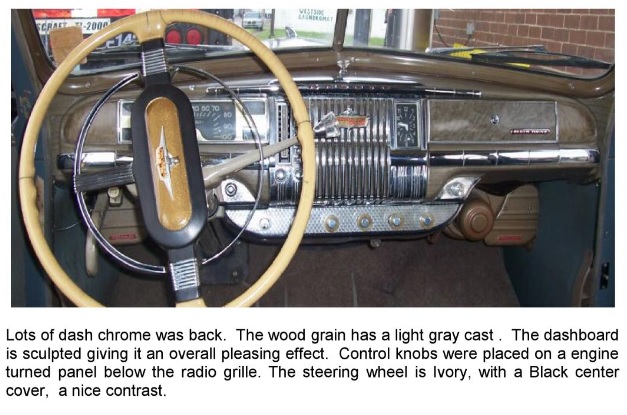
Ye olde Don's wisdom. Mine has key lock on both front doors. Checking dome/map light is now on the list. Think the chrome trim holding the lens in place just snaps in there. (start with the bulb). Probably going to have to pick up a cheap meter to check wiring. Keep forgetting to add trivial pictures. One is of the window crank handle. Not a knob, it's a rectangular piece of chrome on a swivel. Any other '49ers have the same thing? Then, finally figured out what was "different". See side pix of car. I thought the hubcaps, like the one on the rear, were 'normal'. But look at the front one. That's 'norrmal', all chrome. Someone had painted the outer rim of 3 of the hubcap Blue to match the car. Looks like a 'baby moon' with Chrysler on it. Not totally obnoxious, but the all chrome looks nicer. Some paint remover seems to be on the list. Such little things to keep us occupied.

-
Don. True, see #20 above, first removal of ring. Spring rises to touch gizmo, horn blows. Isolate spring with spacers, and it doesn't blow. All is good. All contacts are making contact. Except when it's re-assembled. Re-checked those pictures (the identical '49 assembly), and don't see any part/piece that maybe was missing from mine. Appears there is no diagram showing all the parts in there. Grumble grumble, my first 'simple' project is becoming quite annoying. Get a boat air horn canister and hold it out the window?
-
Let's say it again. Isolated spring from gizmo with 3 Plastic spacers (simulate horn ring pressing down). Horn does not blow, perfect, no contact. Jump wire from gizmo to isolated spring, makes contact, horn blows. All wiring operates perfectly. Remove plastic spacers. Reassemble horn ring in proper position with center cap via 3 screws. Horn ring rocks perfectly, no problem. Turn on key, no honks. This is good, no shorts. Press horn ring, which should tilt spring to make contact. No horn. Pressing ring fails to let the spring make contact. There are no other parts in there to make this dumb thing work. Repeat: baffled.
-
P-D gurus said that users get 195MB to put in attachments. Resized to a fair 500X600, could equate to 2,000 photos. That's quite a few. Deleting old for new should be minimal. Now I know. edit: hole in driver door jam is where a switch SHOULD be. Other doors have switches. But, none make the dome lite come on.
-
Weird. Isolated spring from gizmo with 3 spacers (simulate horn ring pressing down). Jump wire from gizmo to spring, makes contact, horn blows. All is perfect. Reassemble horn ring with center cap via 3 screws. Press horn ring. NOTHING!!!! What the h___ is going on with this dumb horn? Pressing does not want to make the contact. No toots is simply baffling.
-
Keeping busy in the cold, inside. Fun bumping around the forum, checking out old topics, pictures in the Gallery, downloads (got one), and the classifieds (maybe an item of interest). Don't like the light colored type associated with member names .... can't read it. Figured out the 2 ways to do photos. Extra work, but the img link from a photo sharing site works well. I use Picture Trail. Or, the easy attachment method. Did see there is a limit on number of attachments(?) Waiting to hear from top brass, but do you have any idea what that means? Delete old to make room for more? Also reading manuals, trying to absorb basic data on the '49. Questions such as: 1) is there an issue with unleaded gas? Some say no. 2) Engine Oil: original owner manual says SAE30 during warmer seasons. For my frigid climate, it says SAE10 diluted with 10% colorless kerosene! I see a lot of Spitfire 6 owners having no problem with 10W-30 Finding silly things to add to the project list. Should be warm enough Sunday to finish to horn problem. I want to add pictures to that discussion, that will maybe help someone in the future. Did notice no dome light. There is only one, over the back seat. Odd place. But a small flat lamp on the bottom of the dash, to illuminate the floor area? On the driver door, don't see a button/switch to activate the dome? There is a square hole in the jam, where maybe one should be. Will check other doors for switches. Don't forget the bulb too. But need to get out too, it's cabin fever season. Spring is close now.
-
OK, if wanting to try tubeless radials, and original rims create issues with 1) the rim construction doesn't seal 2) the rim isn't wide enough --- what are the options for a proper rim that fit the car (1949 Chrysler). Dale: you bought radials, on original rims? A bias tire would fit these rims. Just for fun, my Coker Tire Price guide from 1990 shows the Coker 3" WW Tubeless, for $85. The good ol' days.
-
Interesting pix. Some contributors over in the photo gallery include engine shots. Was just thinking of engine color yesterday. A quick search indicated that that 40's into early 50's were original Silver, the paint number being MOPAR P4529148. For whatever reason, I like it.
-
Odd, no mention of the year. (which was 1949). A similar idea to the American promo ad?

-
How many of you have switched from bias to radial tires? The conversion charts show a slight difference in size which doesn't seem to be a major problem. Looks like a good selection to choose from. Classic cars seem to have blackwall, or the wide whites, don't recall seeing one with narrow whites. Using stock steel rims, any issue with the tubeless tire, or is it better to add a tube? Rim width? Anything else to consider if choosing radials? Thanks.
-
Being Mopar, not Off Topic. But the language is. Found this in the stash of documentation.
-
Forgot, it's ignition/door key. Haven't tried door yet. Can do so now, having extra key in case it breaks! On my '49, the back doors have the push down lock button. The front doors do not. Is it true, that by pushing the interior door handle forward, will lock the door? (Pull back to open) Clever thought on gas cap/glove box match. I'll try the gas cap key just in case. Otherwise, no concern over the glove box, except for authenticity.