FarmerJon
-
Posts
475 -
Joined
-
Last visited
-
Days Won
1
Everything posted by FarmerJon
-

Autolite 295 Sparkplugs at Walmart equal to Champion J8
FarmerJon replied to desoto1939's topic in P15-D24 Forum
Despite the factory warning, I had good luck running the "power tip" type plugs in my Plymouth. Autolite AR73 can be had for less than $4 ea from Rock auto and added a little power to the top end, and seemed to have a little more push down low as well, tested by take-offs in 2nd gear. I did not take the time to track down a resistor version, in theory it might give a slight advantage as well. Autolite 74 plugs are the standard performance version. The "racing" plugs are side gapped, so have a shorter service life, but in 2.5 years of running them, I did not put enough miles on them to notice much wear. I put around 5000 on the first set. I replaced them due to a cracked insulator on 1. They also had no problems with fowling. I will dig around on my computer to find the pictures I took of one in a stock combustion chamber. Even with a milled head, there is no chance of valve to plug interference.
-
1948 Plymouth Club Coupe. Great driver with Overdrive
FarmerJon replied to FarmerJon's topic in For Sale Classified Ads
Price droped to $15,000, available for inspection and test drive in Appomattox Va. -
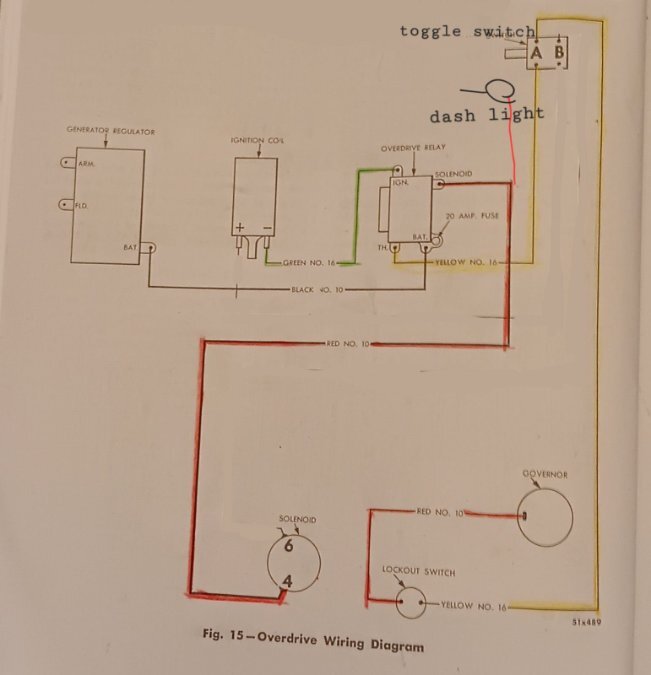
Don't do it. OD is one of the biggest upgrades you can do to these cars. The 6v->12v is pretty straight forward, and I believe that you could overcome the electronic ignition issue with some minor adjustments to the wiring. I have my OD wired to a toggle switch instead of the factory kickdown, so there is no ignition interuption. I believe that would work for you as well, but I cant be sure, as my car always started fine with 6V and points.

-
It is time for me to part ways with my Plymouth. For sale: 1948 Plymouth Special Deluxe Club Coupe. Strong 217 CI Flathead Straight 6 Engine. Freshly rebuilt overdrive transmission,3 on the tree. New Napa 6V battery. Well maintained and previously restored car. An excellent driver both in town and on highway. Car will happily cruise at 70+MPH. I have spent the last few years making into a reliable daily driver. Only selling due to moving. I would like ̶$̶1̶8̶0̶0̶0̶, $15,000 OBO. Car is located in central VA, and is available for inspection or test drives by appointment. Cash is of course King, but I am willing to take most reasonable secure payment methods. I am not looking for any trades, but would consider payment in precious metals. I have made a number of improvements to further enhance an already nice car such as: Sound deadening and heat insulation added to floors,doors and roof. New carpet and custom matching floor mats. Added interior visors. Swapped standard 3 speed transmission for a 1955 Plymouth 3 speed overdrive. Borgwarner R10G1. Trans was meticulously rebuilt with many new old stock parts and all USA made bearings. New clutch throughout bearing and pilot bushing installed. Flywheel resurfaced and balanced with the pressure plate. New ARP pressure plate bolts were used. White post restoration rebuilt master cylinder with bronze bore. Added oil filter. Dual exhaust with Brockman mellowtone steel pack mufflers and chrome pencil tips. Heat shield added under freshly rebuilt Carter WA-1 carburetor,with K&N filter. Mallory "Best" performance coil. Vintage dual points conversion in rebuilt distributor with Terril machine rebuilt vacuum advance unit. Custom made "00" sized battery cables and starter to solenoid cable. NOS starter solenoid. 6 month old Napa battery 6V. New side mirrors. New thermostat and water pump and belt. Rebuilt fuel pump. Vacuum canister and check valve for wipers. New "Aerostar" coil springs in front for 3" drop. 1.5" lowering blocks added to rear. Rear lights rewired with 14 gauge wire and extra bright bulbs installed. New shocks all around. Rubber replaced on the steering box mount.
.jpg.ed646ace1e86eb82565874a416e6113d.jpg)
.jpg.b03060358b1050d47df1079a249d6f43.jpg)
.jpg.d3eec9bd6aaf90425aefdb6c2714c837.jpg)
.jpg.ffff77635104aa70b507d9d931a68ccc.jpg)
-
You can find them on ebay, they are out of production. Torrington NB-15OH (oil hole) should be the right size.
-
Coolant leaking out of the clutch housing?
FarmerJon replied to temecularevev's topic in P15-D24 Forum
I was able to sneak my flywheel out of the bell by knocking the bolts halfway out (torwards engine) This gave JUST enough room to get the wheel off. YMMV, but worth a shot. Edit to clarify: my transmission was removed before pulling flywheel -
Here is the full text, let me know if the resolution isnt good enough to read.

-
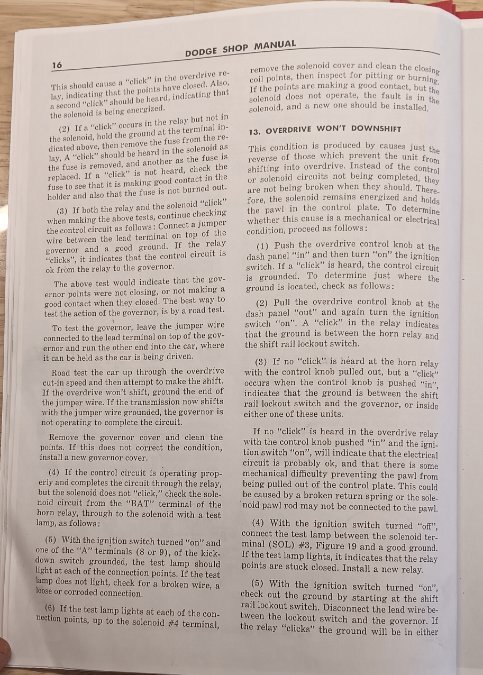
My OD didn't want to engage when I first wired it. Turned out to be a bad interrupter switch AND an internally shorted kick down switch. The interupter switch can be bypassed, or is available NOS on ebay (PN 1370462, or NS-60) The Kickdown switch I didnt have a good way to mount anyway, so I used a toggle switch in-cabin instead. The factory OD manual has some good trouble shooting tips, I will dig it out and take some pictures, but I have the text of part of it. Service Manual reads: "If both the relay and solinoid click when making the above tests, continue checking the control circuit as follows: connect a jumper wire between the lead terminal on top of the governor and a good ground. If then relay clicks, it indicates that the control circuit is ok from the relay to the governor. The above would indicate that the governor points were not closing, or not making a good contact when they closed. The best way to test the action of the governor is by a road test. To test the governor, leave the jumper wire connected and run the other end into the car, where it can be held as the car is being driven. Road test car up through the OD cut in speed and then attempt to make the shift. If the OD won't shift, ground end of jumper wire. If the transmission now shifts, the governor is not operating to complete the circuit" I hope that helps. The OD really is a great improvement, so it will be worth all the trouble in the end.
-
Sure, but he didn't mention doing that when putting it to bed, and I am of the mindset that it is better late than never. The oil that spashes up on cylinder walls is mostly scraped off by the rings, so the remaining film is (relatively) quick to evaporate off. The only downside is that it can be a little messy, smokey and, in theory, an etra cost ( but who here doesnt have an odd quart or two of sacrificial oil, you know, that 0w20 you have nothing to run in?)
-
If you wanted to be extra diligent, you could pull the spark plugs and put a couple drops of oil in each cylinder before spinning it over. That will give the rings and upper cylinders a little lube. It will smoke a little for the first couple miles, and you may want to spin it over before you put in the plugs back so that they dont foul.
-
As much as I like engine cleaners and Italian tuneups, I dont think they will get any of the soot out of the tailpipe(s). Some soot is natural, but if the weber is giving a better air/fuel ratio, it should be much slower to build up. I would fashion something that you can swab out the tailpipe with. Think gun brush, but broomstick based. You may be able to find a bottle brush of the correct size at a hardware store or on Amazon, but a rag stapled to a broomstick would also work. I would get the exhaust nice and hot, then stick the wet swab up the pipe a few times. Of course this will only get it clean for the foot or two before it loops over the axle, and you may find that black water from deeper in the system still runs out. Maybe a few cleanings will remove enough of it that it isnt splattering your bumper and garage floor. Good luck!
-
Sorry if you have already said, but have you put a fresh set of spark plugs in, since it started running rough? Last fall my car picked up a light miss that would clear up at rpm, but power was down. I blamed the carb for loading it up. So I put a rebuilt WA-1 carb on it. Same problem. Pulled a couple spark plugs, they were around a year old, but clean and gap was fine. Problem continued. In frustration, i pulled out ALL the spark plugs, and inspected them with an eye loupe. #5 had a hairline crack in the inner insulator, allowing the plug to ground out. Fresh set of plugs and all better. Have you done a compression test on the engine?
-
I think the part that I highlighted is crucial. It isn't poor workmanship to use sealants on in-spec surfaces. I will often stone a surface flat, then use an appropriate sealant on the (actual gasket material) gasket, especially if it is an assembly that I hope to never open again or is below an oil/fuel/coolant level. Oil pans, transmissions, rear ends. Anaerobic sealant is nice for installing lip seals, to insure oil cannot seep past the outer seal case. I do occasionally wonder how "tight" the original tolerances were on some of these parts. These carb lids probably started out only but so flat, and after being installed and the first few heat cycles, they can get out of hand. There is a reason that many hot rodders (and a few manufacturers) back in the day preferred to build on "seasoned" engine blocks. Foundry technology has greatly improved in the last 100 years, even though the workforce of tradesmen has drastically declined.
-
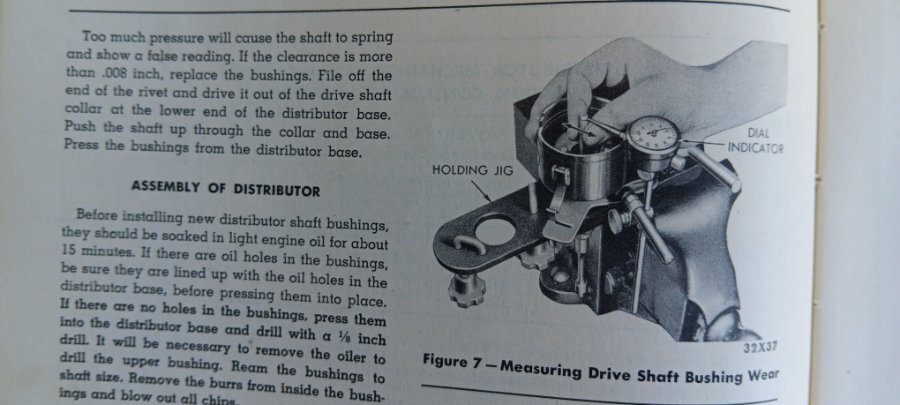
Whooo boy, that thing is crusty. Does that advance plate move freely? An ultrasonic cleaner does great getting all the crust out of the ball bearing pivot. Hopefully, fresh wire inside, with everything clean and lubed will fix the issues you are having. If not, at least you will know that the distributor is OK. Manual calls for .008" max play. If you can feel much slop at all, it may be worth setting up an indicator on it to see if you are in spec.
-
The problem with using sealant is that it makes it difficult to remove the top after applying. Seems like no big deal, but if you ever need to make a float adjustment, prime a dry carb after winter storage, unstick the vacuum piston, or for the hot rodders among us, change jets, It really sucks to replace a lid gasket every time you have it open. It is also possible to bend the lid when prying it off of a sealed surface. Just make the flat parts, that are supposed to be flat, flat. Its no big deal.
-
Rock Auto lists it as SKF 99226.
-
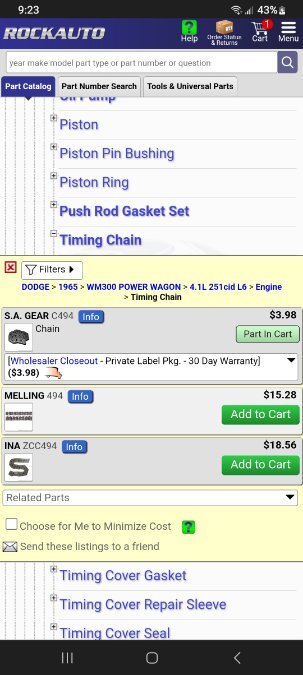
I dont see the set on rock auto, but I see just chains, If 251 chains are the same.
-
Not sure what make carb you have, but all the ball&balls and the Carter WA-1s I have rebuilt have a faint gap around the throttle plate. Even removing the plate and reseating it only gets them so good. I don't think it makes a difference for a single carb set up, I have no problem achieving a 475 rpm idle (manual transmission, maybe you have a different spec) With these old cars, chances are that it isnt just one thing wrong, it can be a little bit of everything. You can check for intake leaks by spraying carb cleaner at the suspected leaks, and if Idle changes, it is leaking. I would check for air leaks and rebuild the carburetor, then reassess.
-
It is almost easier to pull the whole distributor, than to install points with it in the car. The distributor drive is a tab, so you cannot get it "one tooth off", just right or 180* out. Once out you can get a better idea of whats going on. I would check that the advance plate can freely move, and that your vacuum advance isn't leaking.
-
My factory dipstick reads full with 6qts. With the filter. Better to be a little too full, than sucking up air.
-
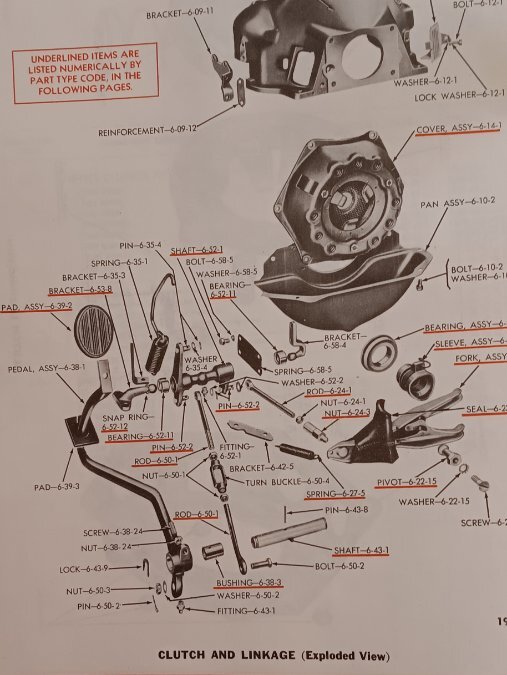
Sam, I don't think that the factory service manual does a good job showing this area. There is the overcenter spring, but also the clutch pedal pull back spring, and the brake pedal pull back spring. Mine were all wrong, so had to figure them out from scratch. The clutch pull back goes from clutch fork to a bracket on the bellhousing, and the brake pullback went to a small u shaped bracket on frame near the steering box.

-
1949 Plymouth Transmission Frozen to Bell (Clutch) Housing
FarmerJon replied to temecularevev's topic in P15-D24 Forum
The bearing retainer gasket sets the endplay for the input shaft. A home made gasket would be OK as long as the endplay is checked. The "Best" gasket set runs around $30 on ebay, and all the seals are available from Rock Auto. Why not reseal the whole thing while it is out? For the bolt grommets, I suspect that they were molded in when new. For my transmission, I used liquid thread sealant on the threads, and black RTV under the head of each bolt. Everything clean and dry, of course. My transmission also had 2 or 3 of the lower tailshaft housing bolts "sealed" with the bolt grommets too, and I did them the same way. No signs of leaks yet. -
There should be a detent ball and spring under each plug bolt in the side of the shift selector.

-
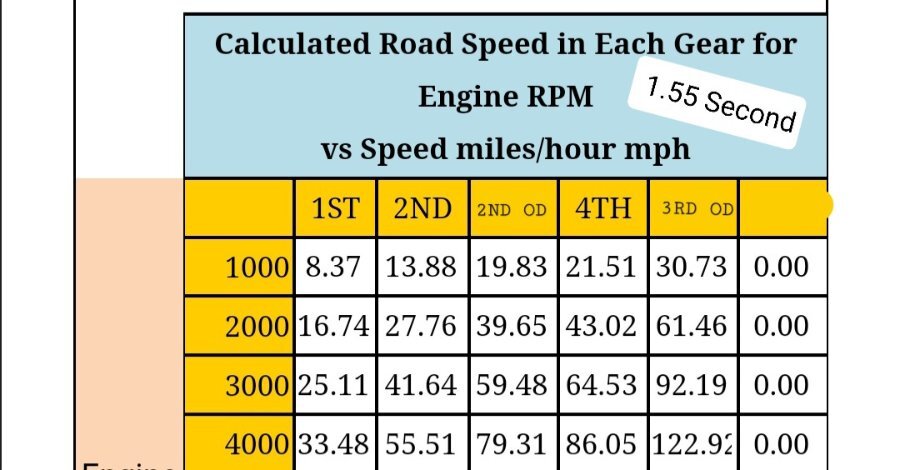
Loren, I currently have the stock 3.9 gears and 28" tires. I will be swapping in the 4.1 gears (and matching speedo gear) to further improve in town performance some time early next year. You can see in the ratio charts I posted that in first, 25 mph is 3000rpm. Fine shift point for leisurly, around town cruising. Peak HP is at 3600, which is right around 30mph. When hot rodding around (not always, but often) I wring it out that high because that IS where the power is. Any higher and power does fall off. I would estimate that the "cliff" where power really drops off is around 3800 rpm. In my test drives, I have had no problem getting the 2-2OD shift. 30mph and up it will shift, if I lift. It is very controllable. I usually shift from second to third 35-40 mph, so that seems to be a plenty big window to actuate the OD.
-
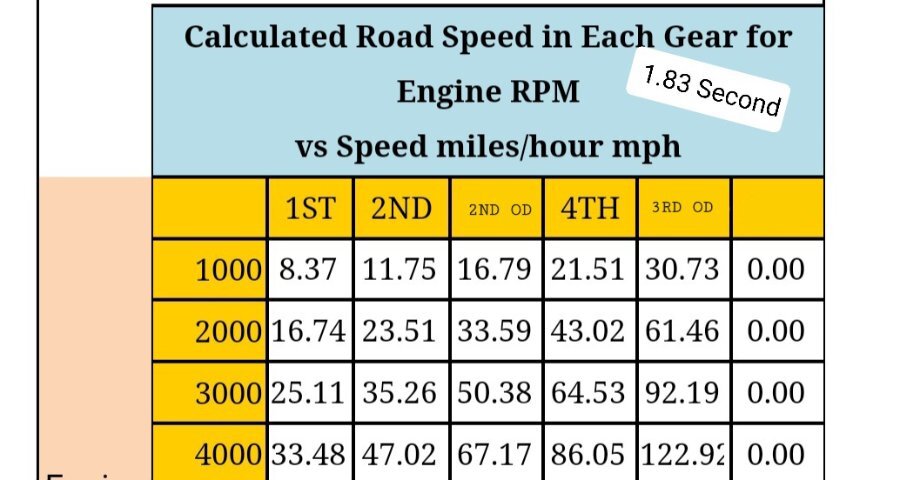
I am on the tail end of installing an R10 OD, so obviously that is my preferred route. I also found that 3.73 gear sets were difficult to find for sale. Easier to get a whole rear end, but shipping would kill it for you, I suspect. My cost for rebuilding the trans myself was around $1200 US. This includes the price of the core transmission, a new clutch and pressure plate, nos input shaft, clutch gear, syncros, 2nd gear, seals and gaskets, USA made bearings, new rollers, snap rings, thrust washers, assorted hardware, cup plugs, spare Overdrive parts, and snap ring pliers. I did not factor in some install costs, like having the flywheel machined, ARP pressure plate bolts, and fluids. These costs were around $300, with flywheel work being right under $200. I already had a spare standard transmission that i pillaged a few parts out of. The second gear, input shaft, clutch gear and shift fork I stole from my spare trans were to convert my '55 pin syncro to the older, and more standard, blocker ring syncros, because they are stronger and I drive my car hard. Some R10s have the blocker ring syncros from the factory, but not all. As long as your gear and input shaft were in good shape, there would be nothing wrong just replacing the friction rings and keeping the pin syncro, and this would reduce cost by around $250-300. As far as the "Fast" 1940 gear set, here is the math. 1.83 is standard, so ratio spread is 2.57, 1.83, 1.281, 1.00, .7 1.55 is fast, so the ratio spread is 2.57, 1.55, 1.085, 1.00, .7 This makes 2nd OD a duplicate for 3rd, so I stuck with the standard ratio spread. If you were able to shift from second to 3rd without OD kicking in, the fast second would be better, but in the few test drives I have taken, when you let up and press the clutch, the OD engages, so you would go from standard 2nd to OD 3rd. I have actually found a similar problem if I shift 1-2 at full tilt, I am above the cut in speed and it wants to kick in 1st OD, so I have been making a point to shift 1-2 at 25mph instead of my usual 30mph. The long term remedy for this is to duplicate what the factory did: taller rear gears. I have a 4.11 axle I plan on rebuilding and installing next. This will raise final drive rpm, by around 200rpm, which is still a huge improvement over my standard 3 speed and 3.90 gears, but will give more grunt in 1st and second, which is always appreciated with 96hp. I have found 2nd OD to be very similar to 3rd, so I wouldn't want the ratios and closer. Another point I feel the need to make is that these are NOT 55mph cars. With my standard 3 speed, I have driven it regularly at 65-70mph (based on GPS) for thousands of miles over the last 3 or 4 years. If you look at the non-OD gear calculator, 3600 rpm is 79mph. I have gone as fast as 83, but started loosing steam due to valve float or point float. Even with the OD, I likely won't push it that fast again untill I do some suspension work, as handling started getting uncomfortable. ETA: I see that you have a '50, have you checked what ratio your axle is? I believe that is around the time 3.73 gears became more common.