
wagoneer
-
Posts
411 -
Joined
-
Last visited
Content Type
Links Directory
Profiles
Articles
Forums
Downloads
Store
Gallery
Blogs
Events
Everything posted by wagoneer
-
onntop of the steering column in the Center. Done by PO very nicely as they converted from the sisson to manual choke (dodge original choke cable). it’s quite convenient.
-
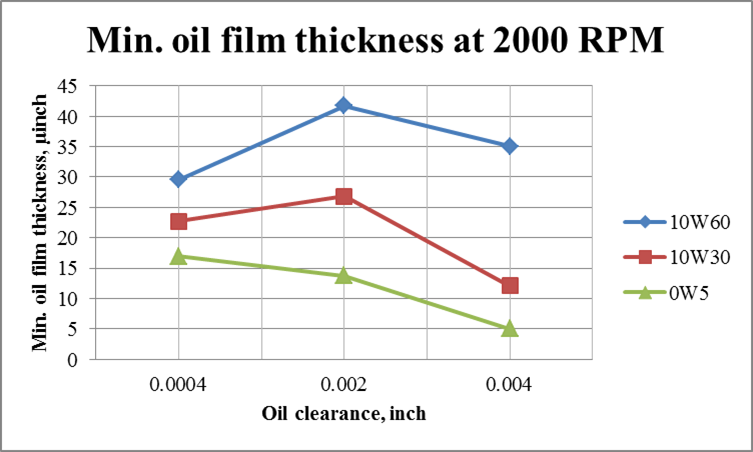
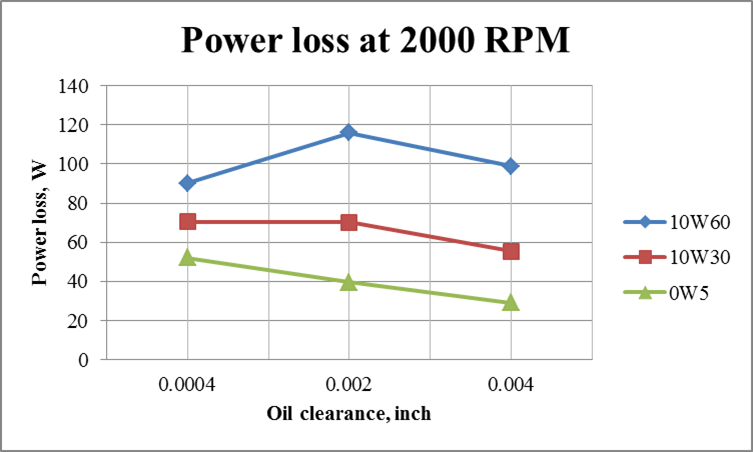
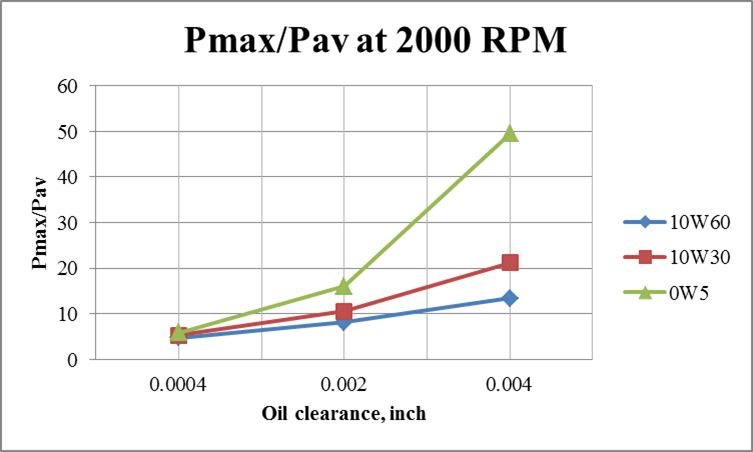
All this discussion about viscosity and break-in in the end have to do with oil thickness coating at various RPMs. Found this really technical paper online that relates oil film thickness, power loss, oil pressure to viscosity at differing rpms I haven't really digested it all, but it should inform this discussion. https://www.substech.com/dokuwiki/doku.php?id=effect_of_oil_viscosity_on_hydrodynamic_friction_of_engine_bearings
-
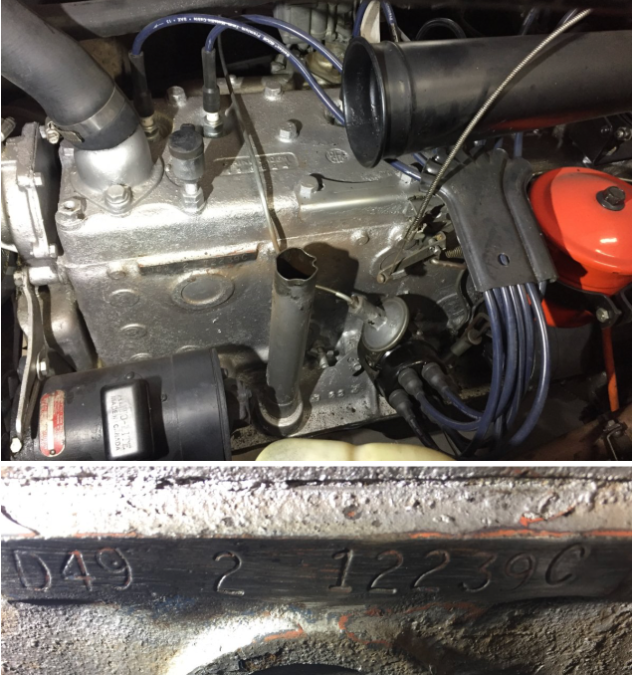
Should look like this https://www.jalopyjournal.com/forum/threads/canadian-dodge-d12-serial-engine.1075655/
-
Found this online - Improving bearing oiling by creating their own oiling channel
-
The D49 tells you what you need to know about the block and where it came from. - 1954 Dodge Kingsway export vehicle. That makes sense since you are out of Canada. https://en.m.wikipedia.org/wiki/Dodge_Kingsway https://www.t137.com/registry/help/otherengines/dengines.html I have a d42 in my own truck. I guess the original engine blew at some point and they drop in whatever is available .
-
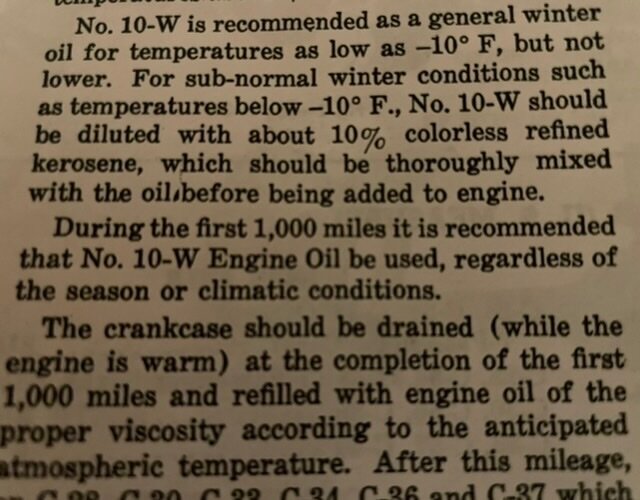
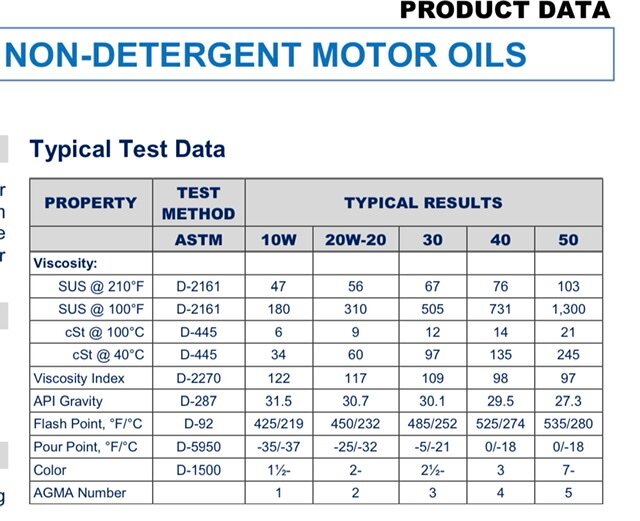
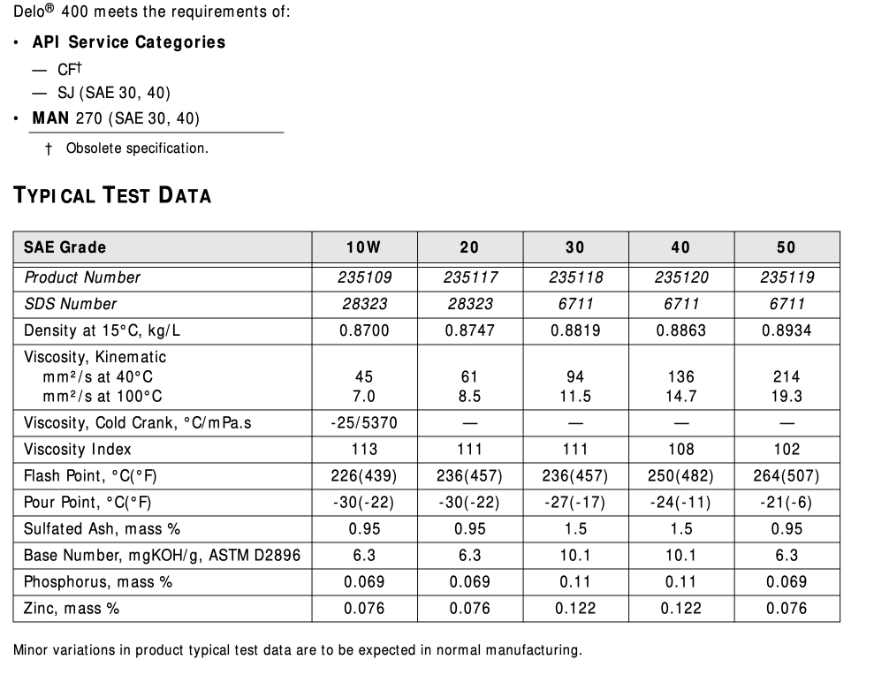
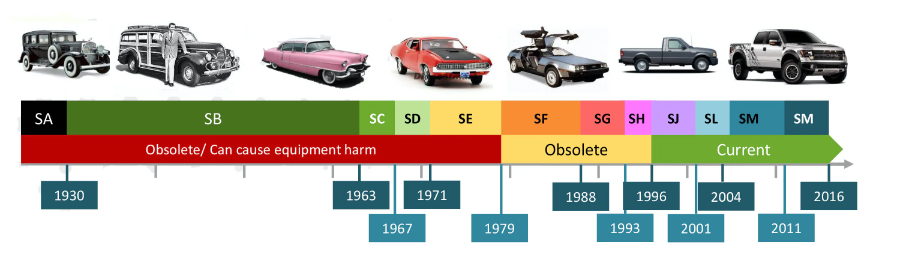
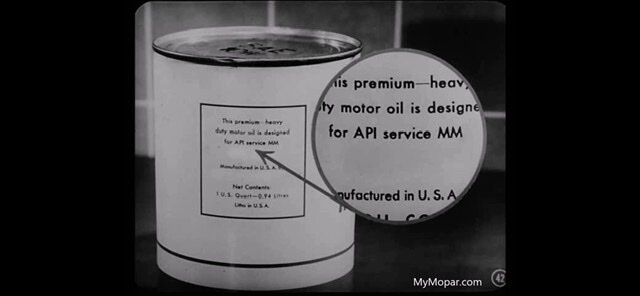
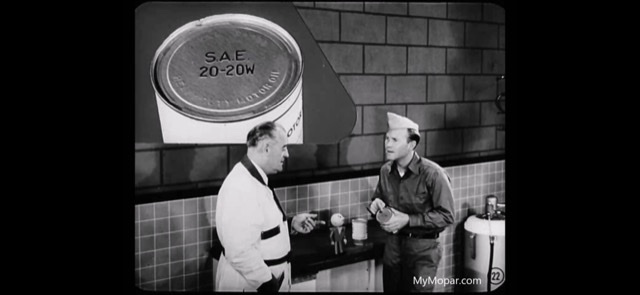
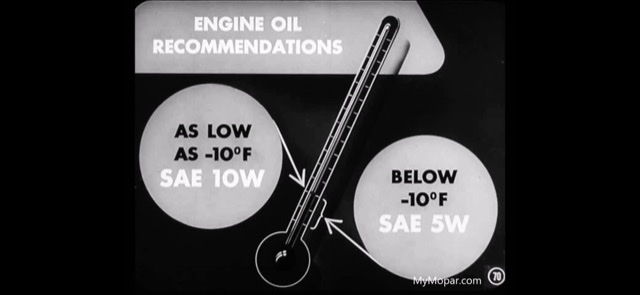
By the book (of Chrysler), this is the weight of oil to use the first 1000 miles: https://www.lubriplate.com/Products/Fluid/Motor-Oil-Series/NON-DET-MOTOR-OIL-10W/NON-DET-MOTOR-OIL-10W/NON-DET-M-O-SAE-10W,-12-1-QTS/ The video couches the statement that “sometimes” rings don’t seat and cause more than normal oil consumption. Seating properly requires wear and detergents prevent wear, thus they recommend no detergent ML oil to allow the wear. whether that is true anymore I don’t know. A lot of engines out there running detergent oil always. I still don’t understand what SAE 10-W oil is different from say a SAE 10. The tech specs indicate temperature range is key. seems it flows like a 10 all the time according to chart below. I have heard or read elsewhere that there are benefits of multi weight oils due to polymers coating bearings or something. If multigrade wasn’t there before mid 50s then how did they come up with 10w(-10) If you see excessive oil consumption after a 1000 miles, do as tech sez-> get an ML service. Here is a detergent 10-W . Notice it's SJ quality oil and not sure why it meets SAE 30,40 too. This is a bit confusing but if you want 10W oil, you can have single grade detergent 10-W of a 90's vintage quality oil suitable for slightly older engines. https://shop.sclubricants.com/delo-400-sae-10w A separate discussion from viscosity is API specification.
-
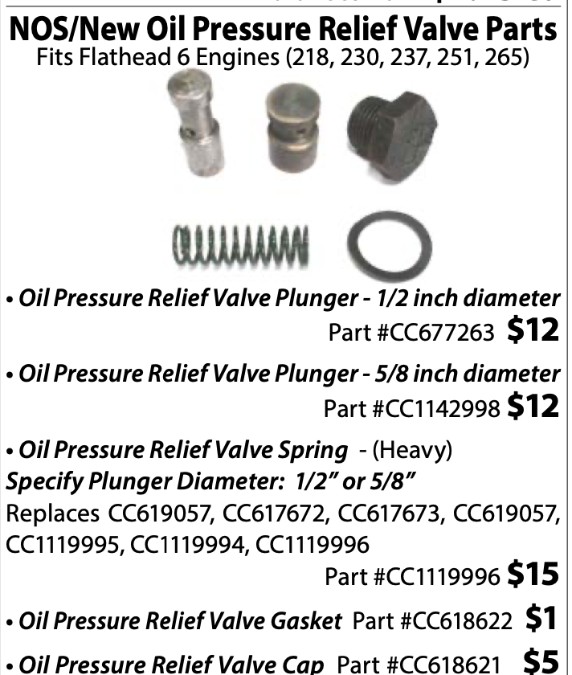
I called vintage power wagon, and they have them in stock for a reasonable price They claim the only difference is in valve diameter, and the springs are the same length regardless of 23" or 25" block.
-
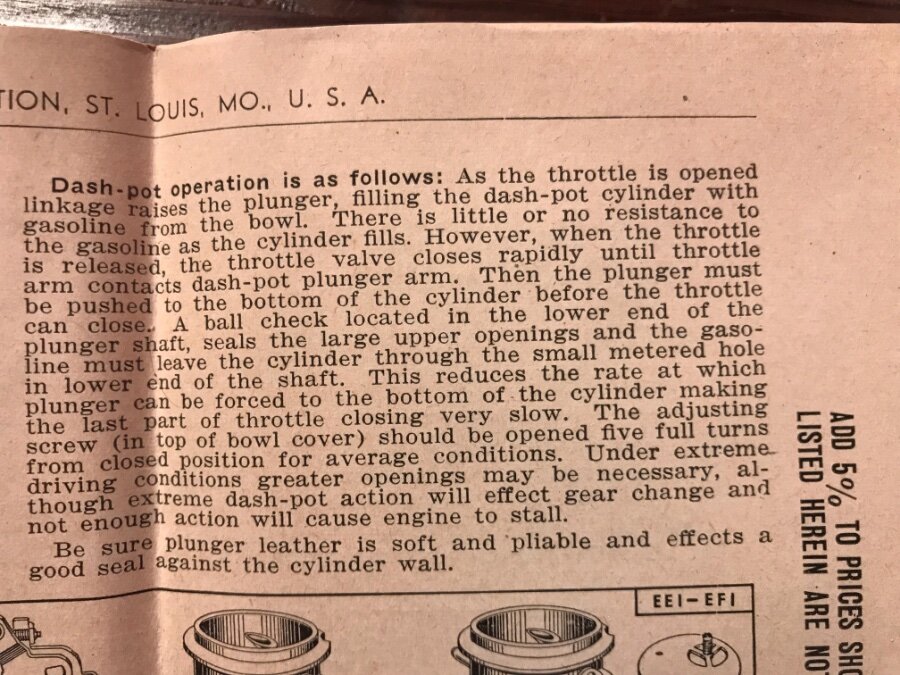
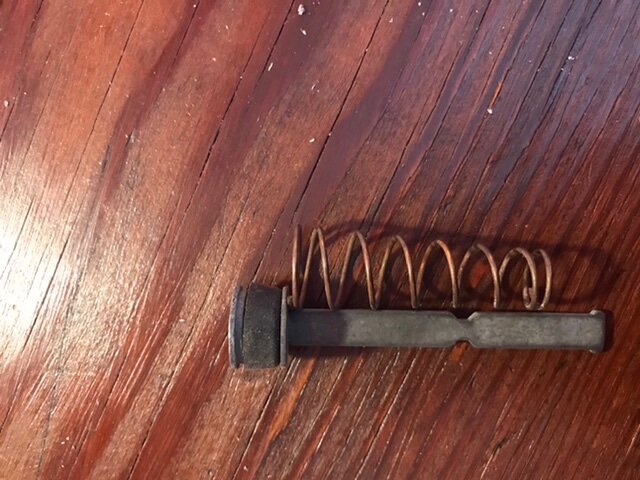
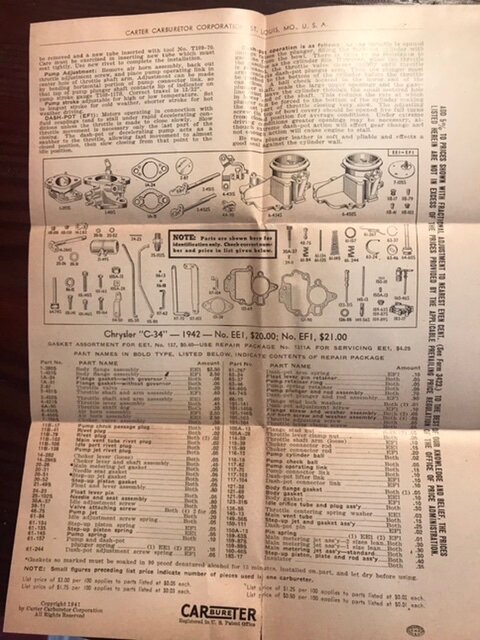
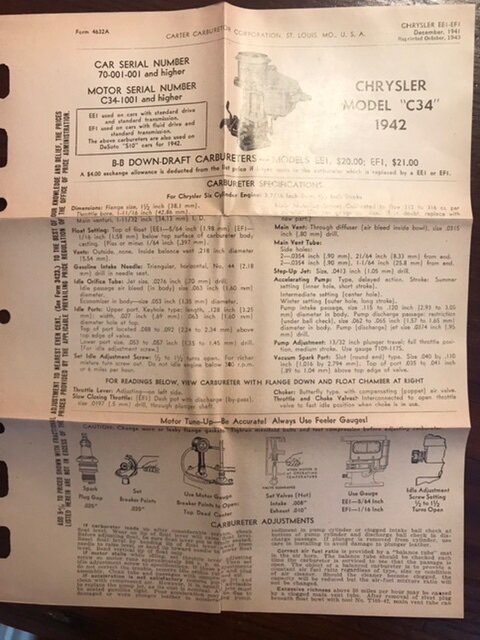
@Dodgeb4ya @harmony I have found the missing checkball. It's in the dashpot plunger. This is from the carburetor parts kit documentation on the C34: The plunger has a check ball at the bottom of it according to this doc.
-
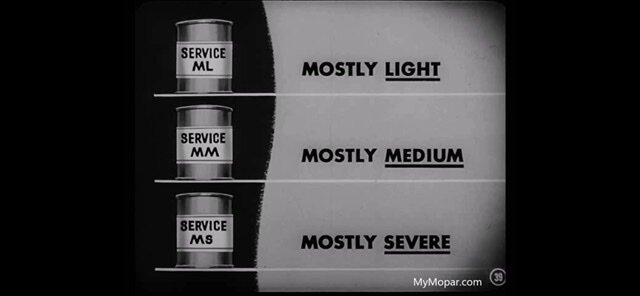
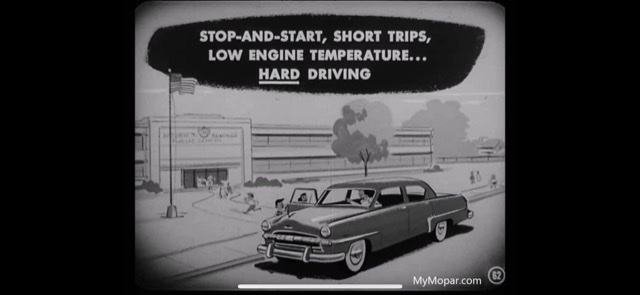
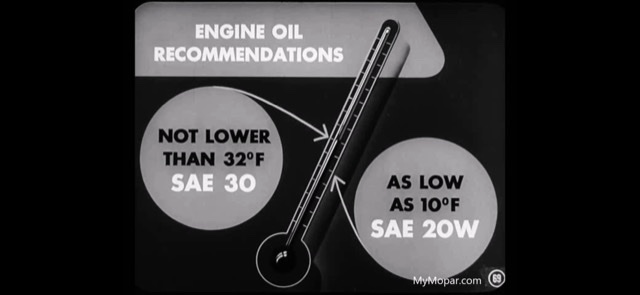
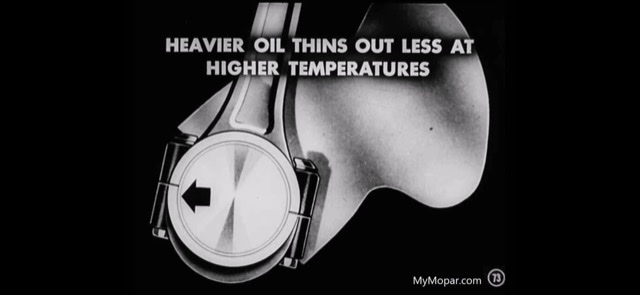
@Polsonator2 I haven’t seen that video before but it has really good info . For us it also makes a lot of impact since they primarily used the inline 6. more food for thought but basically he says a couple of key things: 1. Research over the past years has shown that heavier oils are better as long as they don’t affect cranking ability and thus recommend 30 SAE and 20W. 2. interesting how the ML MM and MS service reference has gone away. But was key to the driving and recommendations guidance. . 3. New engines use a straight 10W non detergent to help rings seat @keithb7 that may interest your new rebuild they recommend non detergent so rings will seat themselves Until the break-in period is over. 4. When they say 10W or 20W, does that mean it’s short form of 20-20W so viscosity is consistent across the temperature range?

-
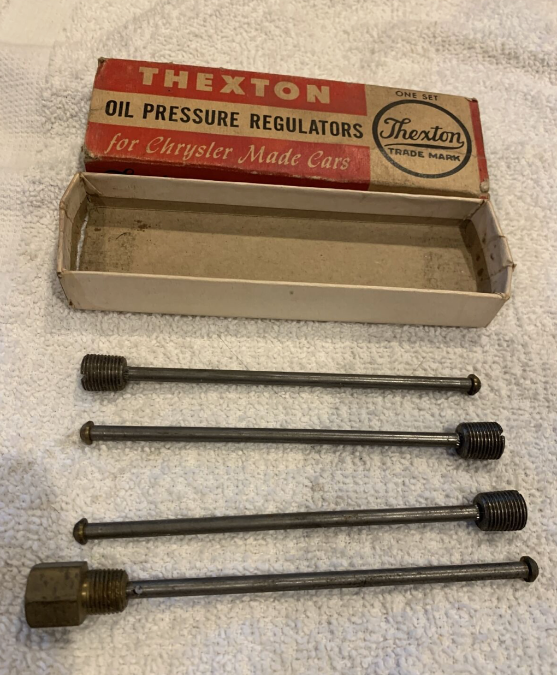
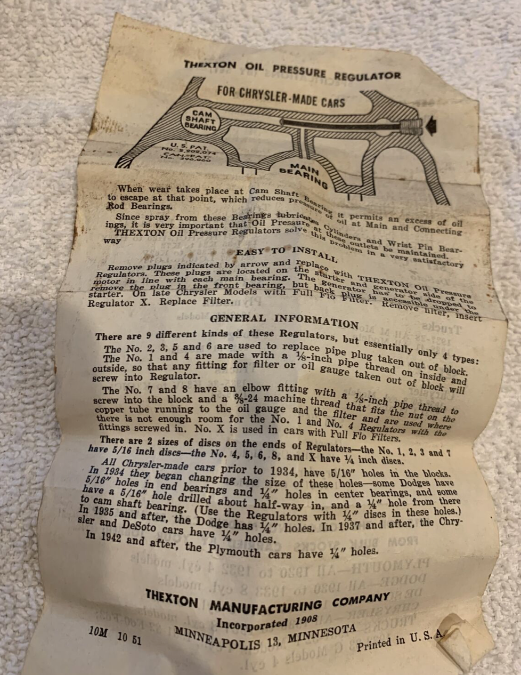
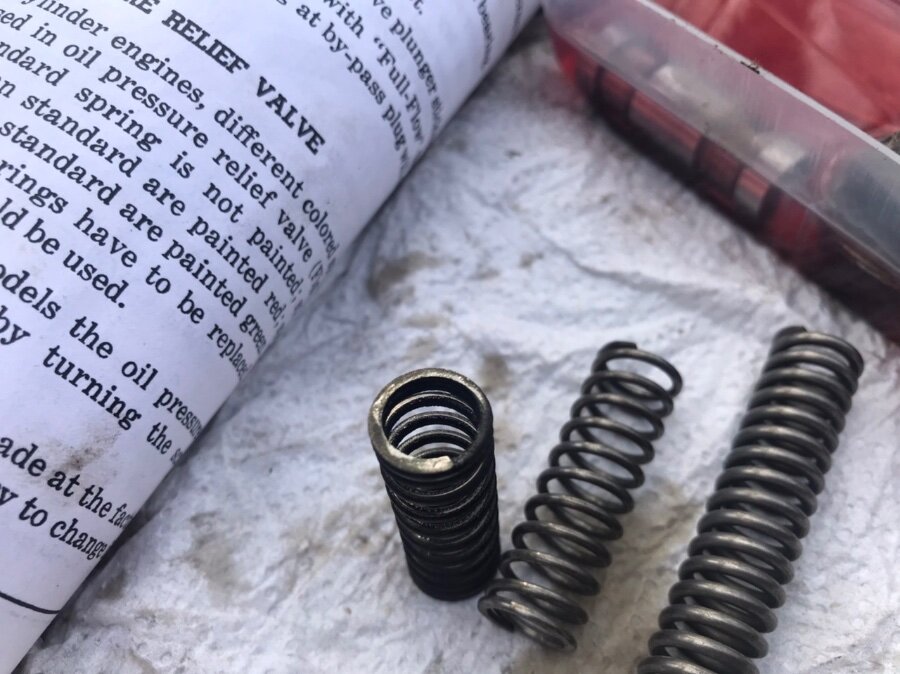
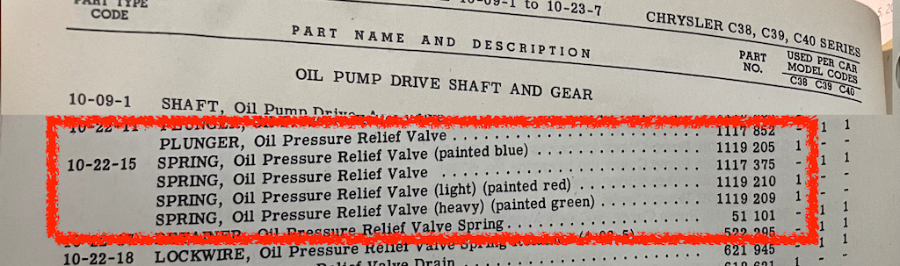
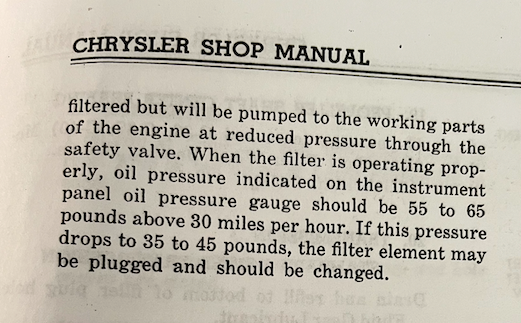
This full flow thread had me looking through the last parts manual - April 1949 edition of the C38/C39/C40 book at the oil pump, and I discovered something very interesting that gives nuance to my own question above regarding which spring to use: Short Answer: For C38 - only has blue, red, or green spring but NOT the plain spring -- So I should use the Green Spring... sigh, I have to open it up again and put the old green spring in. Also my oil pressure was always showing somewhere around 55 to 65. I thought that was high previously, but maybe that's normal for the C38 now. Problem . was it was ALWAYS 55 to 65 even below 30. I think with lower viscosity oil (5w-20) and the regular unpainted spring the pressure will be too low. The unpainted one is used in the L8. I'm going to put the green spring back in. This difference is probably related to the fluid drive oil pressure sensitivity.

-
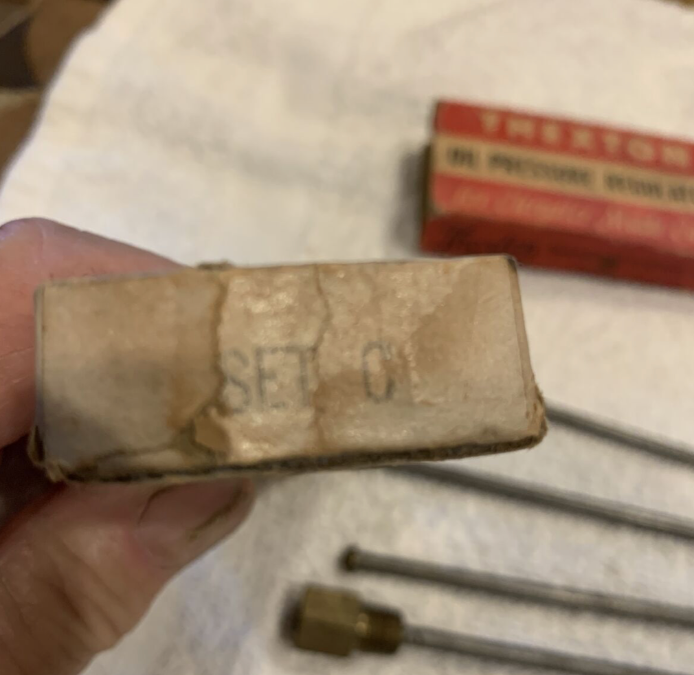
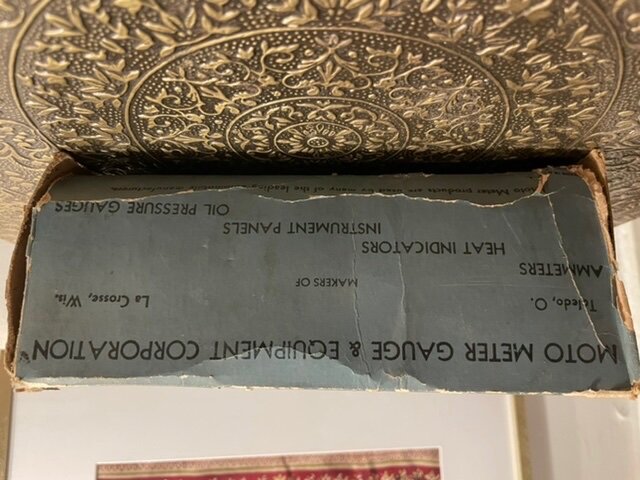
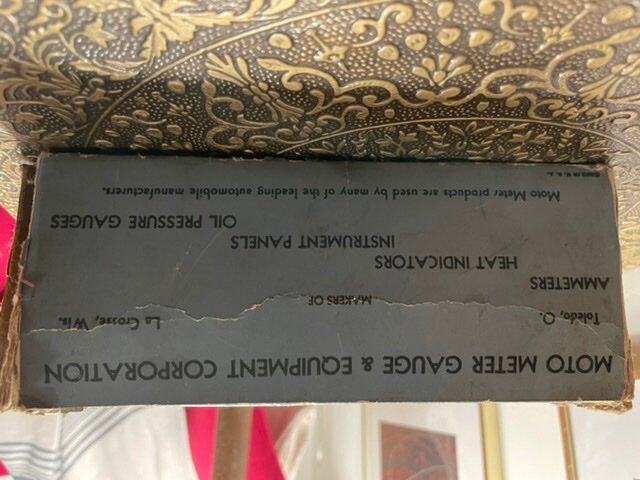
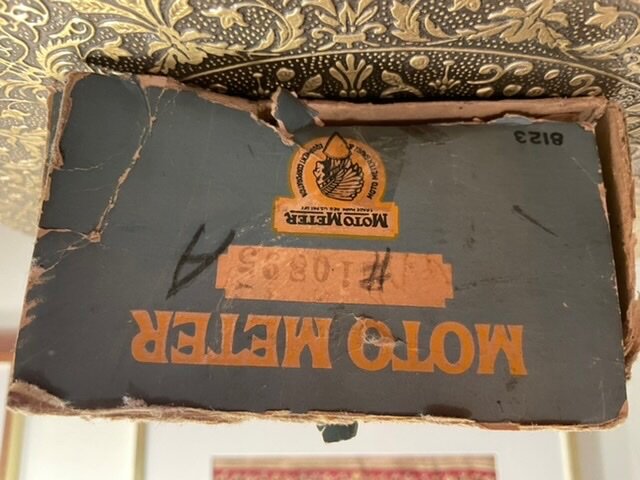
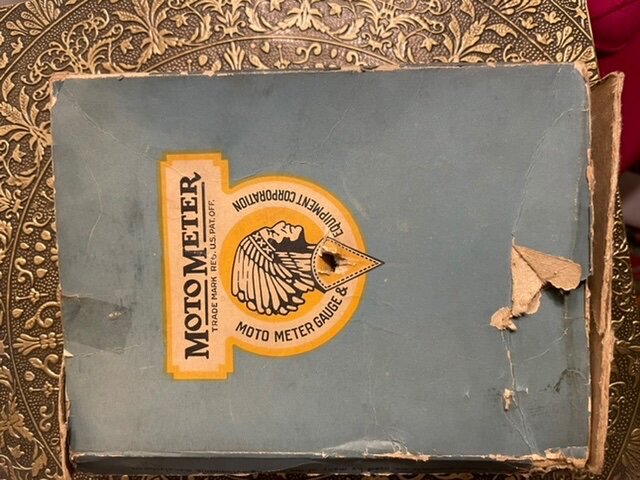
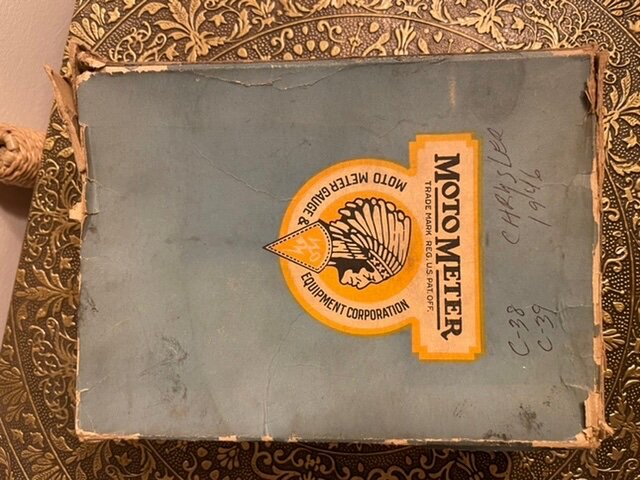
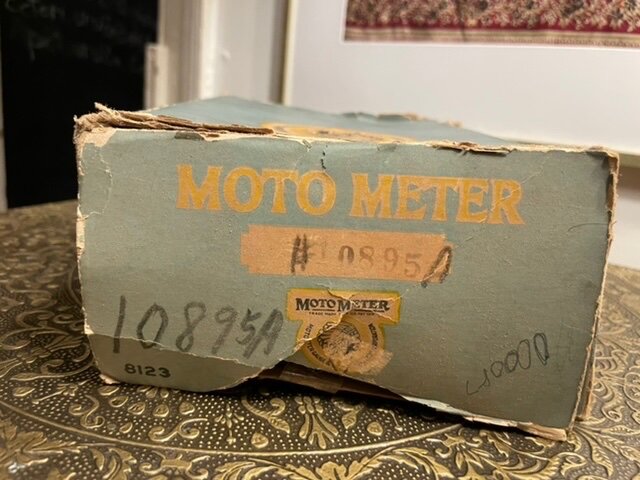
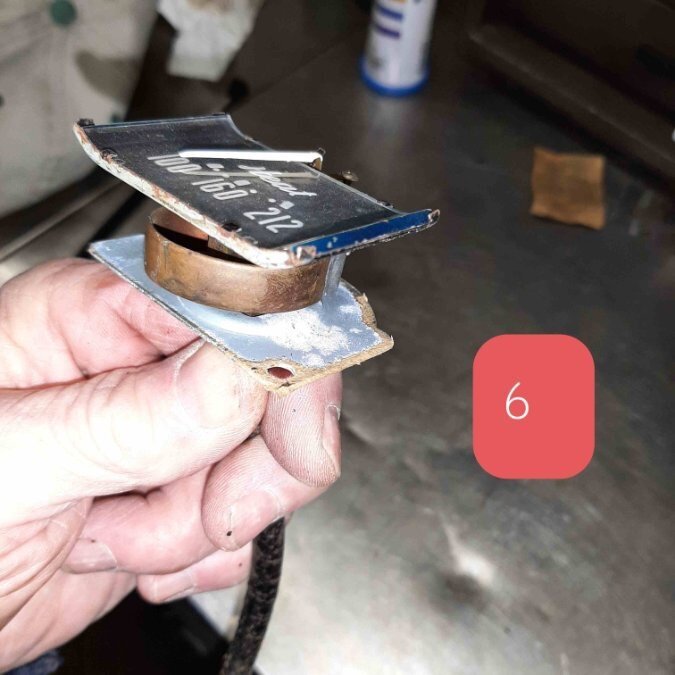
I have most definitely torn that gasket . That is a missing step to replace the gasket . New one didn’t come with it , but I should have made one at least out of gasket in a tube. Here is the original box for this gauge
-
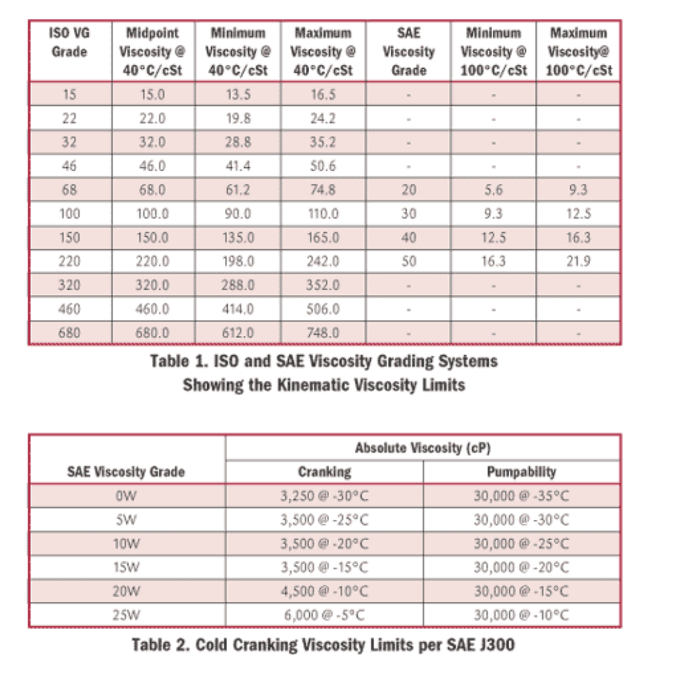
Viscosity in the chart above is measured in Centistokes (mm^2/s). Effectively, how long it takes for a liquid to flow at a particular temperature (100 C in SAE). https://www.machinerylubrication.com/Read/411/oil-viscosity Because the flow-rate is governed by resistance of the oil flowing under gravity through the capillary tube, this test actually measures an oil’s kinematic viscosity. The viscosity is typically reported in centistokes (cSt), equivalent to mm2/s in SI units, and is calculated from the time it takes oil to flow from the starting point to the stopping point using a calibration constant supplied for each tube. Stating an oil’s viscosity is meaningless unless the temperature at which the viscosity was measured is defined. Typically, the viscosity is reported at one of two temperatures, either 40°C (100°F) or 100°C (212°F). For most industrial oils, it is common to measure kinematic viscosity at 40°C because this is the basis for the ISO viscosity grading system (ISO 3448). Likewise, most engine oils are typically measured at 100°C because the SAE engine oil classification system (SAE J300) is referenced to the kinematic viscosity at 100°C (Table 1). Additionally, 100°C reduces the rise of measurement interference for engine oil soot contamination.
-
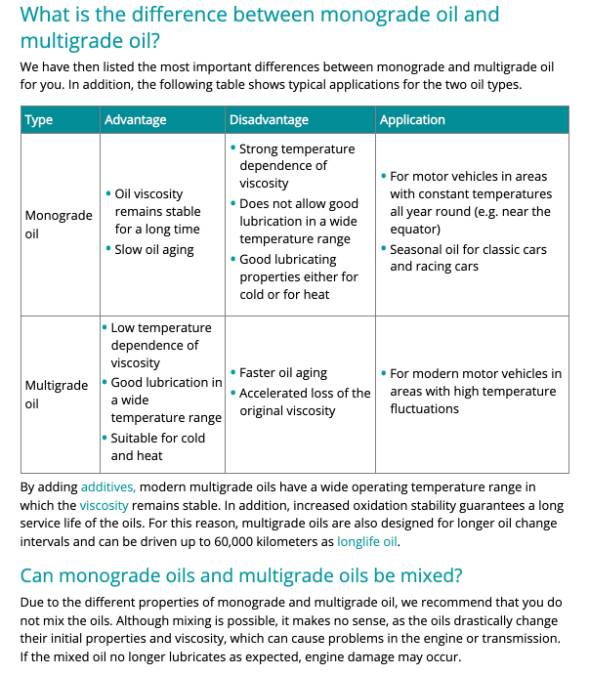
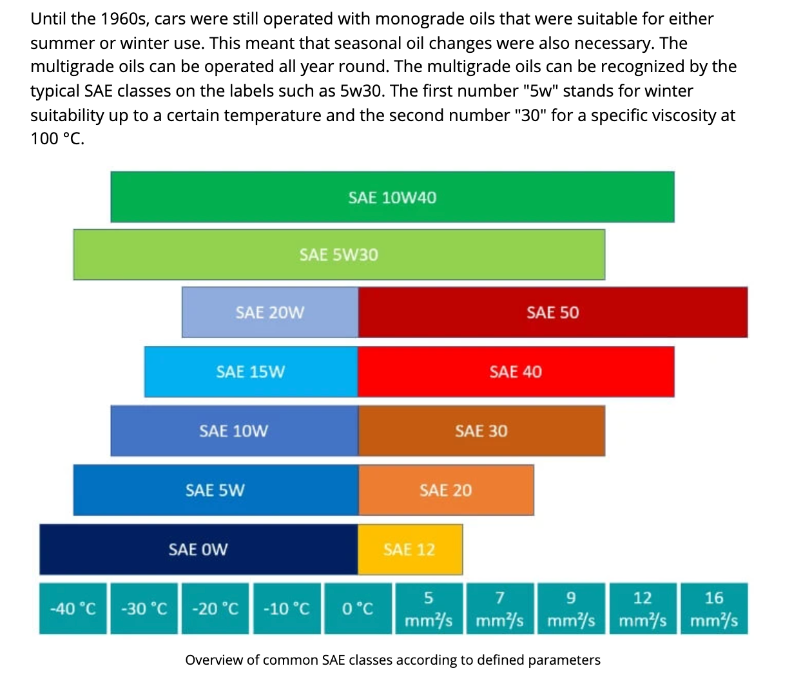
I must admit my understanding of the multigrade weights and it's impact isn't as technically deep as I would like, but it's improving. What's key to this discussion is also that the multi-grade oil changes behavior at certain temperatures which our engines in theory shouldn't get to -- 100 C/212 F, and some, depending on the climate get to during winter time. Seems to me according to the below document - a 5w20 would be most appropriate per the manual for the engine given the climates we generally operate in, and drive our antique vehicles, and that most are garaged. 5w is probably close to what you get when mixing kerosene in 10w to thin it out a bit. A single weight 10w for the transmission makes all the more sense given its significantly lower oil viscosity necessary for the valves and check balls to properly flow when changing gears. Makes all the more sense. @Sniper Reading this again, a 20w50 makes little sense now, and my next oil change will likely be 5w20. https://addinol.de/en/products/lubricants-for-the-automotive-sector/engine-oil/multigrade-oil/
-
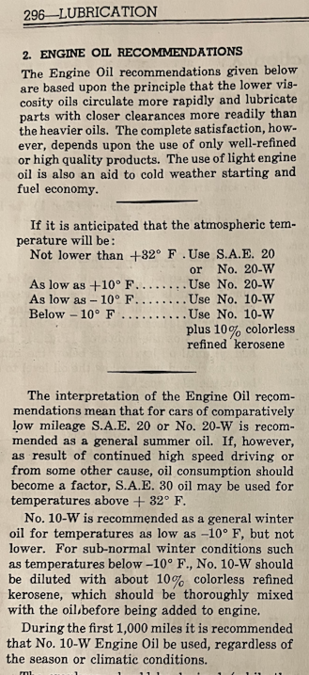
Chrysler Service manual - C38 - p296 I haven't seen 20w-40 so I went with 20w-50.
-
Maybe I missed something here, but the manual calls for 20W oil, and only under high speed driving/high oil consumption use 30W. I've been running 20w-50 generally though I guess now I'm about to change the oil anyway, I may go for a lighter weight. I'm putting straight 10w non-detergent in the trans, but sounds like 10w-30 should be sufficient. I find it amazing that there are any engines out there that are still running non-detergent because of historical oil/sludge build up. Here in North Carolina, probably could do 10w straight year round though I'd be curious about those up in the colder climates have ever tried diluting their oil with kerosene (per the manual).
-
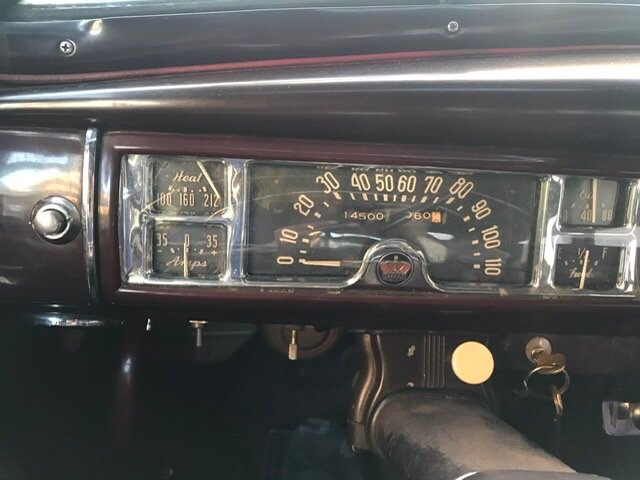
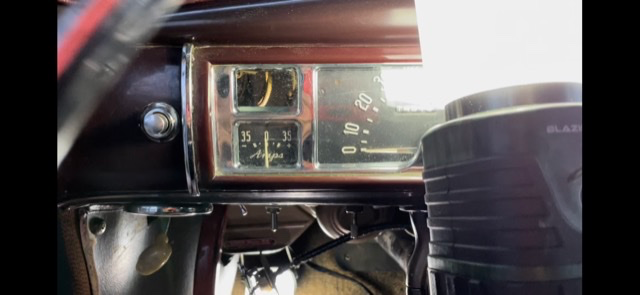
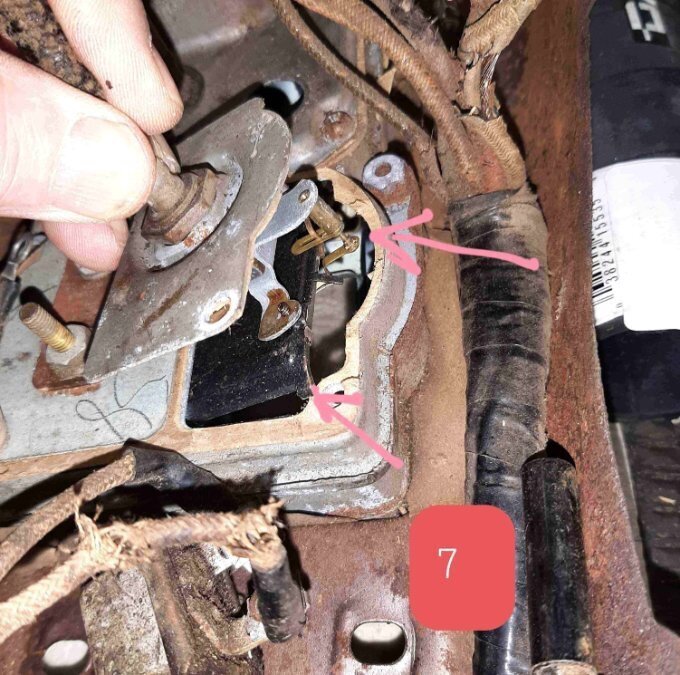
Successful gauge replacement with a few tricks: 1. Make sure the turn and ammeter wires are out of the way to the right of the gauge opening here; the sides of the gauge will cut the sheathing, and the wires will block proper placement route the gauge wire cable ABOVE the steering column through the wires and out the firewall . firewall keeper and grommet remove from engine bay and pry out gently. 2. Slide the bottom of the gauge (glass up) almost flat so you can get around the corners. It will go halfway up. 3. From behind the dash, the copper spring needs to be gently lifted up (use the cable only) and over the lip to get it solidly in. It’s the reverse of ate 4 above. 4. The tricky part is getting the two screws back in. get a suitable sized flathead and balance the screw on the end. The head fits snuggly so should be able to stand. A magnet screw driver would help here. basically push the screw through the upper right corner and adjust it around until you feel the screw drop into the slot. yes the screw falls off a few times …. notes: good thing I’m replacing the wiring from alternator and solenoid. Cause my old wiring stripped. also annoying is the cigar lighter and battery wire are on the same terminal needing separating or replacement…

-
Why not just put a volt meter across the battery terminals and see how much voltage when you fire it up. If it's 12v system, then you should get about 14 volts when running. If it's 6 volts, you would likely be shorting things out pretty quickly especially your radio. There should be some telltale signs of voltage reducers for the stock gauges, and the distributor should be likely a newer type (no points likely).
-
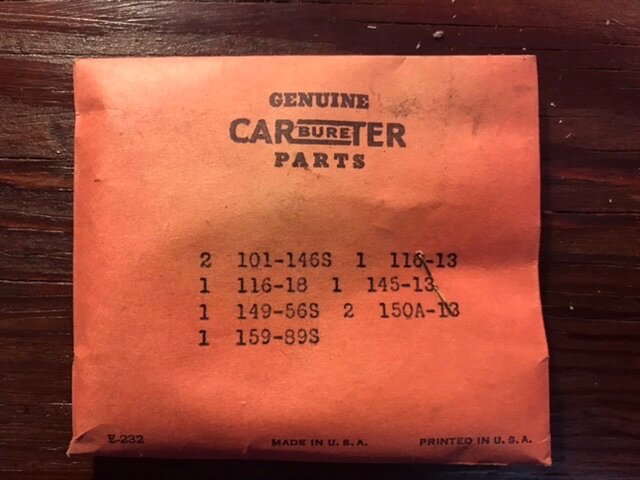
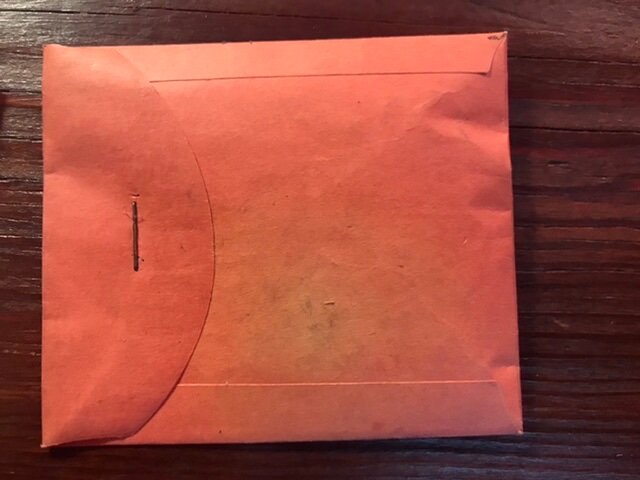
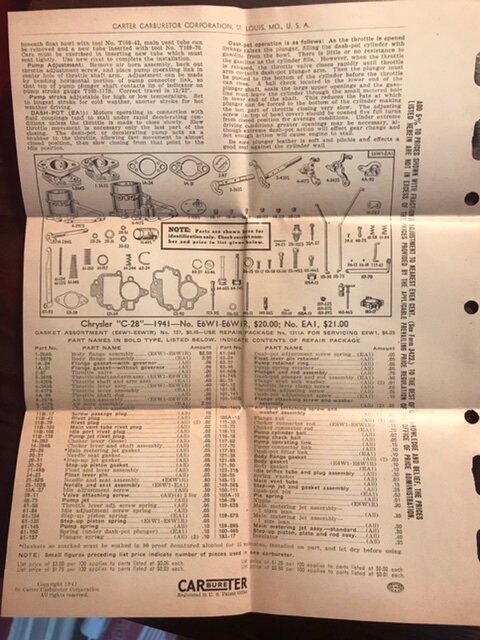
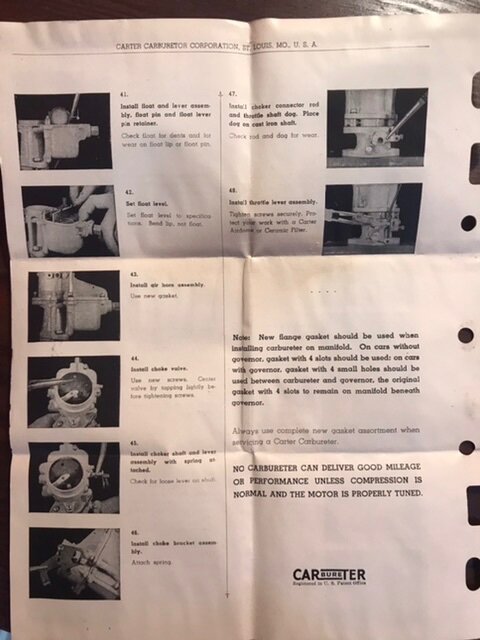
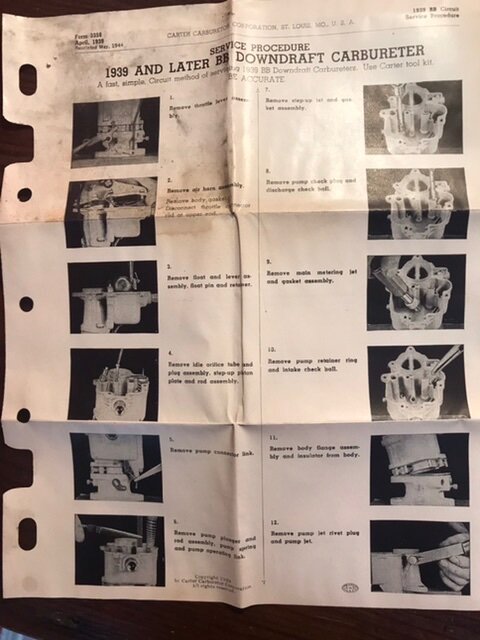
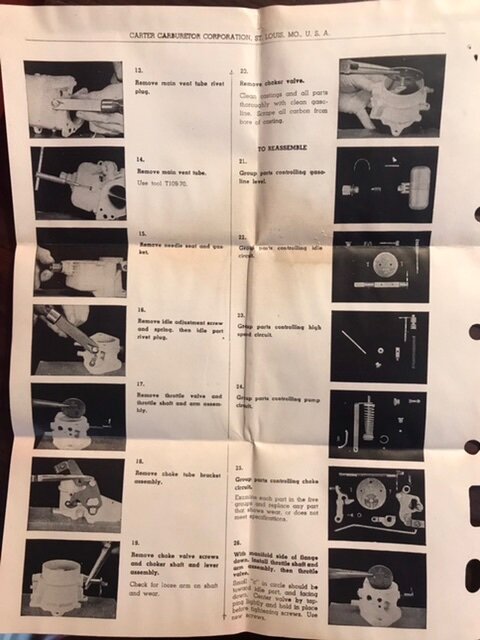
The Carter carburetor kit came! You have to be amazed at how such a kit has survived for almost 80 years without being opened . This particular kit was made in at least may of 1944 (reprint dates on sheets) It contains so many goodies such as the original tuneup sheets for c28/c34 carbs , as well as the original carburetor rebuild sheet that’s available in the downloads section here. I think the kit was used for the needle seat since only the male-to-male seat remains and only one shows in the inventory. The packets are unopened! Of note for this topic, the pump spring is much shorter than the length of the accelerator pump itself meaning there is a bit of travel there. I’ll put up high resolution clean scans of what I have that is not duplicate. I feel like not opening the packets though I’m tempted! It’s a bit of history! You have to wonder what motivated people to keep all this NOS stuff around for so many years. No business plan can account for COGS recouped 80 years later Or even 20 years later. That means it changed hands over and over . A lot of times of it wa sour stuff it would degrade in some corner and be thrown away ! It’s a miracle really that sooo much NOS stuff from our era of favorite vehicles remains . L


-
what fluid for transmission with a fluid drive?
wagoneer replied to harmony's topic in P15-D24 Forum
The transmission is a gear box , not a combustion engine , and primarily lubricates gears and flows through the hydraulic chambers. As far as the m5/m6 is concerned, viscosity is the primary mechanism for action in the trans. Probably being gear fluid also prevents break down and foaming or churn of the oil better than normal motor oil. A hypothesis would be that’s 75w single grade gear oil may be as good as 10w but also not since the 75w gear oil also matches up to higher viscosity motor oils. -
what fluid for transmission with a fluid drive?
wagoneer replied to harmony's topic in P15-D24 Forum
@James_Douglas are you suggesting that a 75W gear oil would work just as well in the m5 trans as a single weight 10w? -
what fluid for transmission with a fluid drive?
wagoneer replied to harmony's topic in P15-D24 Forum
I'm going to try this lubriplate non-detergent 10W in my transmission. I found a really good source that sells that individually, at a good price (almost as much per unit as would be if you buy the case of 12). Applied Industries. https://www.applied.com/c-brands/c-lubriplate/l0804-054/Motor-Oil/p/102105095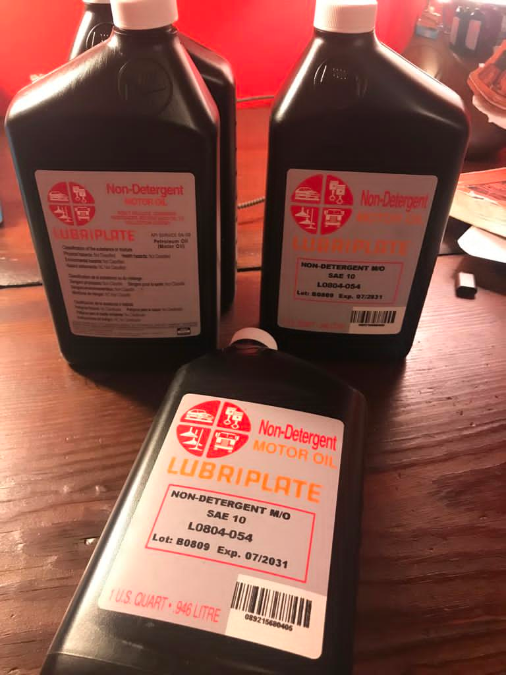
-
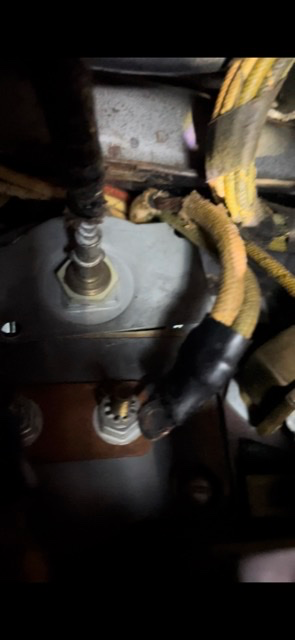
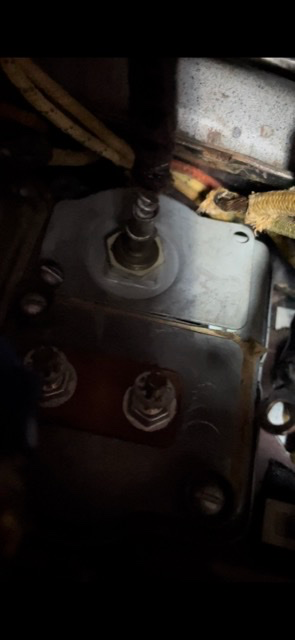
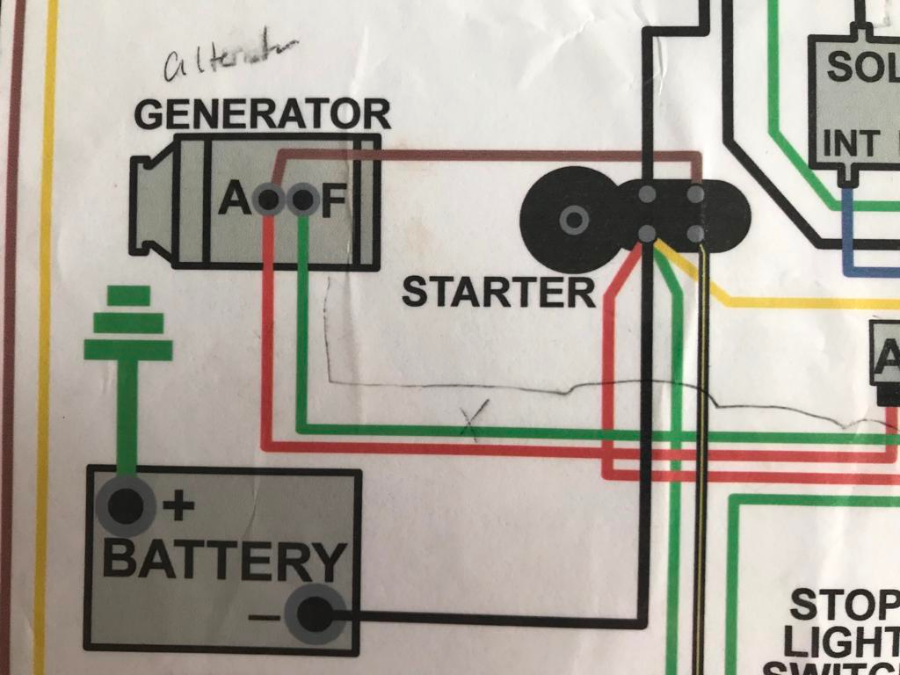
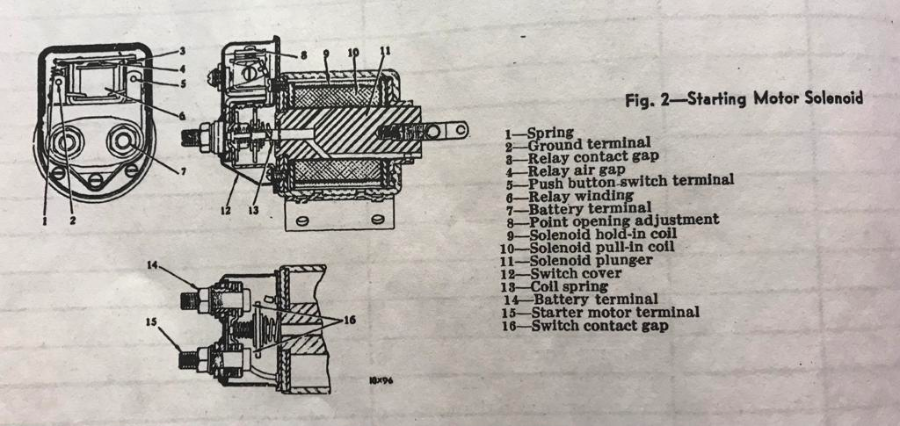
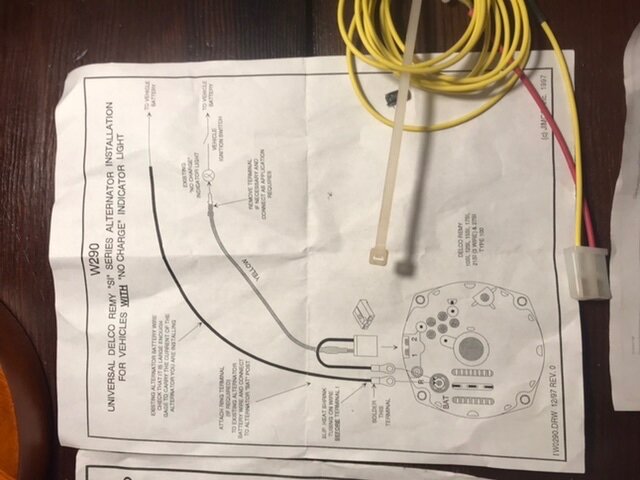
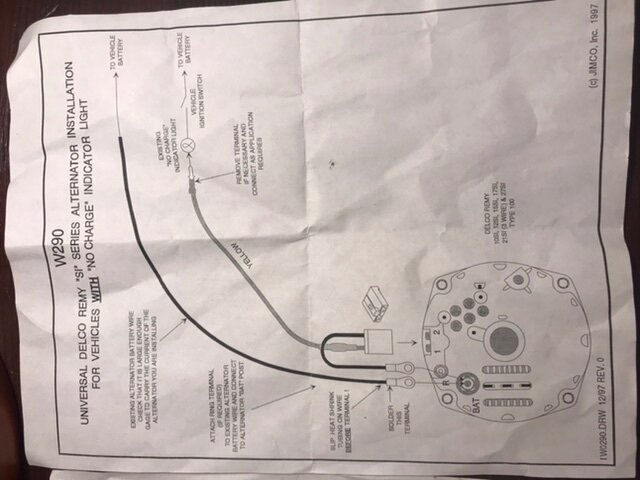
For the Chrysler/Desoto 46-48, there is ground wire connection between the top left solenoid connection and the armature terminal on the generator [ Brown wire from starter to generator A terminal ] . In converting to the Alternator, there is no A terminal. It doesn't seem appropriate to connect it to the battery terminal on the alternator. Note the dodge/plymouth circuits do not have this connection. What have others done for this connection? Would it be sufficient to ground it to the block, or any other ground? Also, the battery connects to 15- starter motor terminal, but what is supposed to connect to 14- battery terminal nominally? (The wiring diagram shows a connection to the automatic choke. Is it meant as an open power source to tap into then for any devices in the bay?
-
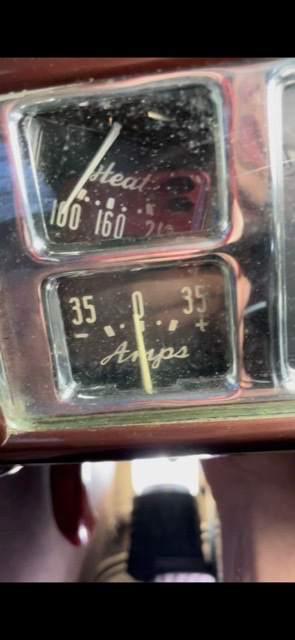
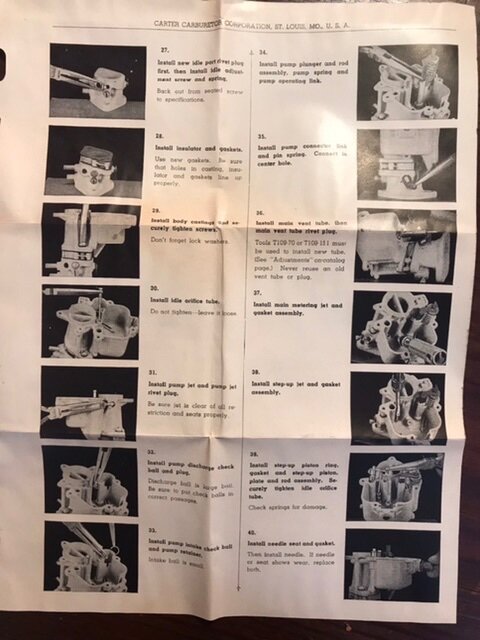
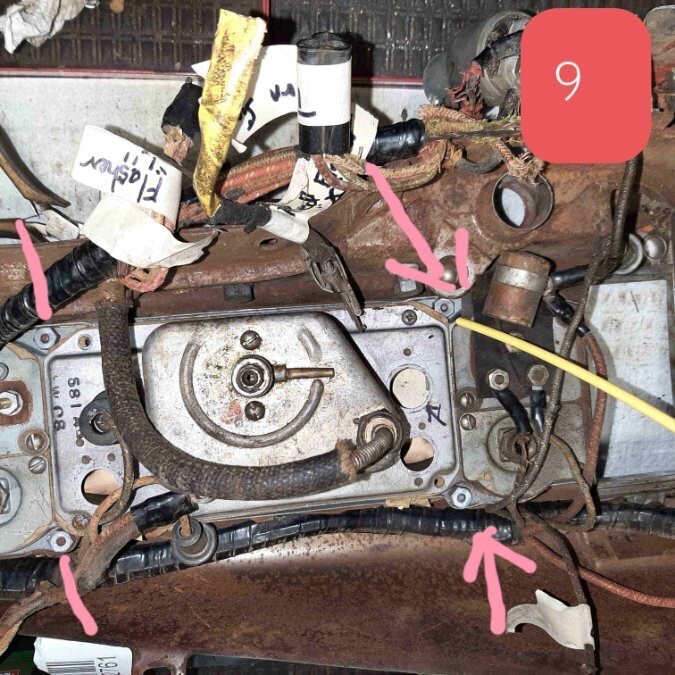
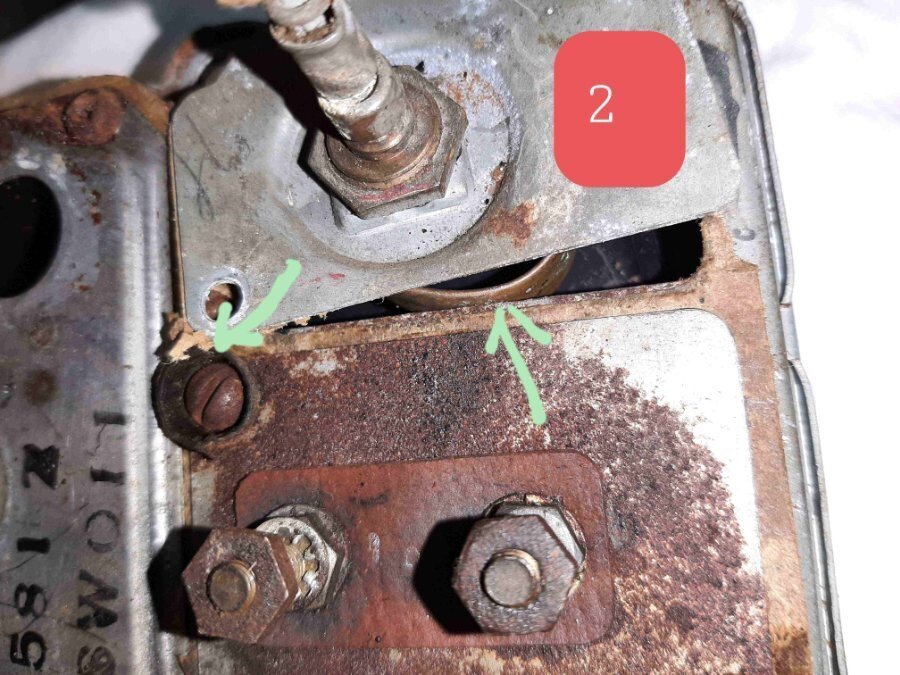
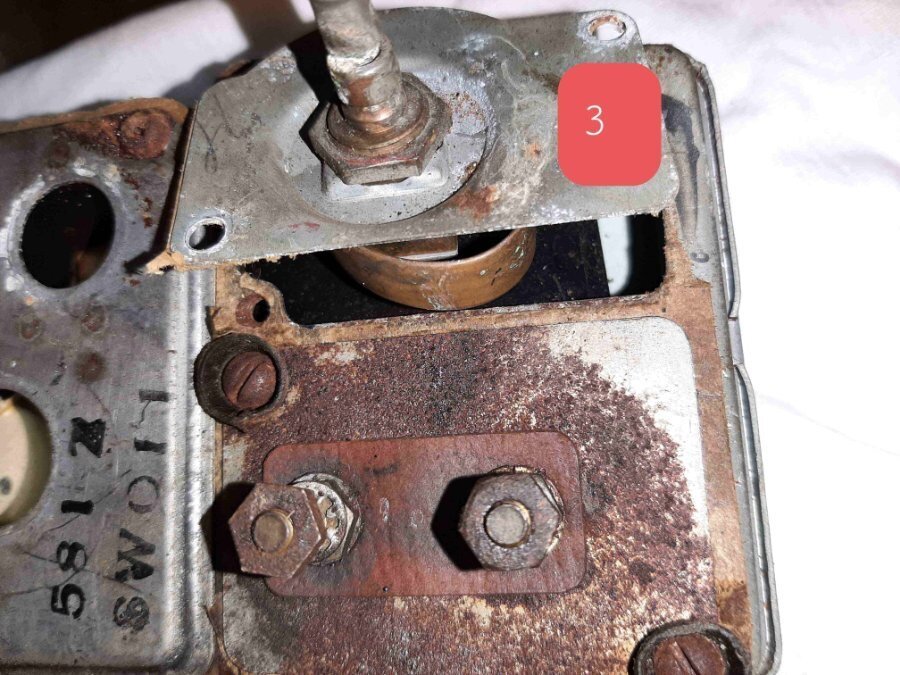
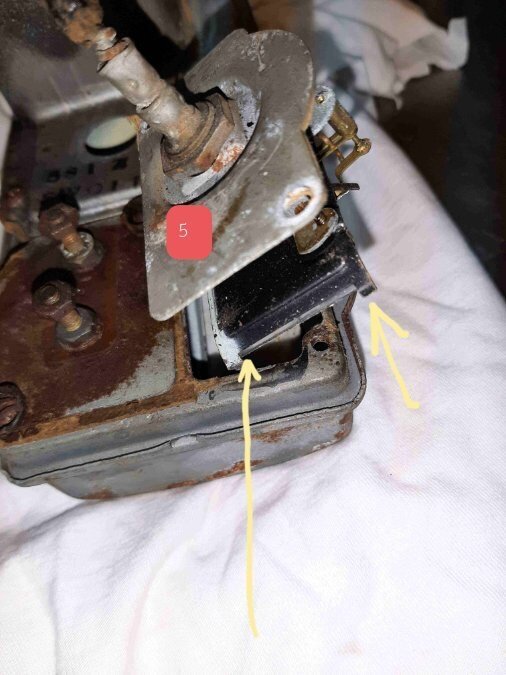
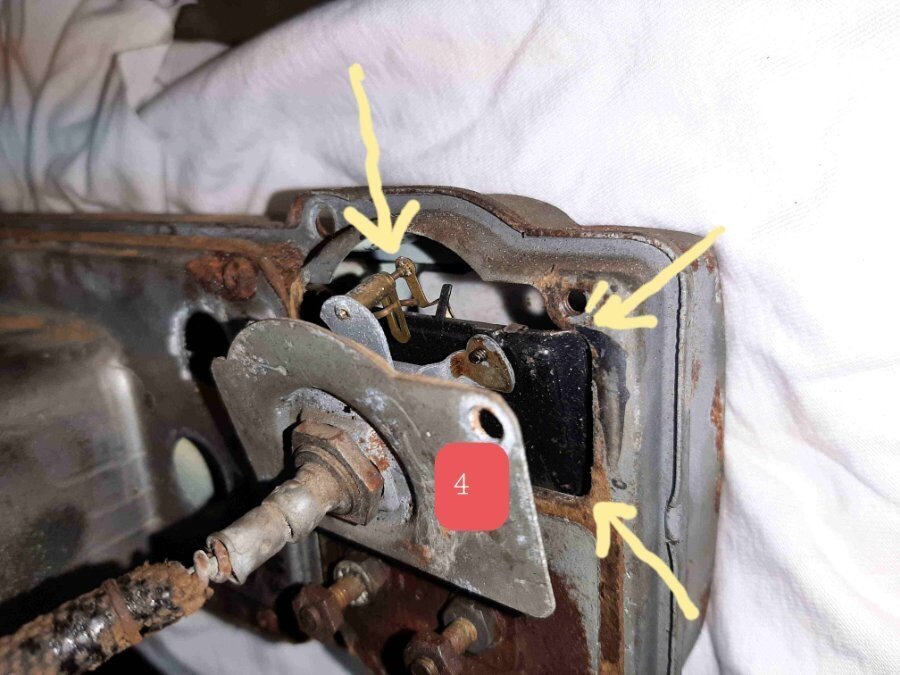
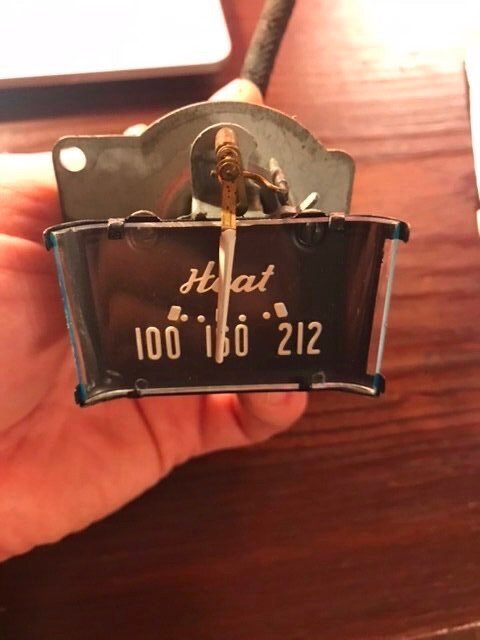
Thanks to @Dodgeb4ya for the excellent answer - I was able to successfully remove it in less than a minute. The secret is that when you pull out the gauge, the first bit slides down to allow for the top to tip out backwards. Below are the instructions I received: 1. Unscrew the gauge...carefully fully break it free from the gasket under it. 2. Start by lifting the bottom of gauge outward and slightly up... 3. #2 pic....you will see the bourdon flat wide tube..that needs to be slightly lifted up and just out of the cluster case and the drop guage down slightly.. 4. #3 pic...now you can tilt the top of the gauge carefully outward being careful not to hit the needle pivot at the top..see arrows for tabs and things you need to watch out for.... 5. Tilting the guage outward at the top then pulling it out will remove it. 6. The armored capillary tube needs to be loose through the firewall to let the guage come out freely.. Just take your time..be gentle and look at the pics for interference items. And the result: One stuck gauge
-
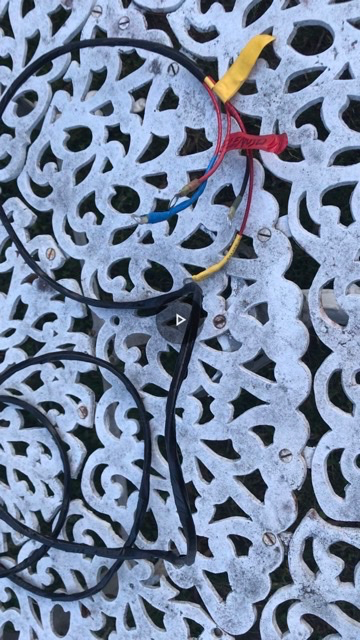
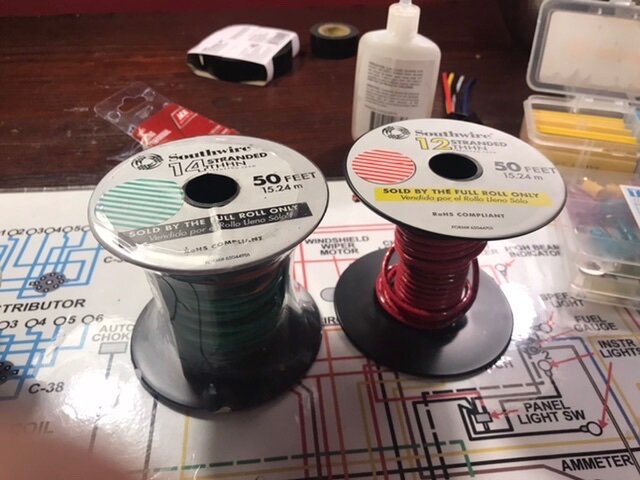
For the 60 amp alternator, you need a minimum of 9 gauge (with low tolerance for wire failure). This is exactly what I got. I decided to upgrade my wiring, and build harnesses myself one system at a time. I decided to avoid the gauge mess for the most part and go with 8 gauge for the main hot circuits ( alternator -> ammeter, solenoid -> ammeter ), 12 gauge for the fluid drive system, and ground/solenoid +/-. I also added a ground wire into my harness to better ground the transmission to the engine circuits. im considering wiring my alternator directly to the ammeter and bypassing the external voltage regulator B terminal altogether I decided to simplify - I'm using high quality oil/gas resistant wiring, but of a single color or few colors. I bought extreme weather electrical tape, and multi color tape. I'm color coding based on electrical tape and labels, as most of the wire is anyway covered in black tape. I basically am sticking to 8 and 12 gauge for most everything inside the engine bay, and 14 gauge for everything inside the cabin. 8 Gauge if it touches the solenoid (horn). I'm documenting my harness system by system, and I'll publish for the group so they can make it themselves. I'm creating the harnesses as I see fit and what makes sense, rather than necessarily original. I'm also replacing whole wires at a time for the most part, and keeping some of the old that looks pretty good. Here's what I made so far. Connection Harness Name color Tracer and color gauge Length source connector type destination terminal type terminal size ET1 engine trans relay yellow 12 3ft Transmission Relay - TH ring Carburator - kickdown switch fork ET2 engine trans relay red 12 3ft Transmission Relay - SOL ring Carburetor - Anti-Stall bullet ET3 engine trans relay black 12 2ft Transmission Relay - PRI ring Ignition Coil - Positive + ring 1/4 ET4 engine trans relay green 12 2ft Transmission Relay - BAT ring Ignition Coil - Negative - ring 1/4 ET5 engine trans relay black 12 2ft Transmission Relay - Ground ring block (near coil) ring T1 transmission relay yellow 12 10ft Transmission Relay - TH ring Transmission - Governor ring 1/4 T2 transmission relay red 12 10ft Transmission Relay - SOL ring Transmission - Solenoid ring 1/4 T3 transmission relay blue 12 10ft Transmission Relay - INT ring Transmission - Interruptor ring 1/4 T4 transmission relay black 12 10ft Transmission Relay - Ground ring Transmission - case ground A1 Alternator Starter Solenoid Red 8 Alternator Ammeter A2 Alternator Starter Solenoid Red 8 Starter Solenoid - Bottom Right ring Ammeter ring

-
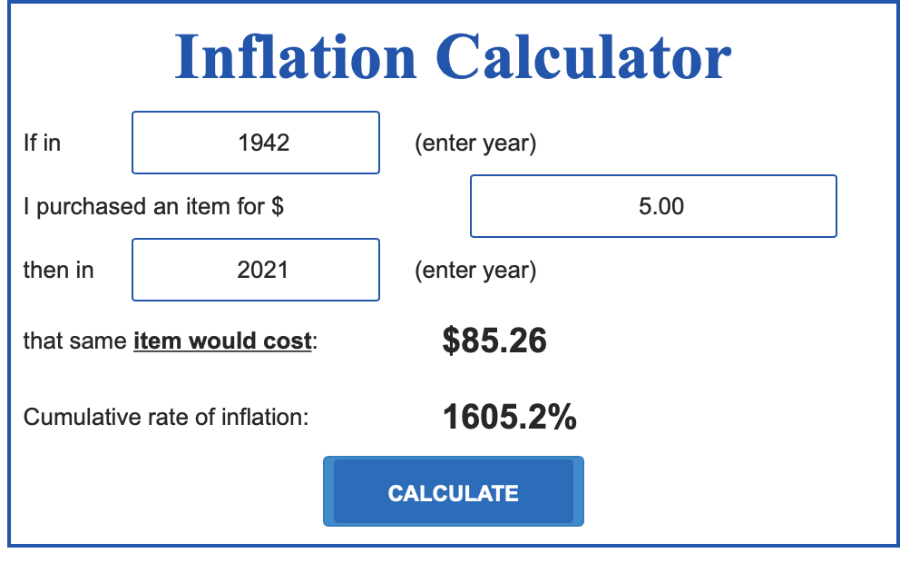
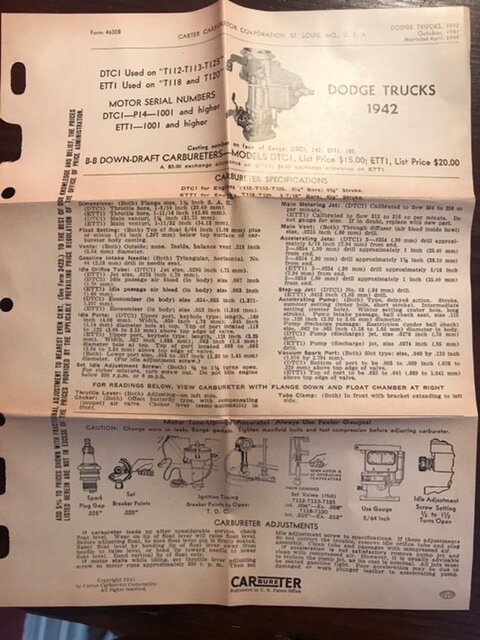
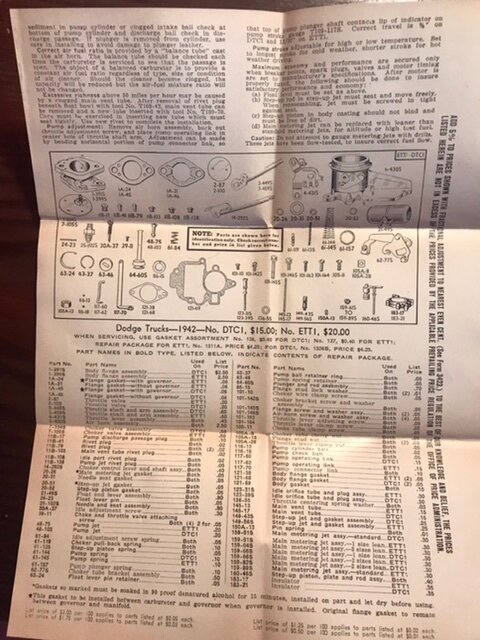
Look what I just found on eBay -- A 1943 Carter repair parts package loaded with all the goodies - original and looks unopened. New everything - check balls, main vent tube, rivets... In 2021 dollars, that $5 is $85 I guess I'm getting it for a steal for $40.... https://www.ebay.com/itm/143233343475