


Loren
-
Posts
820 -
Joined
-
Last visited
-
Days Won
16
9 Followers


-
 I follow eBay great regularity for certain things. Today I spied an Overdrive for sale. From the photos I see it is missing the solenoid. The buy it now price is $695 plus freight. I prefer to “rebuild” my own so I am not interested in it. However, for a rebuilt Overdrive that price is reasonable. To find it simply search for Plymouth Overdrive.
 -
As James says it's on the pad below the fill plug. Not all look like this in size or location

-
For the supply to the relay, for the relay to the solenoid use 10 gauge ( post #4 ) For everything else you can use 14 gauge. There is a notation in the manual that from the Governor to the lockout switch is 10 gauge but that makes no sense as the wire on the other side of the switch is 14 ( the manual says 16 but 14 is more common in automotive use ) I go so far as to color code them from the manual.
-
If your governor is iffy, you might consider a nos replacement. The Studebaker was the most prolific user and if you look on eBay you can find them for around $125 or less. They are made with old technology ( breaker points ) which can get dust in them ( which turns to glass when heated by opening and closing ) and they need to be cleaned every half century or so. lol
-
1949 Plymouth 3 passenger Coupe rear window gasket replacement
Loren replied to Loren's topic in P15-D24 Forum
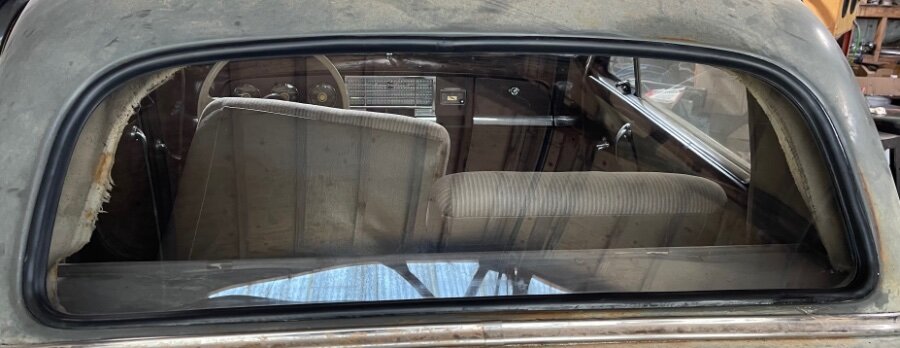
An update: I just finished doing the windshield. That is a two person job even with the suction cup tools. Not hard just takes too many hands. If the car is a Deluxe it goes in from the inside, unlike the Special Deluxe models with the chrome trim. My final thoughts on the matter are the Steele rubber gaskets are very expensive but they work! If you buy a car look at window gaskets very carefully and factor in the cost of replacing 75+ year old window gaskets. You’ll have about $550 in parts solvent & sealer, $80 in tools and $175 in flat glass. If changing gaskets is not in your budget right now you can buy a box of 3M strip caulk to fill and seal any gaps for about $35. Just remember you have to clean any stickum you use now off the window and the body when you change the gasket later. -
The Plymouth club president Russell Nardi, who makes the T-5 adaptor has an axle mounted disc parking brake available now. He has blitzed facebook with ads for it, so I am surprised no one has mentioned it before. While I don’t like the T-5 ( if you have to have one, his adapter is very good ) I do like his E brake set up. I used to have big long arguments with my Dad over “Needs vs Wants”. It was more about philosophy than engineering. He’d say I want this or that on my car and I’d say, “You don’t need that, there’s a better place for your money over here.” He had his dreams but I had the car that ran. I don’t think I won the argument though, because he’d get so angry I had to let him have the last word. In the end one should do what they want. This is a hobby after all and it’s supposed to be fun. Being a cheapskate I hate to see people spend time and money on stuff that won’t do what they want or need.
-
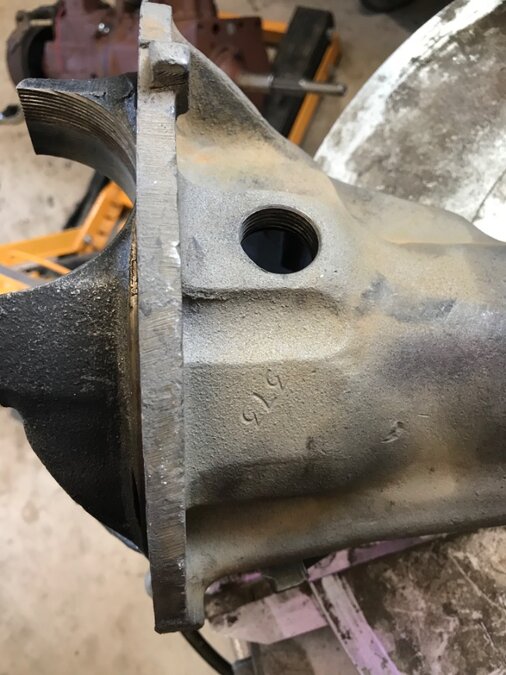
Plymouth Automatic Overdrive R10-G1 It is basically the Plymouth 3 speed transmission with a Borg-Warner Overdrive unit attached. The Overdrive adds an automatic forth gear which lowers engine rpm 30%, thus the higher speed. If the driver seeks to pass, it downshifts automatically and when the driver lifts the gas pedal it upshifts automatically. One of the features is “Freewheeling” which allows the car to coast without putting the transmission in neutral. The Overdrive was conceived as a gas saver. Freewheeling has the added feature of better road holding on slick roads. If you detect a skid you let off the throttle and the car has a much better chance to right itself. Overdrive was offered ( finally ) in May 1952 and can be retrofitted back to 1940 models. The one in the photo has just been gone through with the one year only ( 1940 ) gear set which is the only optional gear ratio for the Plymouth transmission. Since you aren’t changing the rear axle, that is still an option if you upgrade the engine with say a 230 crank and rods. The original Overdrive cars came with 4.1 to 1 final drive ratios which mean they were still 55 mph cars. The standard transmission cars had 3.9 or 3.73 final drive gears, which makes them 65 or 70 mph cars with the addition of the Overdrive. The next optional gear ratio is 3.54 to 1, which was used in the V8 automatic transmission cars up to 1956. Since the Overdrive transmission is a factory produced modification that was available from the dealer the purists ( like me ) appreciate them greatly. Installed correctly they will give the same long service of the standard transmission and use much of the same parts. I think it’s lot of work to change rear axles from other cars or trucks. Changing to an Overdrive is much easier, plus I see nothing wrong with the original axle. The Plymouth axle is a 3rd member type so to change ratios you simply change the 3rd member. Which is much easier to service than the integral type. To check on your current ratio look for the ratio stamped into the housing under the fill plug.
-
Simplify your life, get one of these. Bolts right in, uses the same speedometer gear as your old transmission and it was a factory retrofit. Won't hurt the value of your car. Turns a 55 mph car into a 70 mph car and won't hurt the charm of your car.

-
1949 Plymouth 3 passenger Coupe rear window gasket replacement
Loren posted a topic in P15-D24 Forum
Talk about monkey and football routines! I checked three shop manuals and they don't mention the Business Coupe rear window installation. What had me a little confused is that because the Coupe doesn't have a window surround ( it's part of the gasket ) to hold the headliner, the window and gasket are installed from the inside. On the rest of the cars it goes in from the outside. With an outside install you have gravity on your side and one person can install the easily. Going from the inside is almost impossible. Just too much juggling to do. I suppose two folks can do it but you might not be friends anymore. After considerable thought about the problem I came up with a solution ( beside hiring a glass guy to do it which is a good way to go ). I got an 8 inch vacuum cup with a gauge and pump built in and a set of suction cup with a plastic bridge to hold the window while you get it started. The cheap suction cup/bridge pieces will hold their suction just long enough for you to put two pieces of Gaffer's Tape over them. Gaffer's Tape is used any place you might use Duct Tape but it is so much better. The mastic doesn't make a mess ( it comes off with the tape and holds better ). However they are the key tool. The Vacuum cup gives you a handle to hold the glass and push it if you have too. You should also have a radiator hose removal hook. When I started in auto repair I struggled and almost quit the trade until I found that tool. So it is a "Must Have". The photos should show how it's done without explanation.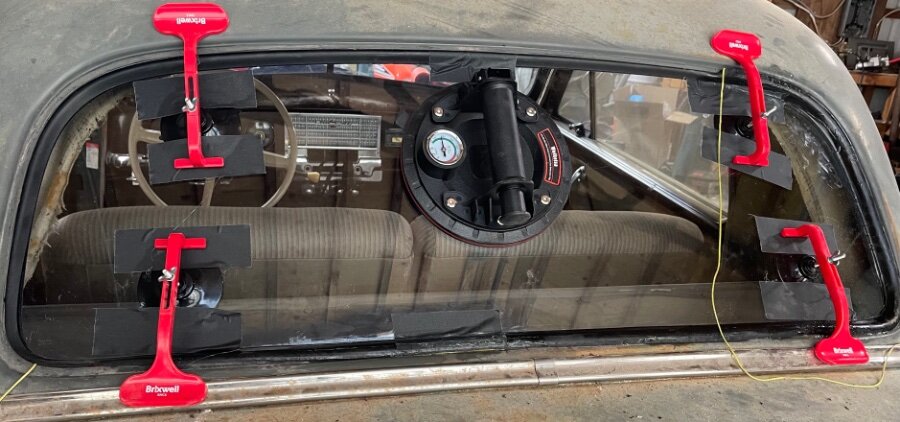
-
The spec is for an obsolete gear lube GL1. You can use a modern lube such as Redline MTL. The latest specs are for LOW Viscosity lube. Low Viscosity lubes run cooler. NO more 90wt! To clean the crud out of your new Overdrive, I would drain it and refill with ATF. Drive it a week then drain and refill with Redline MTL. ATF has additives that remove the crud and make the inside Razor Clean. For my own Overdrive I use Redline D6 ATF all the time but it's really expensive. There's two filler plugs on the side, fill them both, then recheck. NEVER use anything with Extreme Pressure additives ( EP ) or Hypoid additives. The statements you hear about lubes attacking the metals in the Overdrive are just non-sense. The real reason is the Sprag Clutch ( otherwise known as a One-Way Clutch or Freewheel Clutch ) EP or Hypoid additives will make it slip.
-
My 49 has a 6 volt Delta Mark Ten CD ignition and it works perfectly. The way the ignition interrupt works is to ground the spark. Since the spark is going to the ground away your ignition doesn’t notice. The purpose of the ignition interrupt is to take the torque off the gears until the solenoid can retract. It happens so fast you can’t hear it from the engine note or feel it.
-
I have a Delta Mark Ten CD ignition ( 6 volt ) and my Overdrive works fine. If you look at the diagram the ignition is only momentarily interrupted by the solenoid through the throttle switch. In operation you’ll never feel it or hear it. All it does is make sure there’s no torque on the drive train so that the solenoid releases. As for a problem for the ignition, remember the spark is going to ground anyway and if it goes to ground before it gets to the spark plug, the engine misses. Engine miss doesn’t hurt the ignition.
-
If you’re on the left coast, in Reno, NV there’s the shop I use. Nevada Speedometer I am a little fuzzy on the address cause you know Reno must be close to hell, close enough you can see Sparks! A local joke sorry.
-
Any time I can support my local speedometer shop I do. They’re swiftly going the way of shoe repair shops. When I have the dash apart the speedo goes in for lube and calibration. The last time it was off by 5 mph! Since that is just outside of the enforcement limit, I think I saved myself a ticket. Cheap “bulb type” temp gauges were about $30 and I have one for when the stock one is sent out for repair. The cost of repair is really spendy! If I remember it was $300! However the shop replaced everything from the cylinder head to the back of the gauge, so there were no weak spots or unseen cracks. The last one I had done was a while ago so your mileage may vary. It’s hard to compare the cheap replacements with the cost of a repaired original, I know.
-
There are some aftermarket king pin kits with an oversize bushing to replace the upper bearing. It could be this car has 11 or 12 inch brakes. A swap that I have done on my Plymouths ( I’ve only done the 12 Chrysler Windsor brakes so I don’t know about the 11s ). It shouldn’t be a problem changing to the bushings. Honestly the needle bearings I have dealt with were a pain in the neck. Brand new ones in a box ( decades old ) were so stuck they spend a lot of time in the heated ultrasonic cleaner to get them loose. I can imagine what old installed ones could be like. Plymouths are light and really won’t benefit much by using the needle bearings. There’s a reason they aren’t made anymore.

