


Sharps40
-
Posts
759 -
Joined
-
Last visited
-
Days Won
5
Everything posted by Sharps40
-
All good. In discussion with three agencies now, none allow vacation or cross country driving as pleasure or basic usage. Even if its only one "Vacation" each year and within the mileage limits, I must tow it to or have a second modern vehicle along and even then I must attend a show or go to an icecream parlor. Basically, I can't drive it when and where and how I want. So, I'll likely keep normal insurance on it. I doubt I'll see 7500 miles a year but they will be miles when, where and how I want to rack them up and I damn sure ain't going to get many of those miles going to the average show where folks whisper crap about the mistakes in the car all the while leaning in and dragging their gut propelled belt buckles across the new paint..... and I can't eat that much ice cream. I'm going to devils tower, grand canyon, up CA Hwy 1, Riding to the Sun Road, Rt 66, Bryce Canyon, Dinosaur Monuments, hunting, fishing.....maybe get an icecream on the way, maybe not. Classic Insurance seems to be for the Hoity Toity Amelia Islanders.....
-
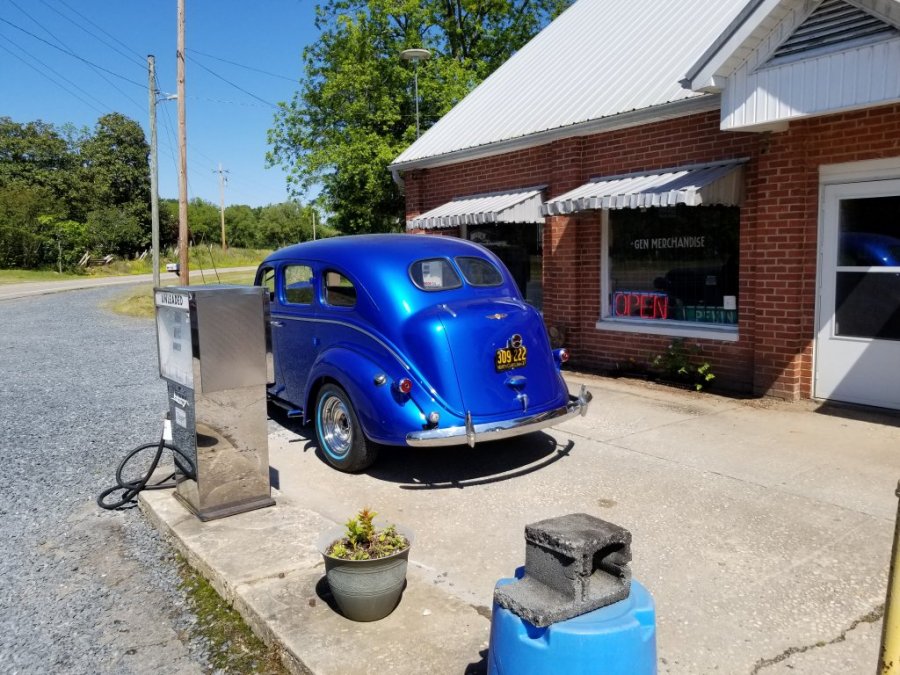
First trip to the gas pump in 30 years. 25 mile ride. 64 mph top speed. Carb #2 makes her dig in and leap forward with a rebel roar! Exhaust....we need an exhaust!
-
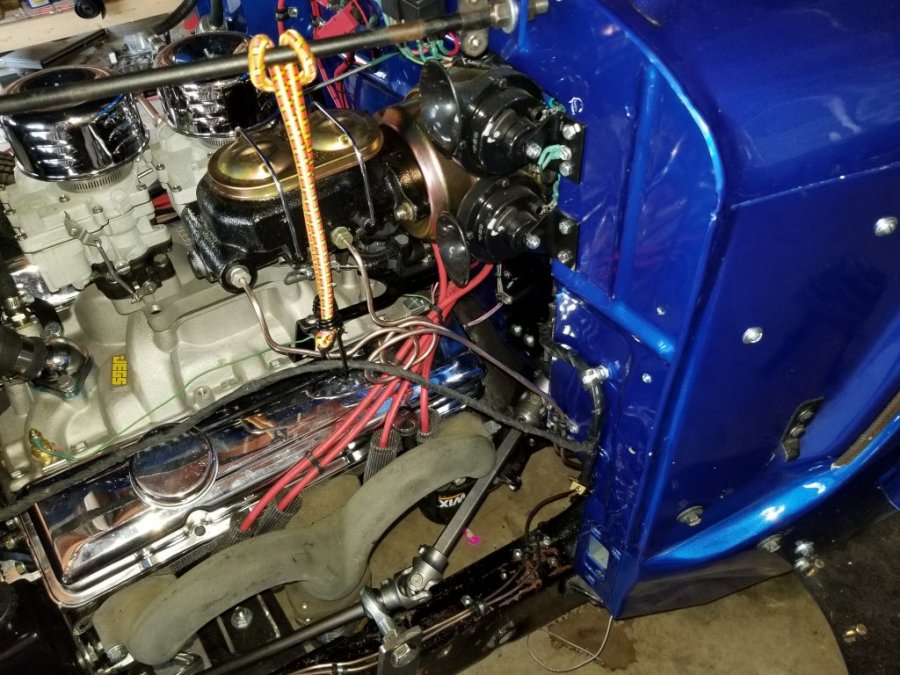
BigTen,Thanks for taking my call today. I think I have the basic tune established. There is a lot (a ton) of advance in the adjustable can on the distributor. Got it backed nearly all the way off, about 3/4 turn from locked out and still pulling about 12 to 14 degrees of additional advance at 3400 rpm. But its much smoother and steadier through out the range.Set the initial back to 6 degrees as you recommended for this bone stock motor. With the vacuum disconnected I'm seeing 28 to 30 degrees advance at 3400 rpm. Hooking the vacuum advance back up bumps it up to 40-42 degrees at the same rpm level. Good for now, some road time will tell if its too much or not enough.Idle hovers around 730 to 750 rpm and smooth/quiter out of the short straight pipes. Ported vacuum seems to be under an inch on the gauge at that level. Manifold vacuum at hot idle is a steady 19ish inches.I'm headed back to the garage to set up the progressive linkage on the second carb. I suspect a couple things will need done after the exhaust is on/front aligned and we can drive it. Most likely pull the carbs as I suspect two issues.I believe the transition slot is uncovered a bit too much at hot idle on the primary carb. (idle mix screws will barely kill the engine when shut and their best run position is 1/4 to 1/3 turn out from closed, seemingly a bit tight....and though less stinky now, we'll see if she still spit lots of fuel fumes as we go. All the plugs are soot black/may need jetted down some.)As for the secondary carb, I note the throttle plate has a tiny hitch on closing. (I checked and both idle circuit screws on the secondary carb are fully closed, so no extra fuel flow there on the idle.) May need the butterfly lapped to fit so it closes fully and smoothly. May just need a stiffer return spring and proper adjustment of the throttle rod.On a side note, i did run it out of gas while tuning......guess we been running it a lot over the last month and used up the first 5 gallons. Added 2 more and she fired right back up.Cold natured hussy too. I'll be converting that manual choke to automatic.
-
Dad, Dodge is insured. Full coverage for now at blue book value. Towing and rental, etc is included. Won't be enough at actual cash value but it gets her some protection as we test drive and get her to and from the final mechanical shops. And, it saved me a 1 hour phone call while standing at the DMV counter. Now I can go stand in line for days and get the title, registration and plate. Once the paper is done, I'll look into just how much I'll be driving and go back through USAAs antique car insurance for an agreed value policy and hopefully find a policy without night time, interstate or other restrictions on use.
-
Dad. BigTen and I played with the brakes again. Had her out on the road for a 5 mile run. So far so good. Prolly went too fast , 45 or so but even with the tweaks needed she feels good. Silky smooth ride once ya get past all the noise. Waiting to hear on moms stuff, if that's delayed then we'll set up to get her into the exhaust shop....she runs good enough now they wont have to push or pull the car around. She looks pretty good in the sun!


-
Dad called. Asked about the camera stabilizer and how it works. I tried not to laugh and told him the phone was duct taped to the windshield and, yes, she rides smoothly on her modern suspension. We are both excited!
-
Dad, 7 months since Ol Bessy came home. Idle is low. She needs a better tune. Brakes need bleeding and adjusted. The loosely installed exhaust pipes clatter and shes growly without mufflers. But....today almost 30 years since she last drove, a 1.5 mile run out and back, all systems function! https://www.youtube.com/watch?v=ZsZWROz6TCY
-
Dad, While waiting UPS to bring the Driveshaft (should arrive Wed, if UPS is on time) I went about doing the initial tune. Looking at the balancer, 30 degrees advanced and I figured we had either an incorrectly set distributor or a late model balancer. Double checked the specs on the balancer and its correct for the engine so in went the piston stop and sure enough, TDC was exactly zero on the blancer, not 30 where we had to set it to start it. (Seems the dizzy has 13 teeth and thats 28 odd degrees....so, likely one tooth off.) Bessy would idle fine, she would rev to high rpm with no vacuum advance, but hook up ported vacuum and she stumbled badly at high rpm. No vacuum leaks noted other than a very slight weep on the passenger side of the primary carbs throttle shaft. On the secondary carb, the throttle shaft is leak free and the throttle plate is vacuum tight till we open it at 60% throttle. Pulled the piston stop and removed the cap, sure enough the rotor was much closer to wire 8 than wire 1. Out came the dizzy and a qick tweek of the oil pump shaft and back down in when the dizzy. Now the rotor pointed at number one. Back up to the crank and I pulled the motor around to 8 degrees advance. Back to the dizzy and lined up all the little triangles. Cap and wires back on and she started on about 1/2 revolution of the starter. Warmed her up and she was at 8 degrees advance at 850 rpm. Mechanical advance at about 3000+ rpm added about 20 degrees, pretty much what I expected. Spend a good bit of time tweaking the idle mix and idle speed until i had no measurable ported vacuum at idle and then got the can adjusted to add about 8 degrees of vacuum advance. So, all in over 3000 rpm I'm seeing about 34 to 36 degrees advance on the balancer. There is room to play with that but she revs smooth, with or without vacuum advance well past 3000 rpm now. Really roars gooder when that second Rochester 2g kicks in! Settings on the Primary Rochester 2g carb came in at 1.75 turns in on the idle speed screw for 800ish RPM Hot idle speed, 1/2 turn out on each of the idle mixture screws (the main jets might be a bit large, again, room to play with that later.) Now if I can get the power brakes from about mushy to decent we might be able to drive in and out of the garage in a couple days. Also, Looks like the leaks are mostly beat down. Finally!
-
Dad, Baring any leaks on the floor tomorrow I'll start her up again and check it over. New 85 Regal front brake hoses with washers and american steel banjo bolts, no leaks for 2 days now. Rear end is shimmed up 3 degrees and trans points down 4 degrees so, we hit the magic "within one degree" rule, drive shaft is on the way. Emergency brake works. New power steering pump is on and I finally found the right fitting for the hi pressure port. So far no leaks. Installed a lower radiator hose for a 65-67 Bel Air/Chevelle/Malibu, good fit with a simple 1 inch trim at the pump end. No strain in the set up that might break the clamps again and put on new clamps. Not leaking yet. Spare tire dogged down, doors adjusted to shut and stay closed, floor is in place, all the wiring connected, door seals installed, enough exhaust pipe available to run out behind the front wheels for a drive. Third brake light installed, right rear light connection repaired, headlights rough aimed, headlight switch replaced. Stereo works. Other than balancing the rear tires, nothing really big left for me to do here. Maybe 2 hours work on my end, one day of welding and a day or three in the exhaust shop. All we need to do is install the drive shaft and weld up the steering and motor mounts. Then comes exhaust and then.....we can drive it. 2 weeks out on the drive shaft and I have to give the exhaust shop a three week lead before we bring it down. If there are no leaks tomorrow after a run in, I'll start coordinating the final muscle moves to get this girl rollin toward a gas station for the first time since 1991.
-
Ok. Driveshaft inbound. $400 delivered. 3.5 in steel, Spicer joints. 2 weeks or less. Front regal/Eldorado brake hoses on. No leaks yet but radiator hose clamps failed and coolant is dripping. Measured the trans output angle at 3 to 4 degrees down. Rear pinion was 4 degrees down. So I started installing the pinion shims bigten brought. Looks like 6 degree shims will get me where I need to be along with some windup in the soft springs. Just need 2 bolts for the spring pack to finish the job. Get em sat after a morning turkey hunt. Finally linked the phone to the car. That took 83 years. But made 2 calls. Crystal clear on both ends. All in all a good day.
-
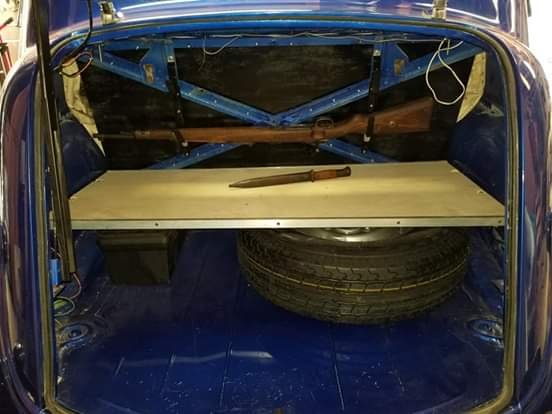
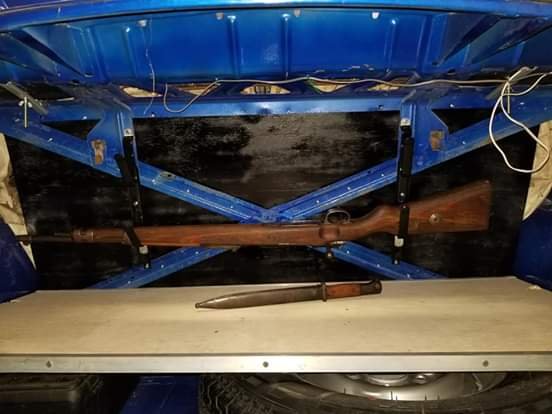
Dad, Uncle Vicks 1940 Battle Throphy is the longest. Looks like Ol Bessy can carry mine and yours on the hunt this winter. Trunk should hold at least 2 dead deer and the rifles.
-
Dad, Quick walk around Ol Bessy now that she's clean. Got her seat/trunk divider made up and installed. Put the rear seat back on, its the last surviving bit of upholstery your Dad made for her all those years ago. It'll serve as the pattern and theme for the new threads this winter. The rear seat bottom cover is a leftover from the late 80s when I was going to put in new seat covers, way back when Kanter Automotive and even JC Whitney still had interior parts for this car. We'll never afford NOS or Reproduction door sills, but like the aluminum grill surround I made up, aluminum angle serves fine and takes a nice polish. I'll get the lower door seals in place tomorrow or next week. Got her a trunk tool box, rooted through my tools and mostly filled it with AeroSpace grade pieces left over from years of munitions work. The best for your Gal. She has a full set of tools to keep her tuned anywhere she go's. Soon...... https://www.youtube.com/watch?v=tQVTsxQqTBk&t=94s
-
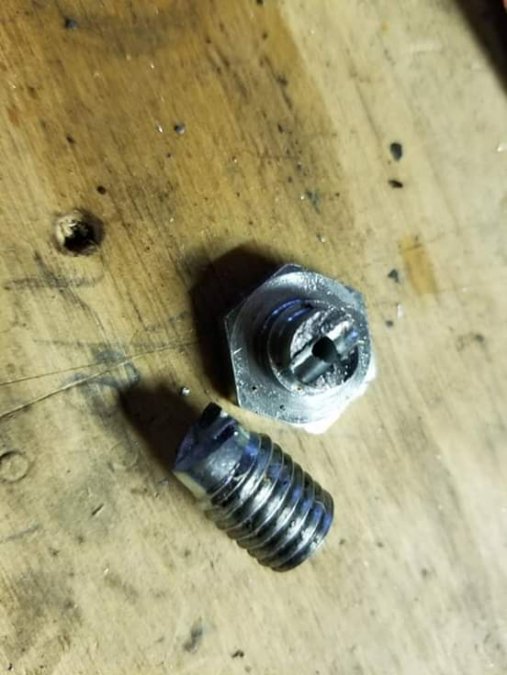
Grease cup. Pack with grease. Clear the hole. Turn cup on to push in grease. Turn in again from time to time when servicing. Clean and repack when the cup bottoms out.
-
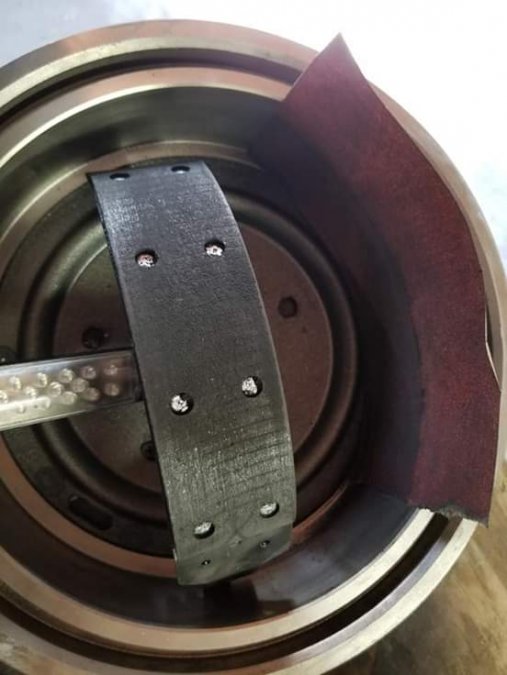
Dad, Good progress on the stop portions of the job today. Got the Lokar Emergency brake cables in place and finally adjusted. Not contained in the instructions is the 3 handed operation necessary to install and adjust: simultaneously hold the clamping block, pull all of the tension out of the rear most cables and then pull harder than you think you need to to lightly compress the return springs, finally, tighten down the cable anchor screws without letting go of the clamping block or rear cables. Well, got it done with two hands but it took all of yesterday and most of this morning. I don't know how, but I do hope and pray it never ever go's out of adjustment. Nice system but a real bastard to get installed and working. Drivers side rear break drum was dragging, so I fitted the shoes to each drum and tapered the heal and toe of the shoes. It helped but finally figured out that Drivers side rear drum was binding when bolted down......its got a warped mounting plate For now its shimmed out 1/16" to allow for all the adjustments that had to be done before finalizing the emergency brakes but, it will have to be replaced with an new drum. Chased down two leaks in the breaking system. The main line to the rear was leaking at the master cylinder. This was a good American steel fitting, 1/4 turn more stopped the weeping. As for the other leak, down at the driver front caliper, I neatly solved that problem. Simply twisted the fancy china chrome banjo bolt off in the hole and proceeded to replace it with an American made banjo bolt. Awaiting the new power steering pump, finally found the leak on it, next to the hi pressure valve is a nice triangular shaped dent filled with solder.......I'll get it swapped out when the pump comes in this week and see if we can get our money back on the current pump. Resevour should never have been soldered. I have to get BigTen some measurements on the drive shaft, he may have one that'll work. If not, we'll order out of Drive Line Specialists in TX. About the same price as local but I don't have to make a one+ hour run out and then back again to get it done, it'd just come in the mail 4 days after a 5 minute phone call.
-
Dad. Master cylinder now working. Kit came with miss matched parts. Deep throat piston and a short plunger push rod bolt. Naturally everything is metric inside. I found one metric bolt, don't know why, usually i throw them far out into the woods when I find them....but, made the bolt into a plunger to replace the short one and if you look closely at the video, you see the turbulence in both chambers and can just see the pistons covering and uncovering the ports. I have about 3/4" pedal free play, should be about 1/2" but I'll get back to that. I went ahead and bled the front calipers, no air in the forward system. Now for a celebratory cigar and back under the car to pull up the rear shoes, bleed the rear and adjust the emergency brake. All that's left is welding, tune and a drive shaft. Too bad yer locked down in VA. Perhaps I'll get "sick"and you and mom will have to come here to care for me. https://www.youtube.com/watch?v=4PuGOsggiJw
-
PS, I can confirm that Monroe 31000 rear shocks, $16 ea from Amazon are a fine fit on a 37 Dodge D5 sedan. Granted mine now has a 12 bolt gm rear but the upper, lower mounts are 37 Dodge as well as the semi elliptic rear springs (NOS 37 Dodge rear springs) and the pads/axle bolts are all in the same place. Looks good. Closer and closer to first driving day!
-
Dad, Bench bled the master cylinder, 15 minutes off, bled, back on. Opened the front caliper valves and 15 minutes to 4 to 6 inches of air bubble free fluid in the temporarily installed vertical hoses. Another 30 minutes saw similar results on the rear cylinders. So, system has mostly fluid in it now. Can't pump it yet, as you see in the video, no turbulence in the master cylinder bowls, most like one or both of the brake cylinder rods need adjusting/are too short. Very likely its the rod between the master cylinder and the power booster. I'll check it out later. But, got the system wetted out and didn't spill any brake fluid on the paint, so, nothing peeling off at this point. https://www.youtube.com/watch?v=Aj_M4gyiGNY

-
Real dumb luck
-
Dad, Started with 25 feet of 3/16 brake tubing.....no mistakes and I just made the last connection. Used 24 feet 9 inches to plumb Ol Bessy. I guessed good.
-
Dad, Took three days off...from everything, including Ol Bessy....separated a rib in my back laying across the Dodges front seat frame working under the dash, then ripped the muscle the next day and then after recovering a bit, sneezed and ripped the muscle again. Needless to say, it ain't easy getting maturer, used to be able to lay about any ol way wrenching in or under a car, no problem-o. No more. But, feeling well enough today and prior to getting "sheltered in place", (i reckon its coming in NC sooner than late) I was able to pull Bessy's rear wheels, paint the new drums and install the rear emergency brake cables. I'll finish up the hydraulics tomorrow and then maybe get my Tbird cleaned up. Best news about the CoronaVirus is I can drive that new to me retro TBird unmolested.....The virus scare has all the "maturest" ladies staying in now (as you recall, in the first 24 hours of ownership of The Bird, the only girlies that threw themselves at me and The Bird were three Buick Driving Blue Hairs in the 80 year old and up range......seems they grew up in that era and fondly remember the early Birds this one is styled after....."Id sure like ya to ride me in that there Bird Young Man, Tee Hee Hee!"
-
Dad,Hydraulic brake lines are 98% installed. Just need to dog down the main line to the rear end and hook it up to the flexible line on the axle. All the line is copper/nickle.....bends easy without kinks, dosn't rust and really takes a nice flare. I used two flare tools, one on the bench and a smaller dedicated 3/16" tool for the tight spots under the car. Kept the system simple, just running a standard GMC Proportioning Valve (PV2) same as the old Blazer. It'll delay the fronts till the rears are engaged. It also provides a warning light in the event one half the system fails. We shouldn't need an adjustable valve for the rear and won't need residual valves as the Master cylinder is above the wheel cylinders. Too easy. Still waiting for the emergency brake pedal and front cable but should be able to put juice in the system this week.

-
Dad, 83 years to get power steering. But its up and functional. Very nice. Thunderbird rack and GM Saganaw power steering box working together. Slight weep at the high pressure hose joint at the box but i was able to cinch it up another 3/4 turn and my hoses didn't pop! Closer and Closer! https://www.youtube.com/watch?v=4G4JoDz7QS8
-
Up this morning working on the kinks in Ol Bessy, still waiting brake parts. So, topped off the radiator, probably start it today, hopefully all the leaks/weeps are sealed. Started filling the power steering pump. Wiggle the wheel, spin the pump with a drill and a belt, add more....got a quart in so far. Who knows what the capacity of a t-bird rack and Saganaw/GM pump is? I have two more quarts. I assume 3 is enough. So far no leaks, just my spills, missing the funnel. Set the adjustable vacuum advance to mid point, engine revs smooth with the advance disconnected, but connected it idles fine then becomes rather rough off idle to WOT. 10 turns total advance in the can, ran it in to zero and backed up to the mid point, 5 turns out. Trimmed the PCV hose as it was 3/8 inch too long and kept popping the pcv valve out of the grommet. A ragged edge with those cotton strings sticking out, so in the interest of a neat appearance, I decided to fix the ragged edge problem and learned life lesson 03182020..... "Never use a lighter to burn off the ragged strings on the PCV hose while said hose is still connected to the engine." Very neatly cleaned up the visible end of the PCV hose and the back fire blew out my lighter for me! So, taking a break and having coffee and calming my frayed nerves.
-
BigTen, Thanks. Spent the afternoon following your instructions. The weeping long bolt on the DS of the water pump did in fact enter the water jacket. Drained, pulled, dried, sealed and back in. Also, the weeping bolt in the PS of the second thermostat housing, blind hole but.....pulled the water neck, sanded the bottom flat. Cleaned it up and back in with the o-ring and sealant on the threads and the mating surfaces. I'll water it back up tomorrow and start her up. I'm figuring no leaks now. In the big news, ripped out all of the excess parts for the steering shafts, put in three single joints and added the support bearing right where you said to put it. Dayum! All the bonk/clunk/push/pull is gone. Steers great and seemingly so little bind and movement in it that even the tiny #10 self taping screws used to position the bracket for welding don't break! Can't go down the road on those screws but good to know that the steering shafts are now bind free and smooth enough that even baby hands can hold it all together.
-
Dad, Brakes next. Went lokar front to back for the parking brake. Expensive but all matching maker and should work fine. I'll put it in first then follow with the brake lines. Ordered a coil of 3/16 tubing to plumb it and based on recommendation, all the fittings are for that line, eliminating many additional unions/less leak potential. Getting started on both next week. Antenna is on the way, probably mount up in front of the radiator, hidden. One its in and working, I'll call you from the car! Last big part is the drive shaft. After that, nothing but driving and tweaking!
