


Bingster
-
Posts
1,810 -
Joined
-
Last visited
-
Days Won
5
Content Type
Links Directory
Profiles
Articles
Forums
Downloads
Store
Gallery
Blogs
Events
Everything posted by Bingster
-
Okay. I've been looking for a belt size but my parts book does not list size.
-
Well, it really doesn't matter. I'm stuck with what I have and I'll have to make it work just like the other guy did. And I will.
-
I haven't data'd the tag as of yet.
-
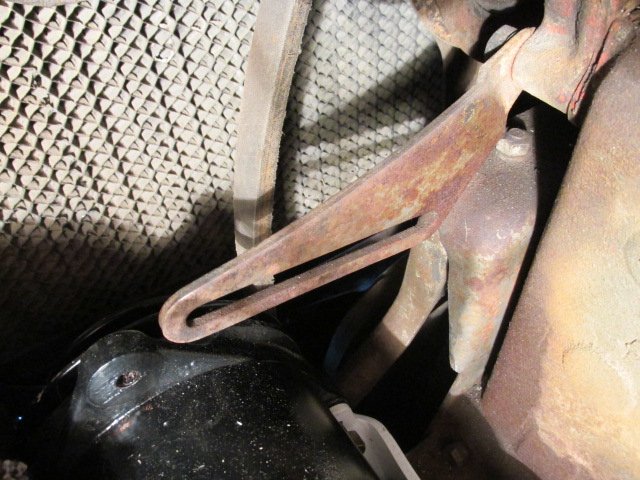
I think that my generator has been replaced somewhere along the line. It 's different than Donald's. The bracket seems to be original. If they put in another generator that was a close fit and "made to work," the fit on the strap would have been off.
-
Okay, another question. Is the arm supposed to be part of the entire fit and adjustment, in that if you loosen the bolt that holds it on to the water pump you can move the arm to line everything up?
-
Can the fan belt through age shrink?
-
The belt was on the car when I bought it. I'll check things out tomorrow. At least I got the thing bolted to the bracket!
-
Yeah, it's just the picture.
-
I'm not lacking horizontal space between the gen and the strap. The gen aligns perfectly with the strap. It's just that the upward travel is restricted. Don, how far will your gen bolt ride up the strap before it can't go any further? I think it may just be what you said, a bit difficult to get the belt around the gen pulley.
-
I'm not sure I follow you.
-
That's a great shot. Thanks. And that's how mine is. Is the bolt that holds the gen to the strap a screw? Mine is but it doesn't seem to want to thread.
-
I'm installing the stock generator on my '47 Desoto. I bolted the bracket with the curved side up, but when the gen is bolted to the bracket, the bolt for the adjustable strap won't allow the gen to go all the way up the slot to get the belt onto the pulley.. Plus, this strap hits the gen housing, preventing it from going further up to get the belt around the pulley. Something's amiss here.
-
I'd like to be surprised like that!
-
I used an HVLP gun to spray a trailer I have with Rustoleum. I had a heck of a time to get it to level out. I thinned it with acetone per directions but was adding so much that I was afraid I'd be spraying a translucent mixture. Anyway, I double coated and laid it on thick. It didn't run but it gave a slightly orange peel effect, not a dry effect, but it just didn't level out well. I question the use of acetone because it flashes so quickly. I needed more wet time. I'm unfamiliar to Rustoleum except for the rattle cans, and honestly, they have a finer, smoother mist of spray than I did. It was obviously something I was doing wrong. Big compressor so air wasn't the problem. Maybe my gun was tip was the wrong size. 1.7
-
I wish they would show photos of their products and not drawings!
-
The wood beams are fine but there's still the issue of the small jack stands supporting them. I may be wrong, but it seems to me that the jack stands negate the reason for the wood beams in the first place. I've face a similar problem and have come to the conclusion for my own piece of mind to stack wood beams on the concrete as a fail-safe to such a height as to prevent the body from crushing you if something goes wrong.
-
Mmmm. That would save me a lot of time. I remember when you posted that switch set-up awhile back. I forgot about it. Thanks.
-
Thanks. I am taking each wire one by one and trying to trace it to where it belongs. I cut back on the tape stuff to get to some fresh color on the wires. That helps. I'm temporarily replacing it with wire the same gauge. I just want the wires necessary to start the engine. I've bundled and eliminated the light wires. Any good photos of how the harness was attached and branched out? I see the clips but sadly didn't take enough photos when I removed the stuff.
-
The original wire covering in my car is clothe covered with the tracer colors as well. Also, I'm trying to figure out from the diagram and the Autolite starter solenoid on the starter, which way I am supposed to be looking at the four terminal posts. Is the huge post for the negative battery cable? If that's so, then to the right of that is another large terminal smaller than the other, with a metal tag attached to it.
-
I'm going through the wiring mess in my '47 Desoto engine compartment to get the engine started and while it's obvious where they spliced in new wire, one has me baffled. The wiring diagram shows a green wire running from the coil negative terminal through the firewall harness and onto the ignition switch. But the wire I have is an original looking yellow/brown kind of color, and it does go through the firewall wiring harness. The other question is what does the wiring harness covering look like from the factory? This harness is wrapped in a very heavy electrical tape. It looks professionally wrapped, not done by a novice.
-
I must admit to a slight smile of amusement as I wrote the title, but it seemed the best and shortest way to say it!
-
Thanks. Although I suppose the length of each cable is a dead giveaway.
-
All the cable is black but one of the terminal connectors is red. Should they both be black?
-
I'm making some new battery cables and I assume the red battery terminal is the positive. I've got a 50/50 chance. By the way, I did use my hand grinder to cut the cable and it was smooooth. Thanks.
-
Okay, that all makes sense. So nobody should have to remove that screw under normal conditions?
