MarcDeSoto
-
Posts
1,860 -
Joined
-
Last visited
-
Days Won
10
Content Type
Links Directory
Profiles
Articles
Forums
Downloads
Store
Gallery
Blogs
Events
Everything posted by MarcDeSoto
-
I have a friend who can rebuild radios, so I let him change the capacitors on mine. I bought new tubes for it too, 8. I have a Philco 802 model. The vibrator still works. And I bought a rebuilt, reconed speaker for it.
-
 My car right now is just a chassis with no fenders or inner fenders. I thought of putting a couple of 2x4s across the bottom of the block held up by 6 ton jack stands. But there is the problem of the crankshaft being in the way.
 -
New Acquisition - 1947 Plymouth Business Coupe
MarcDeSoto replied to hi_volt's topic in P15-D24 Forum
Great car! I think that's the car that got me interested in getting a 40s MoPar back in the the late 70s. I even advertised for a business coupe in the WPC newsletter and got a 48 DeSoto business coupe instead. -
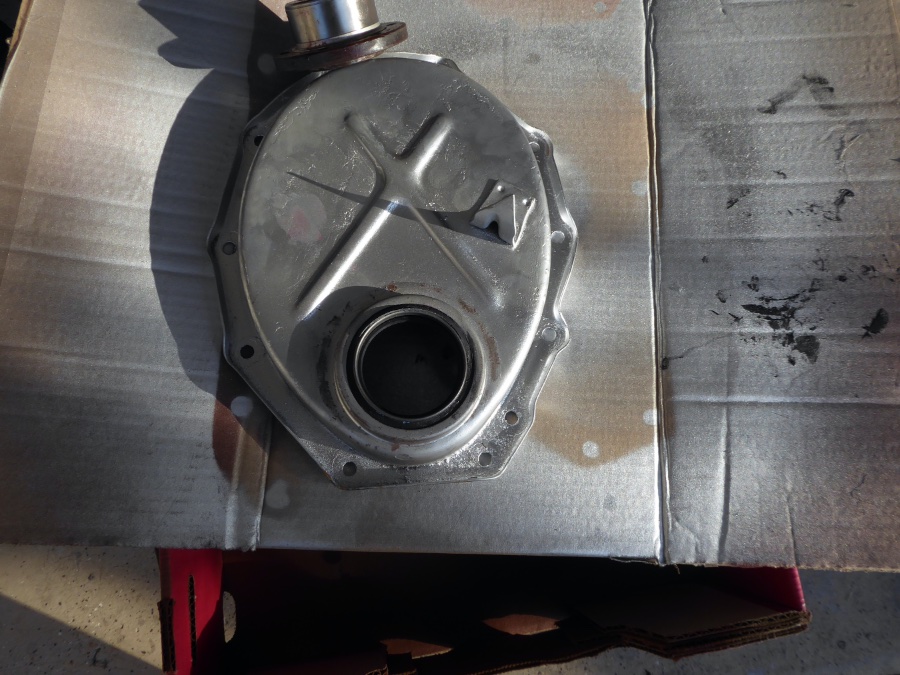
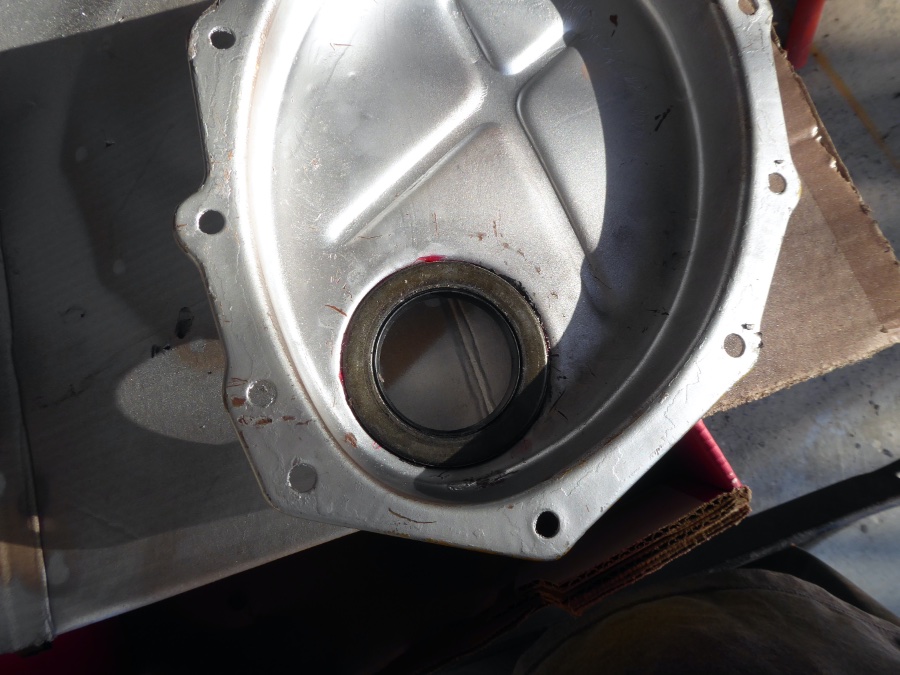
I put on the oil seal today in my timing cover. Sniper and others were right when they said the 1 ton Arbor Press would not do the trick. I pressed the seal in with the seal installer tool that I rented from O'Reillys. The ABS black pipe coupler was all that was needed for a back support. I didn't need to hit the seal with a sledge hammer, just the installer disc and a series light firm taps with a mallet. Now I'm ready to reassemble the front end of the engine and put the oil pan back on. Besides using a cherry picker, what is the best way to support the front of the engine after I take the front motor mount off? I just jacked the engine up from the bottom side of the block, and put jack stands under the bottom edges of the front of the block.

-
Oil leak under chaincase cover on 48 DeSoto!
MarcDeSoto replied to MarcDeSoto's topic in P15-D24 Forum
Where do you buy a new hub? Do they still make them? -
It just goes to show that not everything in restoration flows as easily as it looks in the Youtube videos. Especially if you are not a mechanic. I think the timing cover seal is an important part of the engine and deserves a close look to do it right so you don't have a oil leaker when you finish your restoration. I looked for an iron coupler, but couldn't find one. I think plumbing has gone all plastic. And I wonder how a dead horse got into this thread? Totally off topic.
-
I just went to HD and found what I think is a good support for the timing cover. It is a 3" ABS black pipe coupler. It costs about $5. Thanks for all the replies! This material will be great for my new book, Restoring Flathead Mopars for Dummies.
-
The gasket in the Parts list shows it is put in the cover first, then the seal. BTW, I found the perfect sized round gasket in the Fel-Pro oil pan gasket kit. So, I'm going to use that for my gasket.
-
No the Parts Books doesn't show a big felt gasket. It does show a thin cork gasket. Maybe I could just put some RVT gasker sealer its place?
-
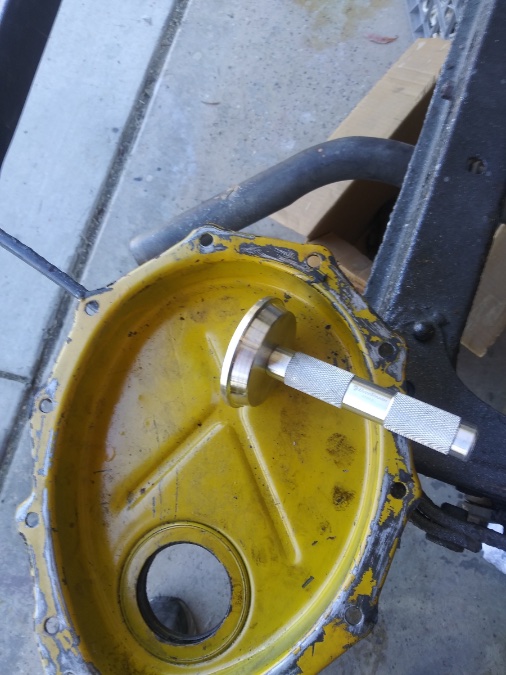
Finally Victory! We got the old seal out by using a chisel and hammer to knock the outside lip in until we were able to knock it out with the installer disc. No my question is how do I install this big, oversized felt gasket in. It's too big. Does it need to be trimmed?
-
I may try this method too. My arbor press arrives tomorrow too.
-
Now that sounds good to me!
-
Now that I can see Los Controls seal I know it must come out the back. I should be getting the new gaskets and seal today. I think I'm going to put my seal pry bar in the back and hit it with a hammer.
-
Oil leak under chaincase cover on 48 DeSoto!
MarcDeSoto replied to MarcDeSoto's topic in P15-D24 Forum
I'm the shop that did that rebuild 40 years ago. I guess I was incompetent. I just put the new redi-sleeve on and for once something went on perfectly! -
Turns out if you don't have a machinist friend, it's hard to get a machine shop to take on a small job like this. How thick is a seal? Mine looks to be 1/2" thick. My friend who is helping me looked at the back and wondered if that ring thing is part of the seal or part of the timing cover? If it is part of the timing cover then you couldn't pound it out the back. Just asking to make sure.

-
I think the take it to a machine shop is starting to sound real good! I'll try that tomorrow!
-
I was in Harbor Freight today and saw a small arbor press. It was a sold out, so I couldn't buy it, but I am looking at similar arbor presses on Amazon. https://www.amazon.com/HHIP-8600-0031-Heavy-Capacity-Height/dp/B00E0NFMH4/ref=sr_1_2?crid=2YBGOAYV4OE5N&keywords=arbor%2Bpress&qid=1681342946&s=industrial&sprefix=arbor%2Bpress%2Cindustrial%2C128&sr=1-2&th=1
-
Yes, I was thinking a press is the only way now to get it out. I wonder if my vise would work in place of a press. As long as I could support the back of the timing cover and use a seal installation tool to press it out?
-
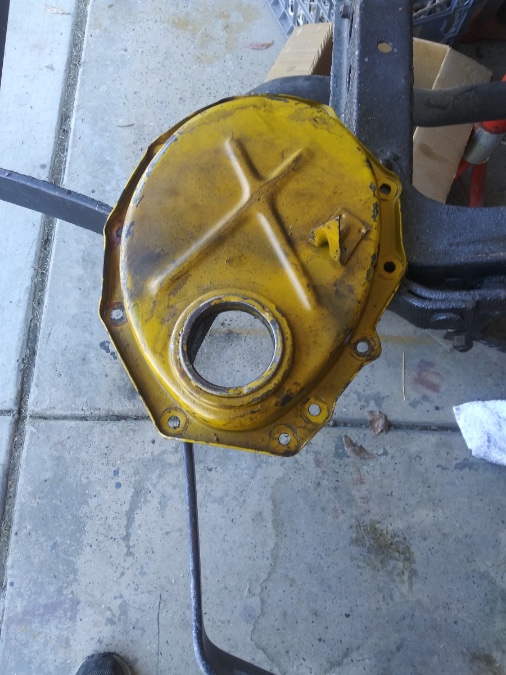
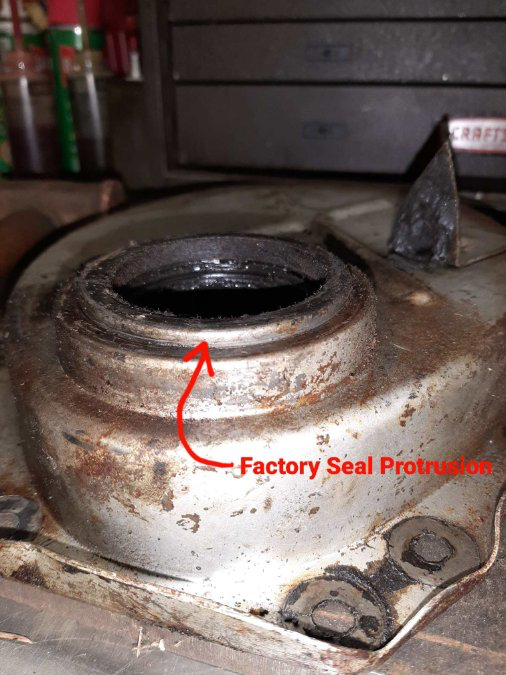
I applied fire today and heated the seal up red hot. It still would not budge with a hammer and a drift. All I've done so far is put some dents in the part that sticks up in front. Just to be clear, I'm hitting the part shown below with the arrow pointing to it. Does anyone sell used timing covers without the old seal in it?
-
excellent pics and it makes much more understandable. I'll do it. I did it like you said, but it won't budge. This is just like the u-joint that wouldn't come out. In the Youtube videos these things come out in one or two whacks. I've hit mine as least 50 times with no movement. Just to be clear, I'm hittlng the front of the timing cover trying to hit the seal out the back.
-
So if you install it from the back to the front, it would make sense to remove it from the front out the back. Good video Keith! I'll watch it again today! I'll use a chisel and a hammer this time. Thanks!!!
-
I've already whacked hard going from the front to back and it didn't move. Maybe it does go from the back out the front. I don't know?
-
After looking at the Parts blow up, it shows the seal going in from the back. So it makes sense to me that it would come out the back. No way it could come out the front unless I'm missing something.
-
I still don't know which way I hammer it? Do I hammer from the inside out or the outside in? I think you mean from the inside out, but my helper says that doesn't make sense because the inside is wider than the outside.
-
I rented a seal remover tool, but can't decide if I should hammer it from the front out the back, or vice versa. Does anyone here know which way the oil seal comes out? Thanks.