

Jim Yergin
-
Posts
1,942 -
Joined
-
Last visited
-
Days Won
2
Content Type
Links Directory
Profiles
Articles
Forums
Downloads
Store
Gallery
Blogs
Events
Everything posted by Jim Yergin
-
Rodney, That is a beautiful car! It is especially impressive knowing what it looked like when you started. Jim Yergin
-
The rest of the story Did I mnetion it was raining??
Jim Yergin replied to greg g's topic in P15-D24 Forum
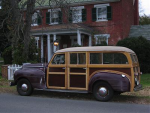
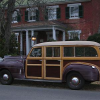
I worked very hard to get the woodie on the road to take it to the annual Father's Day car show at Sully Plantation in Chantilly, Virginia. Didn't have a chance to test drive it until the morning of the show when I planned on taking it to the gas station to fill up. Unfortunately we only got about 100 yards down the road when the rear brakes seized up and ended the first drive. Our very helpful neighbors helped us get the car back into the garage. I guess there is always next year. Here is video proof that my car was moving under its own power (if only for 100 yards). Jim Yergin http://s23.photobucket.com/albums/b397/yergin/?action=view¤t=Startoffirstdrive_0001.flv -
Don, Yes I did find a brake light switch. Lucked into a really knowledgable counterman at the local "Bumper to Bumper." He went right to the parts book and found what I thought I needed. Unfortunately it did not fix my problem - no brake lights when I step on the brake pedal. Lights work when I by-pass the switch and they work when I have the switch out of the tee fitting but connected to the wires and blow 100 psi air into it. Didn't have the time to really get into it with the Sully show tomorrow so I went to Radio Shack and found a momentary push switch that is normally closed. I drilled a hole in the floor board under the brake pedal and mounted the switch. When the pedal is at rest it pushes in the switch and cuts the power to the brake lights. When the pedal is depressed it allows the switch to return to its normally closed position and the lights go on. Don't know how long it will work but for now at least the lack of brake lights will not be what keeps me from Sully. Unfortunately, by the time I had it fixed the big thunderstorms Don, Greg, Chet and Rodney experienced had rolled in and I did not get the chance to test drive the car. Looks like its maiden voyage will be tomorrow morning to the gas station to fill up. If it goes well then it will get a quick wash and then off to Sully. Jim Yergin
-
At 9 AM today, I was on my way out to find a replacement brake light switch to get my '41 on the road and to the show tomorrow at Sully. Just as I left my driveway I saw a blue '48 Plymouth coming toward me. As it got nearer I could see the car had Tennessee license plates. I knew it had to be Don. He was on his way from Tennessee to his hotel in Sterling, Virginia near the Sully show and stopped to say hello. He said the trip went without a hitch. It was great to see him and his car, which sounds great. I am looking forward to seeing him, Rodney, Chet, Greg, and Joe tomorrow at the show. Now I just have to finish the work on my car. Jim Yergin
-
Ed, Fifteen years ago I built the "magic box" following the plans I sent you and installed it in my uncompleted car but never tested it until today (didn't have the lights wired up and the electrics in place until now). Remarkably it works fine. Nice when that happens. Jim Yergin
-
You may need to watch it twice; once to watch the Burma shave signs change and once to catch all the pictures plus listening to the music of the Statler Brothers. For those of you too young to remember "too bad you missed it!" http://oldfortyfives.com/DYRT.htm Jim Yergin
-
I have gone the headlight relay route. I picked up some Autolite headlight relays on eBay. Interestingly the instructions in the box have you use one relay to send the main power through the high/low beam switch. I chose to go on step further and install two relays, one for the high beams and one for the low beams. I figured that way I would not be placing any amperage burden on the high/low beam switch. Seems to work well. Jim Yergin
-
I thought I had found the problem when I discovered that the replacement trim molding clips I am using to attach the stainless trim band along the edge of the hood are longer than the originals. It appeared that in the holes for the clips in the vicinity of the hinge attachments the extra length was blocking the hinge from sliding forward all the way. I removed the offending clip on each side but even with the hinge moved forward to the maximum allowed on the hood, there is still a gap at the cowl that allows the cowl webbing to show a little. It also looks like the hood is up too high at the cowl. I have tried to adjust the hinges where they mount to the cowl but without success. When I have more time I will play around some more with those mounting points and try and create more adjustments. At least the hood latches now. I will take Greg up on his offer and take advantage of the "brain trust" gathered at Sully on Sunday for ideas. Jim Yergin
-
Norm, Thanks for the suggestion. I already tried to adjust the hinges but that did not change the gap. Jim Yergin
-
Thank you all for your replies. It does not sound like I am missing anything. Everything was off the car for painting including the hinges. However the fenders, radiator shell and the hood sit squarely all the way around. It is just that the hood sits too far forward by about 1/2 an inch. Even with the hinge attaching bolts removed it does not slide all the way back. I think the next step is to remove the hood and determine if there is something keeping the hinges from sliding in the passageways where they attach to the hood. Jim Yergin
-
I have installed the hood on my '41 P12 but am having trouble getting it to fit correctly. There is a 1/2 inch gap betwen the rear edge of the hood and the finished front edge of the cowl. In other words, the fabric webbing on the cowl ledge shows. I have loosened and then even removed the three bolts on each side that hold the hinges to the hood but cannot get the hood to slide back any further. Am I missing something? Does anyone have any tips or tricks that will help me? Thanks. Jim Yergin
-
I found an NOS one on eBay for less than $30. Jim Yergin
-
Bob, I don't know about the car but there is certainly a smile on my face at this stage. Thanks to everyone for the kind comments and encouragement. It means a lot coming from those who know first hand what all is involved in getting to this point. Jim Yergin
-
Rodney, Looks great. Can't wait to see the finished product. Jim Yergin
-
I finally got the grille installed on my P12 wagon. What really slowed me down was polishing the approximately 30 pieces of stainless trim and fabricating new fasteners. Still have to install the windshield glass and the hood but at least I am one step closer to being back on the road. Jim Yergin
-
I don't know the details of the fluid drive set up but when I installed a D24 fluid drive crankshaft in my Plymouth block, I discovered that the pilot bushing opening in the crank was not machined to install the manual transmission pilot bushing. I machined the bushing to fit otherwise I think the opening in the crank must be machined. Jim Yergin
-
Rodney, The wiring diagram in my 1941 factory manual shows a relay only with the dual horns and a direct connection for the single horn. Jim Yergin
-
Did you check with Collectors Auto Suppy? Jim Yergin
-
Sorry Norm, I checked and both of my spares are 18 teeth. Jim Yergin
-
You only need to change the gear that the speedometer cable goes into. The internal drive gear is on the output shaft of the transmission and is the same regardless of axle ratio or tire size. Jim Yergin
-
Normspeed, I have a couple of spare three speed transmissions. I will check tonight and see if either of them have 19 teeth speedo gear. Otherwise, Partsvoice indicates that Len Dawson (http://www.dpmotorparts.com/) has one (part #652845) for $65 (ouch!). Jim Yergin
-
According to Partsvoice, Collectors Auto Supply (http://www.collectorsautosupply.com/) has the 16 teeth gear (part #652846). Jim Yergin
-
The 1936-1948 Plymouth Parts book that Chet has posted on his web site (http://chetscoins.com/1948p15/DocumentWeb/) has a chart on page 314 that shows what speedometer drive gear (16, 17, 18 or 19 teeth)to use depending on tire size and rear end ratio. I assume the same info would apply to Chryslers. It also has part numbers. Even if your drive gear does not have a part number on it you could just count the teeth and determine if it is the correct one. You might want to check it out. The password to gain entry to the document is "password" Jim Yergin
-
Thanks Joe. You and Rodney are welcome to stop by any time. My goal is to try and have the car together enough to take it to Sully on June 15th (Father's Day). Will you be attending? I believe Rodney, Don Coatney, Chet, and Greg G will be there. Jim Yergin
-
I had the local tire store balance the tires. They told me it took alot of weight, as is obvious. The weights are on both the front and back. Jim Yergin