-
Posts
197 -
Joined
-
Last visited
-
Days Won
8
Everything posted by Semmerling
-
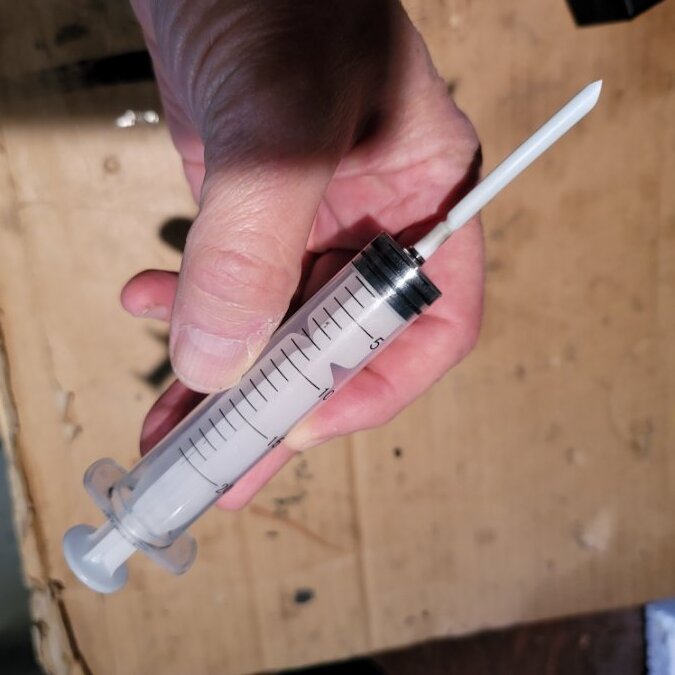
If you are here because you are having difficulty finding 180 weight oil, you have come to the right place. Early Dodge service manuals call for 180 weight oil for use in areas like the steering box, but the search for 180 oil will be a pain in the ass. With the exception of some specialty early Ford parts companies, you will find 180 oil expensive and mostly likely in quantities larger than you will ever need. You may also hear that a direct replacement is MOBIL 600 weight oil, but you will quickly come to see that Mobile 600 is mostly sold in 5 gallon pails and you need far less. The good news is this, you can do much better than either of those two lubricants. In fact, for the steering box, both of those lubricants will work for as long as it stays in the steering box. Lubrications have come a very long way since the 1930s and, just like plastics went from Bakelite to Polyethylene, the lubricants we can apply to the steering box are far superior even in the limited roll of the steering box. Enough said, here we go, forget about 180 oil and 600w Mobile. Go down to an Auto Parts Store and get one of the following: - CV GREASE - STP Oil Treatment - Lubriplate 250 One can also go to John Deere and get Corn Head Grease. Ask for An102562 in the grease gun tube. All of above are superior to the 80 year old specified lubricant. Why are they superior? Well not only can they do the “pressure” part of simple gear lubrication but they will do something the earlier oils don’t do at all….they will stay in the case. I use CV Grease in my steering head in a 1934 Dodge DR. I like that I can buy a small tube of it, I like that it stays in the box, and costs $4, even in 2023. To make the whole process a fast 5-minute job one needs: 1. Grab a 3/8 socket and a short handled wrench, add a 6” extension 2. A small scissors to clip the corner of the CV grease bag 3. I use a medium size syringe that I buy on Amazon. . I take the smallest size heat shrink tubing and shrink it on the syringe, That allows me to effortlessly load the CV grease from the bottom of the box up. Just open the top threaded cap of the filling box (not the one with the standard screw driver rounded head) and fill it so that the gear assembly is well covered. Carefully tighten in the cap and you are done.
- 2 replies
-
- 1
-

-
- steering box
- steering oil
-
(and 2 more)
Tagged with:
-
There is this guy in my town that the town folks call "Dr. Obvious." He is a really nice guy, but he can't help himself. If he buy an ice cream cone he'll say "these things leak all over the place unless you just get right on eating them." I saw him stop to yell up to a guy mounting an outside air conditioner on the second floor from underneath the ladder the guy was using "be careful on that ladder, those things are dangerous." Anyway, it's like a foundation statement for him has just has to get out, it's his contribution, generously offered up. So, yea....the idea that an almost 100 year old car does not have the benefit of....a 100 years of progress....is absolutely true. But as you can get in trouble at low speeds with a rumble seat, like 10mph. One can TOTALLY eliminate the risk of slam shut on rumble seat in low speed situations. I do it, not because I can....because one should. Thanks for the comment. Check this out...these would cut the head off the folks in the rear seat.
-
Flathead 6 - Head Torque both Initial and Maintenance
Semmerling replied to Semmerling's topic in P15-D24 Forum
Jerry, there is allot here...so anything here you have an issue with just let me know. -

ADJUSTING VALVES - MOPAR FLATHEAD 6 - Speedy Guide
Semmerling replied to Semmerling's topic in Technical Archives
THIRD FILE IS JUST A REMINDER OF THE FIRING ORDER OF THE MOPAR 6 CYLINDERS Where as the cylinder number starts on the RIGHT hand side as #1 ( 6 5 4 3 2 1 ) The firing order is as shown MASTER BLOCK GUIDE.pdf -

ADJUSTING VALVES - MOPAR FLATHEAD 6 - Speedy Guide
Semmerling replied to Semmerling's topic in Technical Archives
-
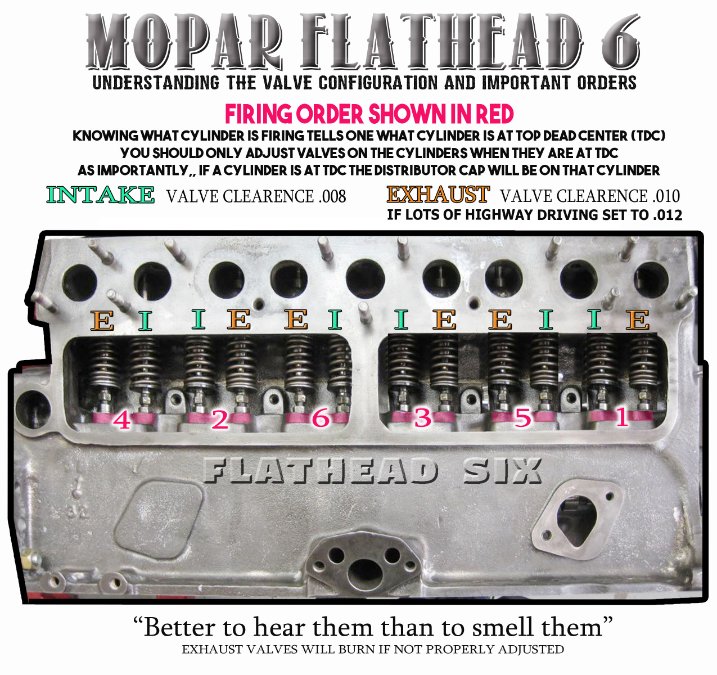
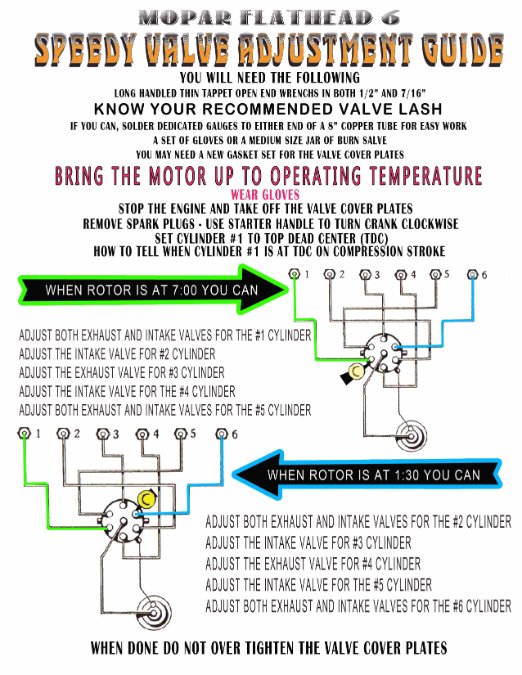
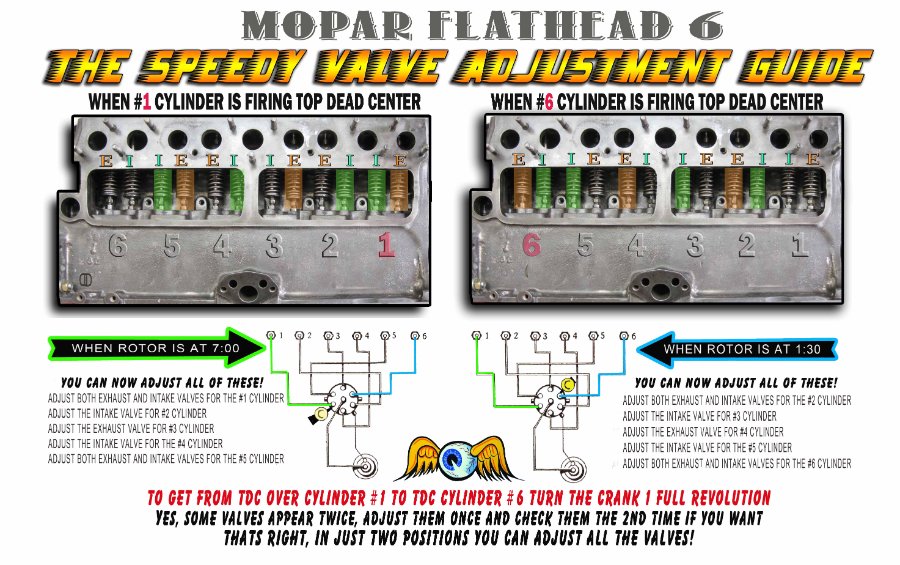
I created the following graphic illustrations for those that are approaching the topic of adjusting their valves on a MOPAR 6. Notes: - There are many ways to go about this. This way is for people that are going to more closely follow the original factory methods whereby one does this work on an engine at operating temperature and when that very same engine is turned off. - Valve adjustments vary between early MOPAR FLATHEADS (early 1930s) and later MOPAR FLATHEAD motors. Generally, the early years warm engines have their INTAKES at .006 and their EXHAUST at .008. Later years seem to come in at INTAKES .008 and EXHAUST .010. Know what you setting should be. This guide allows you to adjust ALL the valves by rotating the crank in only two positions. With the #1 cylinder in Top Dead Center you can do a great number and then, by rotating the crank one full 360 rotation, you can do all the rest. Yes, some valves do duplicate, but you dont have to do them twice. The PDF you CAN SEE you can zoom in on. The PDF file will allow you to down load a high resolution printable document I will set these in in multiple posts as the files are large FIRST ONE IS A THE OVERVIEW - - You see a jpg file below that you can zoom in on partially - The PDF file can be downloaded in high definition and printed out. WITH BLOCK.pdf
-
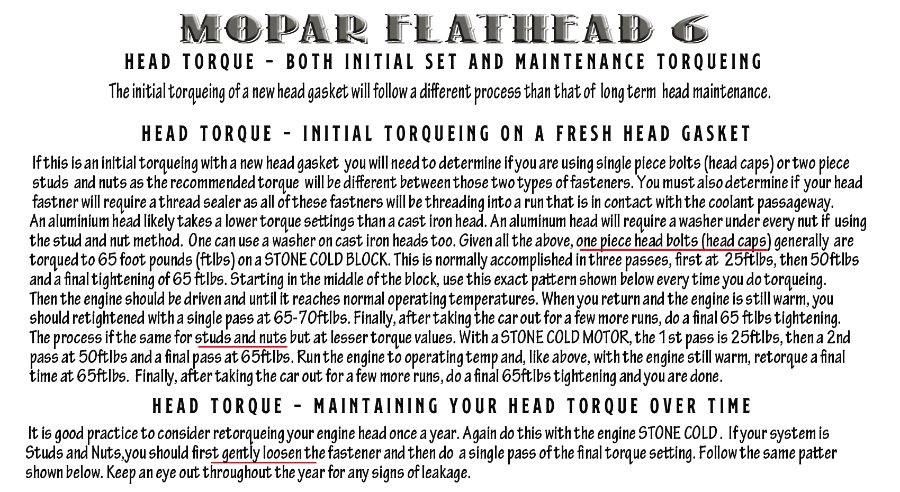
I created the following three (3) graphic illustrations for those that are approaching the topic of torqueing the head on a MOPAR 6. Notes: - The torqueing that you should apply depends on the fasteners that you are suing or your head. Generally one piece head bolts are torqued per OFM (Original Factory Manual) at between 65-70 Foot Pounds. If you are using two piece studs and nuts is can by either 65-70ftlbs or, if using aftermarket modern two piece fasteners it could be less based on the pitch of the threads, most likely 55ftlbs. Take the time to know which you have, - Aluminum head must use a washed under the nut on a two piece fastener system. Aluminum heads are soft. CLICK ON the graphic image below to ZOOM in. It is 2 parts , click on the text and then the engine. CLICK on the PDF file on topas it will allow you to down load a high resolution printable document. PSD MASTER 34 DODGE - TORQUE HEAD.pdf
-
- 2
-

-
-
Only one chokes from the cable, but if for some reason I need to choke the other I made a manual one for the forward
-
Sniper, in truth the ambulances of the period brought the equivalent of a bowling ball bag to place the decapitated heads. No roll bar and a high chance that a roll would do head damage front and back. My grand parents kept my dad seated between them....as in no rumble seat. This was 1934
-
PDF STYLE SEAT BELTS AND RUMBLE LOCK.pdf
-
Ive seen that too and it should work. The head of the seat belt has to be taped over if seat belts are stored in the "tween the seat cushions for use. Here....
-
In the day, dive under
-
I would be curious if others have created safety lock for their rumble seats. In the period in which they were used, rumble seat were known to be deadly in crashes. Aside from a lack of seat belts and passenger faces striking by the top edge of the car's body, the rumble seat would snap closed and in some cases decapitating the occupants. I went as far as to place a heavy spring loaded bolt at the rumble seat rotation point that "pops" into a hole in the heavier steel support on the rear quarter panel, One has to manual pull the spring loaded bolt pin straight out in order to reclose the rumble seat. Has anybody else done something similar? Seat belt can also be found when one first opens up the seat by reaching through the seat-to-back gap that is there 1/2 way up. The belts do not show unless they are needed.
-
Here is what we know thus far... "I have a '47 DeSoto Custom and would like to drain and clean the gas tank before going too far with the fuel system. - Good idea. If the fuel is bad it will ruin any work you do on the fuel system. Here are the questions you asked "I assume you just take the plug off on the tank and drain the gas? " - If you take the plug out liquids will come out quickly until it empties or is replugged - If the fuel is still able to go out through the fuel lines, you could do that too. - As mentioned, one can go in through the top in a number of way - You could safely crimp the fuel line, properly deal with the gauge top end and anything else.....and remove the tank filled. Then you would not need to deal with the fuel....or the old tank.....and you could find a proper place to deal with both. z "Silly question, but where do I put all that gas?" -In a fuel safe container sized for the amount you might/do have. Or you leave it right there....read above. "Is the inside of a gas tank clean?" -It can be clean or it can be in a complete state of ruin - Does your car have a fuel filter. If it does, did you look at it? "Does rust get into it?" - Yes it can and does especially when the tank is old, not sealed and not full of fuel. - Does your car have a fuel filter? If it does, did you look at it? "How do you know if you need a new tank or do the rocks and solution rattling around bit?"" How do you know if I need a new tank or I should try some of the offered cleaning tips? - Regardless of keeping the OLD TANK or getting a NEW TANK the old tank's fuel and tank are still going to have to come out. - Remember if you GET all the fuel out and then CLEAN the tank you will need to deal with all the CLEANING SOLUTIONS/DREGS as well. But forget all that, you need to find somebody that can safely work with fuels and is capable of knowing what to do when see what your situation actually is. Better that than having Where he Blue of the Night meets the Red Flames and Black Smoke of the Day
-
If only to charge the cell phone (gps). My dash never provided for one, too early. It is mounted on the steering wheel column. Fused and what fills the lighter is a dual USB flush plug under a rubber cap. Maritime unit for a convertible.
-
LOOKS LIKE THE PDF FILES WERE TAKEN DOWN.
-
Here is the relatively rare Dodge Wings that I created this last night for a display. It is a three part print out on photo paper on a good printer and then a cut and paste/tape. See below. LEFT WING.pdf WING RIGHT.pdf MAIN BODY.pdf
-

Flathead 6 - Head Torque both Initial and Maintenance
Semmerling replied to Semmerling's topic in P15-D24 Forum
Ed, when you take a stand you make a strong case. Captain Lance Murdock salutes you and would like to borrow your car. -

Flathead 6 - Head Torque both Initial and Maintenance
Semmerling replied to Semmerling's topic in P15-D24 Forum
Ed, Now you and I had a long talk about this, remember? It was right after you admitted that you haven't greased your chassis since Officer Joe Bolton left WPIX. We can talk about the maintenance part but I'm just going to say the say the exact same thing I said back then "Ed, what do you think I find when I retorque my head?" and you said "it was not up to torque?" and I said "yes, Ed, not everything but always something" and you said "I guess I better get right on it" and I said "grease your chassis too." So lets just save some time "Ed, torque your head and grease your chassis, in fact do it for all five of your rigs, at worst all you'll here is a bunch of clicks." -








.jpg.27cfa8bdc4d055ae5e032d86d35544a2.jpg)

