


Tired iron
-
Posts
191 -
Joined
-
Last visited
-
Days Won
10
Content Type
Links Directory
Profiles
Articles
Forums
Downloads
Store
Gallery
Blogs
Events
Everything posted by Tired iron
-
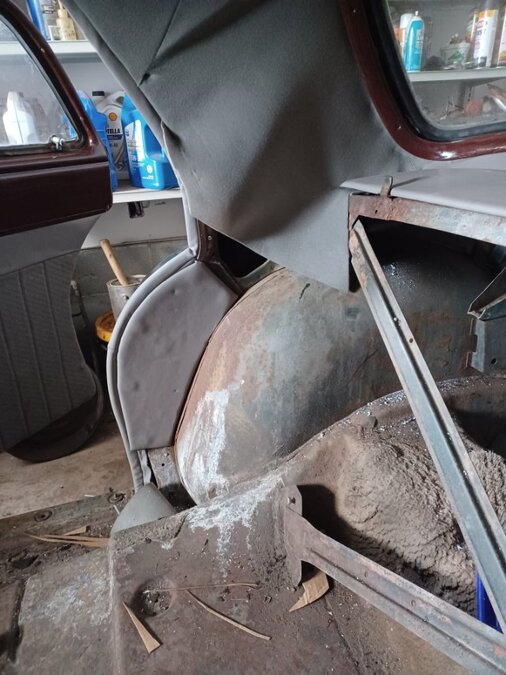
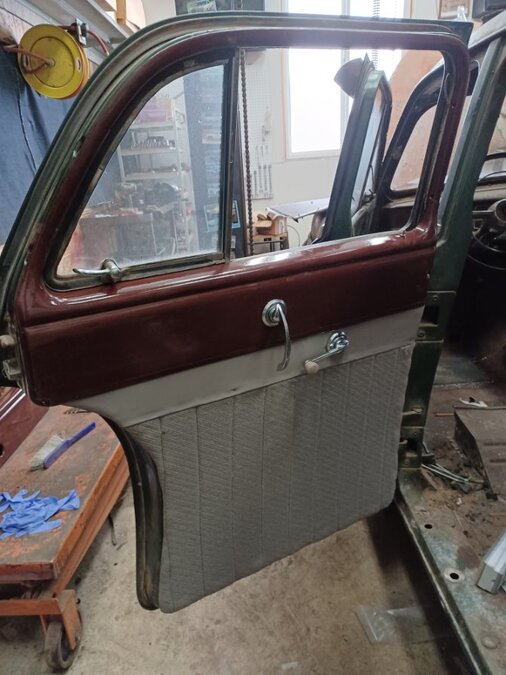
I've got my door cards built and installed and today finished up the headliner. This car had absolutely no interior upholstery to work with...nothing to even use as patterns...so, all things considered, it's turning out pretty good. The bulge in the center of the headliner is where I haven't cut out the dome light bracket. A question for you all. In the last picture, you can see where I've installed the lower side panel. Above that is an upper side panel, which I'm getting ready to install but I don't know how the headliner material attaches to it where the headliner material comes down to meet it. The only thing I can think to do would be to staple the headliner material to the back of this upper panel, and then snap the panel in place. If anyone can describe how the headliner joins the upper side panel, and/or provide a picture of what it looks like when finished, I'd sure appreciate it. The car is a 1950 dodge meadowbrook.


-
Thanks, everyone. I'm not going to do anything with it, but was just wanting to know what it was before i covered it up!
-
Needle bearings into transmission input shaft help!
Tired iron replied to rrunnertexas's topic in P15-D24 Forum
That last needle needs to be slid into place from the end and then it'll slip right down in. Do NOT force it into place! And do not run it with one less needle as there would be way too much clearance and your input shaft would fail prematurely. -
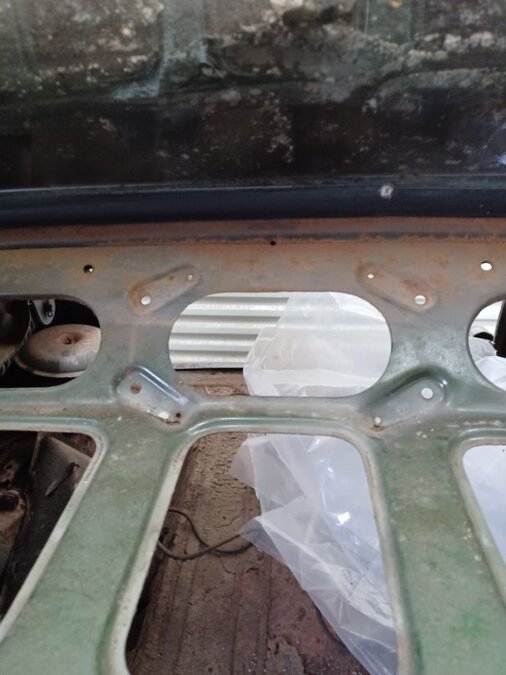
I'm currently doing the upholstery in my 1950 dodge meadowbrook. It's quite the puzzle because everything is gone or rotted... door cards, headliner, kick panels and rear package shelf (I think that's the correct term?). Anyways, in the middle of the most-rear frame, immediately under the rear window, there's a big hole that looks like it was for mounting something. And that's my question: was there something that was supposed to go there? If there were two of these, I'd guess small rear speakers.
-
“Addressing State of Interior” RE Starter & Generator
Tired iron replied to Saskwatch's topic in P15-D24 Forum
i used to work in a motor repair shop and we would do this kind of work daily. Emery cloth to clean up the comm. Then examine the slots between the comm bars. Clean out with a small screwdriver turned the thin way if there is any crud or copper filings. Done. You cut the insulation down only if you've cut the comm down in a lathe in order to even out a comm that's been worn/grooved down from the brushes. And, in that operation, a hacksaw blade can be used AFTER grinding off the sides of the teeth that have been set out a bit. In this way, the teeth will cut down, but not out at all. You don't want to widen the gap of the comm bars. Have fun! -
You're correct! Since your rotor spins clockwise, turning your distributor counterclockwise advances. Think of it as you are turning the distributor to "meet" the spinning rotor sooner, thereby making the spark happen sooner which advances the timing.
-
That's what I have been assuming (like the door cards), but I've seen quite a few pictures of other people's cars where there are screws visible on the kicker panels.
-
Expect more of these questions about redoing my interior on the 1950 Meadowbrook as pretty much the entire interior--panels, headliner, seat upholstery--was just gone. Today I'm making up the kick panel templates and notice two things: one, that there are some really big metal teeth (bigger and different than the comb teeth for the headliner) and, two, all all the pictures I see of installed kick panels show screws as installed. So, are the teeth to hold the windlace in place? And then put the kick panel in place and screw it on? I'm probably over-thinking this, but just want to get it right. thanks, gang.
-
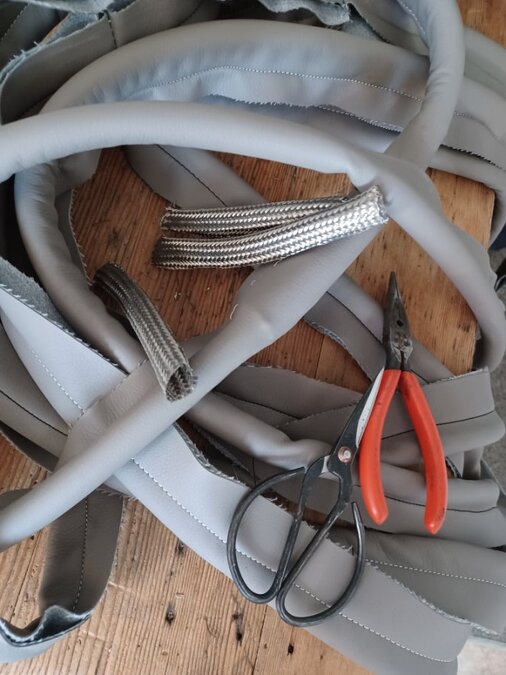
I rummaged around in my shop and, wow, a roll of tubular wire mesh. I cut off four 6" long pieces and slit them open longways. Then I mocked up the widlace so I'd know where the 90 degree troublesome corner is and thrn opened up the windlace there, snuck in the wire mesh and re-sewed thr windlace back up. Worked really well to tame the windlace into a smooth arc at the corners. Thanks for your ideas!
-
This is a good way to do it, and I add one more thng: a momentary switch so that, in the spring when the carb bowl might be empty, I can prime the carb before cranking. This can be especially helpful for my big trucks that have long plumbing rund]s from the fuel tank way out and up to the carb.
-
I made up this windlace color/material matched. I used a soft rubber tubing for the core. I think your note about the wire mesh explains my issue. I'll experiment with reinforcing the corner section by opening up the windlace at that point. And good call on not throwing that roll out. You can have the fabric/vinyl of your choice sewn up around that core. Upholstery shops do it all the time.
-
Am now attaching my new windlace to the tack strips and I don't like the way it looks when I go around the 90 degree corner. What's the secret to getting that right without bunching up? I've read about adding a wire, but don't know if that would help for the tight corner.

-
Im guessing you probably don't want to dig this deep into this, but I replaced my entire brake lines with the new easy to bend nicop lines. I got a kit with plenty of tubing to do the whole car plus all the fittings for about fifty bucks. Or for some more money you can get a kit with all the lines pre cut and flared.
-
You should give it a try. We mig and tig and plasma cut...this is just new materials and tools for making stuff. I've found it to be a very enjoyable change of pace And your hands don't even get dirty! Yes thanks...its the price that's the no-go. And congrats on the start-up. That's always a lot of fun. Thanks, I had missed that one.
-
Hey good folks. I havent posted in a while about my Meadowbrook project because I've been schooling in the upholstery world. The interior was completely gone and I decided to do all the work myself both because it'd be a chance to work on some new skills...and, well, I can't afford to have a upholstery shop do it! SO, I got a great old Consew industrial sewing machine and a whole bunch of cloth and vinyl and foam and have been learning how to sew, thanks to YouTube. I've just finished the door cards and am currently working on sewing a headliner. It's been quite the head scratcher cause the original headliner was completely missing and I've had to make up a template and then transfer that to the headliner cloth. I've just finished sewing it up today and later this week will see if it fits. It's a big if, but if I really got it wrong i'm just out the price of 3 yards of fabric. One thing I can't find is the chrome lever on the drivers side that adjusts the position of the front seat. Anyone know where I might find one? Mine is broken off in half.
-
Albright upholstery supply.
-
I'm on a limited budget and am also using my meadowbrook as a learning project for my newly developed upholstery skills. Sooo, instead of going original authentic, I'm using materials that look good but are way more reasonably priced...like 10 to 20 a yard for fabrics and vinyls obtained from upholstery supply companies. Check out Albright, for example. And no shipping charges AND you get it when you want it.
-
Hey, a little off topic, but while you guys are here... anyone know how many amps the overdrive solinoid draws at 6 volt system? or h ow many amps that circuit breaker is?
-
Trouble installing new handbrake band on 48 DeSoto
Tired iron replied to MarcDeSoto's topic in P15-D24 Forum
Just to get back to those who have thus issue... I just didnt want to shave a bunch of lining off my brand new ebrake. So instead of making the fat lining thinner, i removed the bracket on the bottom and ovaled the mounting holes about an 1/8" . That fixed the problem beautifully. -
Picking a paint store. Auto Color Library?
Tired iron replied to MarcDeSoto's topic in P15-D24 Forum
Hey Marc, Ive painted a few cars in the past couple of years. Perfect paint jobs? Nope. But, I learned lots and had fun doing it. And that's why I mess around with old cars to begin with..to learn stuff and have some fun. Go for it. It wont be a perfect car...it 'll be your car. -
Trouble installing new handbrake band on 48 DeSoto
Tired iron replied to MarcDeSoto's topic in P15-D24 Forum
Good info, thanks everyone. I'll post back when I complete a work-around. -
Good catch Ken! It looks like the real nicop stuff is more like thirty, not twenty. Here's an example of the real deal https://rover.ebay.com/rover/0/0/0?mpre=https%3A%2F%2Fwww.ebay.com%2Fulk%2Fitm%2F324350035230
-
Trouble installing new handbrake band on 48 DeSoto
Tired iron replied to MarcDeSoto's topic in P15-D24 Forum
Mine is too thick (said the papa bear). I suppose I can grind some off...kinda hate to do that, tho. One other option would be to oval thr holes where the ebrake bracket is bolted to the tail piece of the transmission. That way i could move it down a bit thereby creating more clearance for the brake band. Irritating, tho, cause it cost me 65 bucks and for that price you kinds think it would be correct. -
Trouble installing new handbrake band on 48 DeSoto
Tired iron replied to MarcDeSoto's topic in P15-D24 Forum
Hey Marc, Did you get your handbrake figured out?. I just put a new brake band on mine and have the same issue...just too tight! For starters, it's too thick where you slide the brake band in between the transmission bracket and the drum. I can force the band in there, but then I dont have any clearance and its pretty tight to turn the drum. -
I just did this job this morning. Got my gasket kit from bernbaum, if I remember right. It's too bad these transmissions sit sideways as it makes for much more sealing issues.

