


clarkede
-
Posts
83 -
Joined
-
Last visited
-
Days Won
3
Content Type
Links Directory
Profiles
Articles
Forums
Downloads
Store
Gallery
Blogs
Events
Everything posted by clarkede
-
I bought a complete weatherstripping kit this past year from Andy Bernbaum Auto parts. I'm in the middle of my restoration and I've installed several of the weatherstripping pieces from the kit so far including the trunk, cowl, front vent windows, and rear vent windows - and all have fit perfectly. If you're not interested in the whole kit, it looks like they sell just the trunk weatherstripping. Here's a couple pictures where I was laying the weatherstripping into the channel before using the 3M Weatherstripping adhesive to secure it. You can see where i haven't cut the material to size at the bottom until the last moment. ** No matter where you get your weatherstripping, make sure you use the 3M Weatherstripping Adhesive. If you haven't attached weatherstripping before, I'd recommend watching a video or two on how to do it without making a mess.


-

Aftermarket Gas Tank Outlet Threads - Which One?
clarkede replied to hi_volt's topic in P15-D24 Forum
I replaced my fuel tank with one from Mopar Pro back in 2020. I also replaced the fuel lines with flexible lines and connectors. I used two adapters at each end of the line (Russel 640330 - Adapter, INV FLR, Straight, -6(1/2"-20). The flex line I used had additional adapters in it - 16FT of 6AN Nylon Braided PFTE Fuel Line Kit (See images)


-
41 Plymouth - any tips for removing side trim clips?
clarkede replied to 41 Plymouth Coupe's topic in P15-D24 Forum
Those look like the back side of aluminum pop rivets. I would probably just cut all of them off with a small angle grinder, dremel, or an oscillating multi-tool with a cut off blade. Then the moulding will gently pull off of the car from the outside (depending on how flush you cut off the rivets). After the moulding is off, you can then easily remove the clips that will still be attached. -
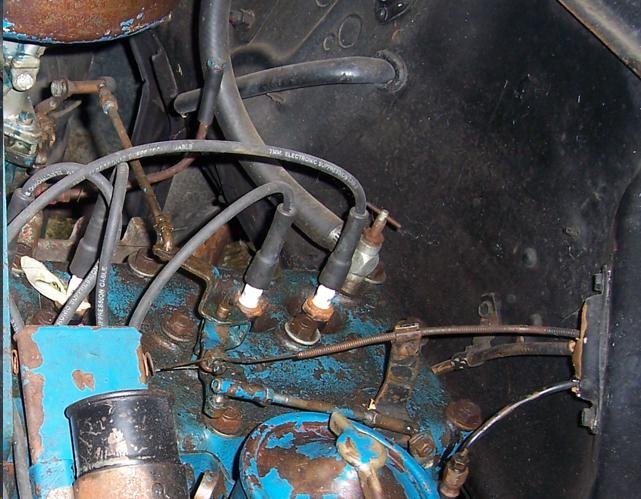
Could your "hot no-starts" be a result of "vapor lock"? Might be a fuel supply problem. I've had this problem where the car starts cold and runs fine, however, after turning off the engine and letting it sit for a few minutes, the engine will then not restart. Many on the forum users have installed electronic fuel pumps (either in parallel or in-line with the mechanical fuel pump) to help solve this problem. Before installing an electronic fuel pump, I've attempted to insulate my fuel supply lines near the exhaust system to help prevent the vaporization of the fuel, but that doesn't completely eliminate the issue of the fuel in the carburetor bowl vaporizing. I remember having this problem when I drove the car a lot when I was younger and I would carry a can of "starting fluid" with me. When it would vapor lock, I would just shoot a little down the carb and it would start right up. To troubleshoot your hot start issue, you might try something like this the next time it acts up to see if it is your coil or fuel.
-
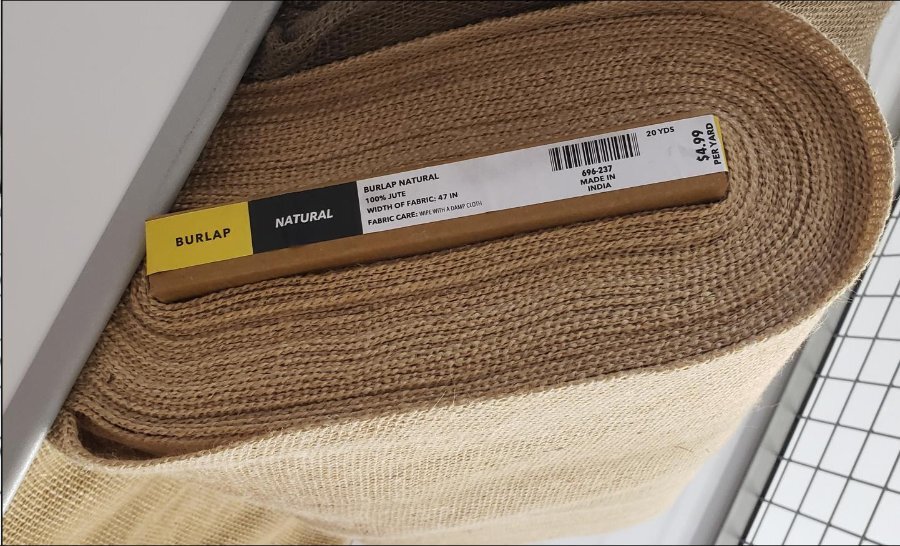
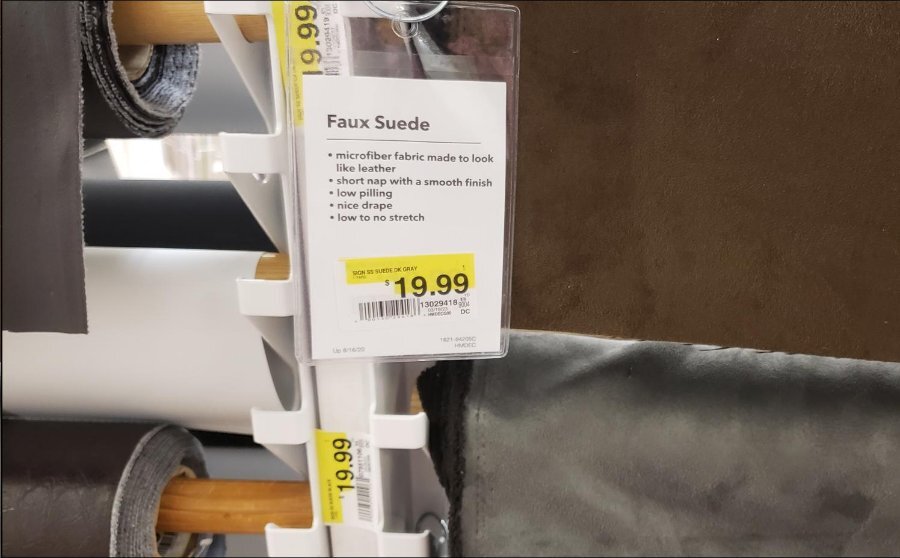
I was recently in a fabric store and found this Natural Burlap - sold by the yard. I'm also thinking about re-covering the seat with a microfiber fabric that would be easy to keep clean. Any opinions on fabric types??
-
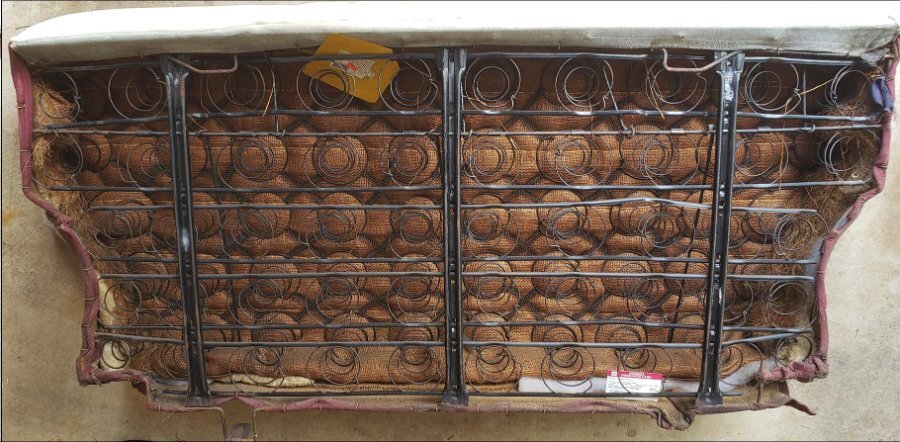
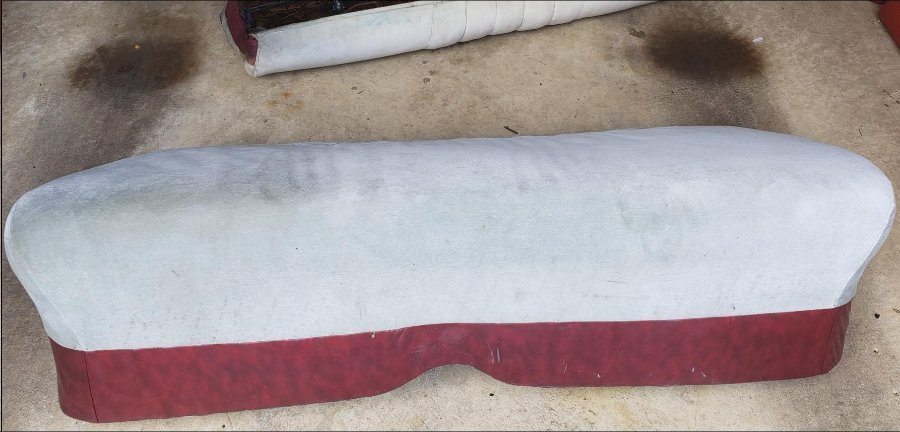
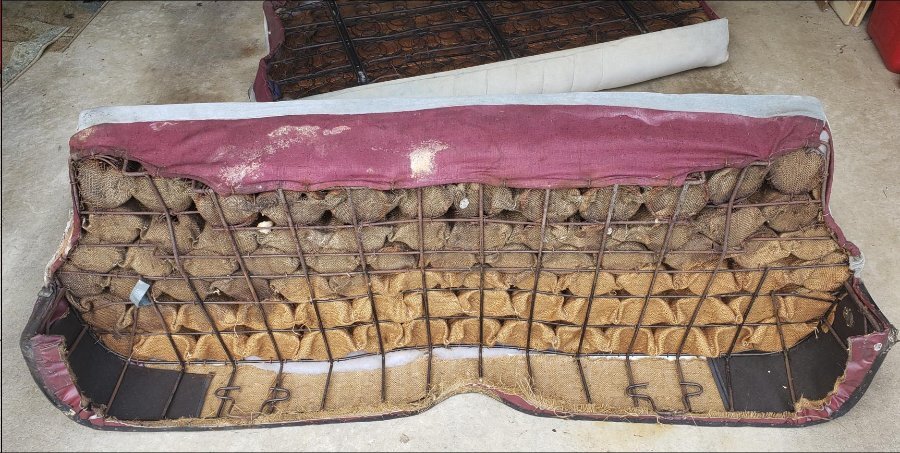
I'm getting ready to reupholster the interior of my car as well and I like the idea of cleaning up and painting the springs and frame. I noticed the my springs for the top part of the seat are not wrapped, but the bottom seat, the springs are wrapped in burlap. Looks like a lot of work. Does anyone have any advice for wrapping or not wrapping the springs? Here are some pictures of rear seat (both top and bottom) where you can see the differences in the springs.

-
Thanks for the information! I've always assumed that D42 was a 218, but now that you mention it I don't have any evidence either way. All, I know is I pulled all the components off my P15 engine and put them on the replacement D42 engine. I would have liked to have migrated over the "hydromatic" transmission. I had never heard of this and thought it would have been so cool to have. Unfortunately, if I remember correctly, the bell housing and transmission were bigger and I couldn't interchange them. I suppose I might have lucked out keeping the standard transmission, because it has never given me any issues (knock on wood). I'm 3/4 through my complete restoration of my Special Deluxe and finally putting things back together. As I get a little closer to starting it back up, I will take your advice and get the spare distributor working and put it in the trunk as a backup. Thanks for the great advice!
-
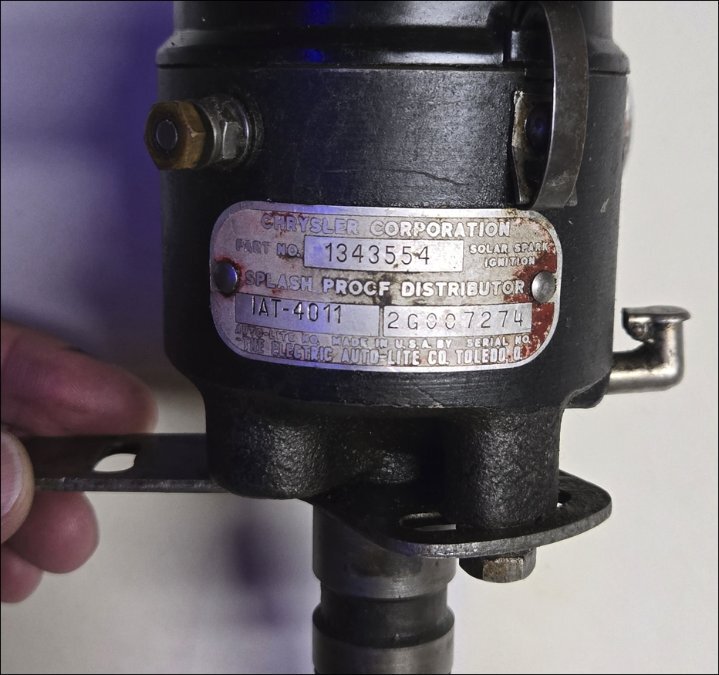
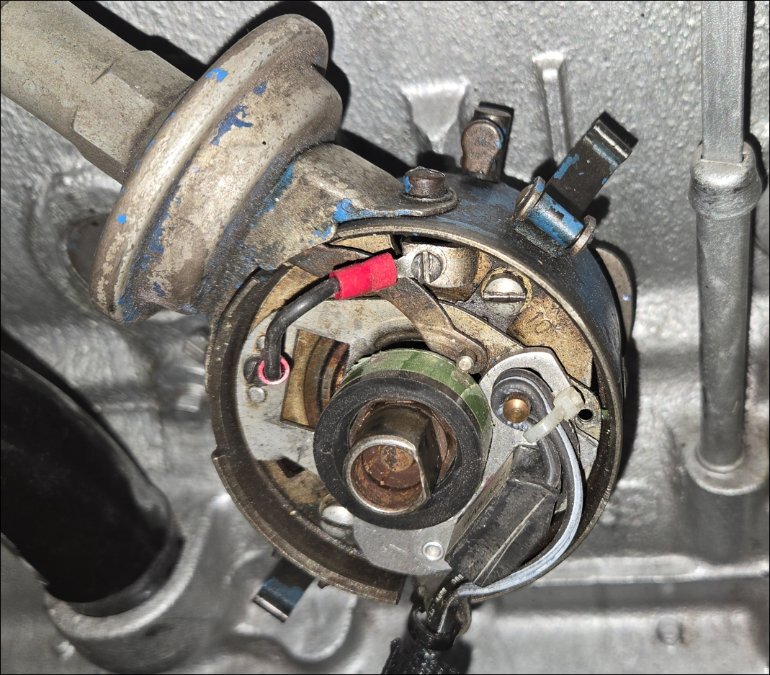
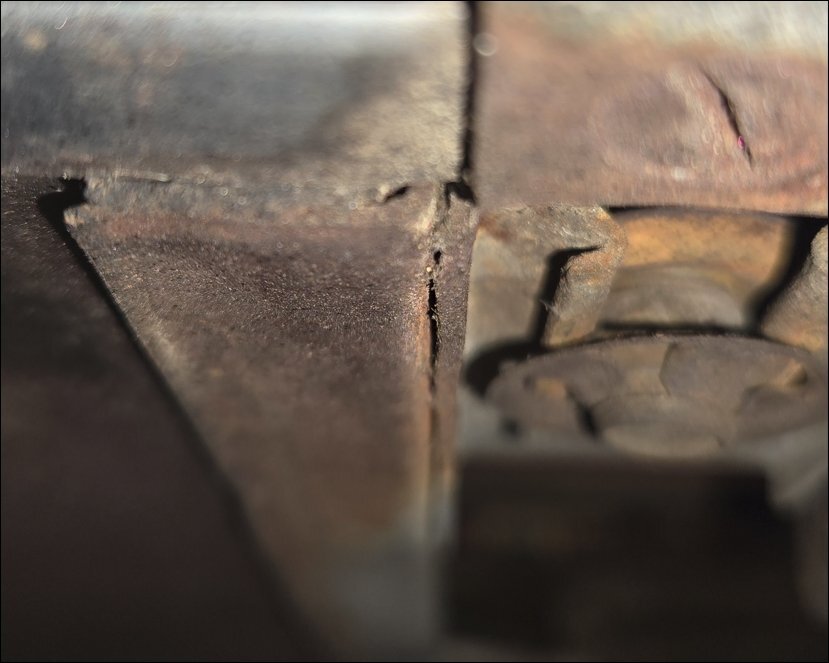
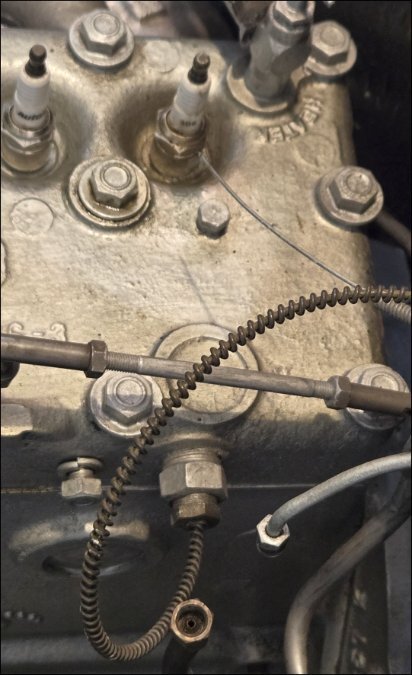
This brings me to a question about a distributor that I have had for many, many years. A little backstory... My original Plymouth P15 engine blew a rod after having it rebuilt by a bad machine shop back in 1986. I got about 15K miles on it before this happened. When it blew, it had a hole in the side of the engine block the size of a grapefruit (see engine image - lower right). The main engine crankshaft bearing came through the hole and ended up sitting on top of the engine. I still have the twisted up bearing - nearly 40 years later. In 1991, I replaced the P15 (218) engine with a D42 (218) engine that I extracted from a 1952 Dodge Coronet. I was young and I remember using the distributor from the P15 and using it in the D42 engine that I was putting in the car. The P15 distributor worked in the D42 engine, but for years I've wondered if the D42 distributor was actually a better distributor. Now, 35 years later, I don't know if I would ever switch back to the distributor that came in the D42 engine, mainly, since I am currently am running with the Pertronix electronic ignition module in it (that I personally love). I know, I know... some of you think they are ticking time-bombs waiting to fail, but (knock on wood) I haven't had a problem with the Pertronix. Now, I just set the timing and don't need to fiddle with adjusting the dwell and periodically replacing the condensor. Anyway, any opinions on the "spare" D42 distributor?? I also now notice says "Splash Proof Distributor" on the label.

-
By the way, the spare distributor I have does have the clip on the vacuum advance arm. I guess some have it and some don't.
-
That looks great and basically exactly what I was thinking of doing. I haven't thought far enough ahead to get a "working" donor vacuum advance module to remove. I do have a spare complete distributor with vacuum advance attached, but I just did a suck test on it and of course i can blow or suck air right through it, so I'm sure the diaphragm in it is also shot. I'm wondering if some other sort of high-temp silicone film could be used to make the diaphragm. I see a lot of options available on the Internet for pump diaphragms including Teflon/silicon/rubberized fabric and so forth. I remember, back in the day, using a tire inner-tube to replace my fuel pump diaphragm until I could find a replacement. Oh the memories...
-
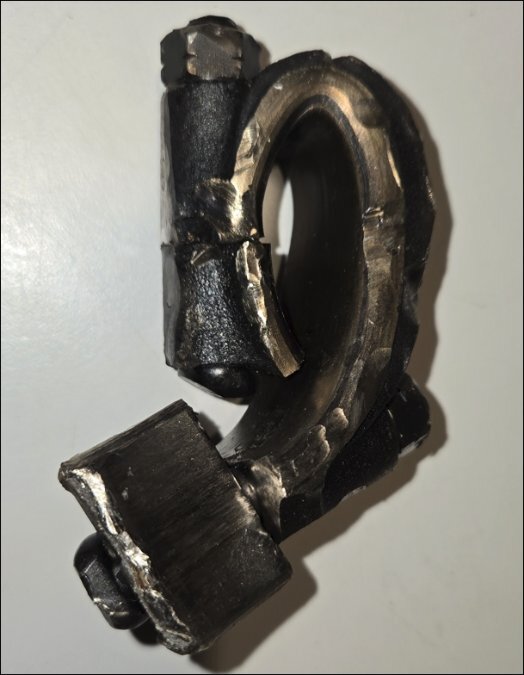
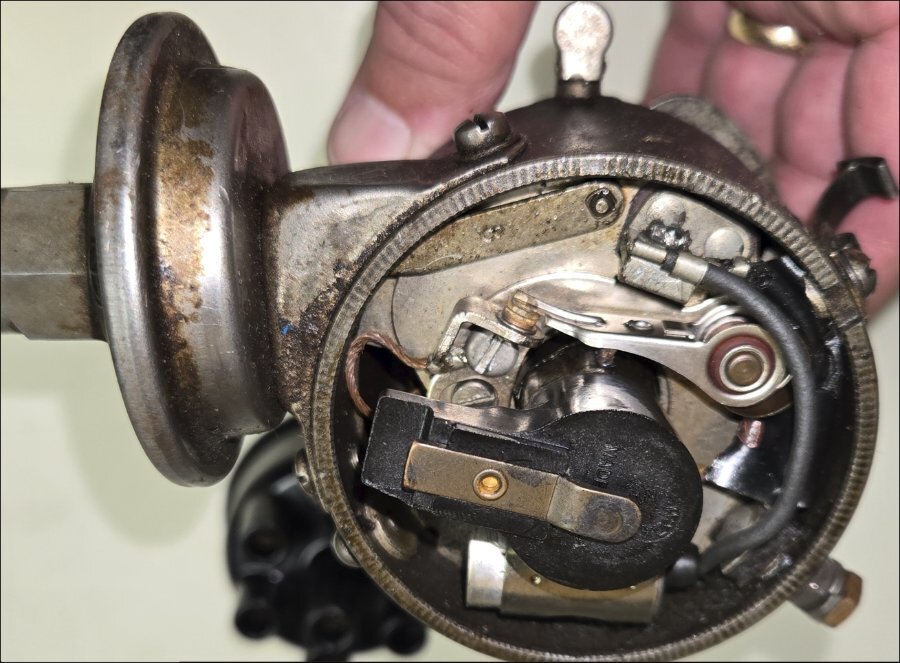
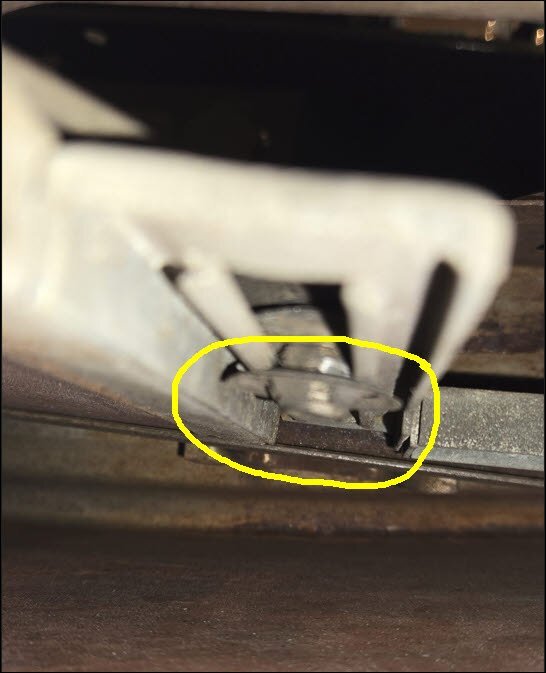
You guys just made me realize that the advance "pin" was hitting the magnetic sleeve of the Pertonix electronic ignition that I installed a couple years ago. Thanks! Also, you can see that I do not have any type of retaining clip to keep the arm from popping off of the pin. I really don't think there is any chance that it would just pop off by itself without unbolting the vacuum advance from the side of the distributor. I am going to be physically cleaning up my distributor in the next few weeks to a month - including possibly repainting it. I would also like to fix the bladder inside the advance as I'm sure it's dry-rotten. Los_Control - I love your idea of testing it with a vacuum pump - which I will also do for the fun of it and watch what happens before and after I clean it up. I've seen where the vacuum advance can be pried into with a lot of patience, so I might give that a try for fun. Otherwise I will attempt to get a new one. Anyone ever attempt to repair it themselves? Is it even worth trying?
-
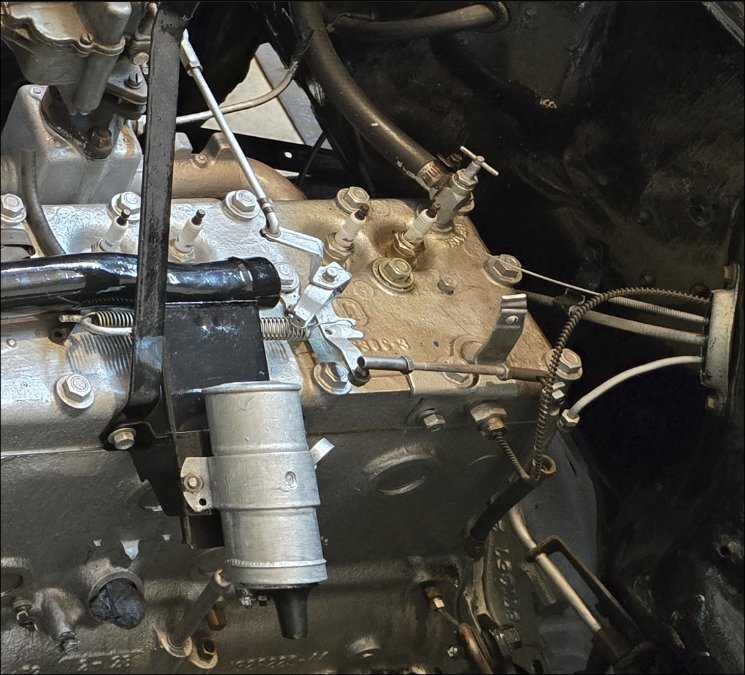
You are correct. I have mine all apart while doing restoration work. I'll try to put the linkages back together and get some better pictures, but for now here is one from my archives showing the cable come through the firewall and attaching to part of the throttle linkage assembly that will basically move the throttle "minimum" up and down to a desired RPM (using the throttle knob on the dashboard). This would allow you to, for example, increase the RPM while the engine is warming up or it could also be used as a "manual" cruise control on the highway - not that we've ever done that before.
-
Do you guys know if steering column holder is aluminum?
clarkede replied to DavidJose1's topic in P15-D24 Forum
I'm going to chime in and guess it is some form of Pot Metal that was commonly used to inexpensively cast various (often intricate) parts. If you look up the definition of pot metal, you will see that it is not magnetic and is basically a mix of iron, zinc, copper, lead and other scrap metals. -
Is this what you're thinking of regarding the gas pedal to carburetor linkage? I can get some better pictures in the morning if it is. Happy New Year!!
-
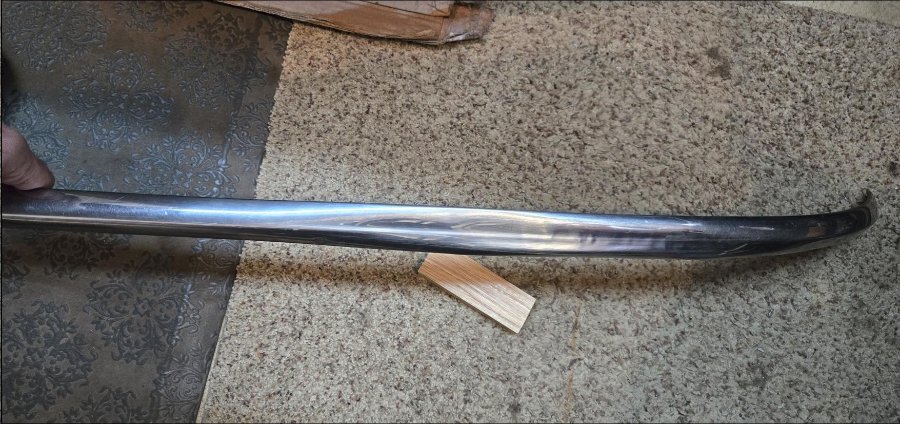
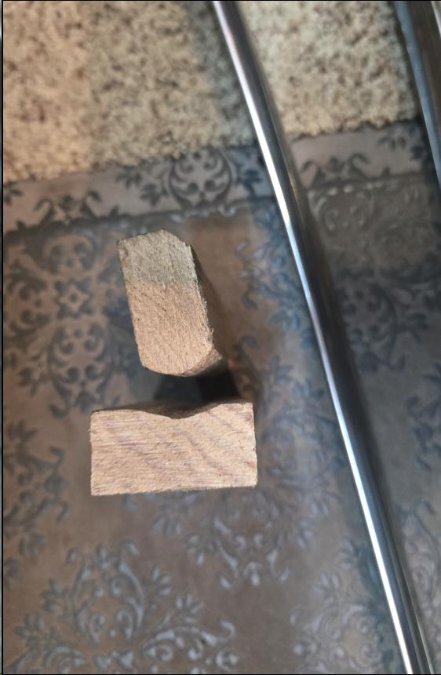
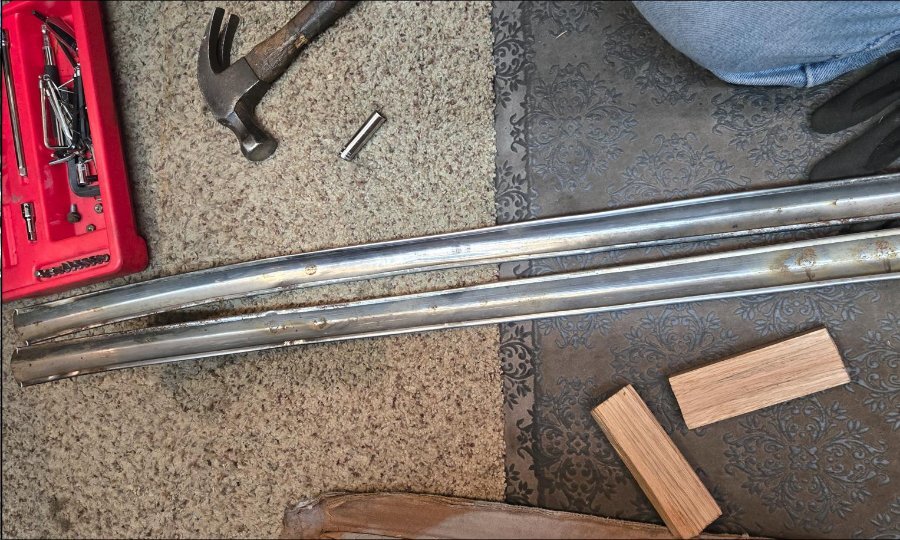
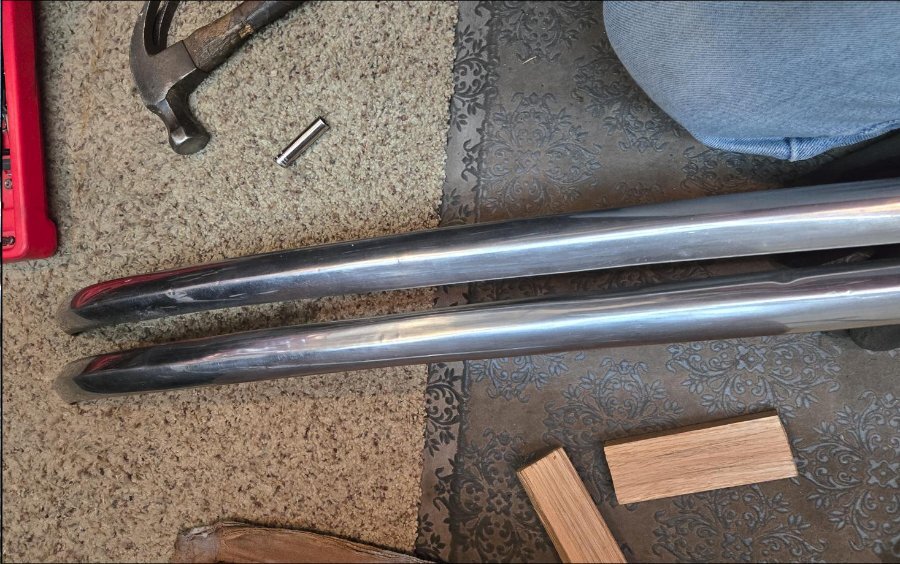
I thought I would share a few successes that I have had recently as I have been completely restoring my 48 Plymouth Special Deluxe sedan. I will start with the stainless steel fender moulding trim that was really in bad shape. Both of my front two fender mouldings (left & right) were severely creased inwards and looked horrible. I was able to restore them to where you can hardly see any deformities. I took two pieces of Oak wood and filed them with a couple wood rasps to conform to what the moulding should look like. For my mold, I used a section of the moulding that was not creased that I wanted the rest to look like. Then I filed one piece of wood that is cupped that the outside face of the moulding would lay on. I file the other piece of wood a little rounded with a little bit of a point would was fit inside the moulding. Then I sandwiched the moulding between the two pieces of wood and placed them on some carpet. I would then start hammering the top piece of wood into the moulding - starting where the crease was just beginning. I would then move back and forth with nice brisk strikes of the hammer on the wood. It only took about 15 minutes worth of hammering to straighten out the crease into the original form. I thought I might leave all kinds of noticeable dents/dings in the moulding, but I was surprised it didn't. It's not perfect, but unless I point it out you wouldn't even notice. Here are a few pictures that show the before during and after.


-
Ah, those help a lot!!! Thanks!! Now I think I go enough to tackle it and clean everything up in there. I definitely want to clean everything up and re-grease. I am now wondering if I should replace the glass or just re-seat it using the window tape I bought. The video post by The Rusted Nut (earlier in this thread) made me think that keeping the original glass gives it some character and has got me thinking that new is not always better (that's an understatement ). So what if the old glass has a little fogging in the corners or a little lamination separation. Any thoughts or opinions on this?
-
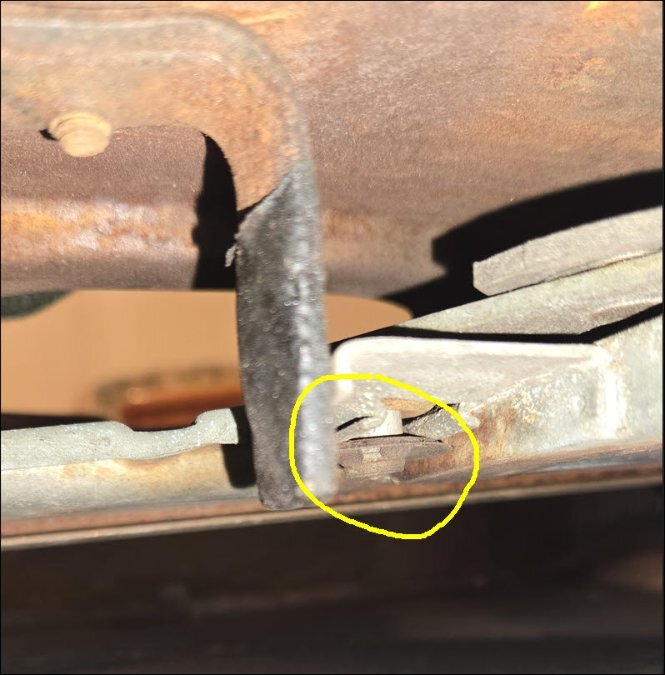
Yes, I have suicide doors as well and those pictures make sense. I now remember loosening up all the screws on the door when I was refinishing them to see what loosened up and those did affect the window track. Do those side screws need to be removed/loosened to actually get the window out and back in or just for window channel maintenance? Oh and a few more pictures of the second door I looked at. These show a different "clip" design to hold the window frame in. There is no tab on these and they look to be some sort of push on clip. I guess I can just pry them off??? I don't know if they will survive for re-use or not?? These are what I felt on the other doors and just gave up trying to find a removable clip. It seems like only one of my doors has the clips like yours. Actually, I have to confirm the other doors still, but I swear I thought I checked them all.
-
I think I found them. I feel stupid because I searched and searched for them before repainting the exteriors, but I couldn't feel anything that felt like a clip. I took ton's of pictures - all of which were making the clips elusive. Everything I felt, just felt round and smooth like a roller wheel. Ok. Now to attempt to get them out. Looks like I just need to pry them downwards slightly and then push toward the top of the door. When I say downward, I have the door laying face down on the painted side. As for the four screws, I'm guessing they are not the regulator mechanism bolts. I'll look for them and attempt to get one apart tonight.


-
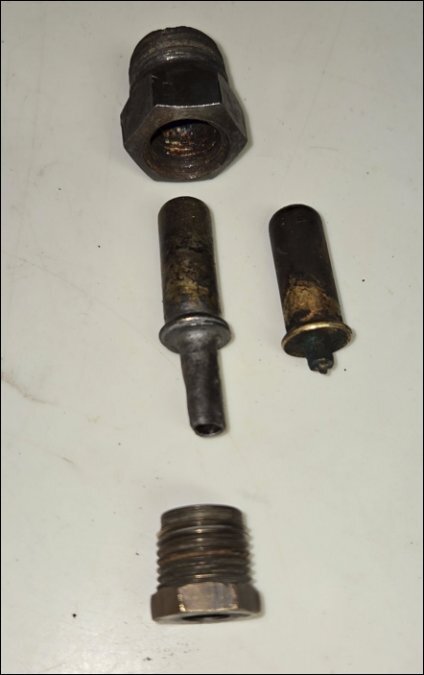
I learned the hard way about the bulb getting stuck and man-handled it a little too much and broke the capillary tube. I forget why I have two broken capillary bulbs. Perhaps one is from when my father worked on it years earlier. I was able to find a relatively inexpensive replacement online in excellent condition for about $90. I kept the old nuts and gauge to remind me how it all fits together if/when I need to take it out again.

-
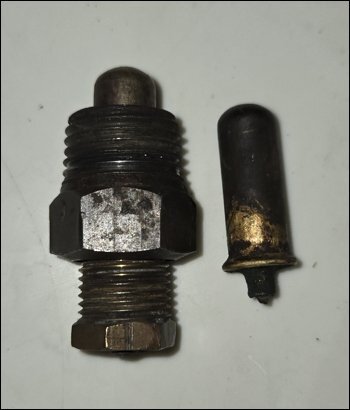
Sniper - Just including a picture I happen to have that shows the plug you're referring to on the top and the temperature probe fitting on the side.
-
Thanks so much. I will look for it tonight and see if it was staring me in the face. For the life of me I could just not find any clips.
-
Plymouthy, I am very interested in what exact clips you used to affix the anti-rattle strip. I don't mind some slight drilling to make way for an easier clip than the original. I only have a few of the original clips that I was able to remove in one piece and I've been looking for another simple solution. Thanks!
-
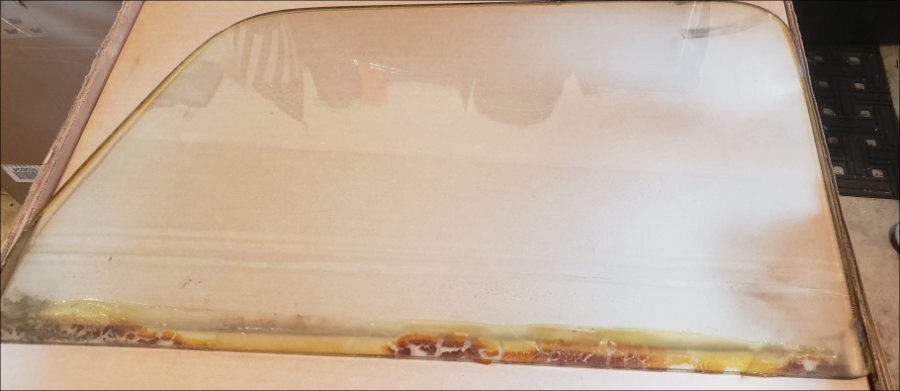
I'm also trying to remove the glass from all four doors on a 48 Plymouth Sedan. I don't see any "clips" to unfasten the window frame. Does anyone have a picture of what they look like or a little more detail to finding the clip. Do I pry something off or squeeze something together with needle nose plyers??? Maybe someone has a picture of the clips on a removed window frame? After I get the glass removed, I plan to have a local glass shop use my existing window glass as a template for the new glass (and cross my fingers they get it right). I've already purchased the "window tape" that is needed to hold the glass in place, but I just need to get the old glass out first and properly clean out the frame to accept the new glass. The glass in one of my doors was loose and I just pulled it out of the frame. You can see in the attached the picture that the glass lamination on the bottom is all messed up. The other window glass looks similar in the remaining three doors. I'm just going to replace all four to ensure they look the same and I might even have them redo the vent window glass if there is a slightly different tint.
-
As a quick test, I've always turned on the headlights and then try and start the car. If the headlights don't come on or "dim considerably", then it's a sign that the battery connections are poor or a dead battery.

