clarkede
-
Posts
87 -
Joined
-
Last visited
-
Days Won
4
Everything posted by clarkede
-
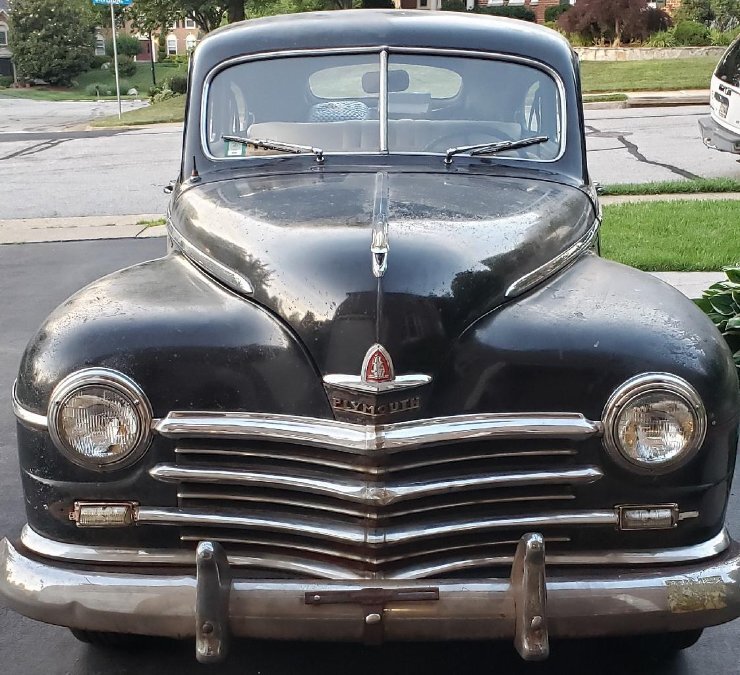
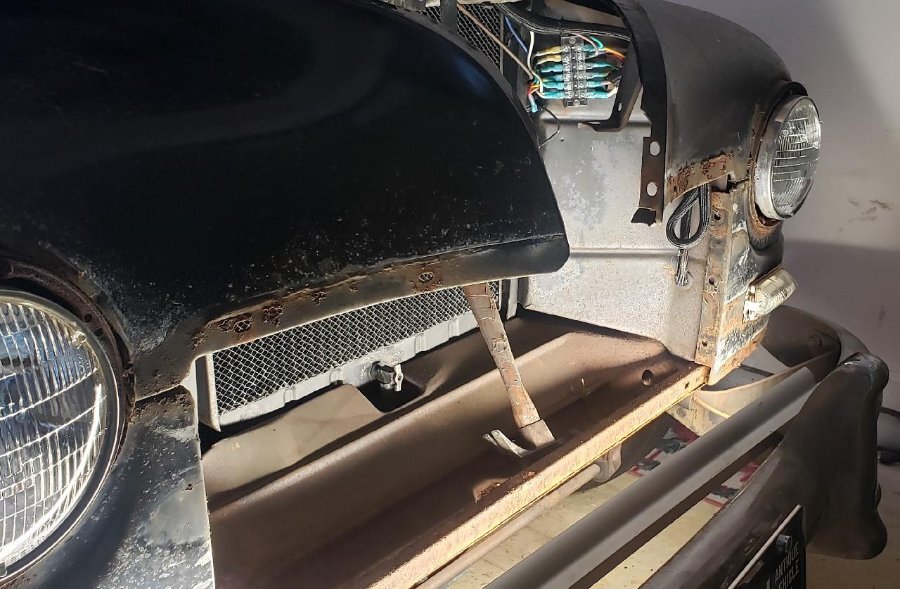
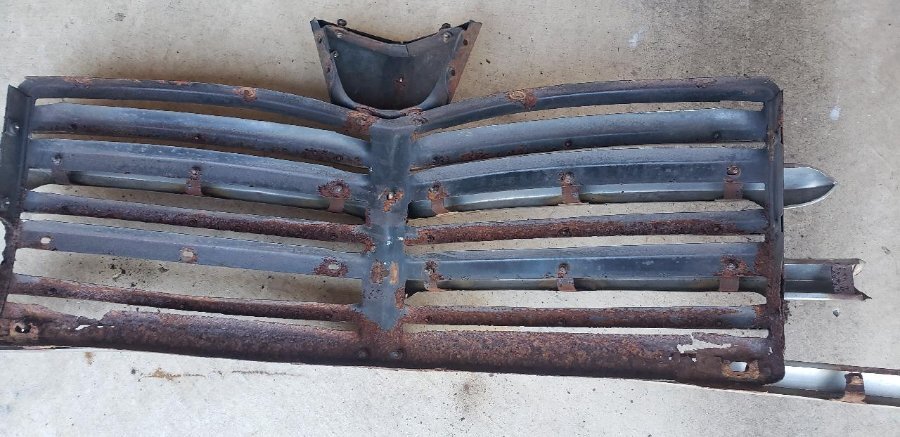
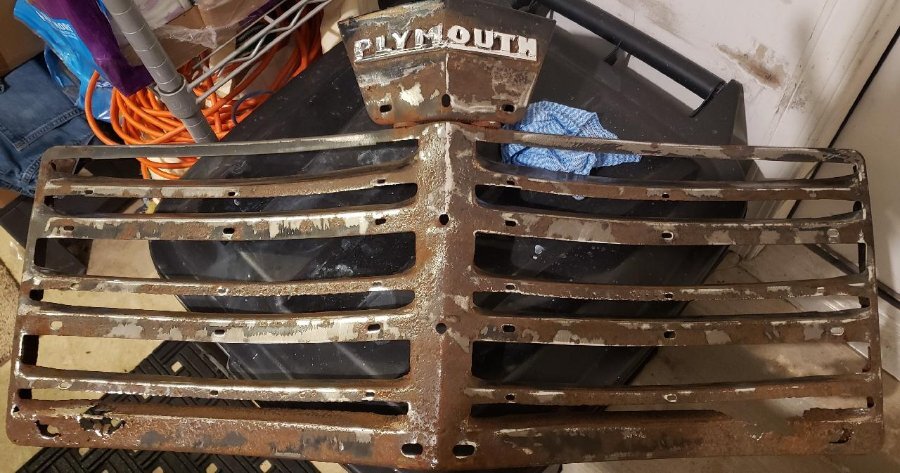
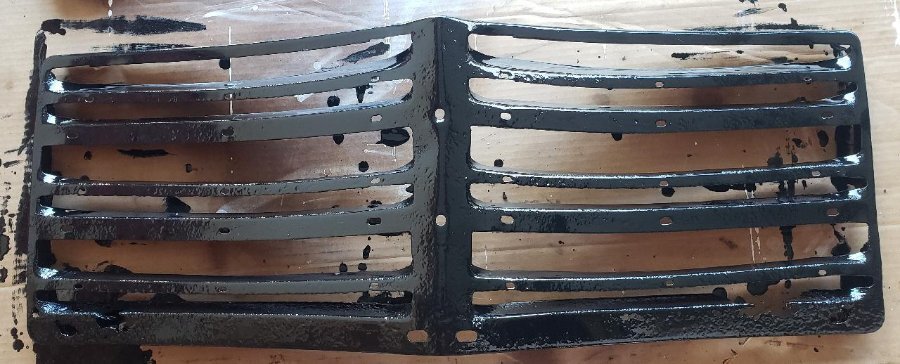
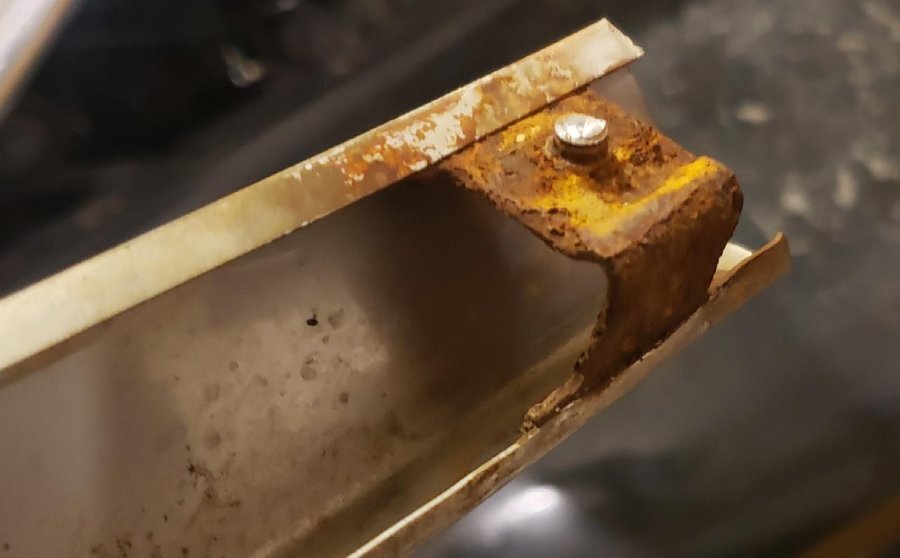
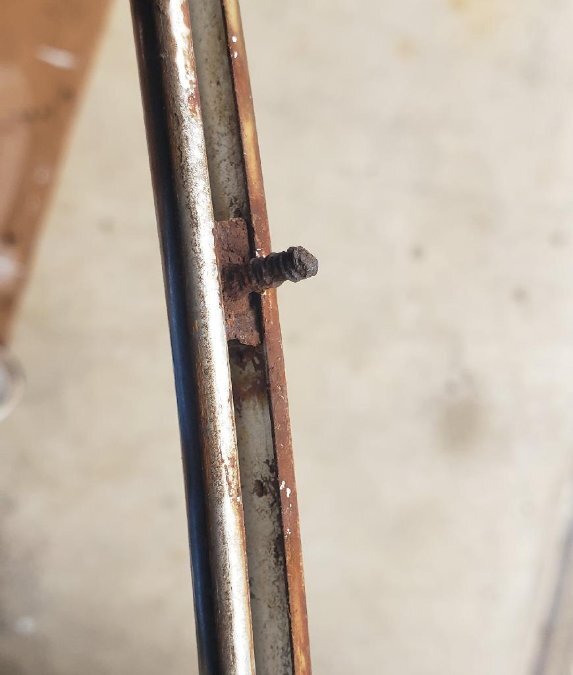
I'm beginning the body restoration of my 1948 Plymouth Special Deluxe. In particular, I'm planning to repaint it myself in the next couple months if I can set aside the proper amount of time to strip everything down and prep it properly. I am not looking to do a crap job, but I'm also not looking to be super detailed with every aspect of it. I tend to be fairly anal about things, so I might get caught up in the details, but I'll see as I move forward. I started removing all the external molding and trim on the car and decided to take fenders and doors off as well so the paint job will look much cleaner. I have a little body work to do on the rocker panels and the bottom of the rear doors and I have been waiting for the weather to warm up a little before starting this project. Well the weather is starting to warm up. after removing much of the external molding, I also pulled off the front grill (for the first time in the cars life) and it needs a little work to say the least. I have attached a few pictures to show what I have done so far. I removed all of the stainless steel trim from the radiator grill panel and then sanded down the grill panel and painted it with some POR15 anti rust paint. Does anyone know what clips are uses to attach the molding to the grill panel? As you can see in the pictures (07-10) the threaded studs are either so rusted or have broken off in my removal process. I want to just replace them with new ones if possible. Also, the clips are either really rusted to the larger stainless molding or they are spot welded together - I just can't tell. The smaller molding pieces looks like the clips slide in from either end. I tried to get pictures to show what I'm talking about. Any help or advice would be appreciated.


-
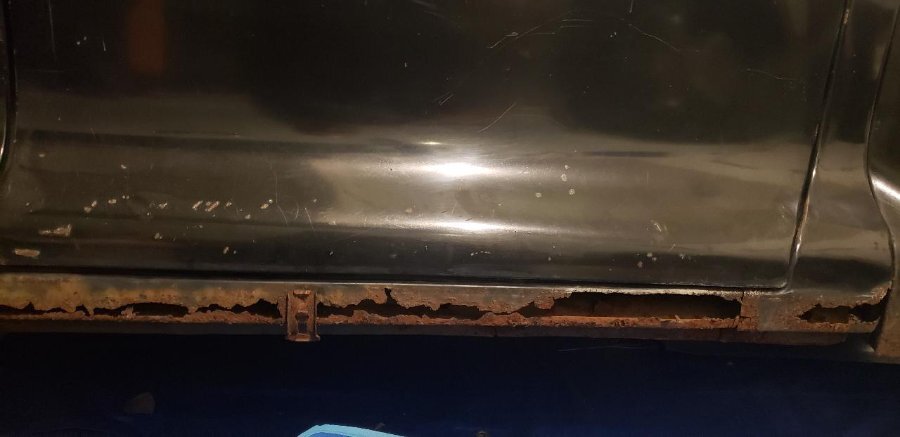
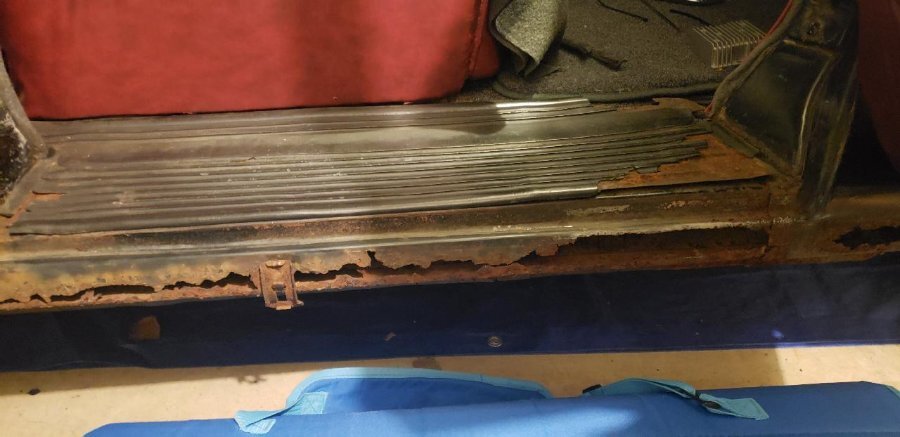
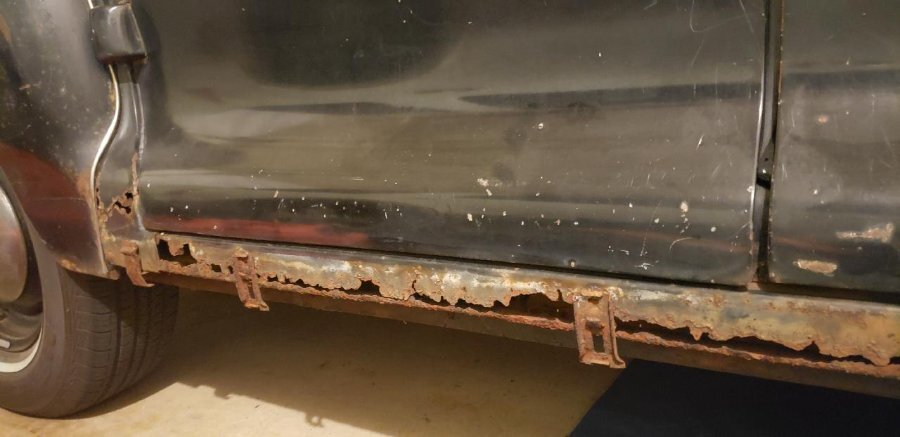
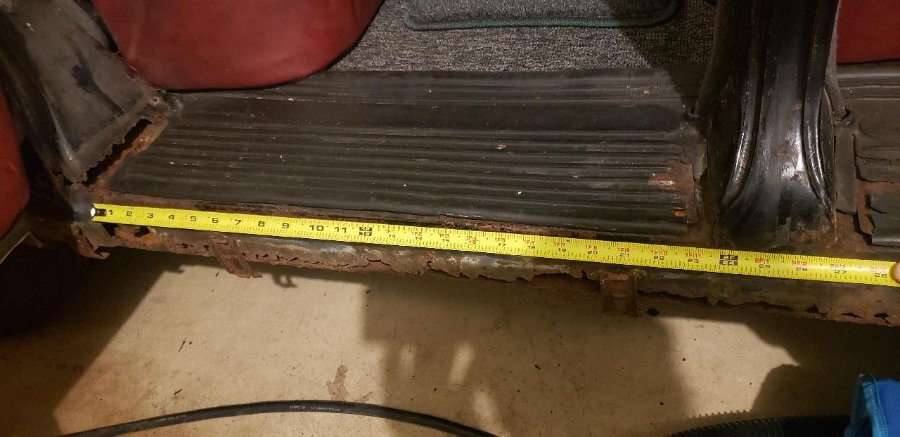
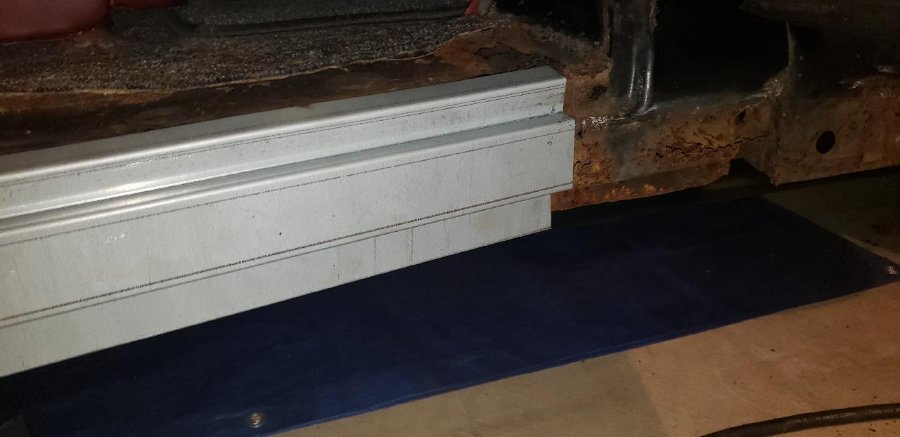
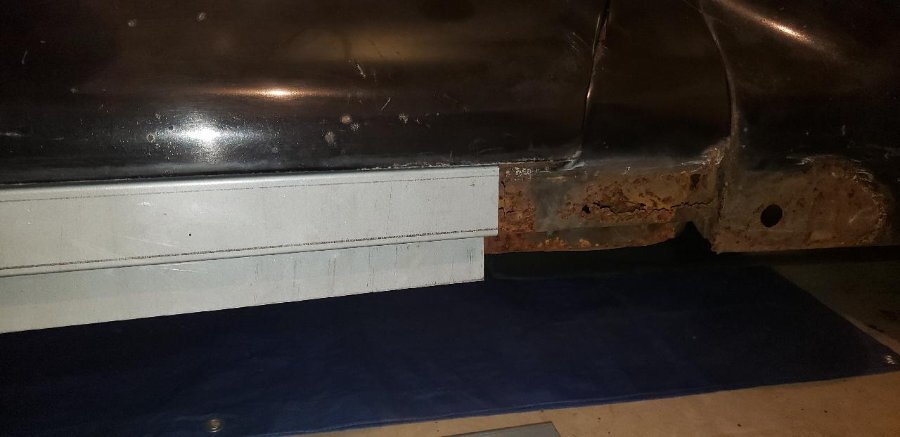
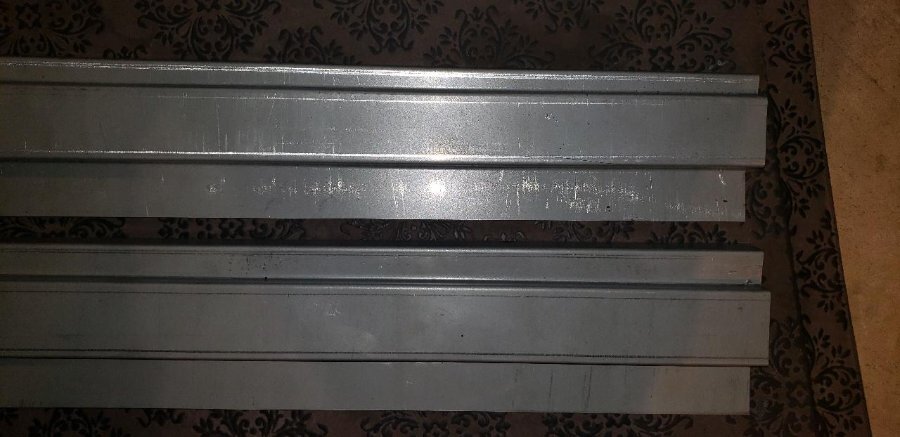
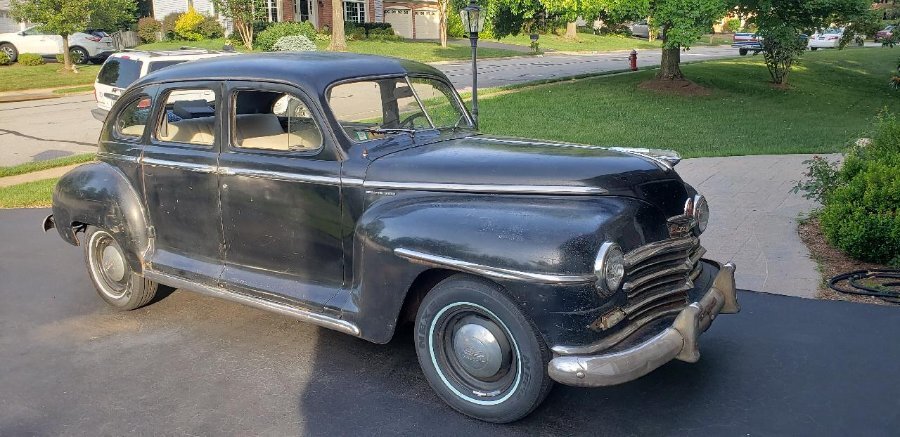
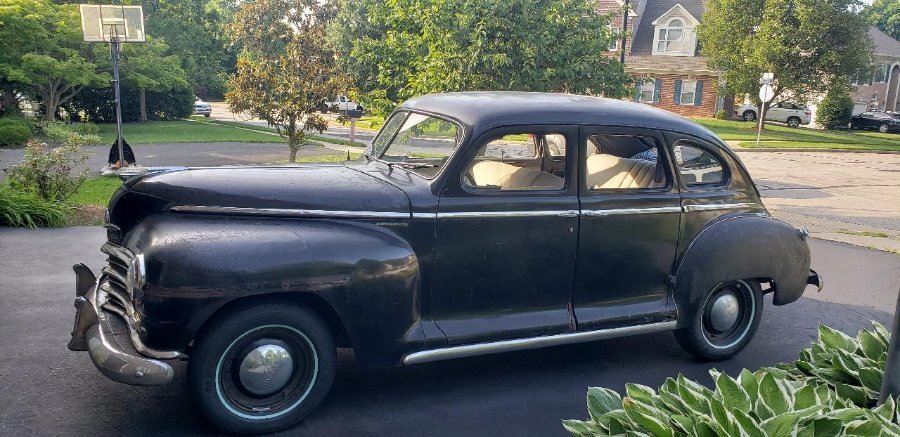
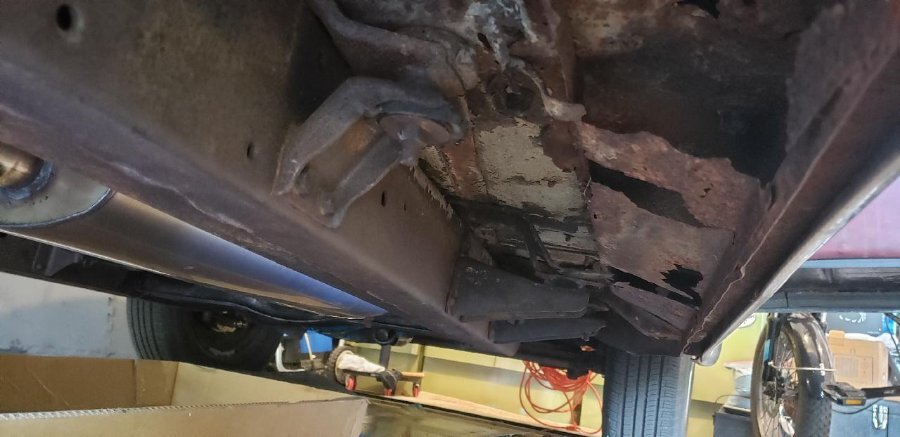
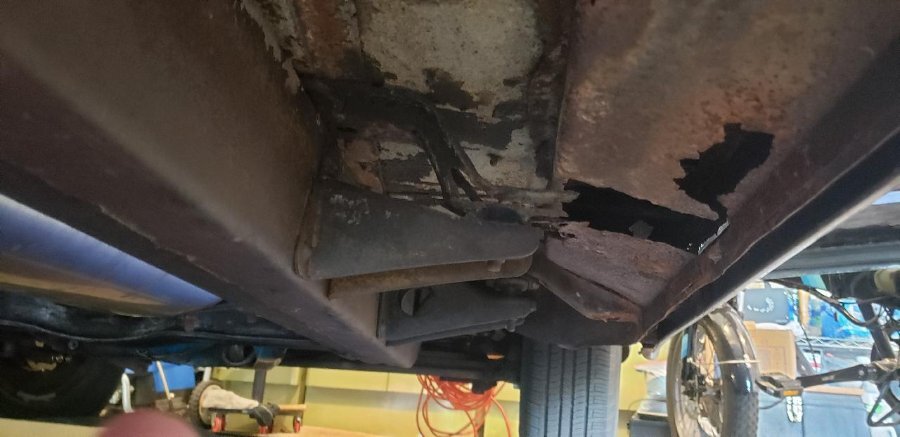
I would first like to share my appreciation for this Forum and all those that participate and share their knowledge and experiences. First - a little background... I’ve been restoring my Plymouth that was passed down to me from through my father from my grandfather. Back in 1984/5 when I was a Junior/Senior in High School I started working on the car and my dad let me take it to college with me. So many fond memories... After finishing school he just gave the car to me to keep in the family. I drove it all the time and it was one of my main means of transportation for many years. Then I started having some trouble with the fuel tank lining disintegrating and causing debris to travel through the fuel lines and into the carburetor and eventually clog the jets. I was able to do emergency road-side carburetor repair to get it going again, but it started happening all the time and I began to lose faith in it as a reliable vehicle (I'm sure many readers of this will know exactly what I'm talking about). Then I let it sit for nearly 20 years as my life focused on raising a family. Then one day I made the decision that it was time to get it running again. After a few months of prep work, I managed to get it started as proof that it was worth it. The feeling was so good to hear it run again. The past two years I spent replacing the tires, entire fuel system (tank & fuel lines), exhaust system, brake system (wheel cylinders, master cylinder, brake lines, front disc brake conversion (scarebird)), and electrical system (all new wiring, improved grounding, conversion to 6V alternator, and added fuse panel). The next main items on my list are to do a little body work and then repaint it. That is what leads me to the topic of this thread – Rocker Panel Replacement. In order to repaint the car I have several things that will need to be done first – including some rust that needs to be dealt with. I am not looking to take this car to the highest degree of perfection, but I would like it to be something that is not an embarrassment to my two young daughters. Unfortunately, my children have been raised with my wife constantly calling it a stinky rust bucket. They have no interest in getting in it, because in their eyes they’ve been brainwashed that it's past it’s time. I’m not doing this restoration for them – it is something that I want to do for myself and I really enjoy doing it. However, my daughters are now in high school and my hope is that if I make it look cool, they might give it a chance and have a little interest in it. I've done some work since these pictures were taken, but here is what it looked like after I got it running again. Now for the project… Overall the body is in pretty good condition. I have a little rust on a couple doors and behind the rear door frame. But the big issue is the rocker panels. I started looking into what they even are and how they work and realized that I was pretty ignorant about them and just took them for granted. But while I was redoing the brakes, exhaust, wiring, etc., I knew I was going to have to tackle the rust. I finally pulled the rocker stainless steel molding off and this is what the rockers look like: This is under front-passenger door (with door closed) This is under front-passenger door (with door open so you can see the sill). I have removed the rubberized sill tread (that is seen in this picture) and the Sill floorboard appears to be in pretty good condition. I’m hoping to not replace the floorboard or the sill, but I will discuss this more as I unfold the story… This is under the rear passenger side door. Below is an image with the rear passenger side door open. Sorry for the tape measure, but I was trying to get some measurements of the rear door opening and the overall length of the rocker panel for a 4 door sedan. As you can see the rear door area is about 24 inches. The total length of both doors is around 57-58 inches. After a lot of researching I ordered new rocker panels (below). The right and left rockers are not interchangeable as the lip that goes under the door increases in height as you get closer to the front of the front door. You can see that the two rockers in this picture are different (the picture just shows one end of each rocker). You can see that the lip on the top image is narrow and the one on the bottom is much larger. I was curious if the rockers would fit over the existing rusted out rockers and they sort of do. The pillar between the front and rear door (and the overall length of the new rockers being a few inches too long) prevented me from fitting it entirely from front to back. I was able to slide the new rocker over the front rusted portion as you can see in this picture below (with the door open): Here you can see the door (mostly) closed and the raw and untrimmed fitment looks pretty decent: Ok… at this point I need to mention a few important issues. 1. I have never welded. I have done electronics soldering, pipe soldering and brazing, but never arc welding. I researched many Youtube videos (Bad Chad is very good and motivational for beginners). I think I can do this. I went out this past weekend and bought a Mig Welder, helmet, gloves, etc. to do the job, along with a few scrap pieces of metal to practice on. More about welding in a bit. 2. The brackets that connect to the frame with rubber mounts are rusted out pretty bad (see images below). I feel that before replacing the outer rockers, that I should do some structural rebuild of some sort. Please chime in with your opinions on this as I really don’t know where to start with the structural braces/bars/beams/etc. Keep in mind, that I could just make it look pretty for painting by replacing the rockers – since that is technically all you see from the outside. However, if I attempt to go back and fix the structural issues later, I might have wished that I had done that first. The floorboard is fairly stable as I had replaced sections of it back in the mid 80’s. You can see in the image above that the frame-braces look to be in pretty good condition. The rubber mounts are in bad shape. The metal beams that go from side-to-side and support the floor sheet metal are rusted out that connect to the frame-braces and the rockers. ---------------- If anyone has "any" advice on doing rocker replacement, please let me know. Also, any advice on the frame mounts and how to properly support the rockers. I’m hoping to share this project to the end (with all its challenges) – including the rocker replacement, prep, sanding and painting.

-
I had a stuck valve on one of my cylinders (see picture and notice second spring was not pushing valve back down). I was able to free it with a screwdriver and a hammer and luckily there was nothing stuck in the valve seat area that might be impeading it from breaking free. At the time, my car had been sitting for about a decade and I really didn't want to pull the head off to inspect and I was sure it was something else. Engine would run, but was running rough and I thought it was a tune-up problem. Once I pulled the valve covers off and manually rotated the engine I could see one was sticking open. I took a series of pictures as I manually rotated the engine because at first I didn't see any problem since the lifter was actually touching when I first looked. However, as I rotated the engine I could see one was not moving like the others. You might have one that is slightly binding or sticking. You might be able to spray some lubricant up on the lower stems that might work its way up without pulling the head. Technically, it didn't take long to diagnose once I gave up on other issues like plugs, timing, carburator/fuel, etc. I hope this picture helps to see what a sticking valve looks like.

-
What kind of breaker did you install and where in the circuit? I'm going to presume you put it between the battery and the ammeter. Did you place it on the firewall somewhere or inside the passenger compartment? I recently rewired my entire 48 and added in a couple fuse panels. Then I had problems with my generator and I replaced it with an alternator - which is running great and I am so glad I did.
-
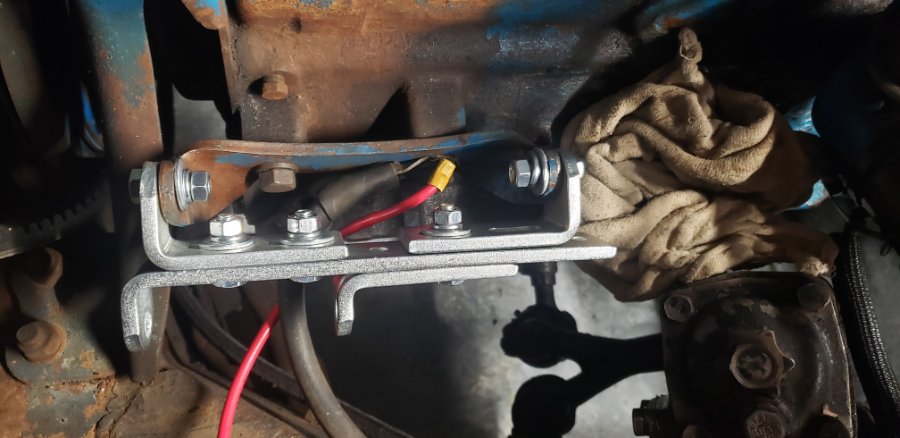
I would like to report that my new alternator test was today. It worked great. I started the engine and immediately noticed that the ammeter was at around +15-20 amps. That means it was charging the battery which is something that I haven't seen in a while now. The ammeter went down as the battery took its initial charge and hovered at around +5 amps. I also turned on the headlights and heater fan and the ammeter continued to hover around +5 amps as it charged. After running the engine for 15 minutes it went down to around 0 amps, but if I turned on the headlights, it never went negative. So, this was a success. I then took it out for a 20 minute drive and everything worked great - even at higher RPMs. The engine does sound different with the alternator vice the generator. I can't really explain the sound difference except that the alternator spins faster (with the smaller pulley on it) and I feel that is sound that I am hearing. It will take a little getting used to it. Also, the bracket assembly that I configured is holding great with the engine running and there is no movement in the alternator at all.
-
My first car was this 1948 Plymouth. It was originally my grandfathers, which was passed down to my dad. When my dad stopped driving it for some electrical issues back in the mid 80's, I took it over and worked for a year and a half getting it running again (including rebuilding engine, electrical, and upholstery refresh(with the help of my mom). At that point the car was nearly 40 years old and when I started driving it to high school it was definitely unique and noticed by everyone. I had a blast with it. I then drove it to college and also had a blast with it. The problem with having an older car at college is the amount of time you spend repairing and up-keeping the vehicle (especially older cars that you have to lube every 1000 miles). The fuel economy is also horrible and it made saving for pizza money really hard. It did, however, force me to learn to repair things, which to this day I am so glad my dad let me have this car as my first.
-
Many times have I needed to pop-the-clutch. I love parking on a slight incline and then letting it roll a little to start the car. It is so easy to do and I'm afraid that it is soon to be a thing of the past with the demise of the standard transmissions.
-
That is the exact issue that I was having. My generator was not charging the battery and I had to keep charging the battery every time I went out and came back - especially if i used the head lights. I didn't feel comfortable going out and making several stops for fear of the starter not having enough juice. I did all kinds of diagnostics and was just going crazy with the generator being the last thing that seemed to be the issue. So, after reading all about alternators it just seemed like the thing to do. I'm glad I have the resources to be able to do it. I will test it out tomorrow and see how well it performs.
-
I like your idea and I searched all my parts bins to find something like it. Well - I did it!!! I found a few smaller brackets and fastened them all together to make an arch shaped bracket. I connected my brackets at the other end so I didn't need to pull the bolt out of the water pump to remove the original bracket. I also had an old alternator spacer that I used instead of a stack of washers to properly space the original bracket to the new brackets. The alignment is perfect. I also used the idea to use a threaded rod that goes through everything at the bottom. Best of all, the alternator is very securely fastened now. I'm super happy. I've also wired the alternator directly to the ammeter and removed the voltage regulator (for now). I also used the angle grinder to clean up all of the parts that need to be properly grounded (clean bare-metal connections are the key). I haven't started the engine yet because I have a few little details to clean up. I will do that tomorrow morning and then fire it up and see how the charging works. I am fairly certain that everything will work great (presuming the alternator was good and not DOA - which would really suck). I'll post my results tomorrow. Oh, I plan to also test the old generator before storing it away. I am certain that I could run it as a motor, but for some reason it would not output any voltage when running as a generator. I will confirm this though a couple tests and post those results in a day or two in case it helps someone else to troubleshoot their generator.

-
Now I need to find an upper bracket that is about 8-9 inches. Anyone have any ideas on where to find one??

-
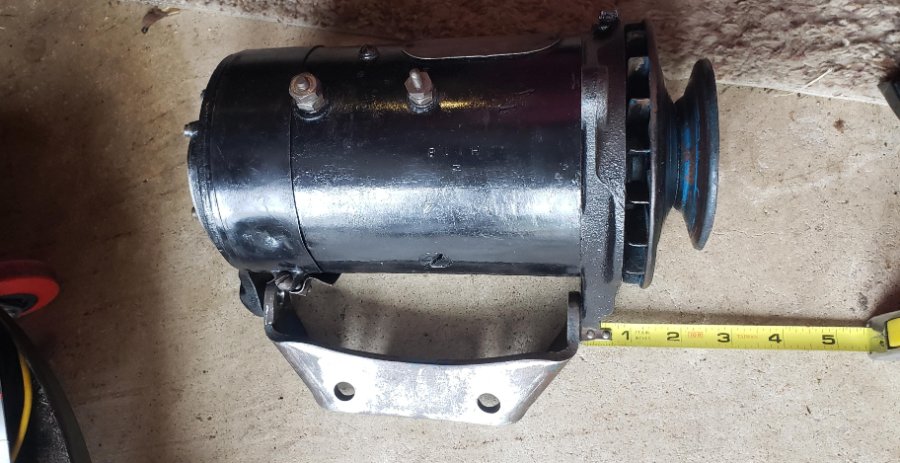
I took advice and cut into my alternator so that I could mount it using the original mounting bracket. To do this I needed to measure carefully to properly distance to the pulley (on original generator) so it would align with the other pulleys and fan belt (Image 1). Image 2 - I determined where to cut into the alternator. Image 3&4 - I used an angle grinder with a metal grinding wheel and cut into the new alternators aluminum frame quite easily (images 3&4). Image 5 - I was able to make a slit right where the original bracket would need to be inserted (image 5). I also needed to enlarge the holes in the existing bracket for the larger bolt to go through. While I had everything off I also used the angle grinder to clean all the surfaces so that I would be sure to get a good ground (since that is where I connect the battery ground). Image 6 - the alternator fits and I did not need to cut the battery tray bracket. The alternator is below the battery tray bracket about 3/4 of an inch and the original 50 inch V-Belt fits just fine. I have not put a permanent bolt in bottom yet since the bolt I have it too short. I need to get another one.


-
Also, probably a dumb question, but if the alternator is supported at top and bottom, is there a significant reason for the bolt to continue to the rear bracket hole (long bolt)?
-
Oh wow... I wouldn't have thought you could do that. Did you use an angle grinder with a cut off wheel t o do it? Was it hard to do?
-
It looks like your alternator might be a little smaller than the one that I've got (although pictures and angles can be deceiving) and the fact that you are able to use the original bracket with the rod, lowers your alternator enough to not hit the battery bracket at the bottom center of your photo (where the battery hold-down bolt connects). I'm jealous - I wish mine were that easy. But, I will figure it out. Thanks for the pictures, as they are all giving me great ideas.
-
Thanks for sharing. Last night I looked through all of your Projects. You've put a lot of attention to detail which is great - especially the carburetor rebuild. I've done that rebuild a few times and the detail (with pictures) that you have reminds me of all the little things you have to be careful of. I was thinking about buying the electrical harness you bough but I decided to custom redo my wiring completely since I was adding in several fuse boxes. Ok, back to the alternator problem... It looks like you were able to use the original bracket with the threaded rod and a few washers (I lost count) on the top bracket. And you've gone to 12v. Photo 1 shows that the alternator I bought has a much larger base attachment than yours and it throws off the pulley alignment. Photo 2 shows how I've configured the universal adapter with the original bracket to get the pulley where it needs to be. Photo 3 shows that bracket brings the alternator over about an inch to be in the right position. I'll post more pictures of what I come up with today.


-
All great points. I wish I could fabricate something like you have but I'm not familiar with welding yet. I feel like that could be in my near-future though. I can't seem to directly connect the alternator to the original bracket because it would completely mess up the pulley alignment which is why I need some sort of adapter bracket in the first place. My goal it to figure something out today and get the car running with the alternator. I think I will head over to one of the local auto stores and see if they have any random brackets that I could use instead of the universal one which raises the height about 2 inches from the original bracket. Also, I like the idea of shortening the belt just a little. I'm going to look at the existing adapter bracket again and see if the shorter belt is really all that I need. I'll need to put the battery tray back in and see if it isn't only the fender bracket that is in the way. In the end, I agree that I just need to get something in that works.
-
Sam, do you remember cutting that bracket off of your Special Deluxe? I don't see it in your picture with your alternator. I tried turning the original bracket that is mounted to the block upside down to see if that changed anything, but it didn't help at all and wouldn't allow the adapter to swivel at all. So back to the original position shown in the picture. The other options could be to buy a new fan belt that is shorter or some other bracket that might work better. However, with the smaller pulley diameter, I believe the alternator has to rotate further over to tighten the fan belt.
-
I had a similar problem with my 1948 Plymouth a few years ago where the fuel tank lining was chipping out and clogging the carburetor. I became quite skilled at pulling the carburetor apart on the side of the road cleaning out the jets and reassembling to get back home. I started to do a lining lining repair of the tank, but after the car sat for a few years where I didn't trust it, I decided to just buy a new tank and I installed flexible fuel lines from the tank to the fuel pump. I also rebuilt the carburetor and added a clear fuel filter so i can see what the fuel looks like. (The old original stone filter looks cool but the grit would just go right trig it) I am so glad I did this... it now runs great and I don't worry about breaking down for a fuel problem.
-
I received my new 6v positive ground alternator today. Woo Woo. Trying to install it and I'm running into a obstruction issue. I bought the generator with a universal bracket kit hoping that it would fit with minimal work. I think I can get it to fit, but the bracket elevates the alternator a couple inches and is making it hit the frame piece the comes out under the battery shelf. Anyone else have this problem or suggestions to fix it? I could cut it off, but someone might recommend a better bracket that actually retro-fits the vehicle better. First picture is the new alternator out of the box with bracket kit. Second picture is of the generator before removing it. Third picture shows alternator hitting the squared off metal piece that is usually under the battery tray. I have the battery tray removed to get easier access.


-
I went to Carlisle this year for the first time since about 2005 and I was quite disappointed at the complete lack of vendors for older cars (pre 1960's??). I'm guessing that show is now for 1960-1970 car enthusiasts. I had a big list of items that I needed for my 1948 Plymouth Special Deluxe and walked every isle and only saw a couple vendors that had anything close to what I was looking for. I've never been to a Hershey show. What is the vendor turnout for older cars??
-
I just started the engine with my analog voltage meter connected and then shorted the Field wire to ground(+). NO increase in voltage at all. I'm guessing this would indicate that there is a break in the field windings? For fun, if I were to open up the generator and isolate the wires to the field windings (from the armature and brushes), I'm guessing I would find that there is no continuity through the field windings. Right?

-
No I haven't. Your the first to recommend an actual test like this. I've got a couple weeks until the new Alternator arrives and I am really curious if the generator works. I wasn't sure what wires I could short to test it. I saw someone elude to this in some posting, but I didn't want to fry anything by shorting the wrong wire. I will try this tomorrow evening if it isn't raining too much from Hurricane Ian. I'll let you know what results show.
-
Thanks DJK. That image confirms my research and the only thing I'm going to do differently (Step 9) is run the wire from the alternator right to the ammeter (and bypass the voltage regulator). I just ordered the 6 Volt, Positive Ground Alternator (with bracket and Pully). I'm excited to get it and install it and hopefully my charging issues will be gone. I still don't know why the generator wasn't charging. Perhaps I got several Voltage Regulators that were DOA in a row.
-
Thanks! That's good to know about the shipping. I've spent the last couple hours researching generator to alternator conversions. This looks so simple and I'm thinking it might be the way to go (and just give up on the generator). Therefore, it looks like I would need a 60A, 6Volt, Positive ground Alternator with a bracket and the right size pulley (I think I have a 5/8" pulley, but I'll check). The single wire that comes out of the Alternator would simply connect to the wire coming from my Ammeter, right? That way it would show if it is charging or not. Now... do I choose a black or silver color? that is the question. It looks like you've converted yours to Negative ground (according to the battery cable colors)? Any special reason for that?
-
I did not remove any of the wires to test the Voltage Regulator after all - as your advice sounds right and it would not output anything anyway. I also watched the video which has some great info in it. Thanks for sharing!!! Tonight I tested voltage and it was 6.35 volts with engine off. Then I started the engine and the voltage stayed relatively steady at about 6.25 volts. There was a little movement as I increased the RPM's to about 2500, but I believe the voltage actually went down and not up. Unless someone has some ideas I think I'm going to have to take the generator back to the motor repair shop and see if they will test it again on the bench and tell me what the actual output voltage and amps are. Thus far, here's everything I've tried to get the generator to charge my battery: • Rebuilt/inspected the generator - Took the generator apart and cleaned/de-greased it inside and out. - Cleaning out the mica between all the contacts in the armature - Polishing armature (looks like shiny copper now) - Checked the brushes and cleaned the inside wire terminals where the brush connect - Lubricated the armature bushings - Cleaned the outside Armature and Field terminals - Tested the generator as a motor by shorting the Field terminal to ground(+) and connecting the Armature to battery(-) = Ran smooth. Not sure of RPMs but I would "estimate" a couple hundred RPMs(?) - I POLARIZED the generator. (everyone asks) :) • New wires and new connectors to the voltage regulator • New Voltage Regulator (Standard VR-2) - The original Voltage Regulator seemed fine, however, - I bought a new Voltage Regulator. I returned it because it wasn't charging the battery (I suspected it was dead on arrival), - I re-bought another new Voltage Regulator. - This makes 3 Voltage regulators all with the same results of "not charging" - I've bench tested the Voltage Regulator with variable voltage and I see two of the relays engage (close contacts) at about 6.9v and 7.8 volts respectively. • New Ammeter installed. Old one didn't work (needle didn't move at all, even after trying to repair it. Shunt must have failed) - Ammeter registers negative when I turn on the key, lights, heater, etc. - Ammeter does not register any charge when the engine is running (at 1500+ RPMs). I know it won't charge at idle RPM. • Other facts (related to electrical system that might be relevent): - I completely rewired the car from head to toe and installed two Fuse Blocks after ammeter. - One fuse block for Key-On devices, such as ignition, heater fan, fuel gauge, wipers, etc. - One fuse block for Always-On devices such as brake lights, cigarette lighter, interior lights, clock, etc. - I rewired brake and parking lights for turn signals - I ran "return" ground(+) wires back to Fuse Blocks for all lights, wipers, and devices that I could. - All electrical devices work as expected with no strange behavior that would indicate something amiss One-by-one, Plan to do the following. If anyone has any test or pictures/videos that they would like me to post, let me know. 1. I plan to take the generator out and take it apart to inspect - AGAIN. 2. I plan to retest the generator as a motor - AGAIN. Is there more than one type of test I could do??? 3. I Plan to take the generator back to the motor repair shop for them to bench test it again. 4. I will give up and look into the 6v Alternator mod. Thanks for any advice anyone can give. I just can't figure out why it runs as a motor, but won't put out enough voltage as a generator to charge the car.