


clarkede
-
Posts
83 -
Joined
-
Last visited
-
Days Won
3
Content Type
Links Directory
Profiles
Articles
Forums
Downloads
Store
Gallery
Blogs
Events
Everything posted by clarkede
-
While were on the topic of key locks.... I've always been missing the tumbler on the driver's side. This means that I have to reach over from the passenger side and lock the door from the inside and then lock the passenger door with the key. Does anyone know where I can get a replacement for this? Attached is a picture of my two locks showing what's missing on one of them.

-
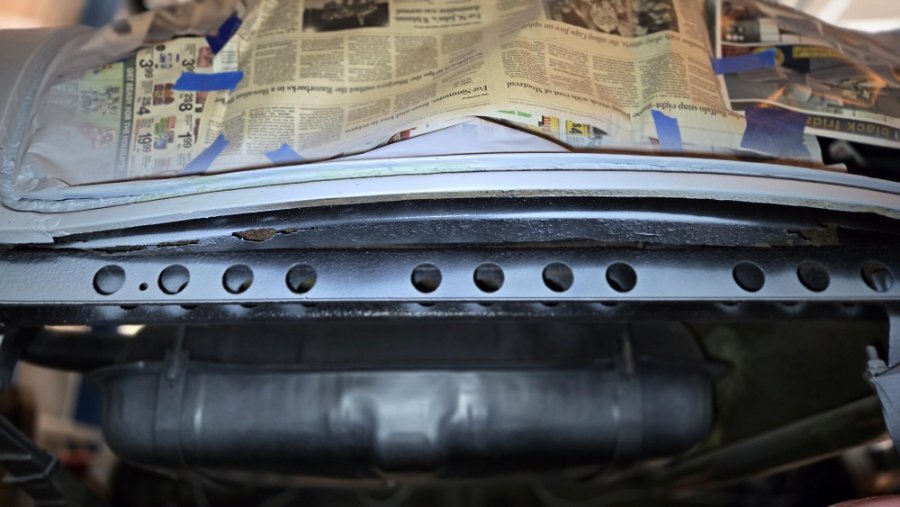
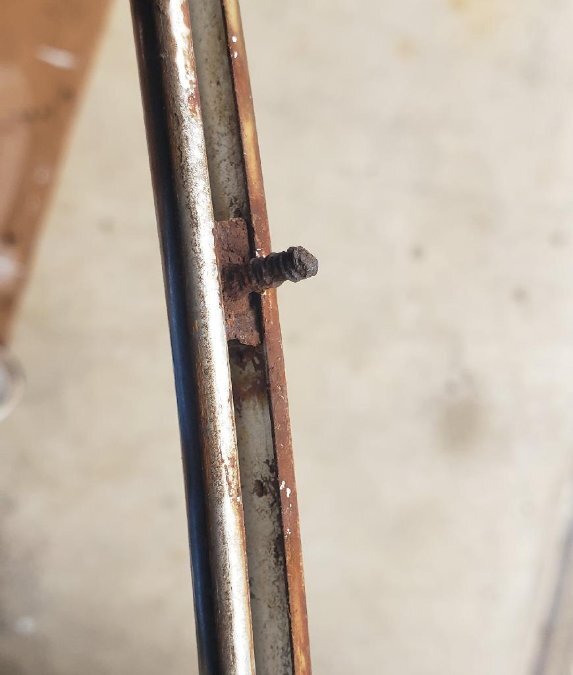
I'm in the middle of painting my car and have the weatherstripping off. Here's a picture of the hole's location that is normally covered by the weatherstripping for the set screw (big hole on the left).

-
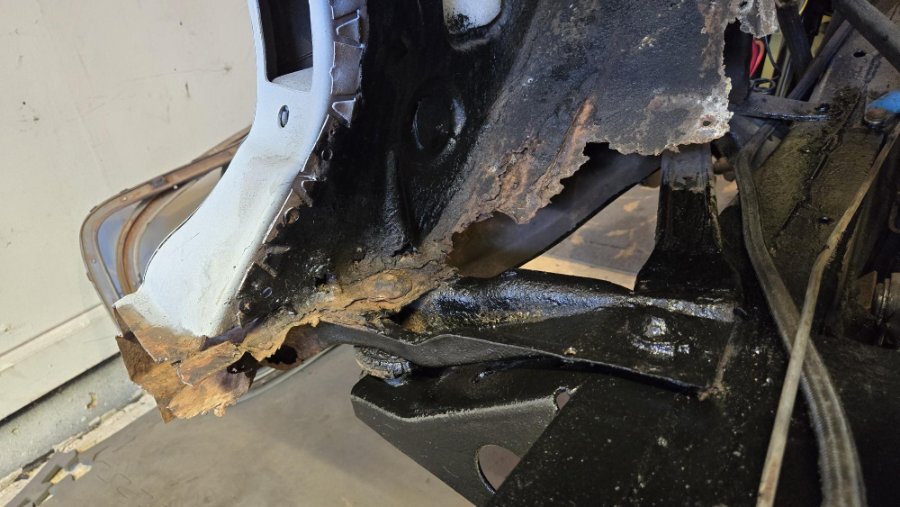
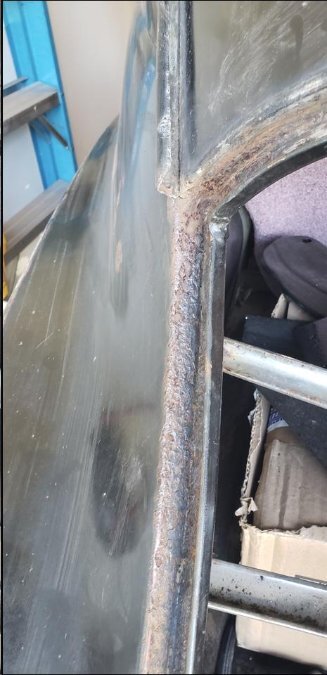
Question: Does anyone know if the body mounts that are just inside the front doors of a P15 can be removed without causing the body to lose support? There is another major body mount (to frame) 8/10 inches inches forward of this mount where the firewall comes down to the frame. I want to replace these metal supports and fabricate new ones that will sit on the rubber mounts and then weld in to new rocker panels that I will be installing. Here is a picture of the drivers side front door frame with the support that I want to replace. You can see that the rubber mounts are gone and it has two rusty and degraded bolts that are holding things together. They are actually pretty firm and would probably last another 70 years (LOL), but while I'm doing the rest I might as well fix these. Thoughts??
-
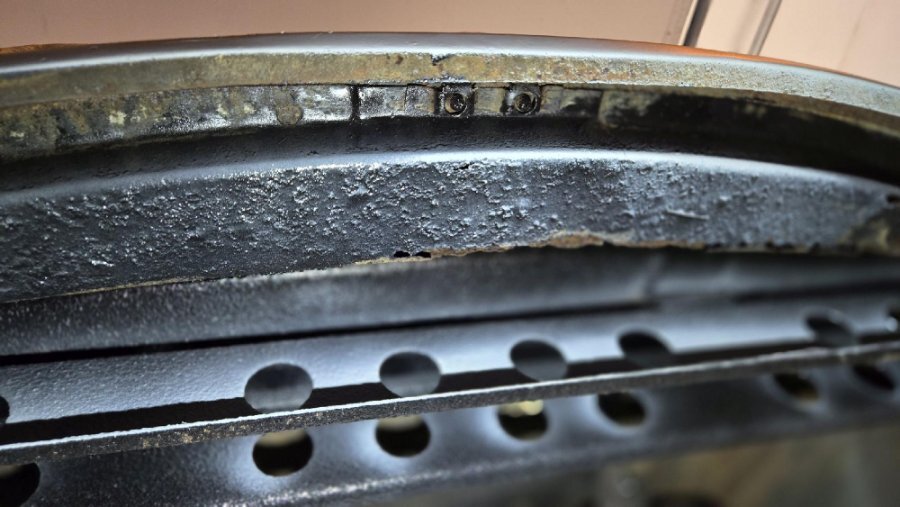
Here's a few more pictures that I just took that might help. A few different angles including one that is straight up showing the trunk latch screws from the bottom. Let me know if you need any measurements or a ruler in the picture for scale. Best of luck.
-
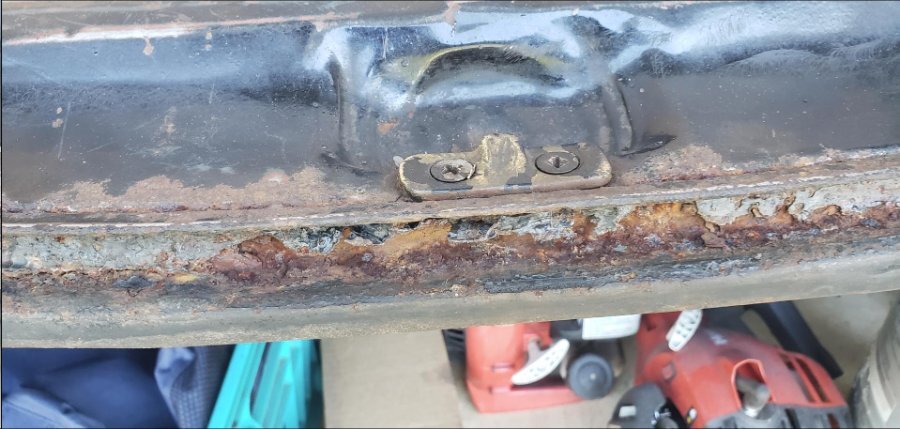
I found a few older pictures that show a groove that the trunk weatherstrip molding goes in which goes all the way around - including the bottom lip area where the trunk latch is. Downward pictures of the lower trunk lip may not show this weatherstripping groove. You asked if I have done any repairs to this area - Well, I definitely have some serious rust inside the trunk (like you do) which will be my next project to repair. Ahead of this, I am still working on replacing the interior passenger compartment floor pan and rocker panels, followed up by painting the exterior of the vehicle. I kinda want to get all the fenders, hood, doors, etc. back on the car before winter so my wife can use the other garage bay for the cold Winter months (she's been very patient so far, but I don't want to push it ) As you can see to the bottom left of the of the trunk lip that I've already done some body filler. These pictures are before I did some quick "JB-Weld Steel Stick" mends to the bottom lip that had some rust holes. I first wire-brushed the area to remove loose rust and paint to clean up the area, then kneaded the two part putty and re-formed the lip groove. I'm having issues uploading the next few pictures... gonna reboot and upload them after dinner.
-
I'm looking up some pictures of my current trunk lip, but in the meantime, I thought you might be interested in this ebay posting that has a great picture of the area you are most interested in. Not trying to sell it, just saying it has the downward view you are probably looking for. I will find a few more pictures of my P15 (or take a few pictures) to help you out. In the meantime, here is the link: https://www.ebay.com/itm/176175763617?_nkw=1948+plymouth+floor&itmmeta=01J7BYP2MPXHFABFNHXTRBJJ6G&hash=item2904e4d0a1:g:WygAAOSwxo5kzYXE&itmprp=enc%3AAQAJAAAA0HoV3kP08IDx%2BKZ9MfhVJKlG21QeaNYE%2FLtFSx9jBGg3OCChmFnHzDvifvU0EtlMTJbYivPrFimBDurJCKSYvCig6LoAGDLKp%2FuJdVLdtDuxT6%2B%2BX78%2FuAZos2dkBNUEILepzPa880Tp4QG9yRZAJvgvMMtfZZUXBa6w%2B8hW%2BV7scQRjEHFd%2BM2ShVEhMo9OgdMfIKeV0qAVt--GsqiBlckEAGGgPsyUES9uYQP2jDo6LQQWLW%2FkmC82LGwvpWqc8gtb4DvM5ZkBsw3ktGz3bSc%3D|tkp%3ABk9SR7qq2P66ZA&edge=0
-
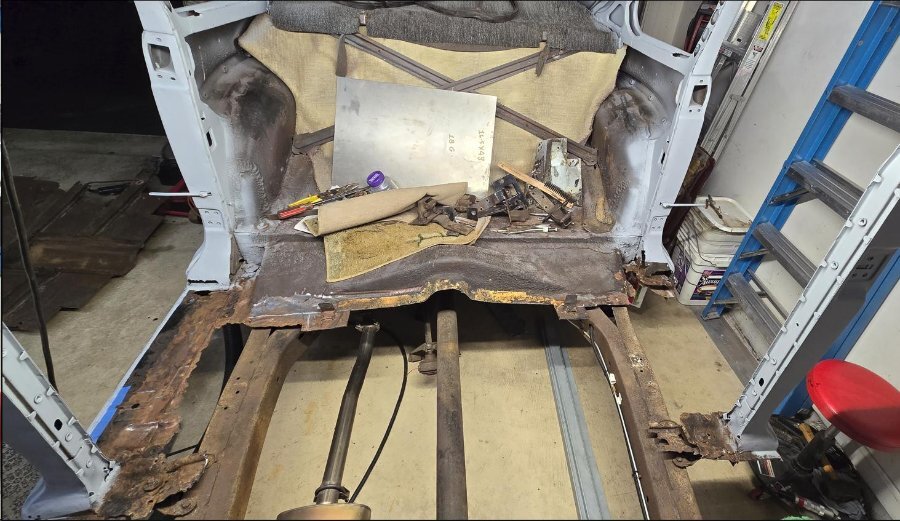
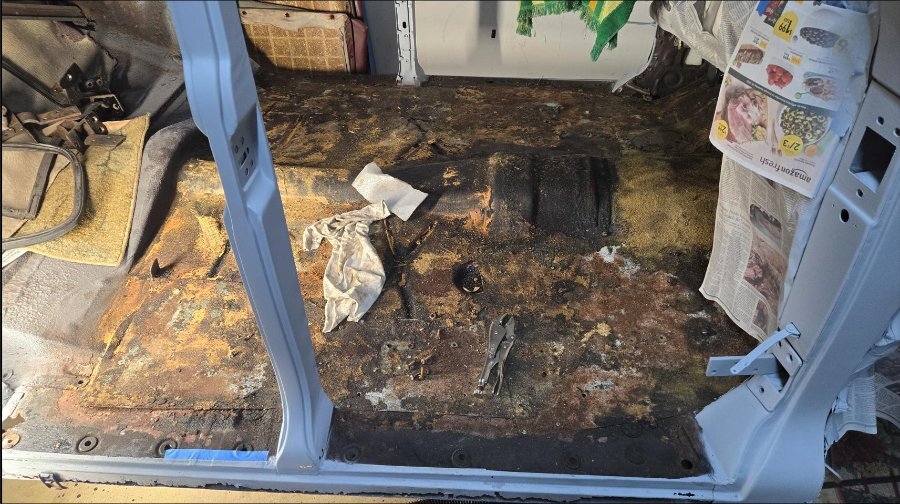
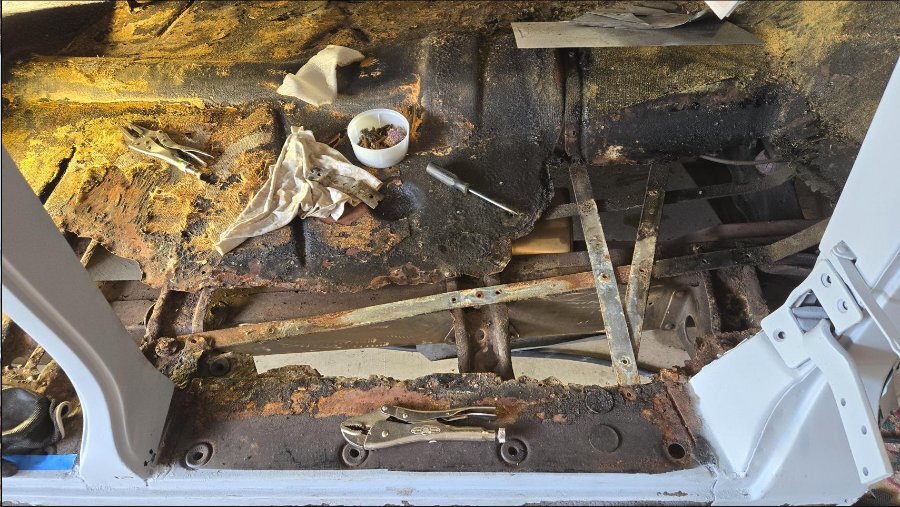
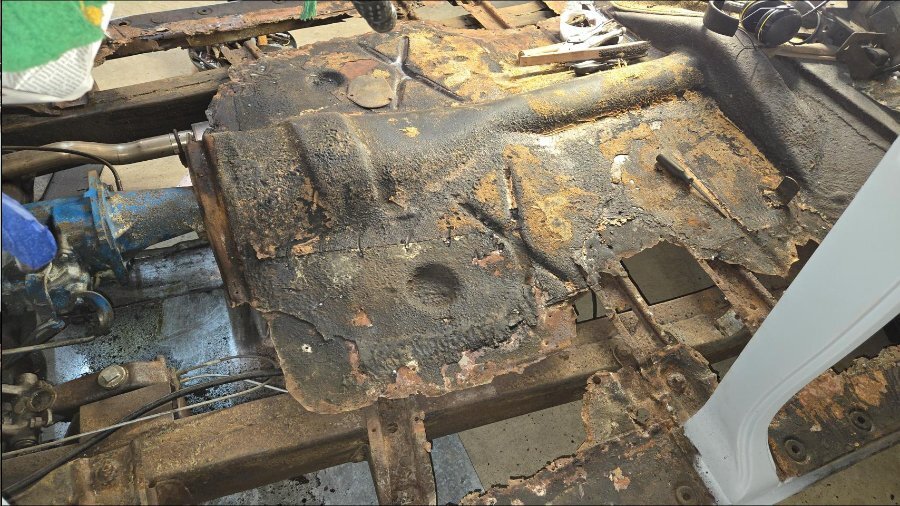
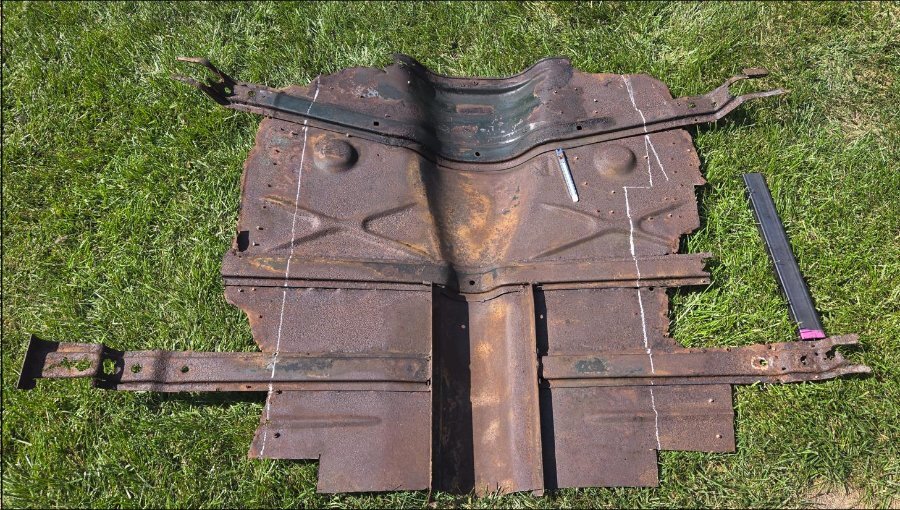
I was trying to find the entire floor pan from front to back (with the transmission/drive shaft hump), but I could only find the front transmission portion toe kick area(see example in first picture attached). Once I cut out the floor pan I realized the entire center portion of the floor was in really good condition, so I would really only need to replace the sides of the floor pan out to the rocker panels. The second image show that I've removed the floor and the driver's side rocker panels completely with the goal of figuring something out.
-
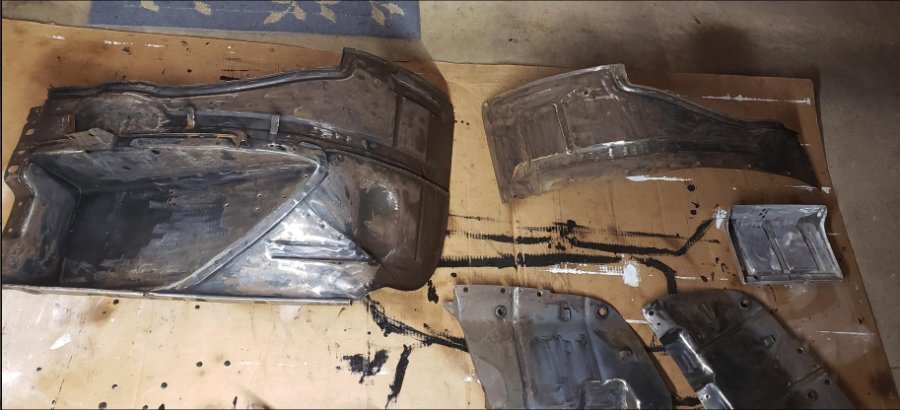
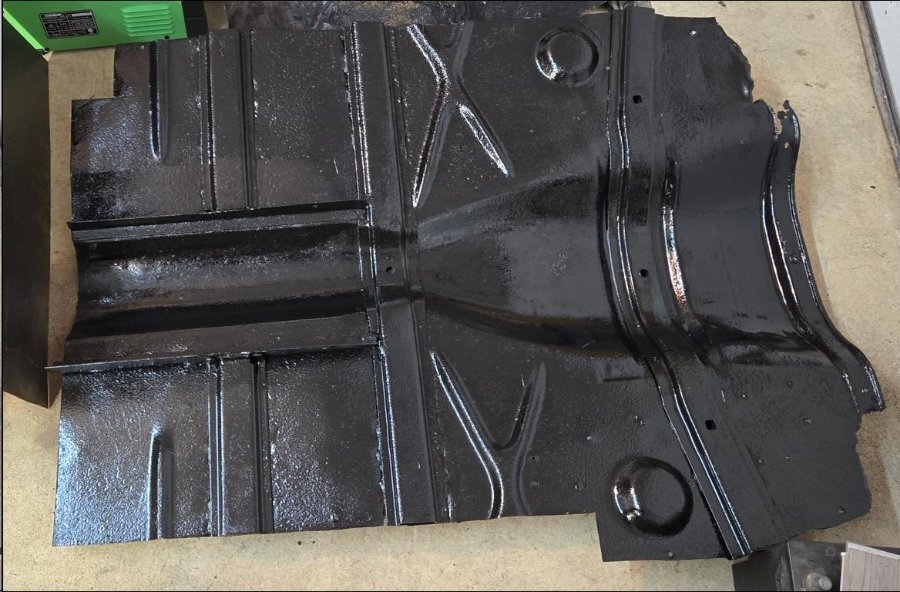
Luckily, I did not have a lot of rust on the fenders, doors, hood, trunk, and interior panels that were up around the engine compartment. For all of those I removed them from the car and sanded them (often to bare metal, but not always) and coated them with POR-15 Rust preventative paint (two coats) (See the first couple photos attached). There were no hidden cavities of these pieces. Where I found hidden (but rusted out) cavities were the rocker panels. Basically, my inner rockers were gone and the floor pan supports were not attached to anything. My plan there is to just cut them out completely and replace the inner rocker with a 1"x1" steel square tube since I can't find inner rockers anywhere. This is the part that I am working on now and I have a lot of thinking of what to do. Was there a specific hidden cavity that you had in mind?
-
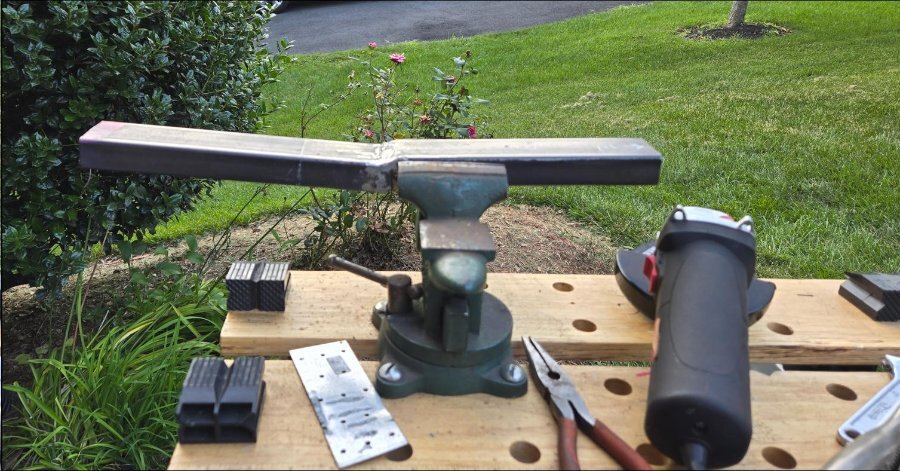
As you can see, I'm now working on re-fabricating the floor pan and the floor supports. I decided to keep the center floor hump as it would be too hard to recreated. Therefore, I've cut away the rusted parts and I'm now working to weld in some new support beams. I have a short section of a 1x2" rectangular tube to work with. As you can see I was going to follow the bending of the existing floor supports by cutting and welding the rectangular tube, however, it is about 3/8" too high as you can see in the pictures below. I contacted the metal shop and they are going to bend some steel to match the current beams. I thought it would be super expensive, but turns out to not be that bad. I will then cut them into sections and weld them to the existing floor pan (center) section that I am keeping.
-
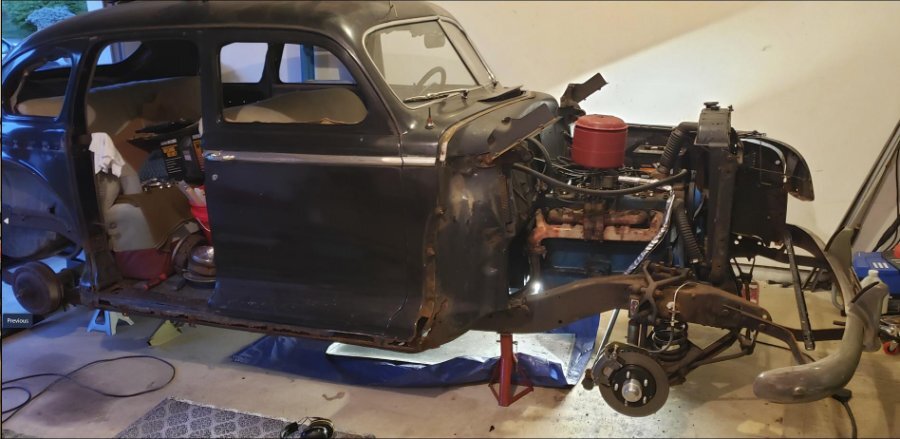
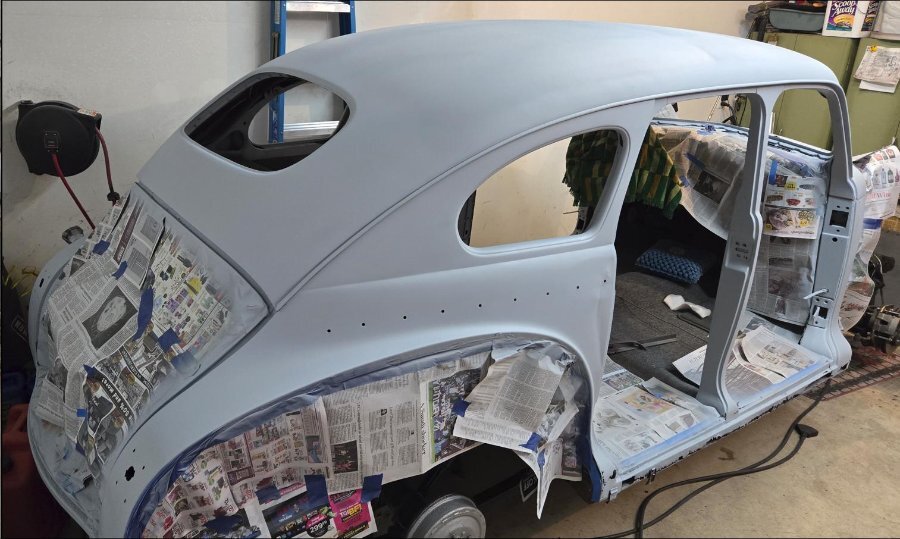
Hey fellow enthusiasts! I kicked my restoration project in to high gear about 5 months ago with the end goal of painting the car. I posted a few months ago with some of the background and details of where I was at that time: I've done a lot since that post. In April, I planned to do things a little backward and paint the car first and then go back and restore the interior, but as I started cleaning things up to paint, I went down one rabbit hole after another. Every time I removed a fender, or a bumper, or a door, I found more things to fix first before painting. I finally got the entire car taken apart, sanded, primed and ready to paint... Oh wait, I now decided to fix the rusted out rocker panels before painting, which also led me to removing the floor pan to fabricate a new one. Here are a few pictures that will show the story better than my words:
-
High Quality H4 Headlights for 12v Cars (Cheap!!)
clarkede replied to Sam Buchanan's topic in P15-D24 Forum
Thanks for the heads up on this deal... After reading the compelling posts, I placed an order for two. Everyone loves a deal! I'm guessing from the confirmation email that I received, that it will take two weeks to take delivery. Can't wait! -
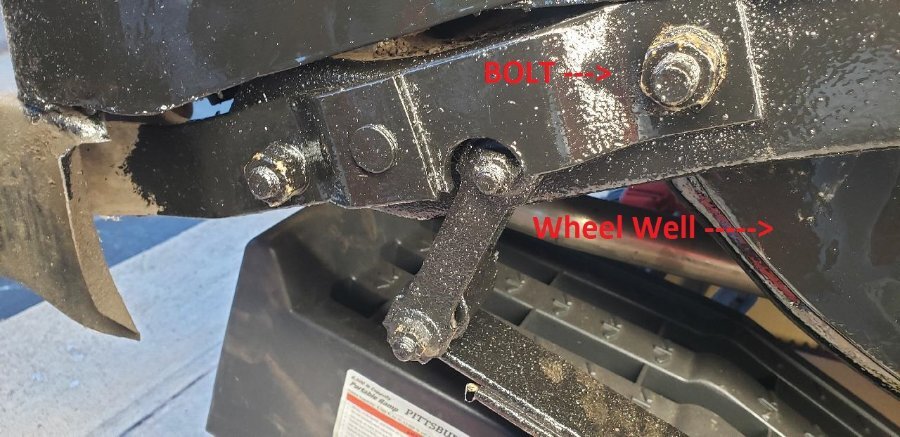
Just an update on getting the bumper bracket bolts off. You're correct in that there was just enough room to get the job done on the spare tire well side. I was able to slide a socket up onto the bolt an then use a thin serpentine fan belt tool to hold the nut while using a breaker bar on the other side (see picture). 3 of the 4 bolts came out fine, but one bolt snapped in half.
-
I've noticed that my original rubber body mounts are flat as pancakes and in need of replacement. Is this a hard job to do? I currently have all the fenders and hood off, so access to some of the mounts is even easier than it would normally be. I'm guessing that I would need to remove the bolts that go through the deteriorated mounts and then jack up the body a little to remove the old mount and then fit the new rubber mounts in place. Do I need to remove all the body mount bolts on one side of the car before attempting to jack up the body? A prior post from 2008 (Joe Flanagan) indicated that the body needed to be jacked up about 4 inches to get enough clearance to remove and reinstall the new mounts. I'm guessing he removed "all" the mount bolts to do this. Also, I have all the tires off and the car is on four jack stands - if I attempt to jack the body up a little could this make the whole car unstable? Any advice on this would be greatly appreciated - before I buy the rubber mounts.
-
Great welding job!!! It looks different, but nice! I'm getting ready to begin welding to repair some rust areas. By begin, I also mean, I am new to welding. I'm going to practice a little and then choose some area's that are not very visible. Hopefully, I will be able to pick up this unique trade without too much regret.
-
I will try again tomorrow and see if I can get some socket or wrench in there to hold the bolt head from slipping. I guess I just got this silly idea of removing the wheel well instead of fighting with a tight space. I usually seem to do things the hard way and then someone points out an easier way = go figure.
-
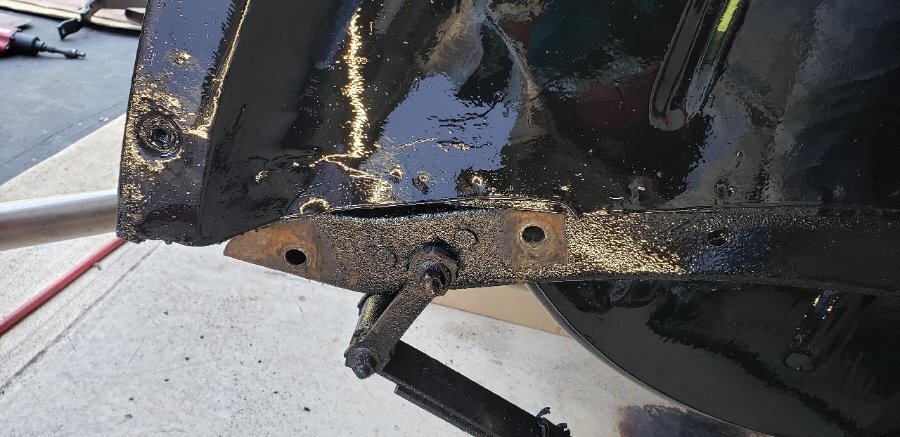
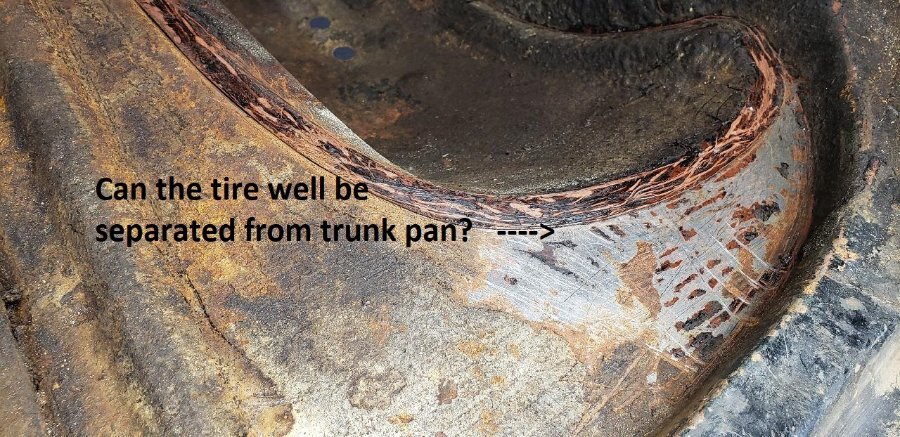
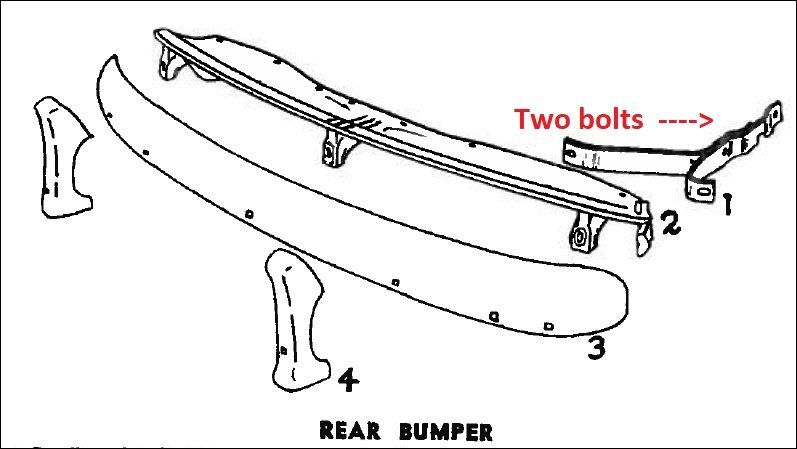
I'm doing some repairs (and undercoating) and I would like to remove the rear bumper. However. the bolts that go through the bumper with the chrome heads are rusted and difficult to reach. I will probably have to cut them off. I thought I would remove the entire bumper with the support bar that connects to the frame so that I could access the bolts easier while off of the car. There are two bolts that hold the bumper supports on each side to the frame. On the passenger side, one of the bolt heads is not easily accessible because the spare tire well is in the way. Has anyone taken out just the rear tire well or is their a trick to getting to that bolt head? The wheel well does not appear to be held in by any bolts, but instead by undercoating or some tar-like adhesive. I might be able to get a blade in the gap between the trunk floor pan and the tire well, but I thought I would ask before wasting time trying to separate something that isn't made to be separated.

-
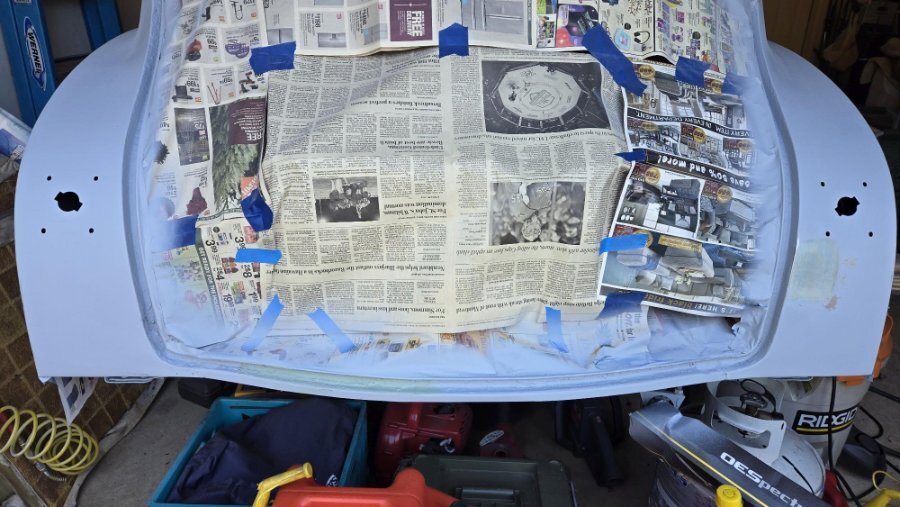
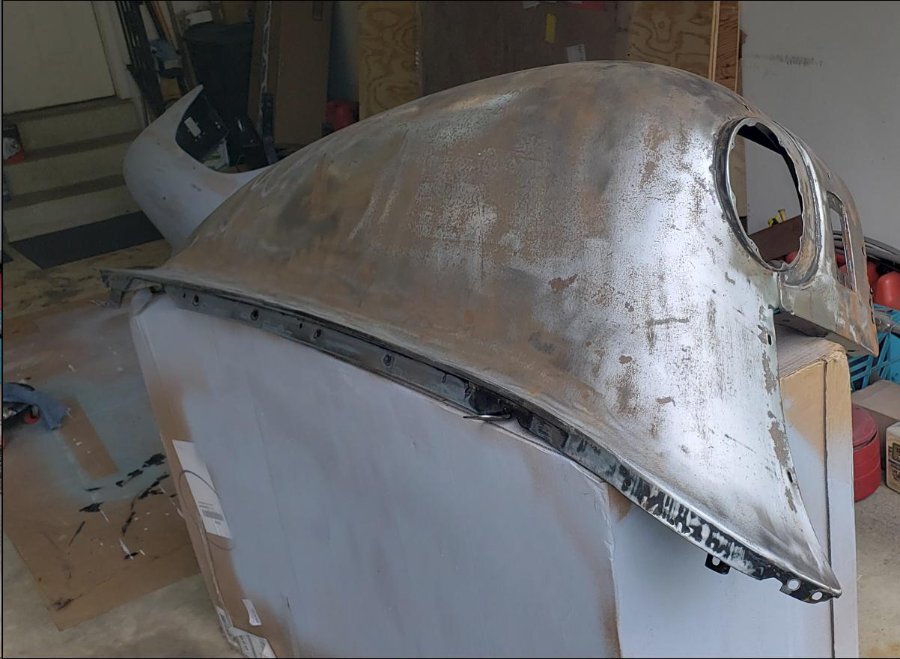
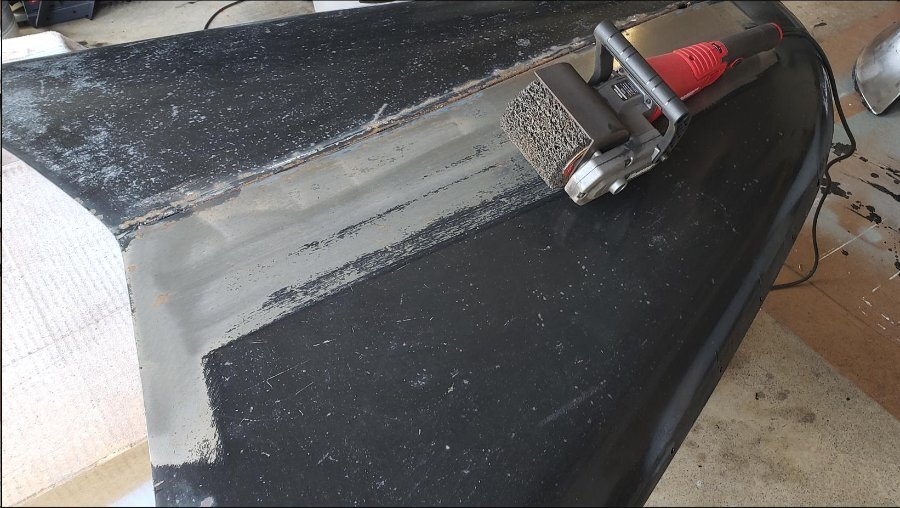
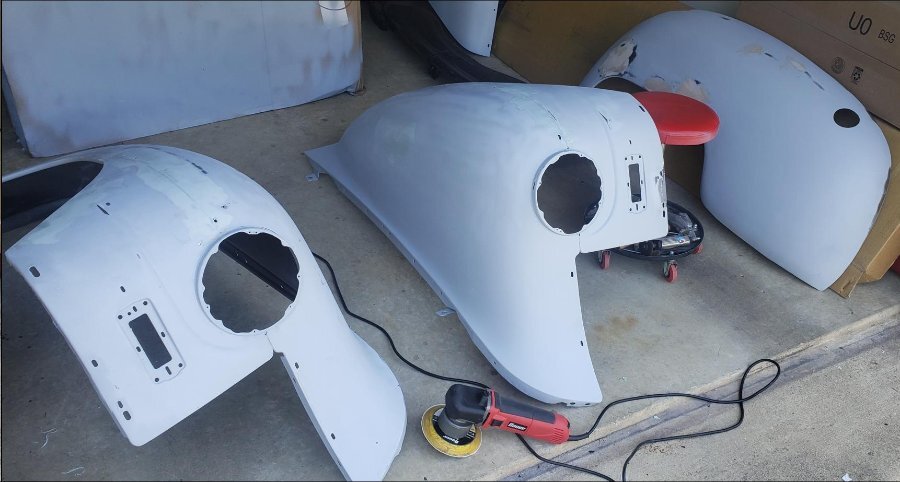
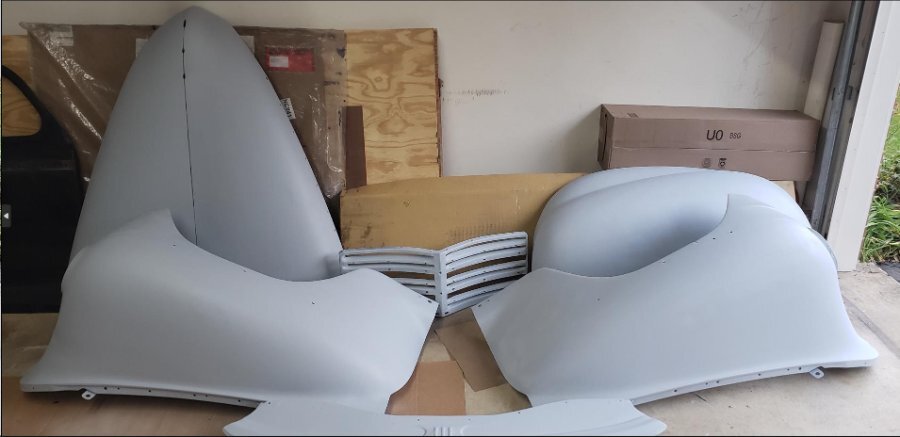
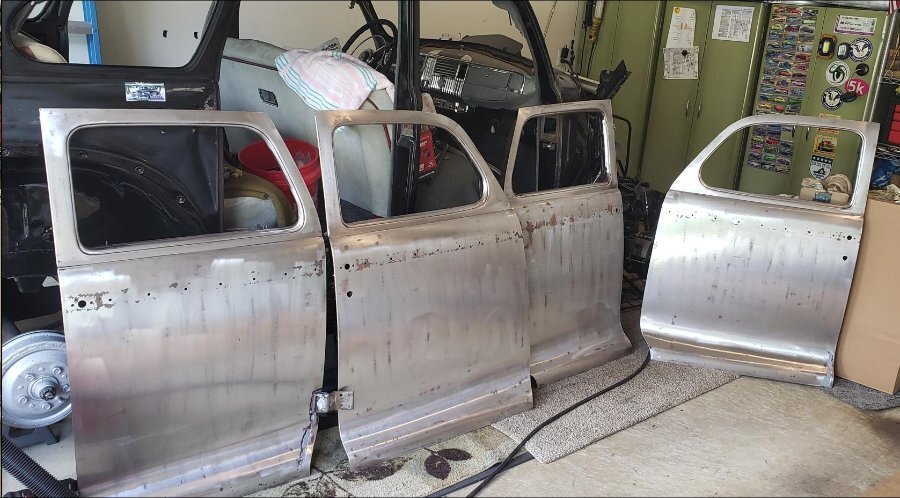
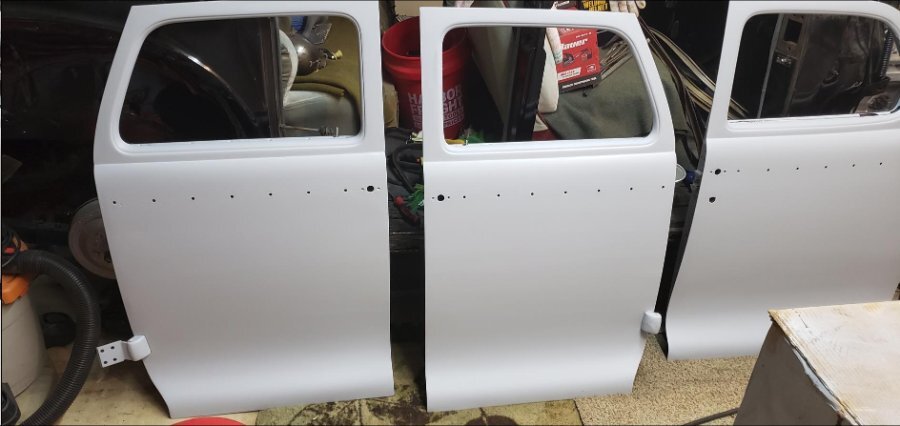
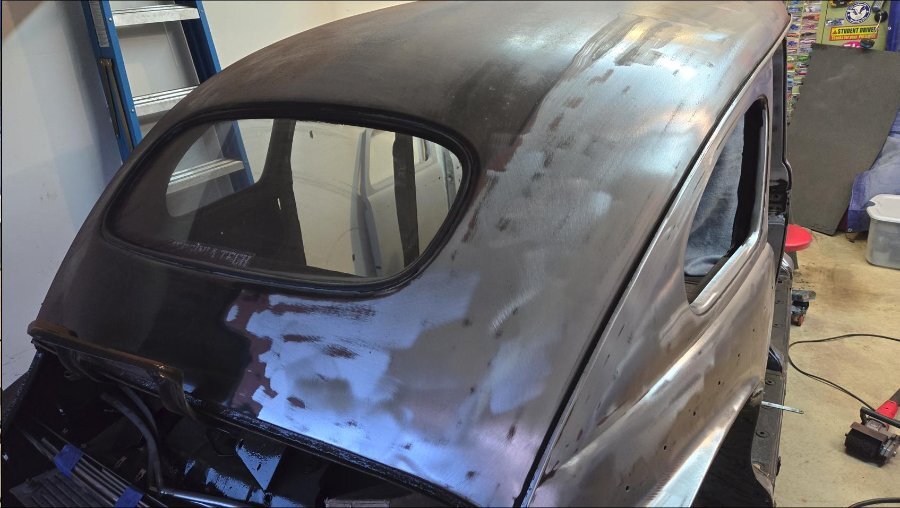
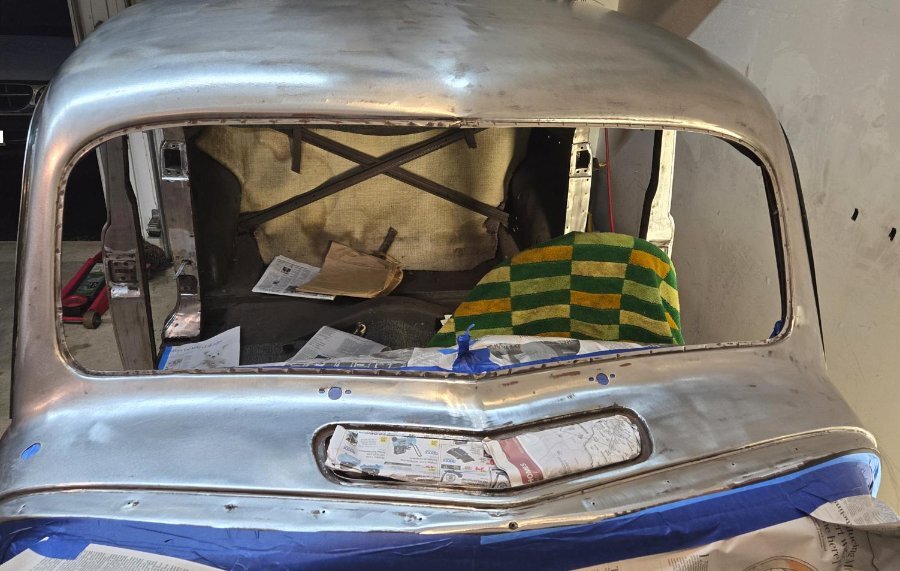
Great ideas. I'll try and knock out the carriage bolts as long as I can do it without messing up the trim pieces. Also, I think I will start researching where I can get bulk Stainless Steel nuts and bolts and try and replace all I can. The past few days I have removed the front and rear fenders, hood, and one of the doors so that I can sand and repaint the car. It's time for a new paint job after 70 years. I still have to remove the three remaining doors, rear bumper, rear deflector, cowl vent, front and rear windows, etc. before starting to sand everything down. Oh, and I'm going to do my best at painting the frame and under-side of the fenders and other body parts that are hidden from view to protect them. I had an old unopened quart can of POR15 Black Glossy Paint - which seems to coat really well. I sanded a few items down before painting, but I don't think I have to sand to bare metal when using POR15 - right? It takes so much time to do that and getting to some areas will be almost impossible to sand to bare metal. Here's a picture of where I am right now.... (Sorry it's a mess)

-
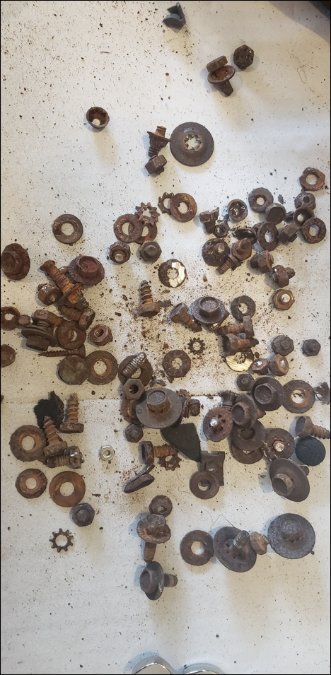
Anyone have any suggestions for a pile of rusty nuts and bolts - many of which are broken? They are original equipment! I'm sure many of you have had this situation after doing some restoration work.
-
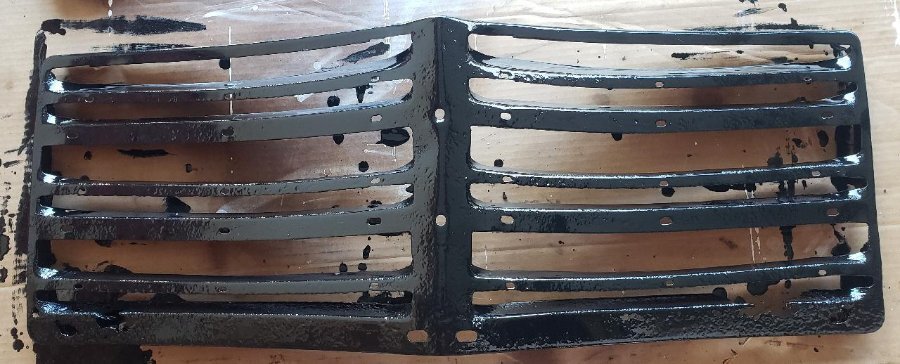
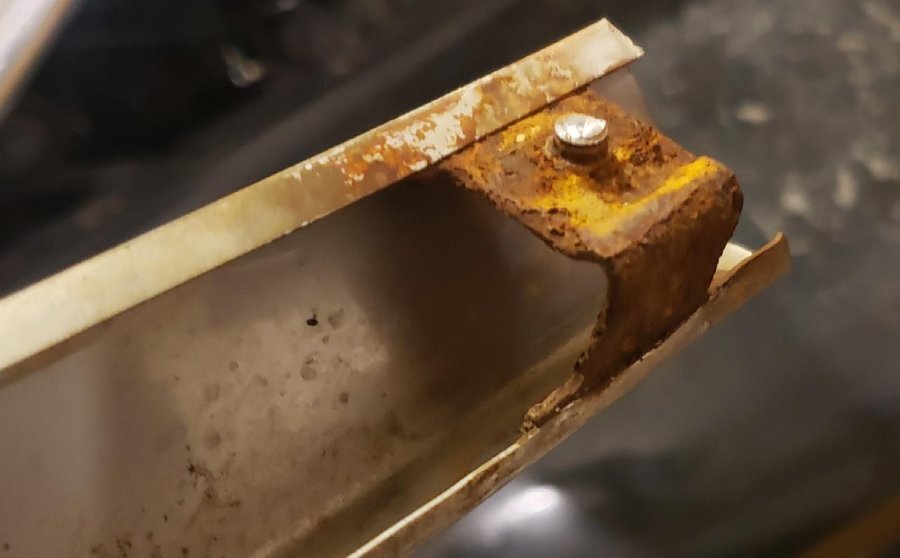
Thank you all for your suggestions and advice. For the larger front grill pieces, I've decided to cut off the rusty bolt heads (see images) and attempt to either: Drill holes in the existing brackets and put bolts through from the back. This is probably going to the the easiest method, so I'll try it first on and see how it goes. I think the bolt sizes were 1/4 and 3/8 depending on the Or if that method doesn't go easily... Weld bolts to the existing brackets where I cut the bolts off. I'm new at welding so I plan to practice a few times and see if I can actually do it first. Any suggestions on how to clean up the stainless steel trim. I believe using 0000 steel wool is what many recommend, but I would rather have your suggestions before I mess up what I have.


-
That sounds like what I'll need to do. Thanks for the advice. I might even see if I can find some simple nylon fasteners (push-pin style) that will work.
-
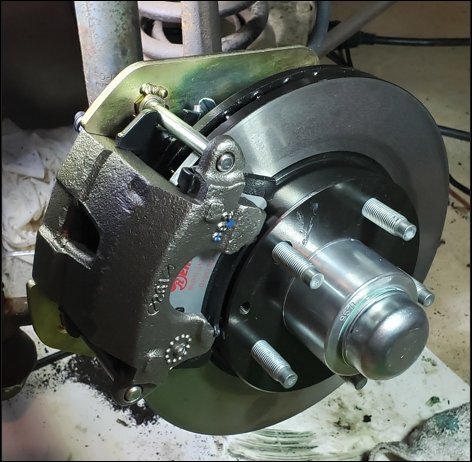
I bought a Scarebird Disk Brake Conversion kit a couple years ago for my 48 Plymouth Special Deluxe Sedan that looks very "similar" to what you have pictured. I converted my front drums to disc, and I love it. I'm sure others would also recommend. I took pictures of the boxes of each of the parts so I could always find replacements if needed that I can share (calipers, pads, bearings, brake hoses, etc.)


-
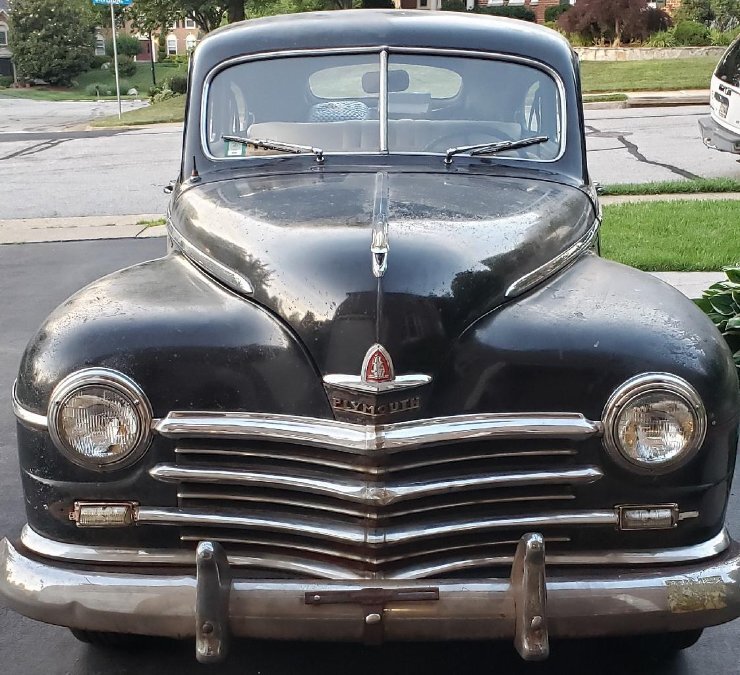
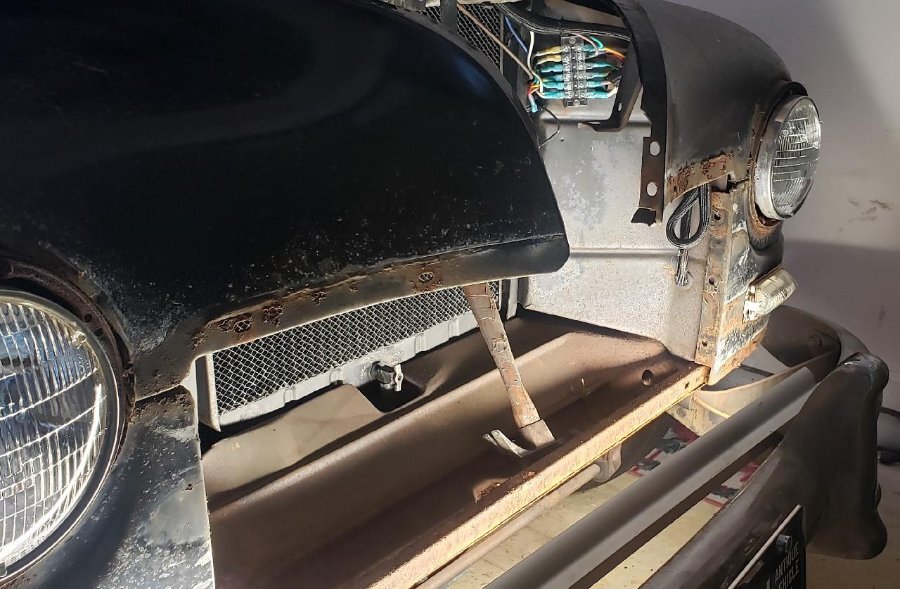
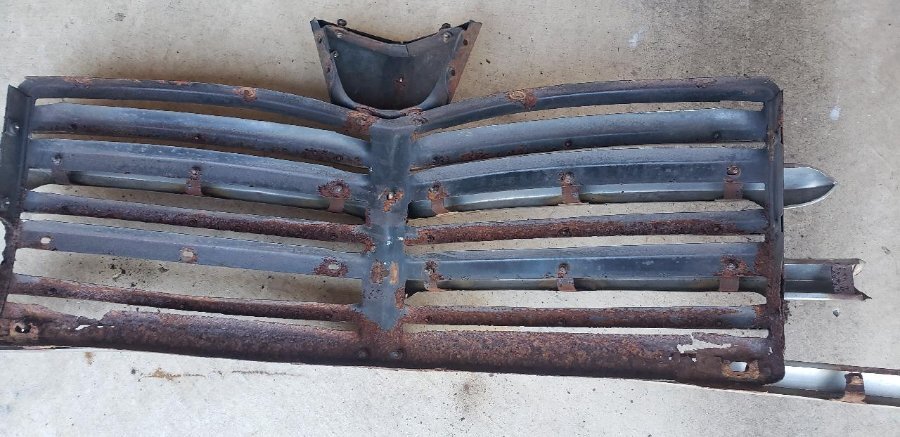
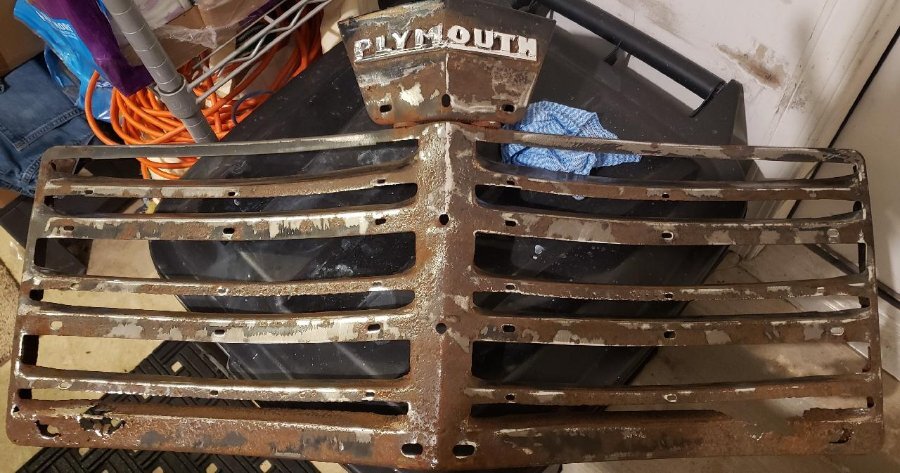
I'm beginning the body restoration of my 1948 Plymouth Special Deluxe. In particular, I'm planning to repaint it myself in the next couple months if I can set aside the proper amount of time to strip everything down and prep it properly. I am not looking to do a crap job, but I'm also not looking to be super detailed with every aspect of it. I tend to be fairly anal about things, so I might get caught up in the details, but I'll see as I move forward. I started removing all the external molding and trim on the car and decided to take fenders and doors off as well so the paint job will look much cleaner. I have a little body work to do on the rocker panels and the bottom of the rear doors and I have been waiting for the weather to warm up a little before starting this project. Well the weather is starting to warm up. after removing much of the external molding, I also pulled off the front grill (for the first time in the cars life) and it needs a little work to say the least. I have attached a few pictures to show what I have done so far. I removed all of the stainless steel trim from the radiator grill panel and then sanded down the grill panel and painted it with some POR15 anti rust paint. Does anyone know what clips are uses to attach the molding to the grill panel? As you can see in the pictures (07-10) the threaded studs are either so rusted or have broken off in my removal process. I want to just replace them with new ones if possible. Also, the clips are either really rusted to the larger stainless molding or they are spot welded together - I just can't tell. The smaller molding pieces looks like the clips slide in from either end. I tried to get pictures to show what I'm talking about. Any help or advice would be appreciated.


-
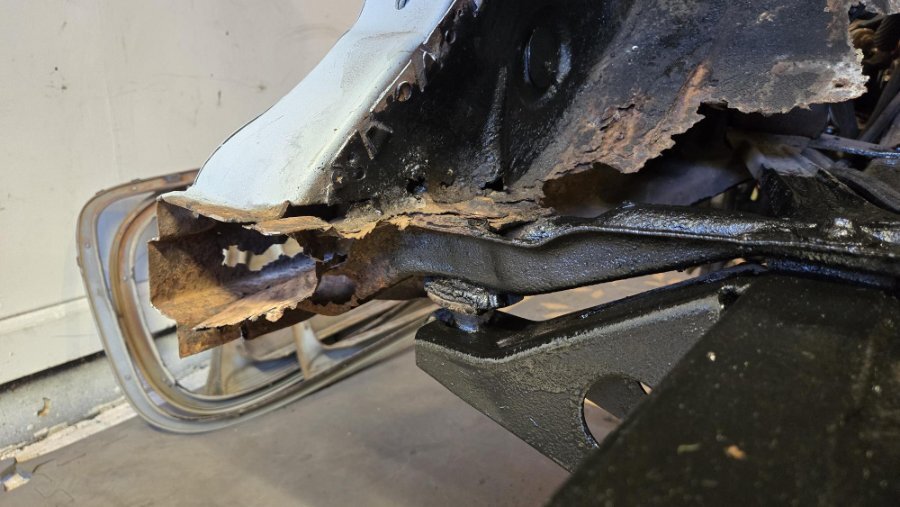
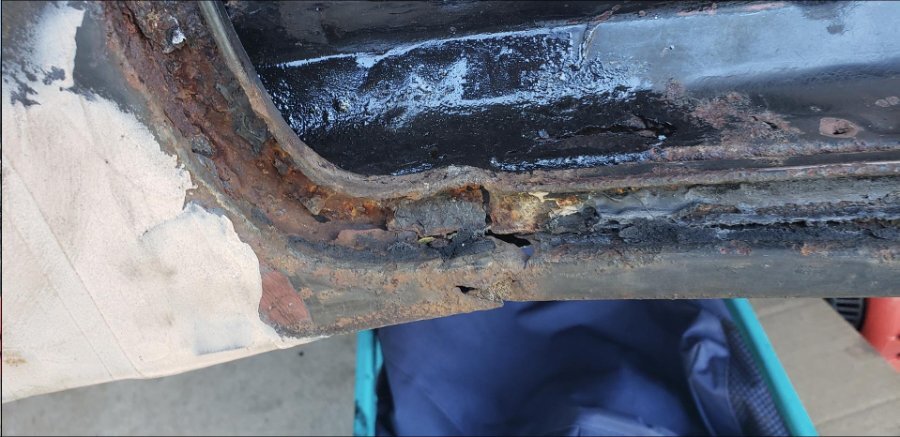
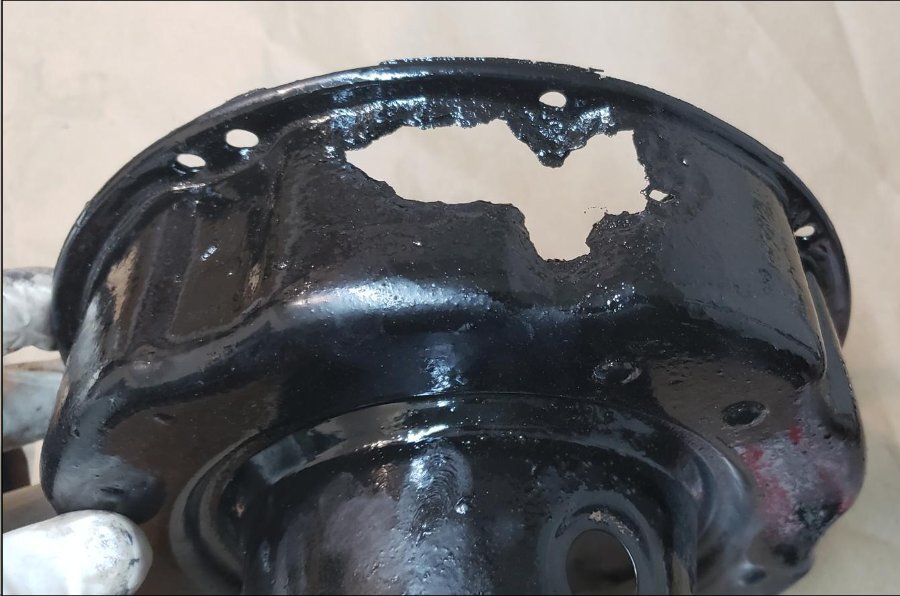
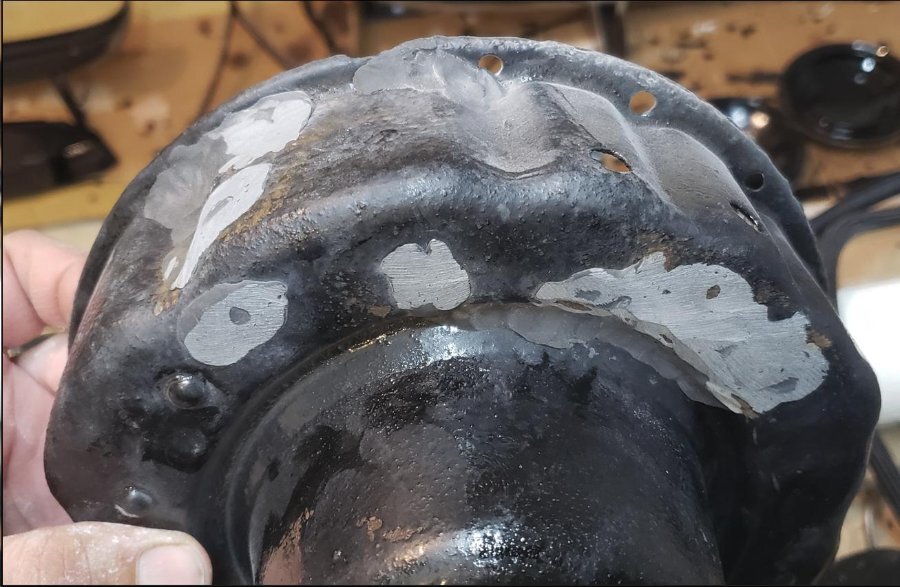
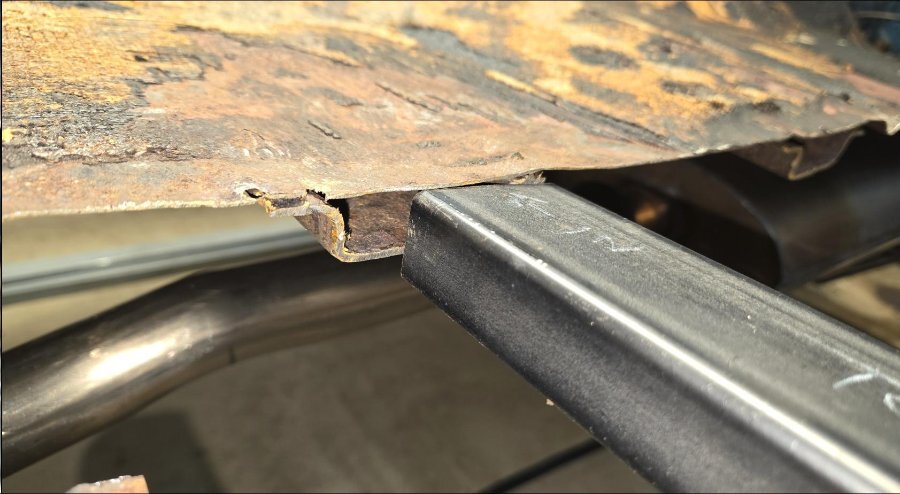
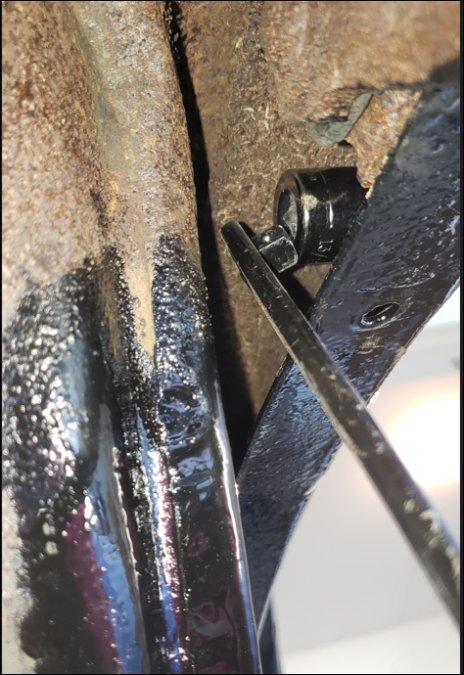
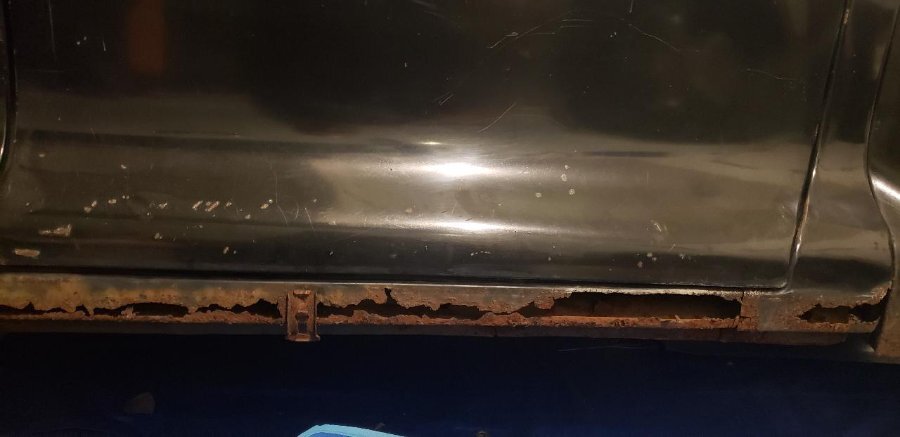
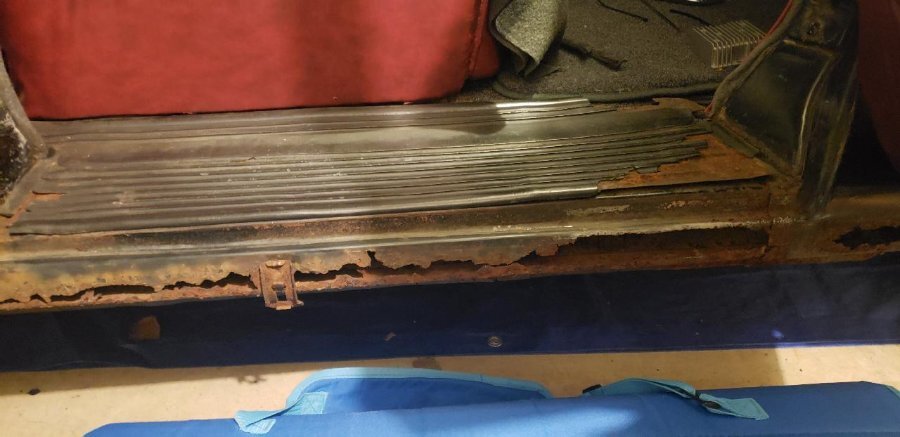
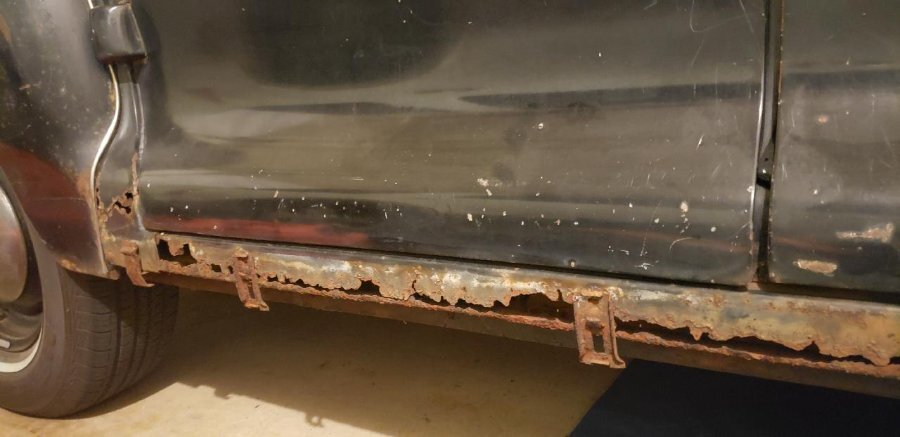
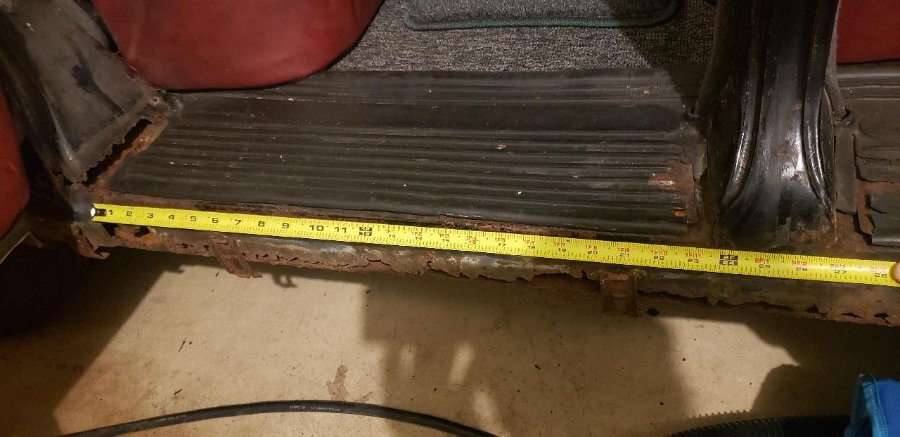
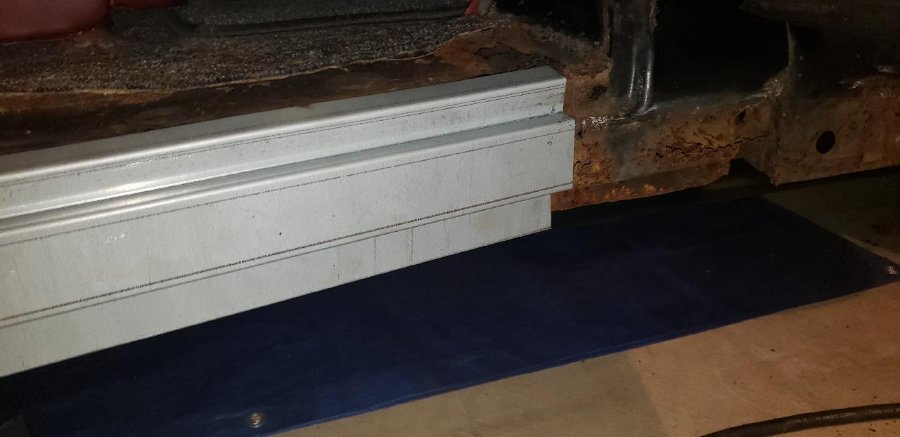
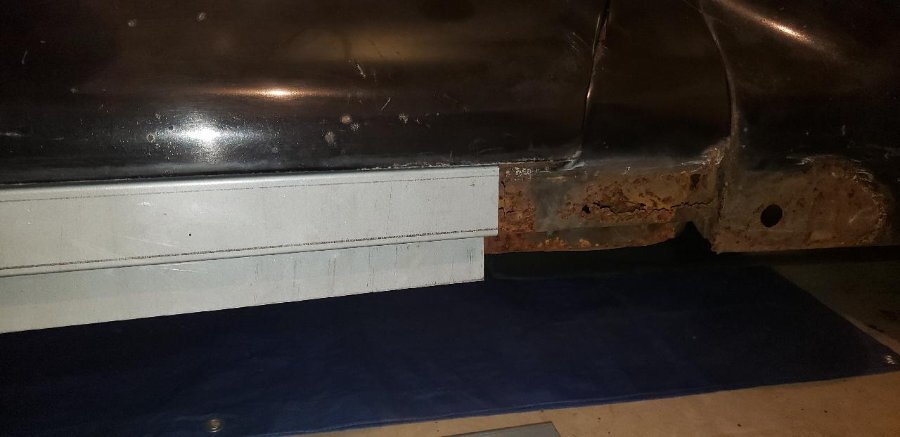
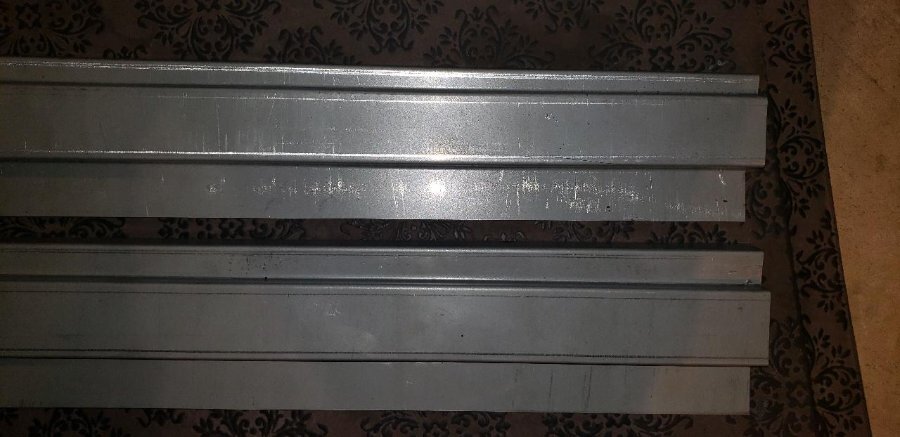
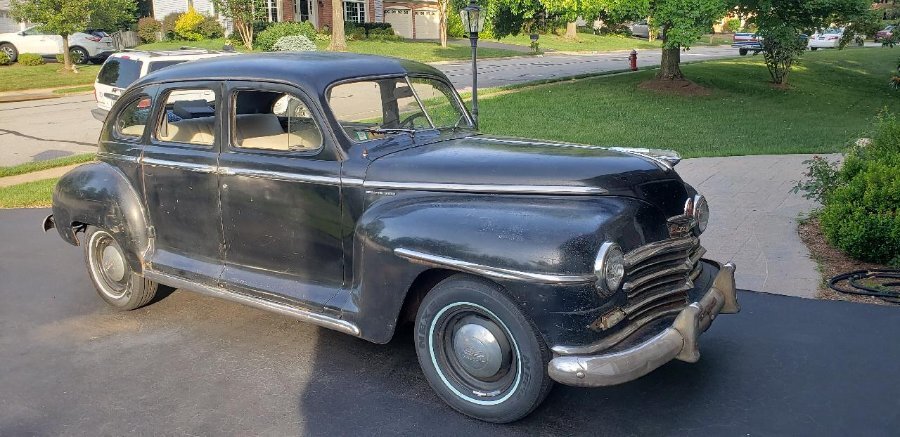
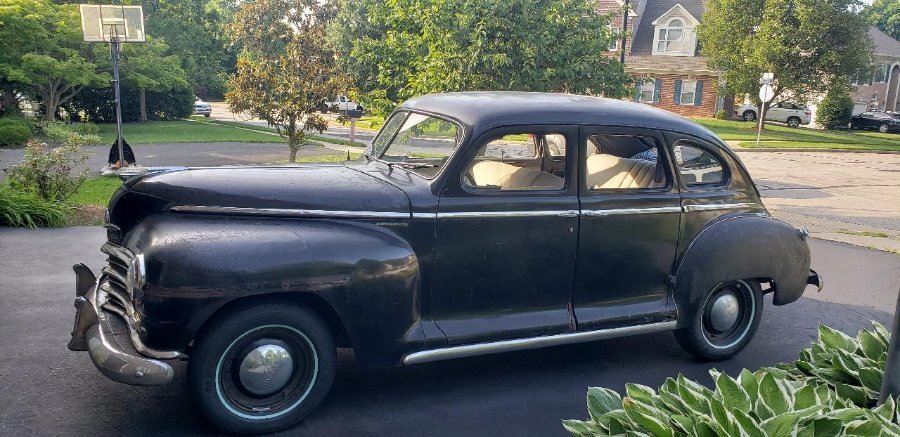
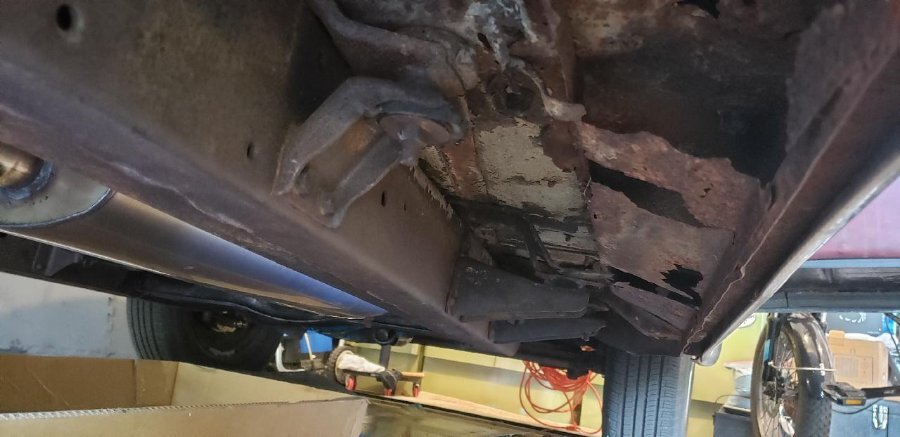
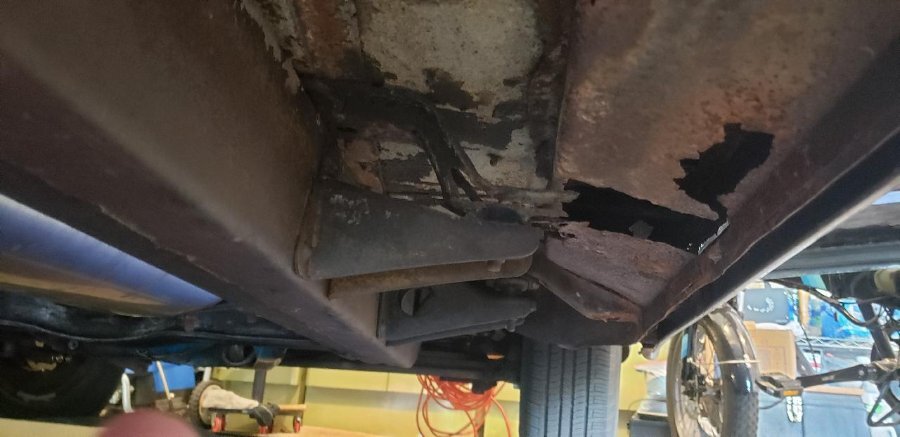
I would first like to share my appreciation for this Forum and all those that participate and share their knowledge and experiences. First - a little background... I’ve been restoring my Plymouth that was passed down to me from through my father from my grandfather. Back in 1984/5 when I was a Junior/Senior in High School I started working on the car and my dad let me take it to college with me. So many fond memories... After finishing school he just gave the car to me to keep in the family. I drove it all the time and it was one of my main means of transportation for many years. Then I started having some trouble with the fuel tank lining disintegrating and causing debris to travel through the fuel lines and into the carburetor and eventually clog the jets. I was able to do emergency road-side carburetor repair to get it going again, but it started happening all the time and I began to lose faith in it as a reliable vehicle (I'm sure many readers of this will know exactly what I'm talking about). Then I let it sit for nearly 20 years as my life focused on raising a family. Then one day I made the decision that it was time to get it running again. After a few months of prep work, I managed to get it started as proof that it was worth it. The feeling was so good to hear it run again. The past two years I spent replacing the tires, entire fuel system (tank & fuel lines), exhaust system, brake system (wheel cylinders, master cylinder, brake lines, front disc brake conversion (scarebird)), and electrical system (all new wiring, improved grounding, conversion to 6V alternator, and added fuse panel). The next main items on my list are to do a little body work and then repaint it. That is what leads me to the topic of this thread – Rocker Panel Replacement. In order to repaint the car I have several things that will need to be done first – including some rust that needs to be dealt with. I am not looking to take this car to the highest degree of perfection, but I would like it to be something that is not an embarrassment to my two young daughters. Unfortunately, my children have been raised with my wife constantly calling it a stinky rust bucket. They have no interest in getting in it, because in their eyes they’ve been brainwashed that it's past it’s time. I’m not doing this restoration for them – it is something that I want to do for myself and I really enjoy doing it. However, my daughters are now in high school and my hope is that if I make it look cool, they might give it a chance and have a little interest in it. I've done some work since these pictures were taken, but here is what it looked like after I got it running again. Now for the project… Overall the body is in pretty good condition. I have a little rust on a couple doors and behind the rear door frame. But the big issue is the rocker panels. I started looking into what they even are and how they work and realized that I was pretty ignorant about them and just took them for granted. But while I was redoing the brakes, exhaust, wiring, etc., I knew I was going to have to tackle the rust. I finally pulled the rocker stainless steel molding off and this is what the rockers look like: This is under front-passenger door (with door closed) This is under front-passenger door (with door open so you can see the sill). I have removed the rubberized sill tread (that is seen in this picture) and the Sill floorboard appears to be in pretty good condition. I’m hoping to not replace the floorboard or the sill, but I will discuss this more as I unfold the story… This is under the rear passenger side door. Below is an image with the rear passenger side door open. Sorry for the tape measure, but I was trying to get some measurements of the rear door opening and the overall length of the rocker panel for a 4 door sedan. As you can see the rear door area is about 24 inches. The total length of both doors is around 57-58 inches. After a lot of researching I ordered new rocker panels (below). The right and left rockers are not interchangeable as the lip that goes under the door increases in height as you get closer to the front of the front door. You can see that the two rockers in this picture are different (the picture just shows one end of each rocker). You can see that the lip on the top image is narrow and the one on the bottom is much larger. I was curious if the rockers would fit over the existing rusted out rockers and they sort of do. The pillar between the front and rear door (and the overall length of the new rockers being a few inches too long) prevented me from fitting it entirely from front to back. I was able to slide the new rocker over the front rusted portion as you can see in this picture below (with the door open): Here you can see the door (mostly) closed and the raw and untrimmed fitment looks pretty decent: Ok… at this point I need to mention a few important issues. 1. I have never welded. I have done electronics soldering, pipe soldering and brazing, but never arc welding. I researched many Youtube videos (Bad Chad is very good and motivational for beginners). I think I can do this. I went out this past weekend and bought a Mig Welder, helmet, gloves, etc. to do the job, along with a few scrap pieces of metal to practice on. More about welding in a bit. 2. The brackets that connect to the frame with rubber mounts are rusted out pretty bad (see images below). I feel that before replacing the outer rockers, that I should do some structural rebuild of some sort. Please chime in with your opinions on this as I really don’t know where to start with the structural braces/bars/beams/etc. Keep in mind, that I could just make it look pretty for painting by replacing the rockers – since that is technically all you see from the outside. However, if I attempt to go back and fix the structural issues later, I might have wished that I had done that first. The floorboard is fairly stable as I had replaced sections of it back in the mid 80’s. You can see in the image above that the frame-braces look to be in pretty good condition. The rubber mounts are in bad shape. The metal beams that go from side-to-side and support the floor sheet metal are rusted out that connect to the frame-braces and the rockers. ---------------- If anyone has "any" advice on doing rocker replacement, please let me know. Also, any advice on the frame mounts and how to properly support the rockers. I’m hoping to share this project to the end (with all its challenges) – including the rocker replacement, prep, sanding and painting.

-
I had a stuck valve on one of my cylinders (see picture and notice second spring was not pushing valve back down). I was able to free it with a screwdriver and a hammer and luckily there was nothing stuck in the valve seat area that might be impeading it from breaking free. At the time, my car had been sitting for about a decade and I really didn't want to pull the head off to inspect and I was sure it was something else. Engine would run, but was running rough and I thought it was a tune-up problem. Once I pulled the valve covers off and manually rotated the engine I could see one was sticking open. I took a series of pictures as I manually rotated the engine because at first I didn't see any problem since the lifter was actually touching when I first looked. However, as I rotated the engine I could see one was not moving like the others. You might have one that is slightly binding or sticking. You might be able to spray some lubricant up on the lower stems that might work its way up without pulling the head. Technically, it didn't take long to diagnose once I gave up on other issues like plugs, timing, carburator/fuel, etc. I hope this picture helps to see what a sticking valve looks like.

-
What kind of breaker did you install and where in the circuit? I'm going to presume you put it between the battery and the ammeter. Did you place it on the firewall somewhere or inside the passenger compartment? I recently rewired my entire 48 and added in a couple fuse panels. Then I had problems with my generator and I replaced it with an alternator - which is running great and I am so glad I did.
