


Greg51T&CWagon
-
Posts
165 -
Joined
-
Last visited
Content Type
Links Directory
Profiles
Articles
Forums
Downloads
Store
Gallery
Blogs
Events
Everything posted by Greg51T&CWagon
-
Can you tell us the size of the little blocks/wedges? I'm having a mechanic swap engines for me and want to have them on hand for him to use.
-
Love Mitchum's stuff. I bet they used the Ply for interior shots b/c the back seat area is much bigger so they could mount the camera far enough back to get the depth of field they needed?
-
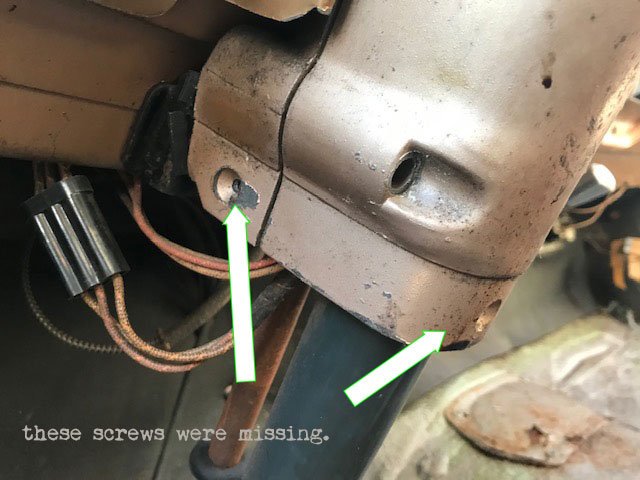
I think the reason the dash had been at least partially out was to replace the windshield wiper motor. It looks new and there is a door jamb sticker from a gas station saying "windshield wiper motor". I can see if a car has a leaky windshield those screws would be the first to seize.
-
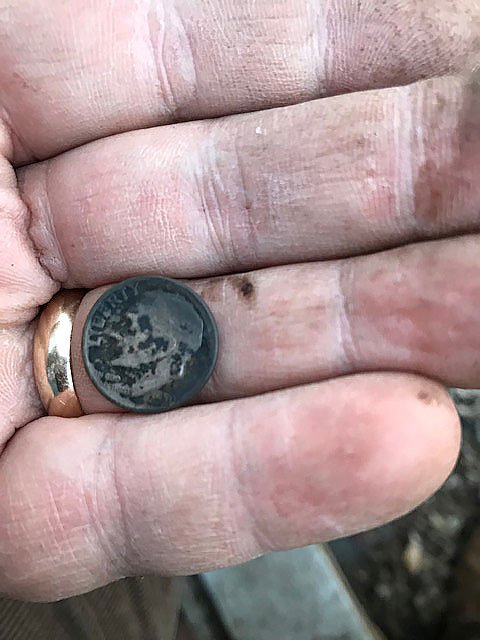
I finally got it off. Putting it back in is going to be interesting. I found a 1950 Dime inside the dash.

-
So got everything off except for the column mount bolts. Can't see how this is attached here? BTW this dash has been out before one of the top screws under the garnish was missing and several from the trim around the steering column. So far it's been relatively easy. No frozen screws etc. edit: i removed three nuts up and above the rubber bumper inside the dash but still won't budge? see pic.
-
This is really helpful thanks! I was feeling around up behind it this morning and the stiffness of the wire bundles and such led me to believe it would be a nightmare to leave it in place and work from below on my back. Long ago in my first vintage car, a 55 Belvedere, I was making the turn in front of the rocky steps in front of the art museum here in Philly and my dash caught on fire right in the middle of everything. I got under the dash and ripped the ammeter wire out-it was shorting and some cabbie sprayed it with his extinguisher. I don't ever want to repeat that! Just a minor burnt fingers. it was not much bigger than a big candle flame. i was able to drive it after some roadside repairs. i'm going to take this very slowly and methodically. everything is getting tagged and photographed. i'm enjoying the pace actually. it's nice to be able to work on a car and not worry about having to get it working quickly.
-
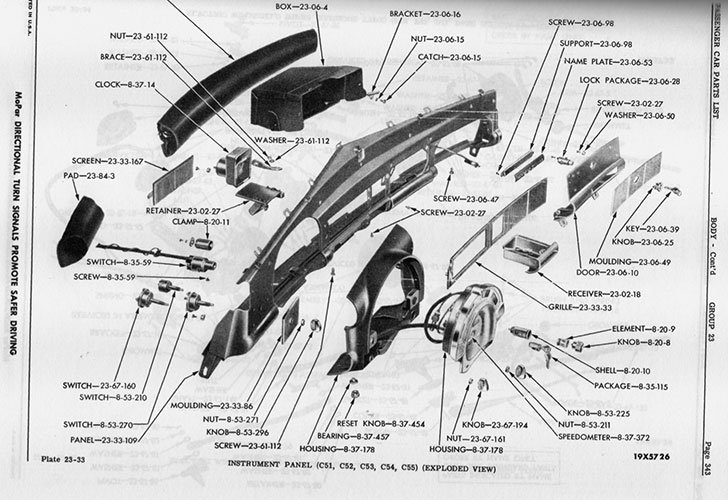
Change of plans. Lol. So I think it would be a lot easier for me to do this right if I pull the dash. Correct me if I'm wrong. I need to remove the garnish molding along the lower windshield edge to access a bunch of bolts across the top then two bolts lower corners. I don't see any attachment to the steering column in the parts diagram for the dash. Plus drop the heater control panel from the bottom and let that drop to the floor. I'll need to disconnect the speedo cable from the trans- can i do that without draining the trans? Oil pressure is already disconnected. am i missing anything? I've brought the starter horn etc harness pigtail into the passenger area already. There is still another smaller pigtail that needs to come through. any tips or cautions i should know before I set out to make this mess?
-
Thanks I will. I have quite a list of new parts to find!
-
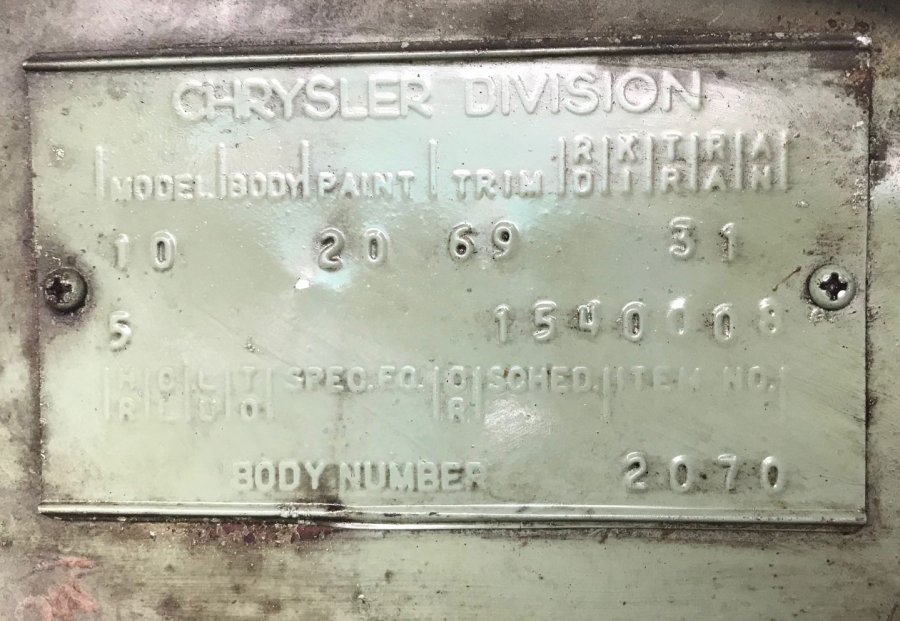
I'm starting to pull the wiring and label to replace. It's in horrendous shape in the engine compartment but not bad behind the dash. In any case I'm replacing most of it. I'd like to do this without removing the dash and also without working upside down. The plan is to remove all the switches from the dash (lights ign etc) and pull the main cluster. dropping the wiring from under the dash. Labeling as I go. The wire that ran to the solenoid was a bare wire for most of its run! I've ordered cloth covered wire from Rhode Island Harnesses. Here's a shot of the registration tag on the firewall. it was hidden behind a caddie brake booster that had been added when the original went bad.

-
Tho it's obvs good enough as it is, it seems to me this heat shield would be even more effective if it were flipped around so that the bit curving down were against the carb base. As it is now that curve would act as a slight air damn pushing the rising hot air toward the carb and fuel bowl. /nit pickin'
-
Thanks, I looked around online and did the 2 tests, primary and secondary and it passed the secondary but failed the primary. I have the Standard 6v coil but they don't make them with the bracket anymore. ? A good friend had a coil burn up his 54 Ford pickup they were in the middle of nowhere in North Dakota without an extinguisher, they tried to throw dirt on it but it burned up. I've got the engine bay almost cleared to have the block pulled. Knock on wood, all of the manifold nuts have been easy to take off. Just need to do the one's underneath. I have a nice little pile of bits to detail now. fan, heater box, heater duct, oil filler tube, some brackets...
-
My vote is coolant as well. Occam's razor and all that.
-
Looked at it again this morning. Looks like it's hiding under a big dollop of undercoating in the fender well next to the access panel. I finished rebuilding the distributor. Can a coil be tested off the car? I have a new one for it but the old one has half the bracket welded to its case. Would like to keep it if it's still good for that reason.
-
I wish it was. the fastener comes up from below and threads into a square nut that is welded to the bracket tab. I just can't find where it's coming up from? Is there a pocket between the outer and inner fender lining? The tab is sort of underneath the box so impossible for me to get to with a sawzall or something to cut and then fix later.
-
Another question with i hope a simple answer. What do I gotta do to access the front left (passenger side) mounting screw for the heater core box? I can't see it inside the fender unless the undercoating is hiding it? It comes up from below into the bracket. Do i need to remove some of the sheetmetal? Phrustrated in Philly, Greg this is the other mounting fastener, it is outboard of this one.

-
Check to make sure the distributor is snugged up tight, that it can't rotate.
-
Yes! Thanks. It fits perfectly up inside the old rotor.
-
Putting the distributor back together. Thought there would be photos and diagrams online to help with the top plate arrangement, there are in general terms but this one part doesn't show up in the ones i've found. and I can't see where it goes. Any ideas? Autolite 4012 btw.

-
you'd think. ? I finally just got it off. after hunting around for a tiny screwdriver. It circles the inner little shaft so you have to expand the two little nubs and with a needle nose plier then slip a tiny eyeglass screwdriver under it on the opposite side of the shaft and pry it out all with just two hands and normal old dude vision. The parts are now happily buzzing away in the ultrasonic cleaner with a mix of evaporust and simple green.
-
Almost done disassembling my distributor but hit a snag. How to remove that little wire retaining ring clip in the top of the distributor shaft so I can take the advance weights apart to clean underneath them etc. This is an IAT 4012 distributor btw.
-
Give George Asche a call. He probably has what you need.
-
Yep, Very interesting guy with a wealth of knowledge and experience. That part of pennsylvania is pretty beautiful too.
-
One of the things George Asche mentioned to me last night was that a manual 3 speed with overdrive will replace a fluid drive with m6. He said he has the longer shafts that are needed. Greg
-
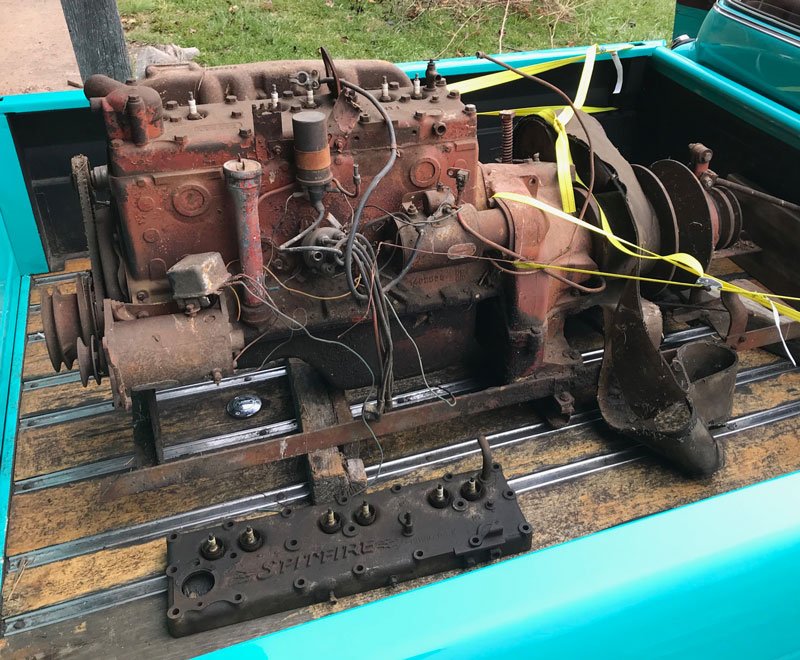
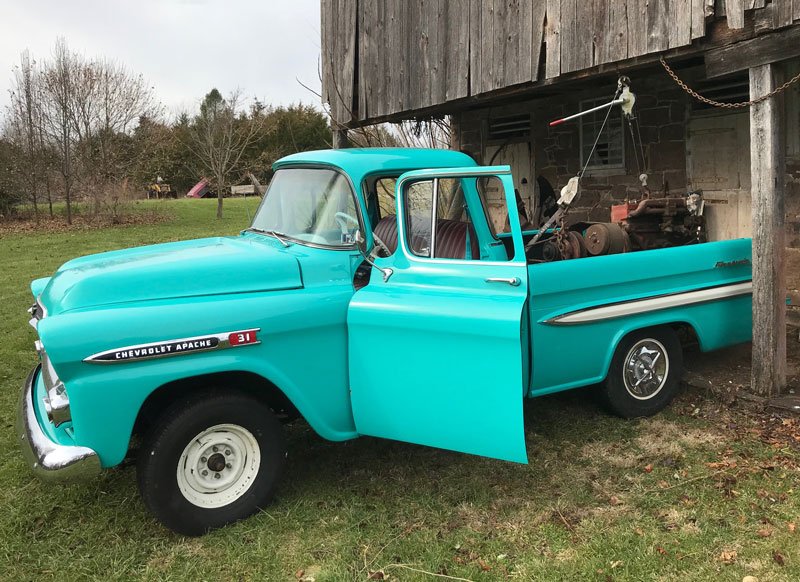
So back from the odyssey to pick up the engine and drop it off at George Asche's. 700 miles round trip. I used my 59 Apache. The engine is a 265! IND 265 13920C. Getting to Asche's was 'interesting' Super windy day so the truck was squirrely, that and the 700 lb? motor in the back made it even more so. That crazy transmission with the variable speed sheaves weighs as much as the engine i think. So I'm fried and what I thought was the last turn ended up being a 7 mile unlit winding near gravel road through the woods in the dark, Some parts were so rutted I had to slow to a crawl. But I made it. George and I had dinner nearby and shared stories then back to his place to see his shop and cool roadster then off to a hotel for much needed sleep. Anybody need a transmission for their combine harvester? Ha! greg

-
Thanks James Good to know. I'll do it this way.
