50farmtruck Posted June 8, 2011 Report Posted June 8, 2011 (edited) Well, here's what worked for me. I had an extra filter set up that was beyond repair, but I was able to salvage the top cap. I cleaned up & painted that cap along with the body of my original set up & after a couple of weeks of searching, got a paper element that I could make work. Here are the numbers: WIX 46180, Baldwin PA2136 & CarQuest 88180. The problem I ran in to was that the mounting hole in the cap didn't drop down over the rod for the wing nut to attach. They sit just flush with each other. So I decided I needed to build a custom top nut to bring it all together & then I ended up making two just because. Now my original set up is completely untouched, so when I feel the need to run it in it's original state all I have to do is fill it with oil & swap the tops. I'm really happy with the results & hope this is useful to some one else as well. Thanks, Bryan Edited June 8, 2011 by 50farmtruck Quote
Mark D Posted June 8, 2011 Report Posted June 8, 2011 Nice work. I just picked up a spare oil-bath filter off of ebay for $20. I intend to do the same thing with it. Now I just need to find the guts to make the first cut and a dremmel tool... Quote
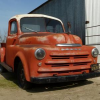
Plymouthy Adams Posted June 8, 2011 Report Posted June 8, 2011 that first picture looked like some hobo stew with birdnest noodle gone bad... Quote
NiftyFifty Posted June 8, 2011 Report Posted June 8, 2011 I used the bottom off my spare oil bath and retro-ed that to work with a chrome 6" round air filter. Was pretty easy...I do have some repairs to do to it though...when my motor blew it blew the whole assembly right off the carb..lucky I didn't lose it on the road Quote
Desotodav Posted June 8, 2011 Report Posted June 8, 2011 Quote My48Ruby Nice work. I just picked up a spare oil-bath filter off of ebay for $20. I intend to do the same thing with it. Now I just need to find the guts to make the first cut and a dremmel tool... Mark, I used a 4 inch angle grinder with a thin cutting disk to cut through mine. I mounted the air filter centre-piece upside down on a flat wooden bench top with a bolt through the centre hole and spun it around around against the angle grinder cutting disk. The angle grinder was levelly mounted on a block at the height at which I needed to cut. I was a little concerned at cutting it free-hand as I thought that I would end up with a crooked cut. Having both items mounted made it easy for me to keep a perfectly straight line. I later had a thin metal strip spot welded to the inside of my filter wall to strengthen it. I now run an oil-soaked foam filter in mine. I'm very happy with the results - that even a trained eye would be hard pressed to spot when it's all together. Good job on you filter Bryan. I agree with Tim, it did look a little nasty in the first photo! Desotodav Quote
Mark D Posted June 9, 2011 Report Posted June 9, 2011 Thanks for the advice Desotodav. I'll give it a go this weekend if time permits. Will post results with pictures. - Mark Quote
50farmtruck Posted June 10, 2011 Author Report Posted June 10, 2011 (edited) Desotodav, I like the idea of welding a skirt to the top for a more original look. Something I may do later on. For anyone else wanting to use a paper element, I would suggest taking your parts to the store with you to check for fitment. Not sure if I did something differently with mine, but the part # others here are using was way to short for my assembly. The cap actually contacted the body closing off the opening completely. That's why I ended up using this filter & also having to build a custom nut, but it all worked out. Bryan Edited June 10, 2011 by 50farmtruck Quote
Desotodav Posted June 10, 2011 Report Posted June 10, 2011 Bryan, I have seen a few different looking original oil-bath air filters on the trucks that I have 'played' with recently. The one that I chopped for my 51 was the original one from that truck. The top part (with the skirt) remained unchanged, apart from the metal strip that was spot-welded to the inside side-wall to add strength. I'm interested though, how did you get your paper element to fit inside your filter? Did you just get an element with a large enough centre hole to go over the 'trumpet' like cone inside the filter body? Desotodav Quote
50farmtruck Posted June 10, 2011 Author Report Posted June 10, 2011 (edited) Desotodav, That's exactly what I did. I ran out of time to take a picture today, but here are the dimensions of the filter. I.D.:3 5/8 O.D.:5 3/4 Length:6 Bryan Edited June 11, 2011 by 50farmtruck Quote

Recommended Posts
Join the conversation
You can post now and register later. If you have an account, sign in now to post with your account.