


Jocko_51_B3B
-
Posts
430 -
Joined
-
Last visited
-
Days Won
3
Content Type
Links Directory
Profiles
Articles
Forums
Downloads
Store
Gallery
Blogs
Events
Everything posted by Jocko_51_B3B
-
 As far as I can tell these L seals aren't being reproduced. I'm considering buying a 3' x 3' sheet of neoprene 1/16" thick, tracing the seals out, cutting them, and punching out the seven bolt holes. I'm curious about how others have handled this. The cost for the rubber (enough for both fenders) is about $20.
 -
48 - 53 Dodge Truck Reproduction Fuel Tank Project
Jocko_51_B3B replied to Bradley S.'s topic in Mopar Flathead Truck Forum
Just ordered the ferrule. https://www.moparpro.com/fuel-tank-ferrules/c202 -
48 - 53 Dodge Truck Reproduction Fuel Tank Project
Jocko_51_B3B replied to Bradley S.'s topic in Mopar Flathead Truck Forum
I recently bought one of the new reproduction gas tanks. I repainted it silver and installed it on my 51 B3B. That's when I found out these tanks are NOT exact reproductions as advertised. At first glance they look perfectly accurate but the difference becomes clear when you go to connect the fuel line. My original factory tank from Dodge has an inverted flare female fitting. (See the photo below.) The flare is convex. It points outward. The flare on the new repro tanks is not an inverted flare fitting. It is concave and points inward. My fuel line has a regular double flare that mates perfectly with my old tank but is polar opposite to the flare on the repro tank. There is no way it will seal. For this reason these tanks should not be advertised as exact reproductions. They are not. Now I need to find a brass fitting that combines a convex male 45 degree flare on one end (to screw into the repro tank) with a female inverted flare on the other end (to connect to my fuel line fitting). I spent time looking for such a fitting today but no luck. Looks like I'll be making phone calls on Monday. Below is the inverted flare fuel line connection on my original Dodge tank. It fits my 45 degree double flared fuel line correctly and makes a good seal. The repro tank flare points inward which is opposite to the flare of my fuel line fitting. I couldn't get a good picture of the repro tank because it is installed on the truck right now.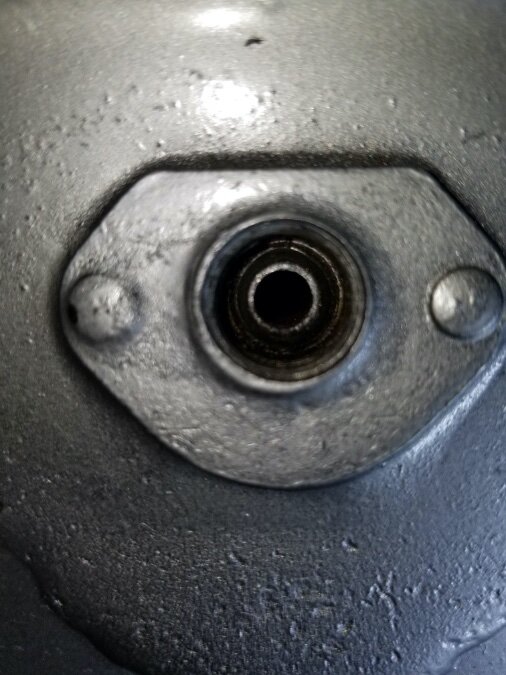
-
A question for Fel-Pro head gasket users: I have a Fel-Pro head gasket I'm getting ready to install. I'm wondering if some type of spray-on sealant like Permatex Copper Spray-A-Gasket should be applied to the copper side, the composite side, or to both sides. Or maybe no sealant on either side is required. Also, should the gasket be applied with the copper side against the block or the head? The Fel-Pro website doesn't address either issue as far as I can tell.
-
Sniper, No I didn't so maybe I jumped the gun. All I did was go through the initial torque sequence in the correct order per the shop manual. I didn't expect to see any weeping at all from the head gasket. In any case I will definitely go through three heat up and re-torque operations this next time no matter what I do to the head bolts. Live and learn I guess. Thanks for getting back to me. Jocko
-
When I put my engine together I used a BEST brand head gasket with Permatex Copper Spray-a-Gasket applied to both sides of the gasket. I used Permatex Thread Sealant with PTFE (#80633) on the head bolt threads. Sure enough I saw a small amount of moisture leaking out from under the head. I didn't over-do-it with the thread sealant so it's possible I didn't use enough of it. Anyway I pulled the head, got a new gasket, and am ready to go for attempt #2. I have two questions about thread sealant to two prior posters on this thread. If Sniper and Los Control happen to read this, thanks for taking a minute to answer: To Sniper... Do you use only teflon tape on your head bolts? I'm considering using only tape or maybe tape along with a generous amount of PTFE thread sealant over the tape. And how many layers of tape work for you? To Los Control...When you say you apply pipe dope until it oozes out of the threads and then you scoop up the excess, I'm guessing your engine has studs instead of head bolts. I have head bolts on my '51 so I won't be able to see any oozing. Do you use regular plumber's pipe dope on your engine? Also I found a pretty good video that covers the different colors, grades, and uses of teflon tape along with some application tips. I learned a lot from it... And here I go again. Just got the head off...
-
Thin Copper Head gaskets for 230 flat head motor
Jocko_51_B3B replied to grady hawkins's topic in P15-D24 Forum
Andy Bernbaum also has the correct copper head gaskets. https://www.oldmoparts.com/parts/l_engine/cylinder-head-gasket-2/ -
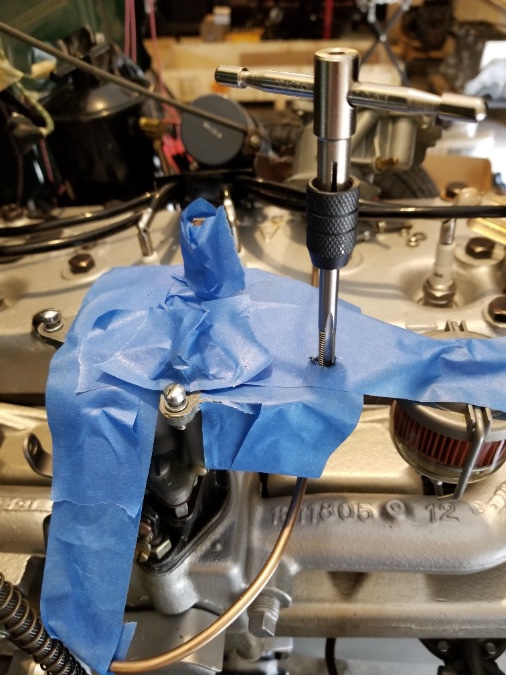
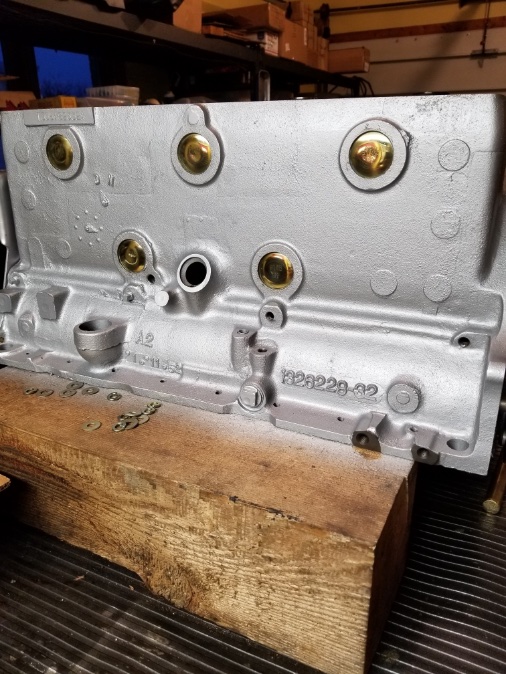
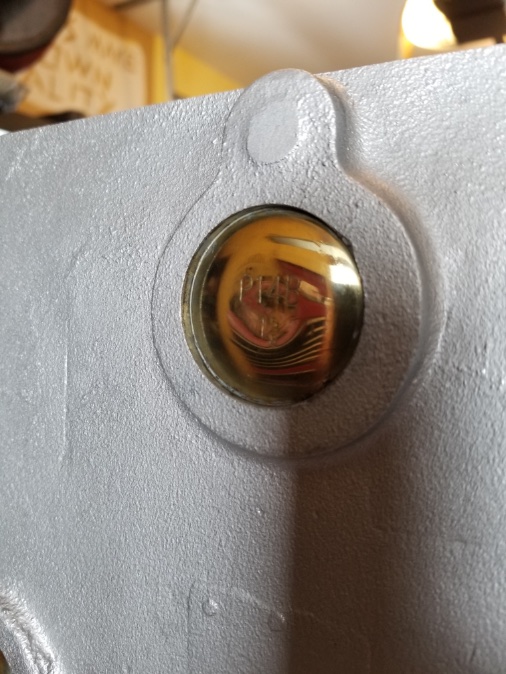
Three of the threaded holes for the air horn mounting screws were stripped by a previous owner. The screws are 10-24 RH so I ordered a Helicoil kit from McMaster-Carr, kit part number 91732A914. I wasn't sure at first whether it would be wise to change over to fine threads, but some online research told me that fine threads would be wrong for a soft metal like aluminum (too easy to strip) so I stuck with 10-24. Only other considerations were to remove the float and drain the gas out of the bowl (which I sucked out with a syringe) before drilling to avoid starting a fire and to mask off the carb body to avoid chips falling into the carb. Problem solved. I helicoil'd all four holes and I replaced the screws with allens because one of my originals was mismatched and I couldn't find the right style at the hardware store. . Finished...

-
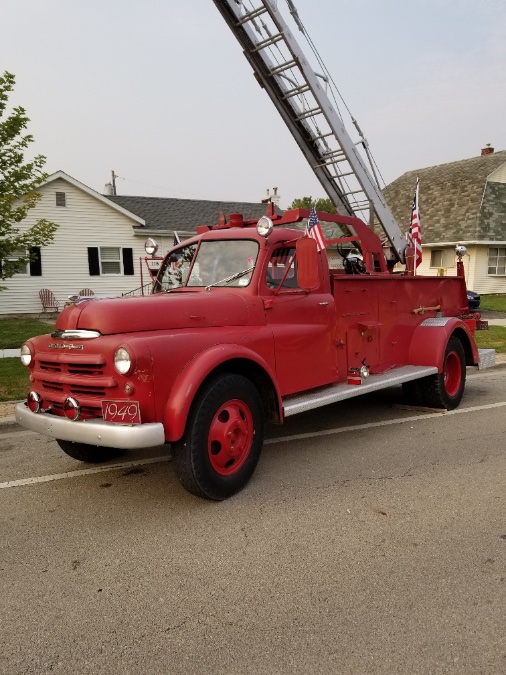
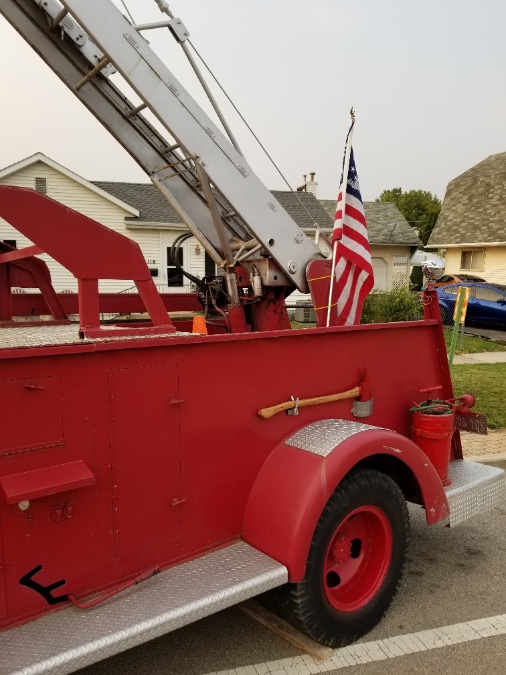
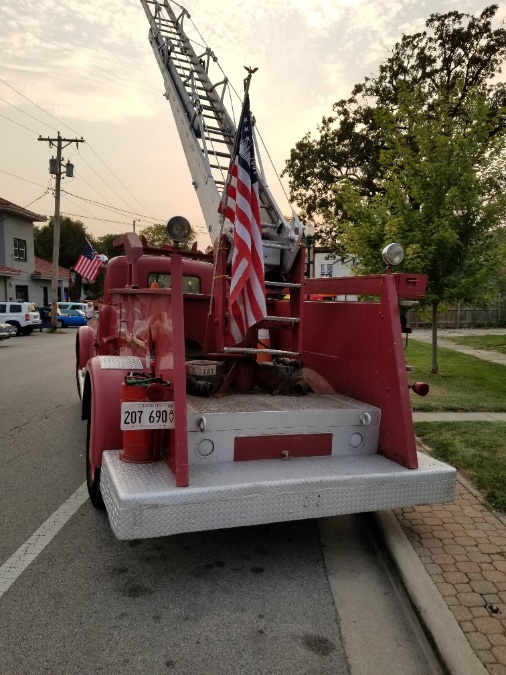
I spotted it at the Morris, Illinois Cruise Night. I didn't see the owner so all I have are photos. If it shows up again at the October Cruise Night I will try to find the owner and get some background info.

-
Clutch Noise Got Me Stumped
Jocko_51_B3B replied to Jocko_51_B3B's topic in Mopar Flathead Truck Forum
The pictures in the parts book show the more protruding side of the disc hub pointing toward the rear of the truck. That's the way I installed it so I believe it is installed correctly. I also had the disc rebuilt. It has all new pads and whatever else they do to it.. -
Clutch Noise Got Me Stumped
Jocko_51_B3B replied to Jocko_51_B3B's topic in Mopar Flathead Truck Forum
I installed a brand new throw out bearing and put in a NOS bearing sleeve from VPW. Same noise. I think the noise happens on initial contact between the pressure plate, disc, and flywheel. Maybe the noise is accentuated by not having the toe boards in yet. Maybe the new clutch disc and resurfaced flywheel need to "wear in". Maybe this. Maybe that. Who knows. The truck is still on jacks but the clutch seems to be working fine. I don't feel like pulling the pressure plate out right now so I'm going to put things together and drive it for a little while and see what happens next. Here's where the truck stands at the moment...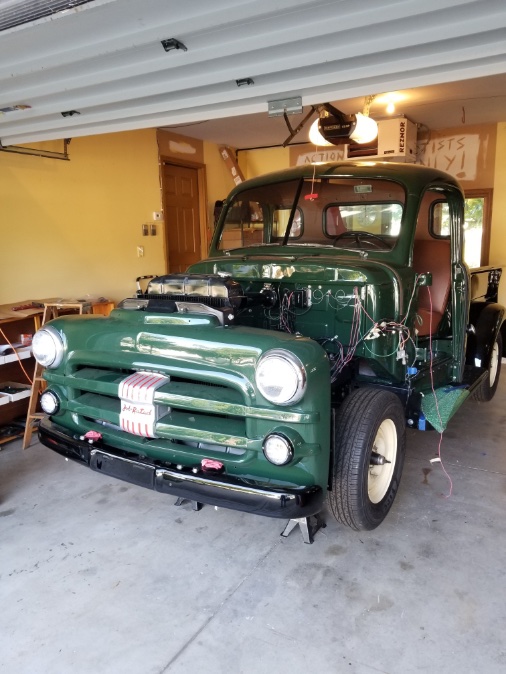
-
Clutch Noise Got Me Stumped
Jocko_51_B3B replied to Jocko_51_B3B's topic in Mopar Flathead Truck Forum
There was nothing apparently wrong with the pressure plate before I installed it, but I will check that possibility and post the results. -
Clutch Noise Got Me Stumped
Jocko_51_B3B replied to Jocko_51_B3B's topic in Mopar Flathead Truck Forum
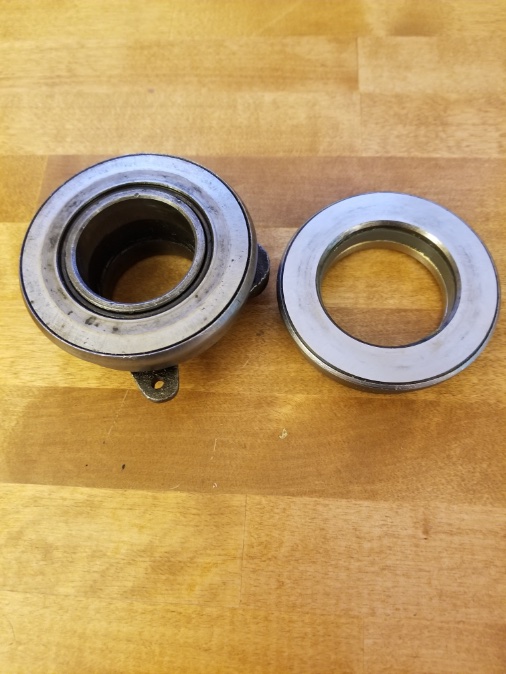
I believe I've found the problem. There is a very slight vibration in the release (throw out) bearing. With the engine running I had a friend operate the clutch pedal as I laid under the truck and watched the release bearing engage and disengage from the pressure plate. I saw a tiny bit of vibration in the bearing itself or between the bearing and the sleeve on which the bearing is mounted. When I depress the clutch pedal all the way down there is so much pressure on the bearing that it prevents it from vibrating. When I take my foot completely off the pedal, the bearing no longer rotates, so the vibration stops. But when I depress the pedal about half way down, as the bearing first begins to spin, there isn't enough force on the bearing to prevent it from vibrating. I'll need to remove the bearing and sleeve assembly to see exactly where the problem exists. If the sleeve diameter is worn down, maybe it's possible to "sleeve the sleeve". Otherwise it's a new bearing. I will post results when I know more. -
Clutch Noise Got Me Stumped
Jocko_51_B3B replied to Jocko_51_B3B's topic in Mopar Flathead Truck Forum
I installed the propeller shaft, but the noise is the same. I'll drive it for a while and see what happens. I don't think driving it will cause damage to anything at this point. -
Clutch Noise Got Me Stumped
Jocko_51_B3B replied to Jocko_51_B3B's topic in Mopar Flathead Truck Forum
The fact that the noise goes away when the clutch pedal is held down does seem to rule out the release bearing. The noise only happens when I release the pedal about half way as the disk starts to engage. Once fully engaged the noise and vibration disappear. I'm thinking the noise has something to do with the disk or pressure plate. I'll install the driveshaft and see if it makes a difference. -
I just installed the clutch and transmission but I get a noise (see the video) when letting out the clutch. Once it's fully let out the noise stops. Here's what has been done: 1. fly wheel has been resurfaced 2. new clutch disc 3. new pilot bearing 4. new pull-back spring on release bearing assembly 5. Surface of release bearing lightly lubed 6. Clutch forks lightly lubed 7. Transmission input shaft lightly lubed. 8. Clutch disc has been installed with the protruding side of the hub pointing back toward the trans (which I believe is correct). More info: 1. I did not replace the release bearing (throw-out bearing) because it rotated freely, seemed well lubed, wasn't loose or sloppy, and I had a professional mechanic give it the OK. 2. The video was made without the driveshaft installed. 3. The video was made in first gear, but it makes the same noise in all gears including neutral. 4. The clutch pedal is adjusted for one inch of free play as per the manual. 5. I saw nothing obviously wrong with the clutch plate so I installed it without any adjustments, fixes, or modifications. 6. Transmission oil is topped off. 7. Transmission shifts fine between all gears including reverse. If someone else had posted this I would say "Replace the release bearing." but the bearing really looked perfectly good when I inspected it. I'm kind of stumped. Clutch Noise 420.mov
-
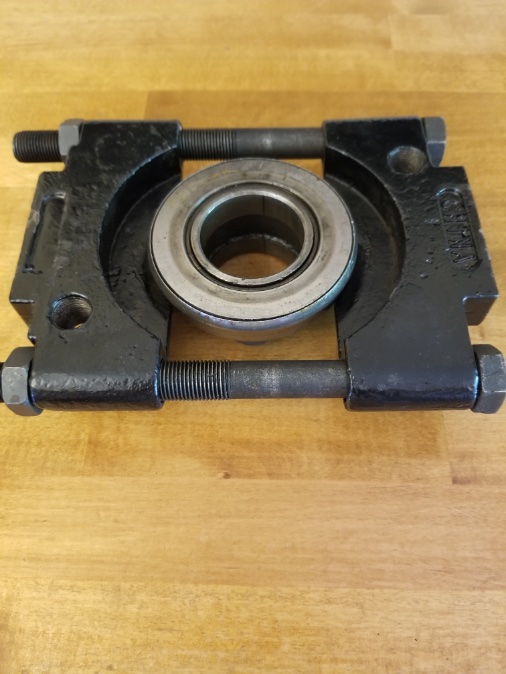
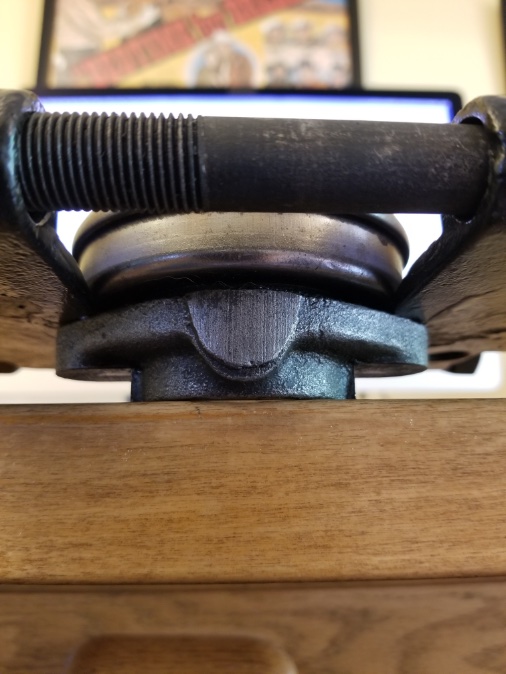
Throw-Out Bearing Replacement
Jocko_51_B3B replied to Jocko_51_B3B's topic in Mopar Flathead Truck Forum
Merle and Ken, Thanks very much. I have a puller like that and it should work. I hope this helps someone else with the same question.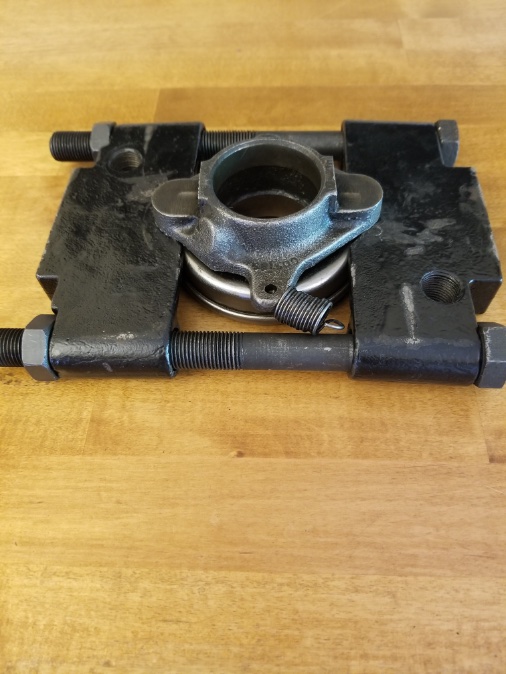
-
I want to replace the throw-out bearing on my B3B, but I'm not sure how the old bearing comes off the sleeve. I don't like applying force when I'm not sure what is holding it in place. Anyone know how to remove the old bearing from the sleeve? Is there a snap ring in there somewhere? Thanks.

-
Plymouthy and Squirebill, I think you guys are right after all. I brought #1 up to TDC using the sprocket teeth markings as my guide to make sure I was there exactly. Then I moved the oil pump over by one tooth and brought the rotor to 7:00. (I also double-checked my point gap to make sure it is .020.) Then I connected my ohmmeter between the points and the block (ground) and adjusted the distributor housing until the points just opened. I should have read the Service Standards at the front of the electrical section in my Shop Manual. It clearly states that the #1 piston should be .000 inches from TDC when the points open. Then right below that it states the same thing again in terms of crankshaft rotation: "Piston position when points open: TDC". Jocko
-
Squirebill, Thanks for your detailed answer. I think I have a handle on this now. And since I still have the head and timing cover removed from the engine I can see how everything moves as I rotate the engine by hand. First things first. I made certain the timing mark on the crankshaft pulley lines up with the timing mark stamped on the camshaft timing pulley. With that, I know my valve timing is set. I then rotated the engine by hand until my #1 piston came up to TDC firing position and #6 at TDC between exhaust and intake. Here is what confused me for a while; No matter how I installed the oil pump I could not get the slot to be perfectly horizontal with #1 at TDC. I tried slipping teeth on the oil pump CW and CCW but no way would the slot line up to be horizontal. It would always be about 30 degrees off, up or down. So, just for good measure, I rotated the engine CCW a little bit until the oil pump slot became horizontal (that brought the #1 piston 5/8 inch below and before TDC). At that point the distributor rotor WAS at 7:00 and it lined up perfectly with my #1 spark plug wire. So from what I see, I believe that the #1 piston is actually before TDC (I measure it to be about 5/8 inch below TDC) when the #1 plug fires (oil slot horizontal & rotor is at 7:00). This makes sense to me since any given plug should fire before TDC, not at TDC. Am I seeing this clearly? Jocko
-
Where does the Service Standard mention that the factory setting for the rotor is 7:00? I don't see it in the B3B Shop Manual under the ignition section.
-
I finally decided on Permatex Form-A-Gasket #1 to seal the Welsh plugs. After putting them in I thought they might look good polished up. Maybe polishing them is a little over the top but why not? So I used a little bit of Mother's Mag & Aluminum polish. It took about two seconds and they turned out pretty nice. The plug in the upper right corner got scratched from the brass drift I used to punch it down so to prevent scratching the other four I put a small piece of aluminum tape on the plugs before punching them down with the drift. That worked. No more scratches.
-
Good info. Thanks JB.
-
I found this little article about electrolysis in car engines. https://www.familyhandyman.com/project/coolant-testing-with-a-multimeter/ From what the article states, when using brass Welch plugs it might be a good idea to change coolant more regularly (or at least check it for conductivity) . I suppose sealant used when installing welch plugs helps prevent galvanic corrosion by reducing direct plug to block contact, but who knows? Talking about sealant, I've read that some guys like to used JB Weld, but is there a product out there made specifically for sealing core plugs?
-
First Question: Any suggestions about what sealants work well for sealing the welch plugs? Second Question: I just ordered a set of brass welch plugs from Summit Racing for my B3B because I was concerned that steel plugs could rust eventually. Then again, brass and cast iron are dissimilar metals which (I'm thinking) could set up galvanic corrosion. Any thoughts on this? I never heard of this being a problem, but since it occurred to me I thought I would put it out there.

