-
Posts
22 -
Joined
-
Last visited
Reputation
4 NeutralProfile Information
-
Gender
Male
-
Location
Pomeroy, Washington
-
Interests
old iron, thinking outside the box, conservation, pathology, regional geology.
-
My Project Cars
1947 WFM-38, 1967 C-600, and a few other non Mopar makes.
Contact Methods
-
Biography
Suffering from an Old Iron Addiction
-
Occupation
Retired Forester
Converted
-
Location
Southeastern WA
-
Interests
Bustin' a Rusty Nut
Recent Profile Visitors
1,019 profile views
-
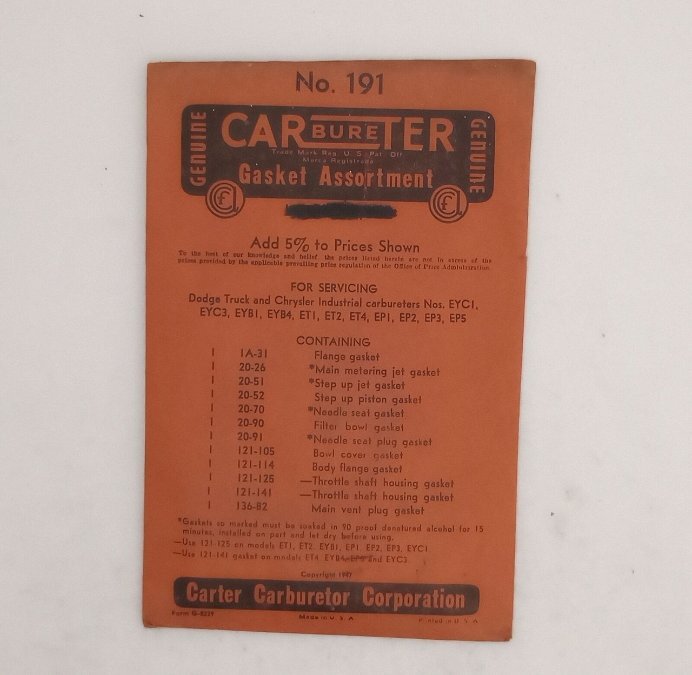
Stumbled across some Carter NOS paper gasket sets for the Ball & Ball carburetors at Old Car Parts Northwest (OCPNW). Might be handy to have around if you're in and out of your carb these days. https://ocpnw.com/carter-191-carburetor-gasket-assort-dodge-truck-chrysler-industrial-carb-nos/ Make sure you match up your carb ID to their listing! Having wandered around their website yesterday, it appears they have a few other parts of appropriate vintage, including a truck front rubber engine mount/isolator, an old stock rebuilt water pump, and I think I saw a 6v voltage regulator, all of appropriate era for our flatties. No affiliation, just passing along the link! MBSoPaB
-
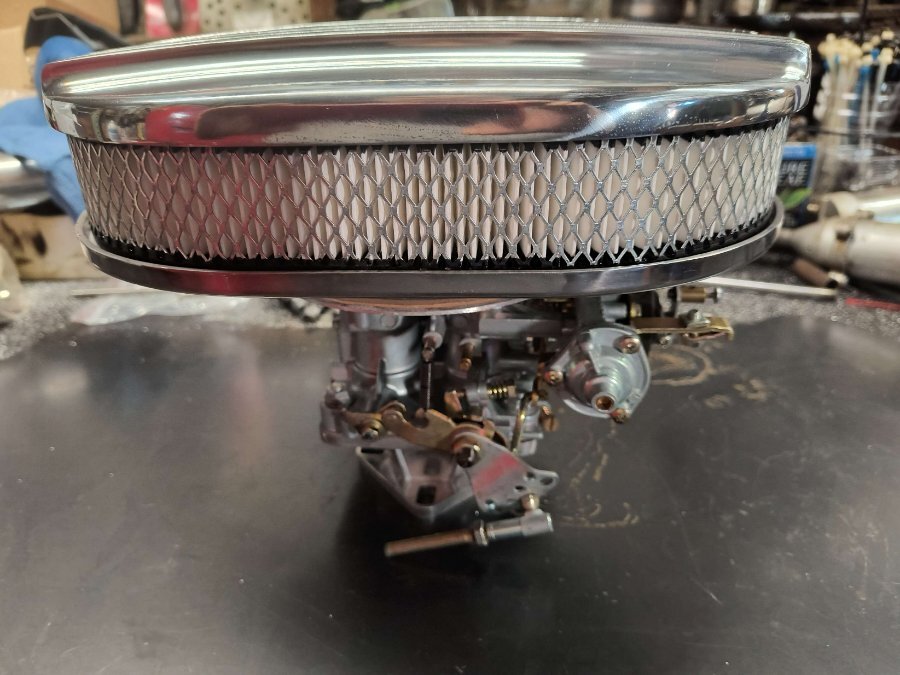
Hello Ray, and welcome to the forum! • First off, downdraft or updraft carburetor? • Next, governor, or ungoverned? If the prior (downdraft), you have options and decisions to consider. If the latter (updraft), fewer options, and fewer decisions left on the table. • Blindly trying different carbs can bring with it some tough troubleshooting and tuning issues - that carb that came on your 251 might still be the easiest route to a running snow cat. • if downdraft, I'll throw the option of a Weber 32/36 progressive out there. It'll require an adapter for the manifold, and you'll need to consider an air cleaner solution. If you're height limited in the Bombardier, this could cause some heartache. In my application, I also opted for an electric fuel pump - they have both 6v or 12v pumps with appropriate pressure (~3.5PSI). My application uses a pump for the Mazda RX-7 from the early 80's (Delphi or Carter for me). • You might consider using the search function for carburetor alternatives; it's discussed a few times here in the truck forums, and also over in the passenger vehicle forums, too. Best of luck with the Bombardier! MBSoPaB
-
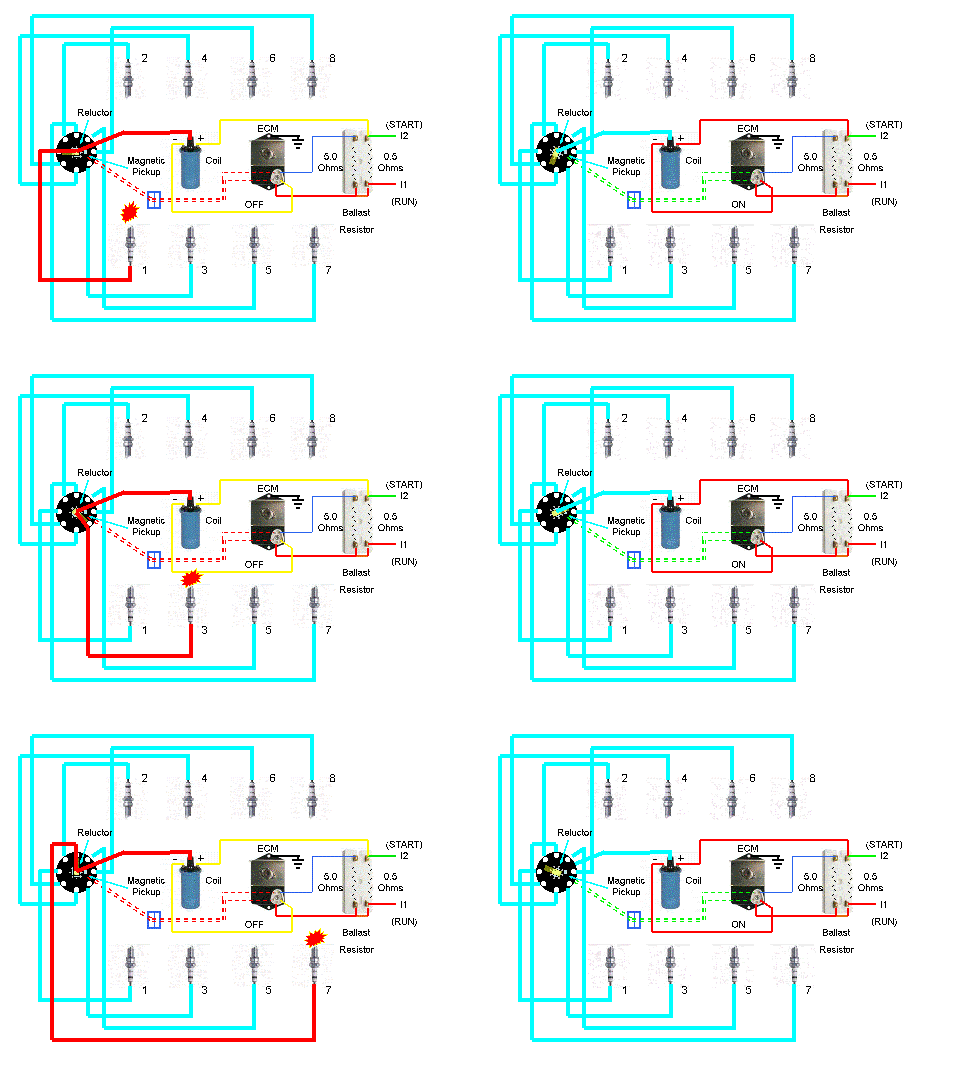
For those of us following along with Sniper's dizzy upgrade and needing a refresher on wiring, I urge you seek out Dave78chieftain webpage. Whether it be wiring up a module on a motorhome or a flathead six, the principles are the same. Lots of good tidbits for us to review. And illustrations, shamelessly stolen from Dave's website page (because they are simple, And get the job done). MBSoPaB
-
13" Rotors. They fit snugly under the old 16" Accuride dually wheels, * barely *. FRT, thinking back on it, and the complexities of mismatched systems and parts, if all you're looking for is to break out of the 40 MPH club, and you think your brakes are up to the task, maybe a good old brownie (auxiliary transmission) is worth considering? • Brown - Lipe, say 5231 size. • Watson, with overdrive (not just underdrive). • Spicer. They're just as much obsolete and unobtanium as changing out an axle, plus you'd have an extra shift lever to grab! MBSoPaB
-
FRT, I used to go round and round with this very same question on my 1.5 and 2 tons. My multivariate analysis boiled down to two questions; which bolt pattern could I live with, and how wide was acceptable in the rear. Truth is, our Job Rated medium duty trucks are pretty narrow, when considering modern rear axle swaps. Front axles, too. Narrowest I could find in modern hardware came under cab & chassis setups from the big three. Think ambulance, wrecker, box van. Beware their ring and pinion ratios are wildly different by intended use and original powerplant. The width in question here is WMS to WMS (wheel mounting surface), unless you're in love with one axle setup and are willing to have tubes and shafts cut down to the width you seek. Lug pattern. Our 5-lug pattern is an 8" on center. The newest axles I ran across were a brief two or three year blip of Dodge motorhomes (MH) circa 1972/1973. The axles and hubs are expensive, and the wheels (19.5" tubeless), expensive as well. I think the last set of MH wheels I came across were 17.5, but I may be misremembering. For rears, my '47 COE runs a Dana 60 with an 8 on 6.5" pattern. My buddy's '59 Montpelier (Dodge flathead 1.5 ton chassis) step van runs a Dana 80 out of a wrecker, and runs slow, with the Furd 10 bolt wheels on it. A 5-lug problem solver, maybe, I had a '58 D400 with an Eaton 1350 or 1380 rear end, single speed, 5 lug on 8" circle matching the pattern under your Dodge now, it had Budd 20" lock ring wheels. And, the front axle; on my '47 COE, I run motorhome disk brakes, thanks to a spindle swap at the kingpin; the kingpin on the COE's and buses were 1.12" diameter, the same as the class A Dodge motorhome chassis from the '70's. M375 or M400 chassis, usually with the 413 and industrial cooling setup, knock the pins out, swap the knuckles over, put the pins back in and put in fresh welch plugs. All Mopar parts, and the engineering didn't outpace the application in those 30+ years. So, for my COE, that runs 8 lug on 6.5" bolt circle, plenty of wheel and tire options there, just not as large as an 8.25 R20 setup. Did this on the Montpelier, too. There's single and dual piston calipers, so size yours accordingly for your needs and intended uses. As far as keeping it original, my buddy's original '41 COE travels at 48 MPH. Crank the windshield out a bit, and it's a nice, cool, airy ride. Good luck with your pursuit! MBSoPaB
-
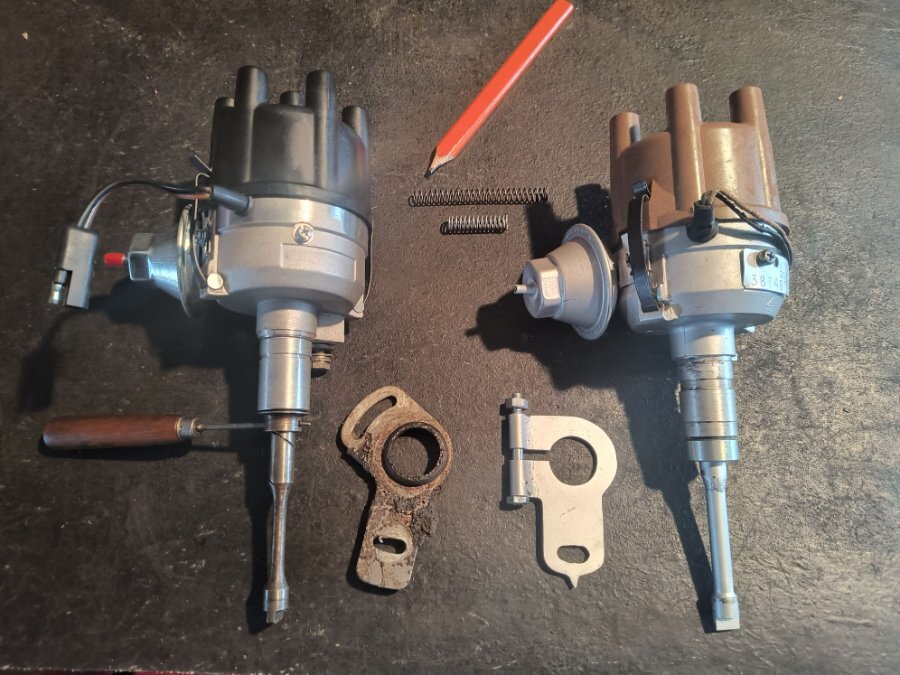
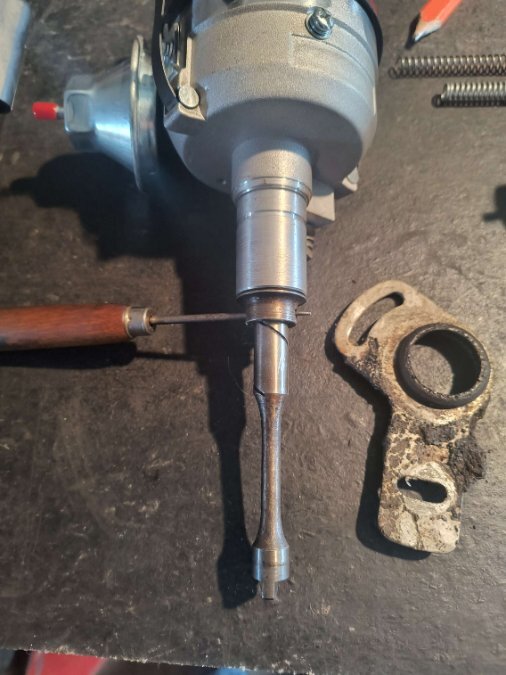
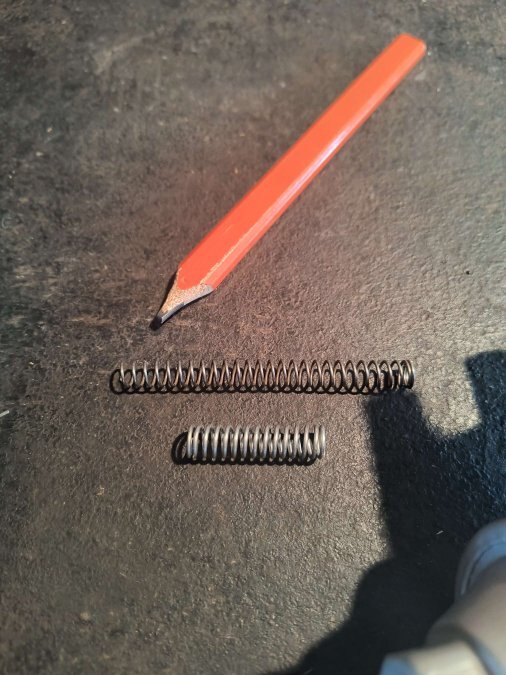
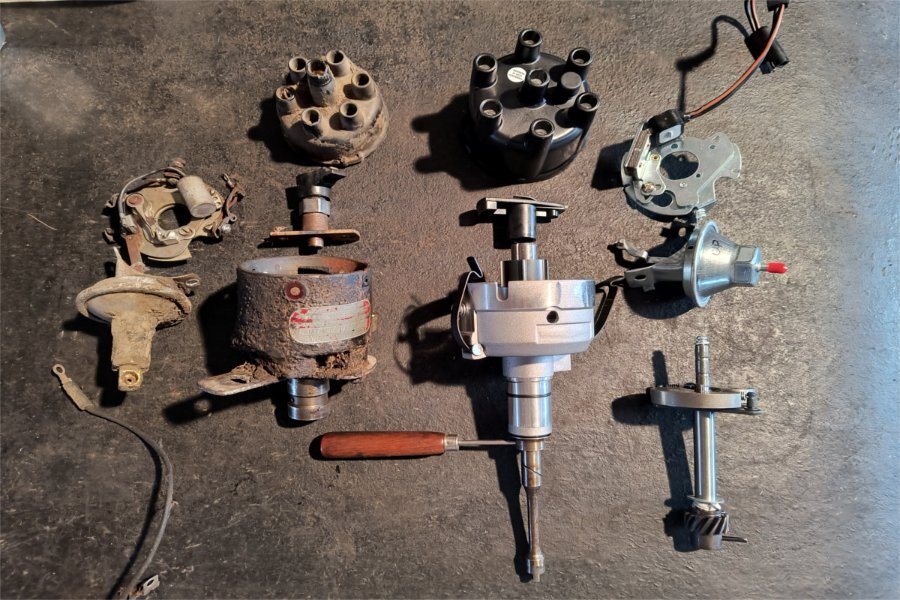
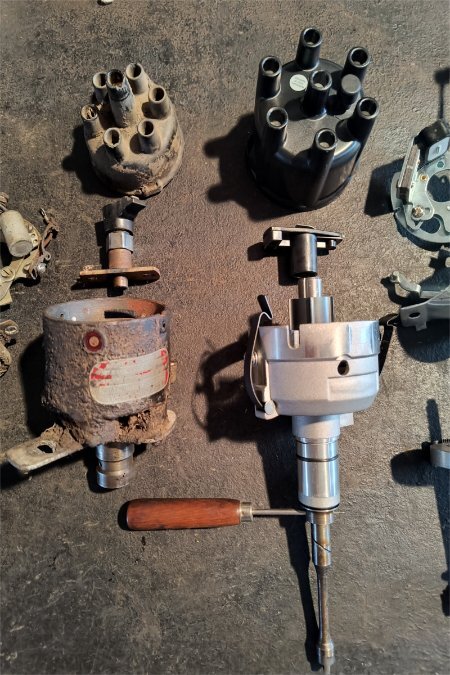
Sniper, back to your first post again - the difference for the retaining method for the top dizzy shaft may not matter. Today I had some time free to move my distributor modernization forward a bit. Turns out, my flathead distributor shaft in the slant six distributor body could re-use the little hairpin clip to retain the modern top shaft, no problem. Well, one minor problem, during disassembly, my hairpin clip went zooming off into the nether region of my work area. I'll come back to that. Anyway, the vernier calipers, depth gauge, and my old eyes said it would be close, and with my parts, it didn't even require any shims. Now, about that hairpin clip... No parts to be had on a Saturday in the little town I live in, so I resorted to my own stockpile of what-not. I found a little spring that was wound the correct direction, could lead itself onto the end of the lower dizzy shaft, and ride in the groove, where the former hairpin clip resided. Give it a solid tug, and cut the tail off. Shove the felt back in place for lubrication, and get on with dizzy reassembly. Now moving on to the adjustment base; I've attached a photo or two of another converted dizzy that I picked up a year or two ago off of the eBay. To me, the interesting part is the timing adjustment base that they sent along - homemade, reasonably well, and due to its clamping means, it's also height adjustable, meaning the dizzy *should* fit the short 23" engines and the long 25" engines. Oh, the photos. • A couple of the fresh converted slant six dizzy with the flathead shaft. Yup, that's an ice pick serving duty while I round up an appropriate roll of spring pin to hold the lower collar in place. Monday, I hope. • Black cap = the DST3690 modern slant six dizzy that Sniper and I, and perhaps others, have been working with. Brown cap = older O.E. slant six dizzy with homemade timing adjustment plate, and welded lower shaft. • Springs; shorty was $0.67 at the hardware store, but turns out it's wound the wrong direction for my hairpin surrogate use. The longer spring, clipped where the pencil points, was the donor for the hairpin surrogate. But back to Sniper's Electronic Ignition Distributor Conversion; Sniper, if that Amazon.com dizzy and it's parts are still unscathed, perhaps you could make a few measurements and determine if indeed the old flathead six hairpin clip works to retain the old shaft in the new dizzy. My results could have been a fluke, but I hope not! MBSoPaB
-
Another vote for Leverage: A success story here utilizing two 24" long pry bars (and safety glasses). On a moderately stuck WDT, I smashed the visible end of the WDT flat along it's tall axis for about an inch and a half (pliers, then vise grips, smashy smashy!). Using a pry bar in each hand, insert a pry bar about 3/4" on either side of the smashed WDT end. A synchronous pry, levered on the cast iron block, and a half a dozen attempts to get the pry bars' ends in unison, created a massive amount of clamping force between the tips (chew, tear into the WDT steel), and leverage to roll at the block, pulling the WDT out/forward. In my case, after an 1/8" of movement observed, I opted to take a ball pein hammer and tap the WDT back in some small amount, followed with repeated small bites with the pry bar leverage. My previous six (steel) WDT removals were all thwarted, with several tricks tried for removal; hooked removal tool and prying, hooked removal tool and slide hammer, vise grips and prying, welding a bolt in the steel WDT then slide hammer, no luck, on the various preceeding engines. Prep had previously included taps from punch and hammer through removed manifold stud holes, same from cylinder head bolt holes, and sliding the 1/8" flat stock down the sides of the WDT (manifold, and cylinder). In my case, that last one, the 1/8" flat stock along the outside of the WDT seemed to have the greatest effect, freeing up the WDT where bound up. The negatives of the dual pry bar method; some rounding to the edges of the block at the cooling/waterpump hole, but nothing that a little flat file work won't blend back naturally into the cavity for the fresh WDT to expand and seat to. Of the last seven flatheads I disassembled, not one had a brass WDT, unfortunately. Perhaps the next one will? One can only hope. MBSoPaB
-
As of this morning, there's one available. https://www.ebay.com/itm/146022665138 No affiliation with this seller. I have, however, held one of these in my hands, and can attest to good casting and machining on the one I bought, then sold, as I shifted my focus over to the 25" engines. Good luck! MBSoPaB
-
Hey Sniper, could you give some insight into your work-around for the screw vs. hairpin clip on the new vs. old dizzy lower shaft? A couple weeks ago I too ordered up one of those fresh dizzies (DST3690) via an eBay seller, and am in the process of swapping over shafts. Same seller/distributor, same screw retention for the upper advance and reluctor top shaft. My junkyard efforts within a 2 hour radius of here haven't been bountiful for turning up an original /6 electronic dizzy, otherwise I'd have boned up on ThrashingCows' mod and likely be done with this step for spark management. Many thanks, MBSoPaB
-
Slightly out of the way, perhaps, but I call little old Pomeroy, Washington home, and can muster up several tons of Detroit (and Los Angeles) iron, heavy to Ma Mopar. Half an hour west of Lewiston, an hour and a quarter east of Walla Walla. A selection of cold brews reside at the store, nary two miles away, ready to slake that thirst. I even hear the heat may give us a break a bit later in the week, right on schedule for your trip through the area!
-
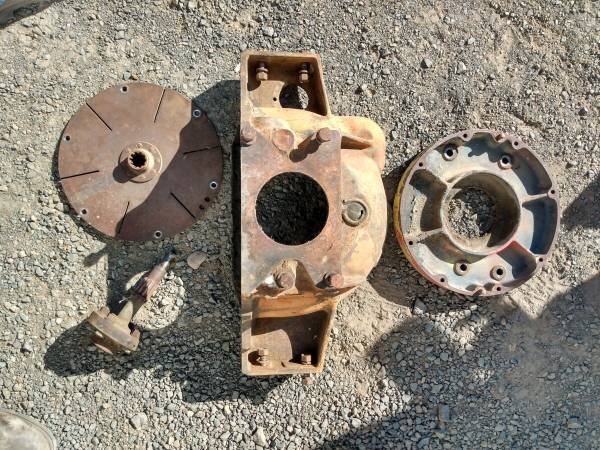
Hey TrampSteer, I too have one of those goofy 'IO4' stamped engines. I was on the hunt for a core 265 to play with, and took a chance on a stationary engine at auction; it ended up being the longer 25" head engine, however displacement was only 237 cubes once I figured out the stroke. In the case of my 237, it was on a sled-like stationary stand, with gauge panel, radiator, tin roof, all one unit. It appeared to once have held a gas tank (missing), and the various farm modifications held no further identification clues. The output end of things was a truck bellhousing sans throw out bearing shaft, with a multi-piece adapter to run a splined coupler which matched no current SAE bolt pattern, nor PTO shaft configuration. My best guess would have been irrigation pump powerplant, as it was irrigation country, but that's just a guess. As it sits on my spares rack, I haven't been inclined to pull tappet covers, but what I could see of the valve stems while rotating the engine didn't appear any larger than the usual automotive diameter. Timing gear cover appears to be a passenger vehicle piece (unlike some marine or forklift applications, where the implement is driven by the timing gear end of the crank). The accessory pulley is the separate bolted pulley and hub style as shows up on the powerwagons (and some other places). Aside from what was bolted to the flywheel, and the accessory drive pulley, everything else looks like passenger vehicle or medium duty truck parts that I've come across. Hopefully your search for more information on your engine is fruitful!
-
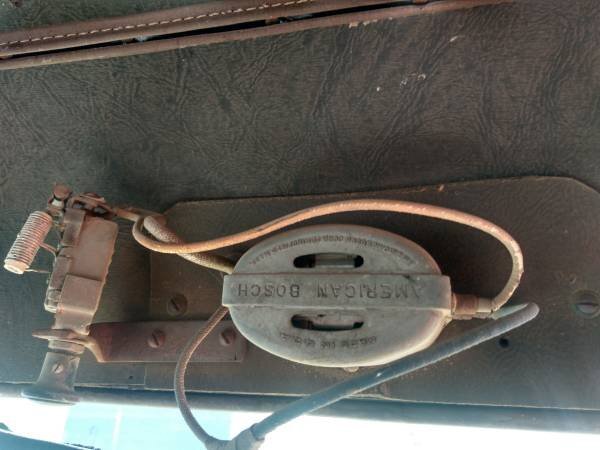
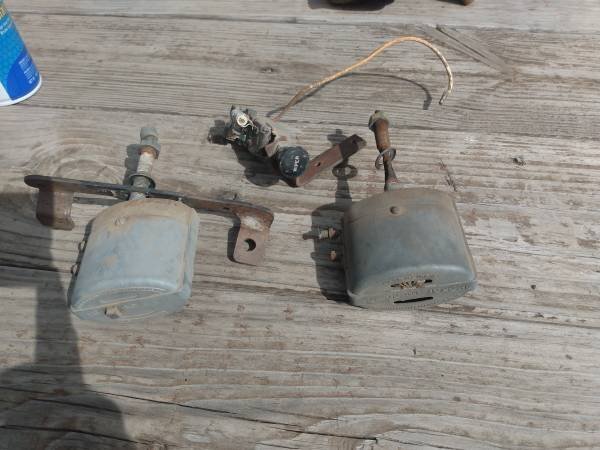
Dgrinnan, most of the Job Rated era Dodges that I've come across with sporting wiper motors other than the Trico vacuum units were vintage American Bosch units. They're a pretty substantial unit in situ, but compact enough to hide behind that wiper motor cover overhead. Some pics attached of a 12v unit (looks just like their 6v units; difference is in the part number, which also alludes to the degrees of swing) that was in my '48 FWD with a long shaft, you can see how they utilized a rheostat switch to change the speed to their liking. Also note how they used a switched unit on the passenger side, to halt that wiper, if it wasn't needed. My buddy installed one of those little modern units and had poor results, like you have experienced, I believe his was from VPW or Roberts, new arm, etc; very underwhelming. My personal solution was a cowl unit from a marine supplier; just be cautious about the body size relative to fitting it in the Dodge wiper actuator location. Hope your project ends with a simple solution! Brian A. (MBSoPaB)


