


splat1955
-
Posts
371 -
Joined
-
Last visited
Content Type
Links Directory
Profiles
Articles
Forums
Downloads
Store
Gallery
Blogs
Events
Everything posted by splat1955
-
Hey, thanks Reg, Steve, Norm and Bob. I saw those rectangular mirrors too, just thought the round ones might go better with the long round body of my car. So, it looks like I'm going to have to give a couple of them a try.
-

Door stops inside door..what is supposed to be there?
splat1955 replied to splat1955's topic in P15-D24 Forum
YIKES Shel!! Did you pull off the panel to get those pics? Man, I more than appreciate that. Now I see what everyone was trying to explain. Okay, so it looks like I am missing everything.....spring clip too. Are there 2 spring clips on that bar Shel? I noticed there was something on the opposite side of the bar also. I can make the rubber and washer....but the spring clips I bet are going to be hard to find. Thanks for the great pics Shel! I think I am going to look for something at the hardware store tomorrow that I can make the rubber snubber out of. I'm going to try and make it to the wrecking yard tomorrow also and get the pics of those old mopars that are sitting there. I'll see if the old Plymouth as the door stops still. Will also take some extra pics of the New Yorker, Cranbrook and the Plymouth. Theres even an old Packard with boxes of engine parts in the car. Anyway, if anyones got any of those clips and wants to part with them, let me know. Thanks again guys. -
Door stops inside door..what is supposed to be there?
splat1955 replied to splat1955's topic in P15-D24 Forum
Hey Guys, All good ideas you have for getting the rubber, but I still don't have a clear picture of what they are or how they are mounted to the arm. Tim, you said the rubber is just a bit bigger than the backing washer...but I don't have anything....the ends of the arms have nothing there....so I have nothing to compare to. Man, I wish these manuals showed a bit more. -
Hey Guys.....thanks for the input. I guess you guys included some pics...but for some reason, pics aren't coming up in the posts like they had been. Maybe it's time to reboot or something. Hey Reg.....your JCW mirrors, which ones are they.....were they the " K " Source, JCW Part # ZX127787A. Kind of a straight type arm. Here's the link to the ones I'm asking you about. http://www.jcwhitney.com/autoparts/Product/tf-Browse/s-10101/Pr-p_Product.CATENTRY_ID:2008322/p-2008322/N-111+10201+600003213/c-10101 If that's them, how is the quality? Are the arms and heads metal? Good Mirrors? Thanks.
-
I'm trying to find out if anyone here has used these either of these mirrors and if so, on what year vehicle. I'd like to try a pair of the 5" mirrors with the straight arm cause they look as though they might be a better look on my '48 Dodge. The 4" has kind of "J" shaped arm....don't know how these would look or function on my car. I don't want to purchase them if they are plastic, but I thought I remember somebody here stating that they'd used one or the other. Any suggestions or recommendations? Oh, these are the clamp on style.
-
Door stops inside door..what is supposed to be there?
splat1955 replied to splat1955's topic in P15-D24 Forum
Okay, I have the drivers side door done. Not exactly what I wanted to do cause I had to use 2 rubber washers, one inside the other. I pulled the arm out so I could work with it easier. The end that is supposed to have the rubber snubber has a hole. So, having a ton of pins that accept cotter pins on one end I loaded a steel washer, then 2 rubber washers (one inside the other cause I didn't have a large rubber washer with a small hole), then another steel washer the size of the first. The rubber washer is larger in diameter than the steel washers but they help keep it flat and in place. Then I ran that pin assembly with all the washers through the hole in the snubber end of the arm. Added a small washer to the pin on the other side of the arm and put a cotter pin through the hole in the pin. Then re-installed the arm and checked to make sure my door wouldn't hit the fender and viola, no more hitting the fender. I think before I put the door all back together, I'm going to hit a hardware store tomorrow and see if I can find something better than the 2 rubber washers I had to use. I sure would like to see a pic of the rubber snubber if anyone has a pic. Also, if anyone has 1 or 2 they want to sell, I'd buy them. -
Door stops inside door..what is supposed to be there?
splat1955 replied to splat1955's topic in P15-D24 Forum
Okay...are you saying it's kind of like a big disk.....with a slot in the center? What keeps it on the end of the bar? Anybody have a pic of the snubber or the whole assy they can post? -
Door stops inside door..what is supposed to be there?
splat1955 replied to splat1955's topic in P15-D24 Forum
Hey Tim, thanks for the info. Can you tell me what the diameter of these snubbers? Did they just sit on the top of the bar? Trying to get a picture in my mind of what was there. -
Door Lock Question...well, actually not the lock.
splat1955 replied to splat1955's topic in P15-D24 Forum
Hey, thanks Dave...Yeah, it is cool when something works out...and so far, things have been coming together on the Dodge. I think I've only had it about 2 months now but have taken care of a lot of little things..some big things as well. I was going to try your seam sealer stuff, but I had this JB Weld Qwik stuff and didn't want to make a trip to town this morning cause I had to go in later today. Figured I'd give it a shot and if everything fell back down into the door before I went to town, then I'd try something else. So alls good, just trying now to figure out what is supposed to be inside the door at the end of the door stop bar to keep the door from opening too far. Then I can button up that door. Thanks again. Brian -
Okay, Got one door problem fixed...but have another question. Both might front doors open too far and touch the front fenders. I've got the drivers door apart right now, and the stop bars are there on both fronts. I've felt the end inside my drivers door, and there is nothing on the bar to stop the door. What is supposed to be on the end of the bar inside the door. I'd like to fix this side while I've got it apart. I was thinking of a couple of washers, with a rubber washer in between a little larger in diameter than the steel washers. Then a small bolt and nut through the washers and through the hold in the bar. Suggestions? What was stock?
-
Door Lock Question...well, actually not the lock.
splat1955 replied to splat1955's topic in P15-D24 Forum
Well Guys, I got in the door with a wire brush on the dremel, then a small grinding stone to remove the little plug weld spots, then wiped with laquer thinner. That took care of the mounting surface. Did the same thing to the mounting ring also but drilled out the small plug welds so the compound could squeeze into those holes as well when pressure was put on. I mixed up some JB Weld " qwik...just a little at first to see how fast it set up. Just as the label said...starts in 4 minutes..maybe a little less. Then hunted for one of those anchors that pops open when pushed through a hole. Found one with a long screw in it. Then, I removed the screw in the mounting ring that holds the lock in place and replaced it with a screw that was about 4 inches long. That was, I could have that screw come through the hole in the door jamb and once I got the ring where I wanted it inside the door, I'd have something to hold onto and also move it around to adjust. Before using the JB...I tried a mock up fit and the screw in the anchor was long enough to hit the window track in the door, so all I had to do was tighten the screw until it hit the window track...didn't need anything to protect the paint on the outside of the door because nothing needed to touch it. Tore it apart, got the parts ready again, mixed up the JB and bingo, was able to get the ring where it needed to go, able to manipulate it with the long screw I had coming out through the door jamb, stuck the anchor through, tightened it just enough to make adjustments, then tightened it just a little more and walked away for a half an hour. Came back, unscrewed the anchor, unscrewed the long screw I had going to the ring through the jamb, slid the lock & shaft in to make sure all was good. Then, put the screw back in that holds the lock and tightened it just a little...waited another half an hour, tightened a little more. The lock seems to be tight in the door, straight and tried the key, all seems good. Hopefully this will last for years. Another small project completed. Of course, I have a new post about the door stop. -
Hey Shel...well, I'm probably going to get put in the " dog " house......and already got my sending unit....but I'm sure I can find something to buy and try that code on......Hey, didn't someone order some nice little 4 or 5 inch mirrors that are a flange mount from JCW? The type that mount to a flat on the door and you don't have to drill any holes....kind of like a peep mirror? I could use one of those....actually 2. If anyone knows which mirrors I'm talking about, I'd sure appreciate a heads up as to the part #, page or description. Hmmm, going to have to be real quiet about this order!
-
Door Lock Question...well, actually not the lock.
splat1955 replied to splat1955's topic in P15-D24 Forum
Thanks again guys, yeah, I guess it would be hard to get a tig or mig head in that space. So, it looks like I will be trying a compound to get it back in it's place. I've got some JB Weld " Qwik " has anyone tried this? I must have used it on something cause it's open, but I can't remember what....probably something on my old Jeepster. Norm, yeah, I will definitely clean both surfaces....then use Laquer Thinner around the inside of the hole and the back side of the mounting ring. Maybe even drill the little plug welds back out of the ring so the compound will be able ooze through the holes and possibly make it more secure. I've been trying to think of a way I can mount something from the outside, that will go through the lock hole and spread out....then be able to tighten it from the outside so it pulls against the inside of the door. Anybody got any ideas? I was thinking of a small flat peice of wood for the outside,,,then a bolt to go through the wood to the inside to a washer larger than the mounting ring and a nut on the bolt...that way, from the outside I could tighten the flat washer against the ring while the JB or whatever I use is setting up. The thing is, this JB Weld " Qwik " that I have says it will start setting up in 4 minutes, and it might take me nearly that long to get the bolt, nut, wood, washer, compong applied, ring in positition, etc. Any other ideas? Hey, what about one of those cheap anchors, the type that spring open once you put them through the ceiling or wall? Long enough screw on it and the screw through a thin piece of wood (to keep my paint from being scratched), then I'd be able to just push it through and tighten it up...might need a second set of hands, but I'm probably going to need those no matter which way I go. Anyone? -
Hey Mike, or anyone else that might know. I've got to try and fix that thing in the door that holds the lock....going to try a fix that was recommended in my other post....Panel Bonding Glue. Anyway, it's going to be a whole lot easier to do this fix using the lock to center the part I need to glue, but the square shaft that runs through the door off the back of the cylinder is going to be a pain. Is there a way to remove that shaft temporarily while I make the repair, then replace the shaft on the cylinder when I'm done? First though, how does it come off?
-
Door Lock Question...well, actually not the lock.
splat1955 replied to splat1955's topic in P15-D24 Forum
Hey Guys, thanks for all the ideas....yeah, my paint is good so I don't really want to mess it up with heat from a weld. Hey 250440ND, This Panel Bonding Glue by 3M and Duramix....can it be had pretty much anywhere? I'm sure in a body shop you guys get it by the ton...but is it available in small quanitities? -
Door Lock Question...well, actually not the lock.
splat1955 replied to splat1955's topic in P15-D24 Forum
Thanks Jeff.....but why couldn't it be tacked from the inside of the door? If all else fails, I may have to JB Weld it. Any other imput guys? -
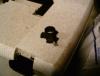
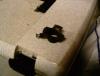
Okay guys, Rather than continue and older post I had started about what holds the door cylinder in place, yada yada, I've pulled the door panel from my drivers side door cause I knew what ever held it in place was laying in the bottom of the door. So, I pulled it out, and I guess because no one else has actually seen one I'd post a pic. I'm sure some of you have seen them using a flashlight and looking up inside the door...which is the only way you should be able to see the part...cause it's part of the door. It's got little flanges and it looks as though it was spot welded or tack welded to the door up where the cylinder goes. Anyway, obviously mines not and that sucks. So, here's my question. Since we have been talking about JB Weld recently, I'm wondering what the opinions are of trying that to hold this device in. If I put my cylinder through the door, then slide this over the shaft and cylinder then with a little more dexterity, I can pretty much hold this thing up where it is supposed to be and with the lock screw pointing to the hole in the door jamb where it is supposed to be. I can even lock the screw, but then the whole unit is loose but stays put, as it was when I got the car. I really don't know much about welding, but do know a guy with a tig or a mig welder that has done some work for me in the past, but the paints decent on my car and I don't want to screw it up too badly. So, I was thinking about JB Weld...but let's here what you guys think I should do. I'm up for suggestions! Sorry about the crappy pics...
-
I feel the same way Shel.....if I had " more money " I'd probably have a second Dodge...or something else....and a garage, oh and a lift for sure, and....etc. Next is a small shop....my wife and I have been thinking about it...well, I have been thinking about it....she has been thinking of ways to get me not to think about it, for a couple of years now. But I think it's about time...and then...maybe another car.
-
Hey Shel......well, I gotta assume that the mouse isn't sleeping in the pic. Probably hopped up in there after your wife got home from somewhere....nice and warm around that wheel and tire. I'll bet though it wished it had gotten out of there a little sooner though.
-
Hey Reg, I'm a " yeah" on the guards also.....Hey, and don't think I've forgotten about finding a bumper for ya....I've got feelers out now all over the country....but no replys yet. I'm especially fond of that front bumper!
-
Well Fred, sounds to me like it's time for surgery on the clock. Not really too much to it, but I don't know how far you have taken you clock down before. I assume you have taken the rear cover off? Have you taken it out of the case and down as far as the clockworks? I'll be off an on today cause the phone company is coming out and doing some work on phone lines in our area. And I have to go offline now, but email me and let me know how far you've taken the clock down to. I can send you the info by email that Shel sent me. It's what I needed to do to get mine going...sort of. Remember though, I will be offline for a few hours so I may not get your email or be able to get back to you for a while today.
-
Hey Fred, I had the same problem.....oiled what needed oil, etc...Put it back together and it would run until the it unwound. That's when I believe the clock is supposed to get hit with a little voltage and swing the counterweights back to rewind. Use a circuit tester to see first that you are getting voltage to the fuse....or to the Batt terminal on the back of the clock where the fused wire goes. That was my first step. If you are getting voltage to the batt terminal on the clock, then the clock requires tearing down a little further. I learned all this thanks to Shel. But check to see that the clock is getting voltage first...we can go from there.
-
Good point Shel.....your right, and now that I think about it, and have gone out to look at my fuses, mines a 2 amp as well.....Sorry Fred ....it's a 2 amp fuse.
-
Your welcome Fred..........Yeah, I think if you can't get the short fuse, then you'd be good to go with the longer fuse holder with 14 guage wire. Good luck and I'd like to hear that another clock was working again. Brian
-
Hey guys, just wanted to let you know that it doesn't see that your links are working for the photos...It may be on my end but I did check my links to photobucket and didn't have a problem with them..So, I don't know for sure...but wanted to give you a " heads up" just in case the links are bad.

