deathbound
-
Posts
1,166 -
Joined
-
Last visited
-
Days Won
5
Content Type
Links Directory
Profiles
Articles
Forums
Downloads
Store
Gallery
Blogs
Events
Everything posted by deathbound
-
Click on "User CP" near the top left, then "Edit Your Details" near the top left, should be the first box that you can change your password/e-mail.
-
A good week....got it running again!!! Long story.
deathbound replied to deathbound's topic in P15-D24 Forum
Thanks. Langdon's.....$190.00 for the HEI & coil. http://stoveboltengineco.com/index.php/catalog/store/#ecwid:category=361515&mode=product&product=1222043 -
Advice on steering & front brake adjustments
deathbound replied to deathbound's topic in P15-D24 Forum
Steering box to frame....bolts tight, no isolation pads used on this year. Ball joints....got caught up in the terminology responding to a previous post-oh well. Anyway, maybe I'm explaining it wrong. With the front end off the ground, wheels off, facing drivers side drum....if I grab it @the 9 o'clock & 3 o'clock positions & move it side to side, I notice about 1/2" fore/aft freeplay or movement in the steering gear shaft-the shaft connecting the steering box to the pitman arm. The steering wheel does not move, indicating to me, that there needs to be some sort of adjustment or part(s) replaced??? Can I take out the freeplay with the adjustment screw on the steering box housing? The reason I ask first, is I don't want to cause another problem. I did do a minor brake adjustment, but I haven't dropped the car on the ground yet to test drive. I want to take care of the steering issue first. Thanks for the responses so far. -
Advice on steering & front brake adjustments
deathbound replied to deathbound's topic in P15-D24 Forum
I didn't notice any play in the ball joints. ALL the movement was at the pivot of the pitman arm/steering shaft. The pitman arm is secure to the steering shaft-seems like the play is in the steering shaft. There was no unusual movement at the pitman arm/drag link connection. I will try the brake adjustment you suggested & post results when done. Thanks. Fortunately, I was aware of this. Thanks. -
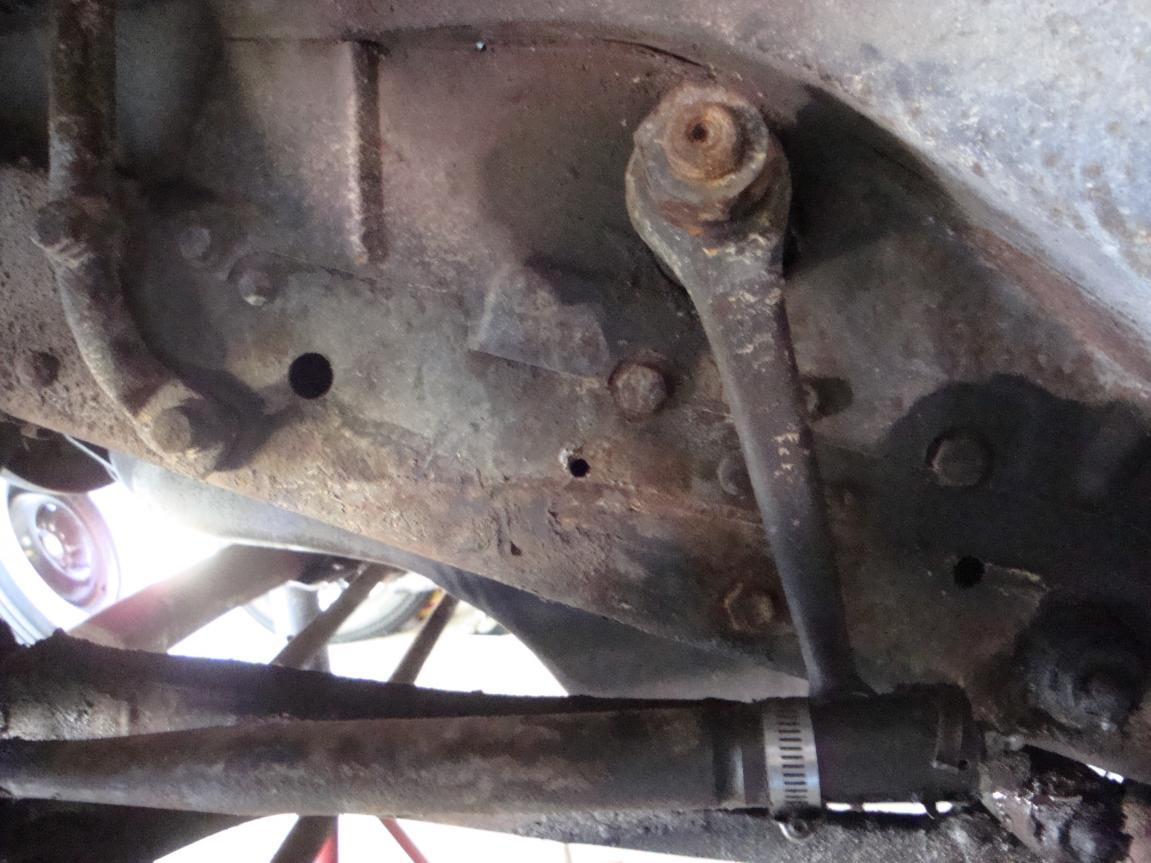
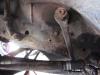
Thought I would try to kill 2 birds with 1 stone. First, with the front end on jack stands, I can move the wheels right to left without the steering wheel moving. I noticed about 7/16"-1/2" of fore/aft movement of the pitman arm with no reaction to the steering wheel. Once in a while while driving in 1st gear about 10 mph, if I hit a small bump or pothole, the front end wobbles violently, so I assume what I found is the problem. First question:in lamens terms, how do I adjust this or does something need replacing? (pic attch'd) Second, I had forgot to loosen the lugnuts before I lifted the frontend, so I had my wife step on the brake. Right side loosened fine, but the left side started to roll-even with the foot brake depressed. This explains why it pulled to the right when braking. Second question:in lamens terms, what adjustment is necessary & how, "minor" or "major" brake adjustment (terms from the service manual)? Still learning about this car, so I appreciate any & all advice. (OT question....how do you post large pics with captions above or below? I don't have a photo hosting service? Is there any way to upload from my laptop to do this? Thanks again.)
-
That is a nice topper & the dual reflections in the bumper & bolt. Where did you find the topper? Edit:Just looked closer @the '38 in the first post.
-
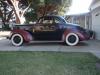
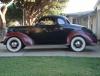
Well, after being down for about a year (since mid Sept last year), I finally got my '38 running again. Last Monday, I buttoned up all the wiring on a complete re-wire with an original wiring harness in very good condition (I did have to make my own headlight harness-as this was missing from the new to me wiring harness). I added an Offy dual carb intake with a pair of Carter Weber carbs & Langdon's cast headers earlier this year. I had to fabricate the carb linkage between my original linkage that runs across the back of the motor to the right side & the linkage Langdon supplies for the carbs. I made a block-off plate/gasket for the mech fuel pump & installed an electric fuel pump just ahead of the rear axle & ran all new fuel line from the tank to a Fenton fuel block-mounted on the firewall to the carbs (with a ball valve @the tank so I can shut it & disconnect it to drop the tank in the future). While I was at it, I installed new plugs, plug wires, cap & rotor. I also installed a NOS heat gauge (previous one was cut-now I what temp I'm running), my ammeter now works (didn't before), oil pressure worked, but my fuel gauge doesn't-need to look into that in the near future. NOW, the good part, back to last Monday. I get home from work, go into the garage, finish tightening up the last couple wires to the ignition switch. Re-connect the ground wire (battery has sat for the year without a tender). Turn the ignition switch on, push the foot starter.....it immediately roars to life-straight headers-no exhaust yet:D:D. Shut it down. I did nothing to the carbs, except bolt them on & install the linkage. Ran smooth, but still need to double check they're synched. Too late to call a muffler shop. Call AAA Tuesday, but can't arrange a flatbed tow. Make an appt. for AAA to pick it up Wednesday @9am....2pm, I call the muffler shop, it's ready (forgot my camera for the pics while it was on the lift:mad:. I get to drive it for the first time in just short of a year.-felt great:D:D. Thursday is when I did the plugs, wire, cap & rotor. Friday, re-installed the hood & hood sides, then washed the year old dust off. NOW, for the real test...drive it up to Ventura (from Long Beach) for the Primer Nationals/Beatnik Blow-Out Saturday. Saturday @6am, a couple friends come by in a '59 Biscayne. I go out to start the '38, it won't start:confused:. We jump it & check the battery, it's not charging. After checking a few things, I throw on an old voltage reg. I had laying around. It works & shows the battery charging now:D. We're on our way. Too late to make a long story short, but it ran great! Cruised @60-65 mph, even hit 70 for a second or 2. Made it there & back without a hitch. Next, go through the front suspension & install the front disc brake conversion I got from Charlie. Also, install the HEI I got a while back. If you got this far, thanks for being patient & reading through.
-
You Only Turn 40 Once...My Wife's New 34 Plymouth
deathbound replied to BloodyKnuckles's topic in P15-D24 Forum
Everything about that car is perfect, I would make it safe, leave it as is & drive it. If it was a thrasher, that would be a different story. -
Hope this hasn't been posted here already...................very cool pics. http://www.jalopyjournal.com/forum/showthread.php?t=603122&highlight=1938+plymouth
-
Need help with an electrical issue on my 1938 P6
deathbound replied to deathbound's topic in P15-D24 Forum
Got power to the 3rd terminal of the amp gauge(accessories).....dirty contacts on each of the 2 parts of the fuse holder. Should've checked, lesson learned. Thanks to those who replied. -
Need help with an electrical issue on my 1938 P6
deathbound replied to deathbound's topic in P15-D24 Forum
So, there are 3 terminals on the back of the stock amp gauge. 1 that has the wire from the starter(hot-checked w/a test light), 1 that has a wire that goes to the volt reg(hot-checked with a test light), & 1 that feeds the switches/accessories(not hot-checked w/a test light). At on time, all 3 were hot, now just 2???? Could there possibly be a short in the amp gauge-not sure of the internal workings???? Thanks -
Need help with an electrical issue on my 1938 P6
deathbound replied to deathbound's topic in P15-D24 Forum
Thanks Bob, I have the same book & one of the laminated color schematics also. I believe it's wired properly, had power to the ammeter terminal that the switches attach to, then accidentally grounded the wire from the ammeter to the brake switch & also accidentally put my test light that was grounded on the ARM & FLD terminals of the regulator, then no power to the switches???? -
Need help with an electrical issue on my 1938 P6
deathbound replied to deathbound's topic in P15-D24 Forum
It is an amp gauge & has a SFE 30 amp fuse(tested good w/an ohmmeter)-brain fart. Is the fuse the strip between the 2 terminals? -
I was troubleshooting my electrical today-checking for power to the taillights. I had power to the all 3 terminals(1 from the starter, 1 to the ignition, & 1 to the stock headlight switch & brake switch) of the volt meter(stock volt meter in the stock cluster). I had power to the light switch & brake light switch. I had my test light in the engine compartment checking for power to the regulator & got distracted with my son & touched the test light to the ARM & FLD terminals, besides the BAT terminal. Now I don't have power to the terminal on the volt meter that has the wires that feed the headlight & brake switches. Also, while I still had power to the volt meter terminal, I accidentally grounded the wire from the volt meter to brake switch. My question is...could either of these 2 things cause me to loose power to the volt meter terminal-which in turn, loose power to the headlight & brake switches? Car is a 1938 Plymouth P6, stock wiring in good condition, car was converted to 12volt neg ground, stock gauge cluster. Hope this isn't too confusing-just trying not to leave anything out. Thanks in advance.
-
Another welcome from So Cal....nice looking car.
-
Anyone in SoCal that can help me tune my 53?
deathbound replied to Martin53Cranbrook's topic in P15-D24 Forum
Can you post the info for me or any others in the area? -
Doesn't look like a beater to me........nice!
-
Welcome from Long Beach....tons of info here.
-
I saw this on the HAMB also & knew I'd seen the car before on here. I hope for my 38 to look 1/2 as nice as yours did. Hope all turns out well.
-
Before & after 3" blocks, nothing up front except stock tube axle.
-
Don't want to rub it in, but I work outside in SUNNY southern California & see that "thing" nearly everyday & it's still working most of the time. It kinda looks like this>>>>> except for the eyes & mouth.
-
Love the old trumpets-especially pre-units. I usually take the winter time also to work on my Panhead, but with the Coupe not running right now, I don't want to be without both since our winters' aren't really that bad here in So Cal.
-
Here's a couple pics of a friends Plymouth-47 if I remember correctly-with a milder chop-better proportions than the one from the first post.


-
Thanks.....besides what was mentioned about the vent windows...here's a link from Allpar: http://www.allpar.com/history/plymouth/1938.html
-
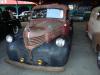
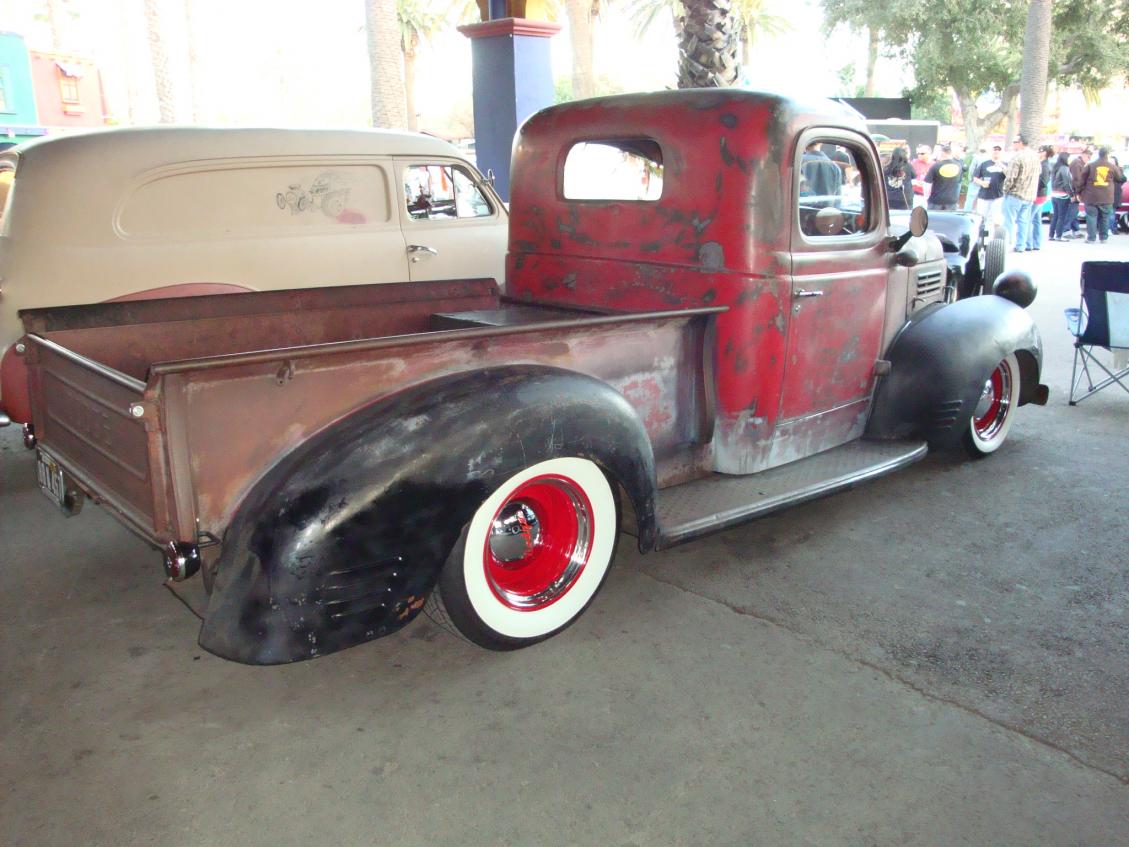
I was at the Grand National Roadster Show in Pomona, Ca last weekend. I saw this 46 Dodge truck & snapped a couple pics. I like these trucks a lot more than the Chevy/Ford trucks of the same era. My favorite part are the long fenders with ribs. Hope this is the right forum for this truck, even though it's not a 48-53.