


JBNeal
-
Posts
5,720 -
Joined
-
Last visited
-
Days Won
61
Content Type
Links Directory
Profiles
Articles
Forums
Downloads
Store
Gallery
Blogs
Events
Classifieds
Posts posted by JBNeal
-
-
My experience has been to fill any gearbox about 3/4 full of grease, then after using for a few hours, the grease will 'settle' and then can be topped off. On PTO gearboxes, grease will be pushed up the gearbox wall, and then fall over onto the gears, coating them continuously if enough grease is in there.
A short cut is to use a putty knife to scoop out the grease from its tube & force the grease into the gearbox (cover removed). Assemble, use for probably a hunnert miles (preferably on hot days), then top off as required with a grease gun.
-
The original drawer-type headlight switch is prone to internal corrosion that can boost resistance sky high. It's possible to run the switch back & forth a few dozen times to knock the corrosion down, but I went so far as to carefully disassemble the switch, clean the contacts, and add some dielectric grease to coat the contacts.
The dimmer switch also is prone to internal corrosion, but since I could not find an easy way to disassemble the switch, I found a NOS unit on eBay (got lucky & only helled out ten bucks). Maybe that switch needs to be operated a few dozen times to work the corrosion loose.
But the biggest culprit of all is a bad ground. I've run temporary ground wires to lights, switches, etc. from the battery to verify continuity, and most times I have found that the cumulative effect of corrosion at riveted & bolted joints can make for excessive resistance in the 6V circuit.
-
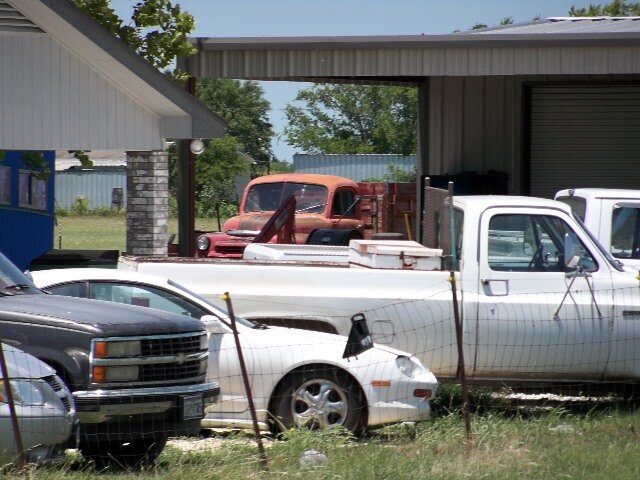
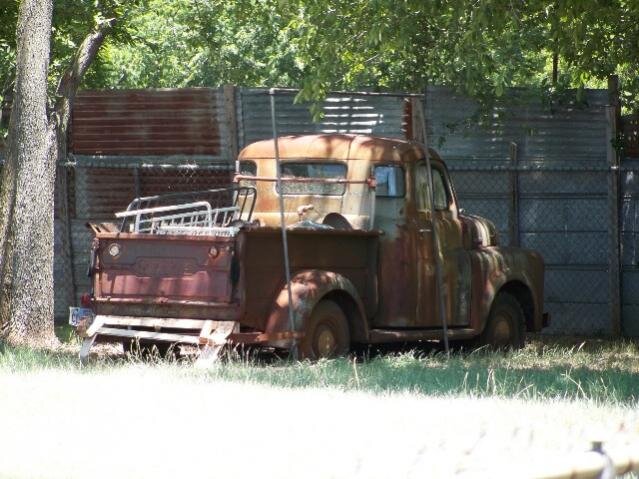
SURVIVOR S:
took a few pics this weekend: the B-3 2 ton is no longer out in the field where it sat for many years, I reckon the new land owner sold it for scrap; I'll have to follow up on the B-1 that is covered with weeds as this was a goat feeder (no goats in sight nowadays); the B-1 grain truck had both front wheels yanked off, so I reckon the guy is working on it now; the B-1 sitting in the back yard has been there so long it has moss growing on it

-
Replacement cable should be 2/0 AWG, preferable with soldered lugs & terminals. One of the hardest lessons for me to learn about 6V systems after dealing with 12V systems all of my life boils down to Ohm's Law. The 6V system needs the least amount of resistance to operate, and even though my original cables looked OK, there was corrosion between the strands in the cable that had a cumulative effect that bumped up the resistance significantly, especially when the engine got hot during the TX summer. Also, corrosion at the terminals & lugs would do the same thing. So fresh conductors with sealed off terminals are ideal to minimize resistance, along with using the minimum length required to complete the circuit. Crimped or bolted terminals are ok for short term use, but eventually corrosion will begin to take place within the cable as sulfates begin to wick along the copper strands, and then you'll be cussin' the 6V system for being unreliable.
Figure out where your battery will be located before investing in new cable assemblies. Originally, the positive ground cable was bolted to the top of the transmission. A simple upgrade is to use a starter mounting bolt as the location for the ground cable. This will ensure continuity and make for improved starter motor performance.
-
this got me curious, so I checked the '48 short bed, the '49 extra long bed & the '51 short bed out front: none had this cover. The short beds have the stamping so they don't need a cover, and the 1 ton is so wide that it doesn't need extra access. Makes me wonder if this is a California vs. Michigan thing...
-
I replaced all brake lines and sleeved the master & wheel cylinders, so I opted for the DOT 5 in the '48 1/2 ton back in '99...the brakes seem to be holding up with consistent firm pedal. If it weren't for a bad flare on one of my lines, I probably would never need to top off the master cylinder every few months. I repeated this with the '49 1 ton in '04 with similar results.
-
if I remember right, MTBE is on the way out because although it helps to clean emissions, it doesn't break down when it gets in the water supply and has been linked to problems akin to lead & mercury or the like. Ethanol & methanol will 'attack' most natural materials, but is not as deleterious to sythetic materials such as stainless steel alloys, EPDM rubber, etc.
E-10 has quietly become used here in TX as in many other places as most cars on the road have the critical materials in their fuel system hardware that can handle the evaporative characteristics of this biofuel. The ethanol in E-10 is essentially a combustible filler that helps in producing cleaner emissions but does not substantially affect catalytic converters or oxygen sensors. The gasoline in E-10 has enough lubrication to overcome any drying effect that ethanol has on rubber components, so modern synthetic rubber can withstand contact. Natural rubber, on the other hand, will dissolve in time with contact to E-10.
-
My '92 D-250 CTD ran on 235/85R16 tires, and that is similar in size to the 7.50-16 tires. One of my plans, way way way down the road, is to find some D-250 rims, remove the centers from those, & replace them with the centers from my lock-ring rims. One thing I've noticed is that my single wheel one ton rims have a different offset than the dually one ton rims, and that offset is different from D-350 rims, dunno if the bolt circle is the same or not though.
At any rate, I am wanting to get away from the lock rings because of the hassle of trying to get a simple flat fixed. I've already had to stop using two truck tire shops because those guys ding'd up my lock rings every time with their sledge hammers, and their attitude was...well, they were truck stops and I was throwing off their rhythm I reckon. But then again, some kid at Firestone ripped the bead while trying to fix the flat on my Ram 2500 CTD a few weeks ago & ruined that tire, so what can a dude do...
-
I put new sockets on the '48 as my wires were in similar decrepit shape. The pigtail that was on it had 3" leads, well short of the terminal block. I was able to remove the spades from the socket and removed the short leads from the crimp. I soldered new leads to the spade, being careful not to build up too much lead, and popped them back into the socket. Then I was able to have the leads go to the terminal block in about the same length as the old wires. I probably went overboard with the soldering approach, but since I was replacing the entire wiring harness, I figured I wanted to have as few butt joint splices as possible.
On the '49, I went a different route as those wires were only bare in a few places. I would cut the old wire back just shy of the good insulation & splice on a new conductor, using electrical tape to cover the butt joint and about 3" over the old wire insulation. When done, I would tug on the tape a little to see if the old insulation would pull off of the conductor. In one case it did, so I re-worked that joint with a longer lead. I consider this a temporary fix as I want to replace the entire wiring harness when I do the cosmetic restoration on that beast.
-
I submerged the air filter in a bucket of diesel for about 3 days on the '48 & '49, both had been parked in a field in different parts of TX for more than 20 yrs...draining the filter into that bucket, they both dripped out a good chunk of residue. Rinsing in kerosene per the manufacturer's instructions might not get all the crud in the cellulose, and if the filter housing was 'dry' while the beast lie dormant, the thing might have filled up with bugs or dobbers' nests or the like.
I am opting to convert to the paper element because some of us klutzenheimers have spilled a fair amount of that oil bath on the side of the truck or forgot to tighten the base bolt and spilled the contents on the motor rounding that first right turn. Either way, them things can make a mess, whereas the paper is a tad more forgiving.
-
a PCV system isn't necessary but it helps to keep those fumes in the crankcase from going to atmosphere. The road draft system does use a venturi effect to move gases, but the big problem is at idle to low speeds. Not enough vacuum is produced to fully extract blow-by gases, so a cloud of sorts forms in the crankcase. I have seen this while setting a loose idle screw as a greyish cloud would be wisping from the oil filler pipe & draft tube. Oil would drip from the draft tube, necessitating cardboard on the floor. And if I'm not mistaken, blow-by gases can dissolve into the crankcase oil, further contaminating the oil with NOx gases that can react with the hydrocarbons to produce all kinds of nasty stuff.
The big advantage to the PCV system is that it is on demand all of the time. When routed correctly, PCV will draw gases at idle, at top engine speed, and all speeds in between.
-
that copper line goes to the vacuum wipers...in the 4th pic, this can be seen behind #5 spark plug.
FYI: there are several variations on the 23" block intake manifolds. My '49 has the vacuum port for the wipers between #5 & #6 cylinders, as well as a port around #3 pointing towards the right front fender, but this one is larger, maybe 2-3 sizes up, with a bushing & a plug installed. I have a '53 flathead that has neither of these, but there is a casting belly-button in the same area as the '49 for the wipers, probably made by a plug inserted in the original mold to eliminate this port. The larger port was also moved to just below the carburetor flange. My assumption is that Chrysler decided to use one vacuum port on the intake manifold instead of two to reduce cost (one less hole to tap).
-
OOPS...I hadn't thought about dialup usage when I've posted pics in a thread. I reckon I'll do thumbnails from now on, after resizing them. I had been uploading photos to an album on my profile, but I reckon if I resize these pics from my camera I can get them down to the 80kb size and put together better photos in the gallery.
-
The 180 t-stat helps the engine get hot enough to evaporate any condensation in the crankcase. Adding a PCV system takes full benefit of the hydrocarbons put into a motor, as blow-by gases & evaporated water are forced out of the engine crankcase through the combustion chamber instead of being allowed to flash off by free convection. With moisture removed from the crankcase, sludge is much less likely to form.
As for definitive proof, look into what military issue Power Wagons did on their flathead engines. All have a PCV system to keep moisture out of the engine from fording waterways. The added benefit of removing condensate from the crankcase was one of those accidental discoveries as engine maintenance showed with oil visibly containing less contaminants (black vs. dark brown).
Chrysler even went so far as to issue several service bulletins concerning the use of PCV systems back in the late 40s. Vacuumatic crankcase ventilators were added to engines at dealerships, but I reckon Chrysler didn't add this at the factory because of the increased cost at the time.
-
I have recently painted some steel hollow-core doors at the house using a foam brush, and if I had sanded in between coats they probably would have looked like they were spray-painted. I figgered these stake pockets could be coated with a similar foam brush taped to the end of a stick. Multiple thin coats should seal off the metal, even if it doesn't look perfect. I plan on painting the stake pockets before top-coating the bed sheet metal, cuz I can see dripping a li'l paint here & there during the process.
-
The '49 had a low oil psi reading after warmup when it was running before the tow truck debacle. Cold was 40psi, but after driving it for five minutes to the next stop sign, the pressure would hang at 10-20psi all day long.
I took a few minutes to pull the regulator valve from the '49 this evening, using a wood screw to wiggle it out of its bore. Sure enough, there were two burrs on the valve, with the semi-circle burr more than likely matching the bore of one of the internal oil passages.
Has anyone seen an oil pressure regulator valve do this? My guess is that with the small amount of rust present, the valve was stuck in its bore until I fired up the engine the first time back in '03. My flathead experience shows as I had not even pulled this valve out for inspection when I did my in-truck engine teardown in '02. I reckon when I fired it up, the pressure jarred the valve loose, but not before goobering up the valve surface.
Anyhow, I'm gonna try to clean the bore out with some emery cloth glued to a wooden dowel, then flush the bore with brake parts cleaner to get the residue out. Hopefully the bore intersecting passages aren't too messed up.
-
I reckon that has a vacuum operated 2-speed rear, as evidenced by the big diaphragm. Them things are great for climbing hills while carrying a load.
-
whenever I assemble an engine, I usually fill it with water instead of coolant in case there are leaks...there's less of a mess, and it allows the thermostat to cycle faster. I usually run the motor for several hours of operation to kinda flush out any crud that I missed during disassembly. it's also cheaper...but only done during non-winter months.
-
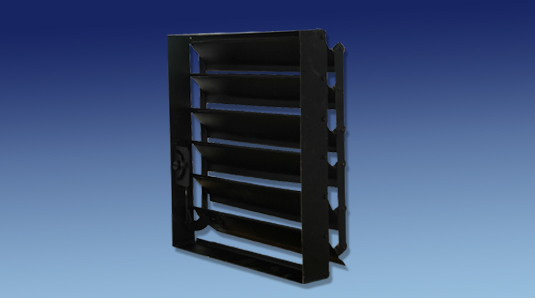
Getting the engine to heat up faster has had me thinkin'bout finding a way to restrict air flow through the radiator fins in a controlled manner. Something similar in effect as winter grill covers on diesel trucks, but with a cable control to open & close a collar damper. I'm still doin' some figgerin' on how to do this, but this is part of the contraption I'm conjurin' up:
-
FOR SALE: looks like a B-1 with a B-4 low-side bed...but this turn signal looks to be located so as to be operated by the driver's, um...knees?


-
Just off the top of my head, I know where 7 B-1s and 4 B-3s are sitting in someone's back yard or next to an old barn. One of those is a grain truck that showed up at the shadetree mechanic's down the road, and that beast looks like it has been barn-stored for decades, lots of dust & barn owl sweat on it. I found a B-2 in the next town over, partially dismantled behind a low-end body shop. He wanted a $1500 for it, no title, windows busted out, interior gone, no rims, so I balked. Went back a couple months later, the truck was gone, the guy I talked to played dumb and told me to va-moose.
One of these days I'm gonna get that camera and take pictures before all these beasts up & disappear like that one, several of them look to be excellent candidates for restoration.
-
it's a noticeable increase in the lower end, but it won't snap yer neck. When I traded my '92 Ram 5.9L CTD for the '02 Ram 5.9L CTD, now THAT was a noticeable difference...I could pass people on the highway without having to plan ahead.
-
Wellllll SHUCKS...thank goodness I don't drive either of my Pilot-Houses very much, cuz it looks like the Wix 51010 does nothing but sit in an oil bath for the bypass filter housings I have as the upper & lower IDs are the same. The 51011 appears to be what I need to have been using all these years...GOSH I reckon I've been spoiled by spin-on filters and never put much thought into how this flathead's filtration actually worked. This explains why the oil would be dirty within 100 miles after changing, no matter how I setup the carburetor. How'bout them apples...wellsir, this goes to the top of the list of engine upgrades to do: CORRECT oil filter, 180 thermostat, PCV system,
paper air cleaner conversion.
Thank all y'all for contributing cuz this is something basic that I have overlooked for years and y'all's back'n'forth got me to thinkin'bout it...cain't wait to get started on this now, maybe after it stops raining cats & dogs 'round here. -
This sorta thing has come up at work when dealing with our European counterparts who want us to use very expensive Italian or German hydraulic control valves on equipment we build for them. These valves are more susceptible to failure from fluid contamination than the American valves we use for domestic production. With this known, we have a never ending analysis as to which control valve to use for which application. The expensive valves have smoother and more accurate controls, but at a higher price. In some applications, this expense is unnecessary.
These flatheads were designed for high contamination use, not only in cars & trucks but as stationary engines for industrial use or heavy equipment power plants for agricultural use. My thinkin' is that we could have better lubrication with the house brand multi-weight oils of today than with the SAE 30 oils of 50 years ago. Full flow filtration may be better for the engine lubrication, but how much better might be negligible compared with the bypass filtration. Weighing the cost of modifying the flathead block for full flow filtration versus more frequent oil changes with the bypass filtration makes me think that the payoff would not be in my lifetime. DC's installation of the full flow filter makes sense because the modification requires simple hand tools since the flathead block was designed for this upgrade.
My question is about the bypass filter itself. I've been running the Wix 51010 canister similar to what DC has pictured instead of the sock-type (Wix 51011). That canister was in the '48 when I started working on it when I was 12, and a similar canister was in the '49. I haven't seen a cross-section of either type of filter, so I'm unsure of what the actual filtration difference is other than the particulate rating. Is the sock type better than the canister for any reason? My guess is that it completely fills the filter housing as the canister does not.
Low-Side Bed [CA]
in Mopar Flathead Truck Forum
Posted