dgrinnan
-
Posts
372 -
Joined
-
Last visited
-
Days Won
4
Everything posted by dgrinnan
-
thanks for all the replies. I see how my use of front and rear could be confusing. I m talking about the front wheels. The outer bearing pops right out. I was asking about removing the inner bearing.
-
I have my front brakes tore down for replacement. Working on a wheel cylinder rebuild. while I am at it and have everything apart I was wondering about the wheel bearings. the front bearing is easy. It comes right out when you remove the axle nut and washer. Is the rear bearing pressed or can I tap it out. I haven't taken a real good look at it yet. Is there possibly a spring clip?
-
UPDATED 9/13/22 - THIS JUST KEEPS GETTING BETTER AND BETTER. I HAVE MY FRONT BRAKES TORE DOWN. I AM REBUILDING THE WHEEL CYLINDERS AND FIND MY BRAKE DRUMS/HUBS ARE IN BAD SHAPE. SO FAR THE ONLY OPTION I HAVE FOUND IS ON EBAY. NEW ONES ARE $450 EACH. HAS ANYONE COME UP WITH ANOTHER SOLUTION OTHER THAT A DISC BRAKE CONVERSION WHICH WILL COST JUST AS MUCH. $800-$1,000.
-
Brake drum removal - alternate solution?
dgrinnan replied to dgrinnan's topic in Mopar Flathead Truck Forum
Thanks for every ones feedback. It is very helpful just understanding the mechanics of what is going on. I am use to fighting with pulling the drum on a more modern car. Knowing how this is set up keeps me from doing something stupid and causing damage. -
Brake drum removal - alternate solution?
dgrinnan replied to dgrinnan's topic in Mopar Flathead Truck Forum
Thanks. I figured there was probably more to it. -
I have seen the tech tips and post about using a drum/wheel hub puller. I am assuming the challenge is because of the brakes holding onto the drum? If this is not the case my actual question is not valid. Has anyone tried adjusting the brakes in to remove the pressure against the inside of the drum? With a little banging to break loose any rust around the center of the hub shouldn't the brake drums then just pull off?
-
Thanks. I wanted to confirm before I mounted them.
-
1947 WC - I just discovered the rear are 11" and the front are 10". The reare clearly need removed with a hub puller. What about the front? Are they the same set up and need pulled with a hub puller?
-
Thanks, Andy Bernbaum has them.
-
Where are you getting brake parts? I need brake shoes and possibly wheel cylinders. I have a new master cylinder. I tried Rock Auto, NAPA Online, DCM Classics, Autozone and PartGeeks. No one list brake shoes. NAPA Online did have front right and left wheel cylinders. I have a 1947 WC. A conversion kit for just the front to go to rotors and pads is $800. UPDATED: DCM has a rebuild kit for the wheel cylinder. UPDATED 9/13/22 - THIS JUST KEEPS GETTING BETTER AND BETTER. I HAVE MY FRONT BRAKES TORE DOWN. I AM REBUILDING THE WHEEL CYLINDERS AND FIND MY BRAKE DRUMS/HUBS ARE IN BAD SHAPE. SO FAR THE ONLY OPTION I HAVE FOUND IS ON EBAY. NEW ONES ARE $450 EACH. HAS ANYONE COME UP WITH ANOTHER SOLUTION OTHER THAT A DISC BRAKE CONVERSION WHICH WILL COST JUST AS MUCH. $800-$1,000.
-
I think I have the solution. First of all, a lot of parts/pieces were missing from my truck when I got it. I had no old parts as reference. I am trying to put things together and it is a real puzzle figuring how some of this stuff was orginially put together. I still need to confirm with DCM but they sell a "Rear cross member "L" bracket". I beleive it bolts to the rea bed crossmember and the L inserts into the botton of the stake pockets to give the bedside stability so it does not spread at the top when you open the tailgate. It appears to have pre drilled/tapped holes that I am hoping are designed to receive the tail light brackets. I will post an update once I have this assembled in case anyone else has the same problem.

-
I checked on DCM Classics and did not see anything. Should there be some sort of gasket between the headlight bucket and fender on a 47 1/2 ton?
-
Did you mount them yourself? How did you hold the nut on the backside while starting and tightening the nut? It is up inside the bed rail pocket.
-
I have new bedsides. I also bought tail lights and brackets from DCM. It appears the brackets are supposed to mount to the bed pockets. There are no pre-drilled holes in the bed pocket. I am trying to figure out the best way to mount them. I am clearly going to have to drill holes but what fasteners are you using? I can go for just a bold and nut but it will be difficult to hold a nut on the inside of the bed pocket while I start and tighten a bolt. I considered riviet nuts but so far the ones I have found are smaller. 1/4 20. Not large enought. I probably need a 7/16 bolt. (socket size)
-
I do like your truck. that is the color scheme I am leaning toward.
-
I am not against switching to negative ground. I just didn't know if it required anything special. I appreciate every ones help. Switching the altimeter polarity is easy.
-
I have a lot of fun with it but can't wait to get the 47 Dodge WC on the road. I love the art deco trucks. 47 was the last year before they went to the new design.
-
Here is my other truck. Tells you where I stand. ?

-
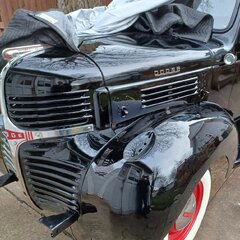
It is hard to mess up the look of these iconic trucks. I am going for the look of the black truck. Once I have mine road ready it is heading to paint. Still on the fence if I am going to paint it solid black or red with black fenders like the picture of the big truck.
-
Thanks for the feedback.
-
So nothing special has to be done (other than the normal conversion stuff)? I can just reverse polarity when I do the conversion and go to negative ground?
-
I have done a 12v conversion before but not on a vehicle with a positive ground system. Do you need to do anything different? Can you convert to 12v and stay positive ground? I know about all the other stuff that is needed. Light bulbs, ballast resistor, gauges.
-
Thanks. I have whitewalls right now but they are starting to dry rot and replacement white walls are through the roof now in price. I am considering putting on some new tires and painting on white walls.
-
Can you install modern tubeless tires on original 1947 1/2 ton truck rims? Will they hold air or do you need an innertubes?