


Happy 46R
-
Posts
146 -
Joined
-
Last visited
-
Days Won
2
Content Type
Links Directory
Profiles
Articles
Forums
Downloads
Store
Gallery
Blogs
Events
Everything posted by Happy 46R
-
Sorry I don't have any pictures for you but on my car and a parts car I use the lock set is removed by folding back the rubber seal on the edge of the door and there is an access hole there. Cannot remember slot or philips head needed inside that access port. Have fun with your project. It looks well worth it. I know there was a thread a few months back about a broken hood latch cable and one of the members showed how they created a second pull cable handle under the left front fender and that way if one broke he had a secondary access. Good idea.
-
I cannot help a lot but I am thinking that the 4 5/8 is the bulb diameter as I believe there was a 5" and a 6" option during production. AB only sells the total unit that I can see but you may be able to phone them and either get a bulb from them or source a supplier that may have one to fit. Dave
-
HELP Removing Bell Housing (Clutch Cover) from 49 Plymouth P17
Happy 46R replied to temecularevev's topic in P15-D24 Forum
Make sure you update us as to how things go for you. Not being a mechanic or having lots of experience I often hesitate to post suggestions or opinions. I have recently done exactly what you are proposing and it went well following the outline. I hope suburbans are no different in the set up and your project goes well. Dave -
HELP Removing Bell Housing (Clutch Cover) from 49 Plymouth P17
Happy 46R replied to temecularevev's topic in P15-D24 Forum
It is hard to tell from your photo but on my Dodge the clutch inspection cover can be removed with the engine and bell housing connected and in place. (Inspection cover is rounded on the bottom and about 6" wide/ I think there are 4 bolts holding it in place)This will expose the ring gear / flywheel which can be rotated by hand once the spark plugs are removed to reduce compression in the engine. Rotating the ring gear allows you to access the bolts holding the clutch pressure plate in place and this allows it and the disc to be lowered out of the bell housing. Putting it back requires an alignment tool to set the splines in place to allow the transmission to slide back into place. The suburban configuration may be different but this is what has worked on the three vehicles I have owned. The clutch assembly does have considerable weight to it when you are laying on your back under the car so be careful. Jope this helps. -
Hi Murray, thanks for the pm. I will check this afternoon as I have to check on the car anyway. Hit -32 Celcius last night so want to make sure the small heater in the garage is running. It wont get the place warm but it will take a bit of the edge off. Dave
-
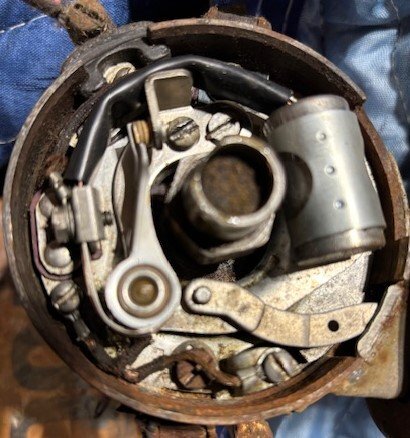
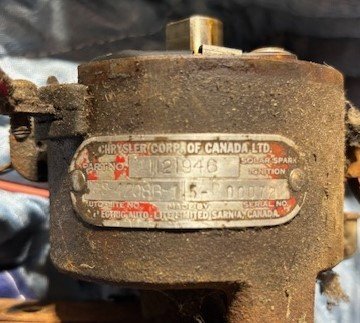
Hello Pep48, Not sure this will help however on my spare Chrysler Corporation of Canada spare distributor the vacuum advance lever simply fits over the pin. I cannot find any sort of fastener or clip that retains the arm. Couple of photos of the spare I have.
-
All of mine are standard removeable nipples. Occasionally they plug up or won't allow the grease through so I have a supply available. Just unscrew and replace. Hopefully yours hasn't been damaged. Congratulations by the way on a new project. Dave
-
This is best I can do, sorry. On the original website address there is a "see more" entry almost to the end of the first page you see. Opening that button expands the grid from the Plymouth section and onwards. I think this is the section you were asking about. Again sorry if it doesn't work for what you need.
-
The only one that I have is: ALLPAR.com/old/model-guide/index.html Not sure if it is what you need or not. Dave
-
very nice indeed. Keep us posted/ Dave
-
Hello Ozjohn53 and welcome. Looking forward to pics and stories as the project progresses. I can't help you out technically with a proper profile description but I can tell you that if you search different suppliers mentioned in many of the postings you will find that AB has a weatherstripping package and they may be able to assist you with dimentional information or other information. I will PM you with the site contact as I am not sure what I am allowed to post on the forum. Enjoy the project. Dave
-
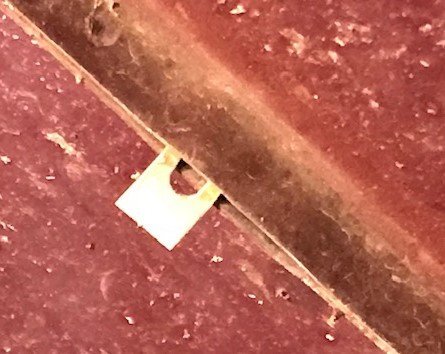
how to open the hood without a hood release cable
Happy 46R replied to OUTFXD's topic in P15-D24 Forum
Hello OUTFXD, I have a 46 Dodge Special Deluxe but a Canadian Model. I just went out and got a picture in hopes it helps. I am not sure your release set up would be the same as mine but it is all I can offer. I can only think of two options as accessing the catch from below appears impossible. The photo orientation is the square hole is to the front of the grille. On the right side of the photo is the connection of the cable to the mechanism. If you have a small gap between the hood and the grille you may be able to insert a thin piece of steel, (Metal Ruler) and push the knob back towards the firewall at the appropriate angle. You would have to be right of the secondary latch and angled slightly from left to right to get the proper directional push. The connection between the catch and the wire is slightly recessed with a raised lip around it so you may have to bend the front edge of the flat bar down a bit. This idea only works if there is a bit of room between hood and grille. The second option would be to create an L shaped piece of perhaps 1/4 or 3/8" round stock or ready rod with enough length to reach through the grille and up the hole of the mechanism from below. I am not sure you could get enough purchase on the round stock to push that mechanism back but you never know. Both of these require steady hands and patience, neither of which I have. Best I can come up with and good luck. Dave
-
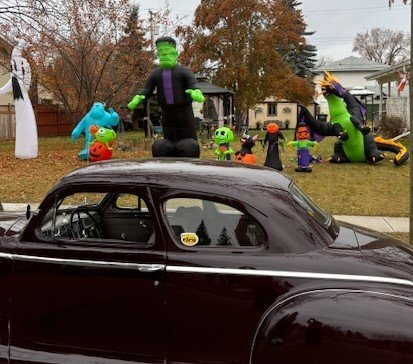
Last year the weather cooperated and I was able to take a ride on Christmas Eve with no snow and mild temperatures. (-3 Celcius) This year I am not so sure as we have already had a skiff of snow that has thankfully gone and some colder temperatures. I try to run the car right up to snow so will have to keep a close eye on the weather. Today was around 6 degrees with only a light breeze so I headed out to inspect some of the SPOOKTACULAR creations around town. Caught this one as it was being set up so hopefully the halloween weather on Thursday does not include the rain scheduled for 4:30 local time. Happy Halloween everyone.
-
Not sure it will help your situation but there are a couple of videos that may help. One is for old dodge trucks the other for a 41 rebuild. May not have all the answers but might have some. Try https://www.google.com/search?q=1941+dodge+door+window+replacement+p15-D24 for the 41 restoration.
-
On sealing the hood I used the dum dum putty and applied it extra thick where the penetrations are for the tabs on the chrome. I was really careful to put even pressure on the whole length of the chrome so it didn't kink and when you take the chrome off the tabs have a tendancy to slide inside the chrome track so if you can mark where they go, marker dot or something simple, so when you put it back on you know where the holes are. You also need to unbolt the hood ornament to get clearance for the chrome strip to lift up so I used the dum dum putty under it and making a circle of it around those mounting holes so I didn't get the putty on the bolt threads. About a 20 minute project. Have fun with it. Dave
-
No expert on this but could the problem be related to the drive shaft? I recall a thread I was reading some time ago about how important it is to mark the drive shaft's orientation to the transmission and differential so it remains true when removing and reinstalling. Given the new torque converter and transmission rebuild could they magnify the vibration from an out of balanced or twisted drive shaft? Just an idea. Dave
-
I was at an area body shop on Tuesday and they were kind enough to give me a package of the dum-dum putty in strips. Each strip was about 12" long and a 1/4 of an inch wide. Chrome strip was easily removed by straightening the tabs on the bottom side after unbolting the hood ornament to give the front end of the strip clearance. I used the putty to seal the entire seam back to front and then created a second layer of protection by encircling the tabs on the center chrome piece with the putty. Long story short the strip is sealed and there is no water on the engine after a wash. Thank you Plymouthy Adams for your insight.
-
Thanks Frank, My worry is the water getting in as I have a good set of wires and caps and don't experience any hesitation or missfires. It certainly doesn't help the appearance of the car with all the calcification building up in the spark plug wells and it makes cleaning it off tricky when I want to remove spark plugs. Do you have a suggestion for the seam sealer as I don't want to use something that destroys the paint or discolors the stainless. Dave
-
When I wash my cluib coupe I get water sitting in the spark plug wells on the head. The reason is the center crease in the hood, which is covered by the stainless, leaks. Is there a tried and tested means of sealing that off to prevent the water leak. I have checked the shop manual and the parts manual that I have and neither shows any type of seal between the two hood panels. I have searched the forum and although there are many entries about hoods there doesn't appear to be anything about this issue. My two hood panels appear to be spot welded together along a central seam. The chrome strip has 4 tabs that slip between the two pieces and are then bent over to hold the strip in place. The spark plugs are directly under the seam and fill with water. Other than removing the strip and siliconing the seam I am at a loss as to how to solve the problem. My car is not a show car but I don't want to do something that will damage the car or make future restoration more difficult. Hope someone has an answer. Dave


-
LED running lights and halogen headlights for my '47 Super De Luxe
Happy 46R replied to 46Chris's topic in P15-D24 Forum
First off thank you for this thread. It got me thinking about my lighting and what I wanted to do for upgrades. I have a 6V Positive Ground system in my car that I have owned for about 5 years now. I regularly check my lights and although I have turn signals it always seemed to me that the flasher was going really fast but the lamps all worked so I didn't question it further. I have rarely driven the car at night so headlights never were a consideration other than to turn them on and off to test them. Today as I was thinking about LED and Halogen replacements I actually physically checked my lighting. The rear tail lights have been converted to a tail, turn and brake light by installing the two filament bulbs and sockets and splicing off the single brake light wire for the trunk light. Not a lot of craftsmanship, (Marettes & Black Tape) involved but obviously enough to make things work? The single trunk light is a two filament brake and tail light combo. So if I am following the information correctly on this thread I will need to purchase Three (3) of the 1158 LED bulbs for the two side lights and the one trunk light as well as the 84787 flasher. I have already ordered the H606C1 Halogen headlamps from the local parts store. @Sam Buchanan I will messaage you seperately to talk about this as my electrical skills are minimal but I am determined to learn. My next problem will be that while I was researching the LED bulb issue I learned that there is definately a problem with the wiring that exists as the single trunk tail light became almost non visible and the turn signals stopped working when I turned the headlamps on. So once the lights arrive changing them out will include a bunch of wiring changes as obviously there is a problem Houston! Thank again everyone who contributed to the thread as it was really informative and saved me a future problem. Dave -
I rescued a distributor from a salvage yard last year that was firmly encrusted in the well and would not come out. As mentioned the use of lubricant in significant quantities is mandatory and if you are able let it soak in overnight to help the cause that is even better. The final answer in my situation was a 15" long piece of 1" X 1" spruce and repeated light tapping of the wood from under the car pushing the distributor up. I emphasize light tapping as I used the base of the hold down clips to secure the wood from sliding out of place and by tapping one side then the other after about 5 minutes it popped right out. I like the idea of coming from the bottom if you have your oil pump out as that has much of the same effect. Good luck. Dave
-
Hi Ivan, Thanks for inquiry. The one below is actually off the internet but it is what I recall the piece to look like. The original car was last driven in 1972 when yes I did total it. Pickup truck with camper winch and bumper at an intersection. Not much left. Dave

-
Thanks Bingster, I was able to find two shapes in the photos on the gallery. One is the singular U shaped and the other is the U shape with a cross piece. Don't think they would provide a lot of protection but you never know. Thank you for replying. Dave
-
It's not a Plymouth or Dodge but it is a Chrysler
Happy 46R replied to joecoozie's topic in P15-D24 Forum
No mistake is an understatement. What a great addition to your collection. Enjoy every mile and smile. -
Hi, my current 46 Dodge Coupe is a twin to the car I had when I was 17 but I am searching for some parts that will make it closer to an identical twin. My original car had a curved bar that sat in front of the grille and if memory serves was bolted on the inside of the bumper using the bolts that hold the bumperettes in place. I don't think it was structurally resilient but definately decorative. My original had the top curved piece and a central cross piece with the fog lamps set outside the width of the bumperettes. I went through all the pictures in the Plymouth and Dodge gallery and noticed very few of the double bar units and a few more of the single bar units but nothing that appears consistent. They seem to be more prevelant on the Plymouths but I didn't do an actual count. Was there a special car these were put on or were they dealer options like the oil filters? Once I have a part number or even a proper name, bush bar doesn't do it on google, I would like to get one for my current car. Thanks for any help or suggestions.

