Happy 46R
-
Posts
119 -
Joined
-
Last visited
-
Days Won
2
Content Type
Links Directory
Profiles
Articles
Forums
Downloads
Store
Gallery
Blogs
Events
Classifieds
Everything posted by Happy 46R
-
Hello, here is an out of the box thought. Could you provide rough or at least scaled measurements to the tech department at your local high school or someone who is equiped with a 3D printer? They could make the base which you could then upholster? I hear they are making 3D models in carbon and other materials now not just plastic. The nice thing with this is you could scale it accordingly or try various sizes for very little investment or cost. Just an idea. Dave
-
ANSWERED Hard to find interior parts 1104546 1104547
Happy 46R replied to D35 Torpedo's topic in P15-D24 Forum
I have access to a parts car but it is a 47 or 48 2 door coupe. Not sure if the parts interchange or if the arm rests are still attached. Hoping to get out to the salvage yard this weekend or very early next week and will check. I will photo and advise once I know for sure. Dave -
Just as a followup I just tried the method from Sniper and the first try gave me the exact article I have been searching for the last week. Thank you everyone for the help. Dave
-
Thank you everyone. I just found it frustrating and was hoping someone had the answer. Lots of good help in the forum for sure, and not just with our cars. Dave
-
Is there a secret way of searching topics? I have tried a couple of different times to find something I have read recently and can't seem to find what I want. My last try was engine flushing as I know in the last couple of months there have been at least two or three remarks about this and some had very good links to even older comments. Are the words separated by commas or something? Sorry I am not that great on the computer but only slightly better with the wrenches! Dave
-
Great trip Chris. You always have such great adventures with your trusty steed. Anyone who has dipped the tires of that sedan in all four oceans is certainly a great adventurer! See you at the next car club meeting. Dave
-
Hi Ivan, I have never seen a thermostat configuration like yours however I would think that as long as the copper coils were in the block and not the radiator housing the thermostat would work the same as mine does. It would seem logical that as the engine block heats the coils they reach a set temperature and pull the stopper down to allow for water flow. I could be out to left field but that would be my assumption on how it should work. I did however find this in a google search and although it relates to industrial engines it seems to show the style of thermostat you have. Hope this helps sorry I wasn't more authoritative. Dave

-
Good job Tom! Knowing the bad back situation myself there is an increased satisfaction with getting that type of project done and dusted. Well done. Dave
-
And it looks really good. Great to see the different options and questions this forum presents. I will not be headed down this road for some time but your posts are really thought provoking. Cheers Dave
-
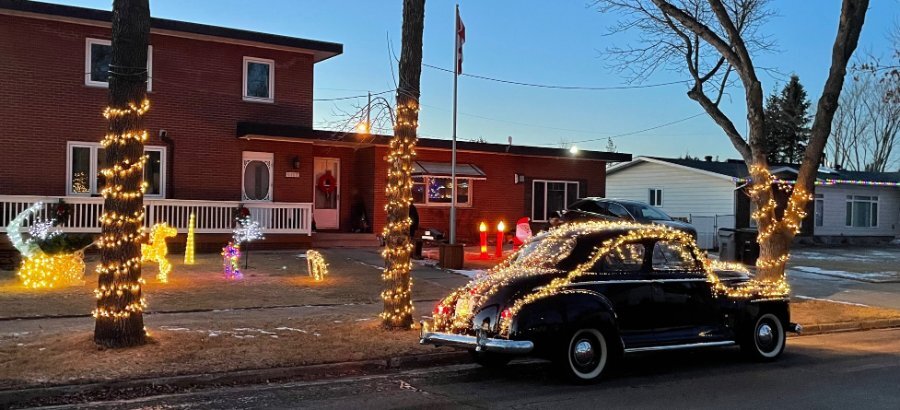
Congratulations it is not very often that those of us in the northern part of the continent get to showcase our cars on New Years Day. Your Business Coupe has great lines and looks completely at home in the "snow" scene. Enjoy while you can as there will be days that are not as good. Dave
-
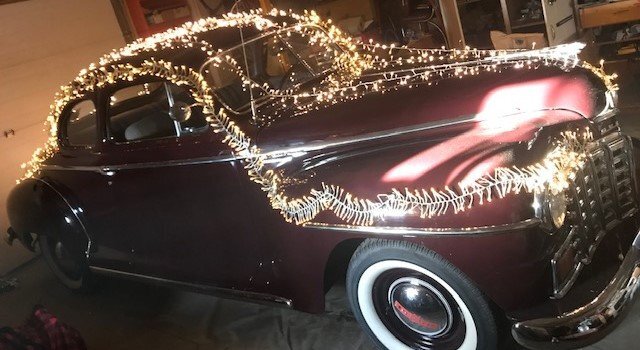
Update: Christmas Eve turned out to be just under the freezing mark, -2C with no wind, no rain, no snow and a great opportunity to spread some Christmas cheer. My wife, Daughter, Sister in law, son in law and myself drove every street in town and spent an hour and half waving, smiling and enjoying the evening. Even smiles and waves from the retirement center and local hospital. Merry Christmas!
-
Merry Christmas to everyone and to all you celebrate it with. I spent a little time in the garage enjoying the +1C weather and getting ready for a little spreading of the Christmas spirit around town this afternoon. Professor Plum and I have about 13 miles planned at sunset to go up and down each street with carols playing and lights flashing. Should be a hoot, Dave
-
Sorry rcl700 I did not have access to the car to give you full details. I sent you a message about the tires. P215 75 R 15.
-
Coker Classic 15".
-
So here is the end of the saga! I made the trek to the parts store and bought a cigarette lighter extension that I was able to connect to the 12 V lawn tractor battery and strung the lights and this was the final product. Looking forward to Christmas Eve when Professor Plum and I get to travel through town. Merry Christmas or Seasons Greetings to everyone.

-
Thanks everyone. The problem was of course the converter plugs into a cigarette lighter socket so direct wiring was troublesome. The parts are not expensive but it is the travel to get them that adds to the cost. New part from the store is probably the best solution.
-
My 1946 D25C Club Coupe has a working original 6V positive ground cigarette lighter. I do not want to break it so am looking for some expertise. This year near Edmonton has been unseasonably warm and we are currently talking no snow for Christmas. I was looking to take my car for a Christmas Eve tour of town with some Christmas lights and Christmas music. The music I have figured out. I don't have easy access to auxiliary parts and was thinking to save an hour or so of driving I would take the cigarette lighter socket out of the dash and hook it to a 12V garden tractor battery. I would then use it with an inverter to power the Christmas lights. My concern is will the cigarette lighter socket be damaged with a 12V input instead of a 6 V input. If there is a chance of that I would make the journey to a parts store instead of taking any chances. Thanks for any ideas.
-
I recently installed a tach in my 230 ci 102 hp 46 Dodge coupe. Using a GPS app on my phone I can do 90 KMH at 2750 rpm. At 3000 rpm she touches 105 KMH and this is with a standard 3 spd transmission and no overdrive. Sorry I don't have the gear ratio for you. Dave
-
Thanks Cannuck. Appreciate the response. I got mine out yesterday and cleaned it but wanted to make sure I put it back correctly or repaired if needed. Have a great summer hope you haven't been hit by any of the crazy weather the east has gotten this year. Dave
-
I was looking back at old articles for some help with the draft tube mentioned by Plymouthy Adams above. Three questions I have are: 1: is there supposed to be a screen on the open end of the tube. My car is a daily driver not a show car so I am interested only for operation necessity. 2: is there a proper way to position the tube once it is installed. My car was tilted back towards the transmission, my spare engine has it tucked up under the exhaust manifold and the parts car I have access to is positioned more to the front than the rear, 3: is there an O ring or gasket of some sort between the block and the tube. My manual does not have an exploded view or any part reference at the join. Thanks Dave
-
Hey Keith, a beautiful car to go with a beautiful part of the world. Being an old Pentictonite I know what I am missing when I see your pictures. Have a great return trip. Dave
-
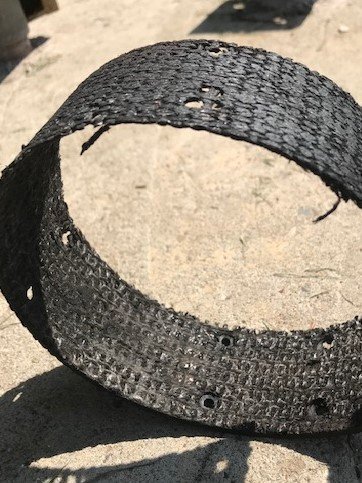
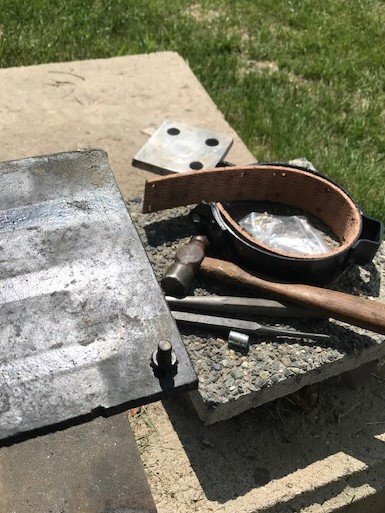
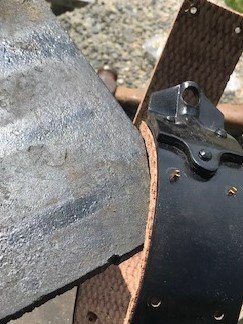
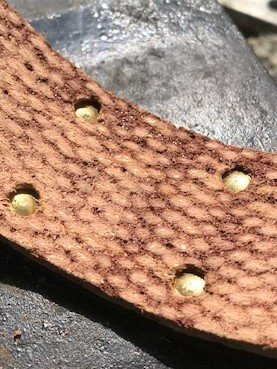
I am not a mechanic but have certainly barked a knuckle or two on a stubborn nut and bolt assembly. I knew my parking brake was nearing its end of life so this winter ordered in the parts to change out the lining. I kept putting it off because I wasn't sure I knew enough to handle the job and I could not find any Youtube or video files that would step by step it for me. I am not a computer wizard either! Sniper was kind enough to post a relining of a tractor brake on a forum post that gave me some guidance. I challenged myself last weekend and although the test is yet to come after install I think I managed to do a competent job that will allow me to confidently leave the car with the brake applied. Not being as skillful with the video camera as KeithB7 I am going to rely on a few still pictures. Initial removal was easy enough as I removed the anchor bolt on the passenger side of the parking band. I then removed the Adjusting Bolt Nut from the driver's side of the parking band and removed the bolt and two springs. This was followed by removing the Guide Bolt Adjusting Nut and Lock Nut which freed the parking band so it would slide over the splined area of the drive shaft. After removing the Clevis Pin from the Clevis on the end of the Parking Brake Cable and the Spring and Extension I removed the two mounting bolts from the side of the transmission so that the Activating Mechanism could be cleaned and inspected at the same time. Once the parking band was on the bench it was easy to see just how worn out the lining was. Using a 1/8" drill bit I then drilled all the Rivet Heads on the outside of the parking band. Any residual rivet pieces were punched out of the band with a small drift punch. I then clamped the new lining onto the old lining and marked the rivet locations with a felt marker. The new stock was about 4" longer than necessary but it gave me a little sample piece to practice on. The material is 5/32" X 2 1/2" and is a non- asbestos woven material that is fairly stiff. After removing the clamps I inserted the material into the parking band and clamped it in place ensuring the marked holes on the lining and the drilled holes on the parking band aligned. The hole pattern on the parking band is not symmetrical so you have to be careful to make sure your alignment marks are matched at each step. After drilling out the relining material through the parking band I unclamped the lining and clamped it flat on a scrap piece of 1" X 4" with the inside of the band face up. I wanted to countersink the new rivets about 1/2 way through the material but I do not have a drill press. I was also concerned that countersinking with a regular drill bit would create a void between the flat bottom of the Rivet Head and the beveled surface of the countersink hole. I used an 11/32" Pilot Point Bit with a depth collar attached to countersink the rivet head holes. I was able to use the extra material to practice a number of times to make sure I got the vertical alignment correct. After countersinking all of the holes I then realigned the new lining on the parking band and ensured the holes lined up before putting the rivets into place. The rivets that came with the lining were Split Rivets and I simply put a small cold chisel into the split to force the two sides apart and then secured them with a Drift Punch to completely fold the tabs over. As the parking brake is not normally used for stopping a car in motion I felt the split rivet would be sufficient rather than a rolled finish. I finished off the process by drilling a hole in an old H beam I have and attached a nut and bolt. The protruding part of the bolt made a perfect fit onto the head of the rivet and a sharp rap with a small ball peen hammer set the rivet head in the countersunk hole and finished the flatenning of the rivet. Turning the parking band 180 degrees was all that was need to complete the other row of rivets. Tomorrow I am taking the parking band on a 60 mile round trip to a brake and clutch shop in Edmonton Alberta to have longer rivets installed in the four end holes on the lining. (Two on each end) as these holes go through double layers of parking band material and the supplied rivets were not long enough. Hope they appreciate my efforts. I also cleaned, lubricated and prepared all the parts to reverse the removal process and put the brake back together. I also gave the drum a light dusting with some 3000 grit sandpaper to ensure it was ok to go. It would appear that I did this project just in time as the rivets had just started to mark the drum. I will let you know how the install goes!


-
great information. Thank you for that. Dave
-
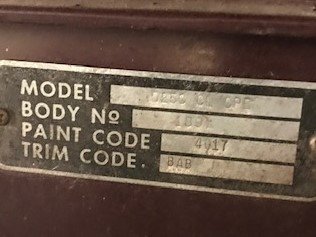
I do not have any records that correspond to the numbers you have. I would think the BC references the Business Coupe but that doesn't relate to the Chrysler / Dodge / Plymouth coding system of D24 etc. As far as body style, color etc. your car's Canadian cousin has a plate identifying each component located on the firewall above the brake / clutch linkages. I am not sure if you have access to alternate light sources or not but maybe a nearby university or college might have a lab that would take a look to see if any subsurface writing becomes visible with the various colors??? Might be worth a try for both plates. Good luck. Dave
-
So adding a lilttle "North of the Border" info to this memory tells me the Mounties never had AM/FM radios in the cars until well into the 1980's when they found out it was costing them more to have the production line stopped to have the "standard equipment" removed. They never had vehicles with "air conditioning" until it became standard equipment from the manufacturer or unless they were ordering a car for the dog unit. They also changed from the black and white color scheme in late 1973 / 74 when they moved to the blue and white scheme. From there it was some where around 1994 when they went to straight white with a decal kit for accent. That was all due to reductions in cost per unit. It was some where around this time that the roof becons also changed to light bars and then more recently the LED lights installed in the lighting fixtures. This increased top speed capabilities until you factored in the hundreds of pounds of equipment they had to carry in the trunks. Early decals were unilingual english, then bilingual french and english and then reflective unilingual. Some are very collectible. Don't ask how I know all this! Dave