


Happy 46R
-
Posts
146 -
Joined
-
Last visited
-
Days Won
2
1 Follower

Recent Profile Visitors
1,445 profile views


-
Sorry I don't have any pictures for you but on my car and a parts car I use the lock set is removed by folding back the rubber seal on the edge of the door and there is an access hole there. Cannot remember slot or philips head needed inside that access port. Have fun with your project. It looks well worth it. I know there was a thread a few months back about a broken hood latch cable and one of the members showed how they created a second pull cable handle under the left front fender and that way if one broke he had a secondary access. Good idea.
-
I cannot help a lot but I am thinking that the 4 5/8 is the bulb diameter as I believe there was a 5" and a 6" option during production. AB only sells the total unit that I can see but you may be able to phone them and either get a bulb from them or source a supplier that may have one to fit. Dave
-
HELP Removing Bell Housing (Clutch Cover) from 49 Plymouth P17
Happy 46R replied to temecularevev's topic in P15-D24 Forum
Make sure you update us as to how things go for you. Not being a mechanic or having lots of experience I often hesitate to post suggestions or opinions. I have recently done exactly what you are proposing and it went well following the outline. I hope suburbans are no different in the set up and your project goes well. Dave -
HELP Removing Bell Housing (Clutch Cover) from 49 Plymouth P17
Happy 46R replied to temecularevev's topic in P15-D24 Forum
It is hard to tell from your photo but on my Dodge the clutch inspection cover can be removed with the engine and bell housing connected and in place. (Inspection cover is rounded on the bottom and about 6" wide/ I think there are 4 bolts holding it in place)This will expose the ring gear / flywheel which can be rotated by hand once the spark plugs are removed to reduce compression in the engine. Rotating the ring gear allows you to access the bolts holding the clutch pressure plate in place and this allows it and the disc to be lowered out of the bell housing. Putting it back requires an alignment tool to set the splines in place to allow the transmission to slide back into place. The suburban configuration may be different but this is what has worked on the three vehicles I have owned. The clutch assembly does have considerable weight to it when you are laying on your back under the car so be careful. Jope this helps. -
Hi Murray, thanks for the pm. I will check this afternoon as I have to check on the car anyway. Hit -32 Celcius last night so want to make sure the small heater in the garage is running. It wont get the place warm but it will take a bit of the edge off. Dave
-
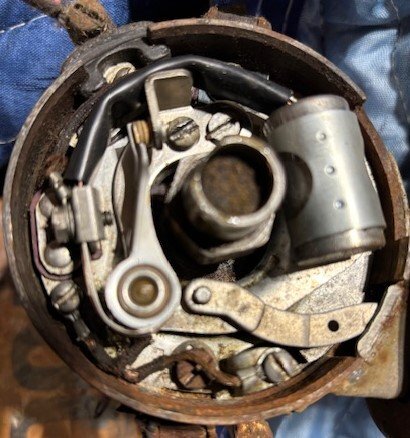
Hello Pep48, Not sure this will help however on my spare Chrysler Corporation of Canada spare distributor the vacuum advance lever simply fits over the pin. I cannot find any sort of fastener or clip that retains the arm. Couple of photos of the spare I have.
-
All of mine are standard removeable nipples. Occasionally they plug up or won't allow the grease through so I have a supply available. Just unscrew and replace. Hopefully yours hasn't been damaged. Congratulations by the way on a new project. Dave
-
This is best I can do, sorry. On the original website address there is a "see more" entry almost to the end of the first page you see. Opening that button expands the grid from the Plymouth section and onwards. I think this is the section you were asking about. Again sorry if it doesn't work for what you need.
-
The only one that I have is: ALLPAR.com/old/model-guide/index.html Not sure if it is what you need or not. Dave
-
very nice indeed. Keep us posted/ Dave
-
Hello Ozjohn53 and welcome. Looking forward to pics and stories as the project progresses. I can't help you out technically with a proper profile description but I can tell you that if you search different suppliers mentioned in many of the postings you will find that AB has a weatherstripping package and they may be able to assist you with dimentional information or other information. I will PM you with the site contact as I am not sure what I am allowed to post on the forum. Enjoy the project. Dave
-
how to open the hood without a hood release cable
Happy 46R replied to OUTFXD's topic in P15-D24 Forum
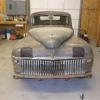
Hello OUTFXD, I have a 46 Dodge Special Deluxe but a Canadian Model. I just went out and got a picture in hopes it helps. I am not sure your release set up would be the same as mine but it is all I can offer. I can only think of two options as accessing the catch from below appears impossible. The photo orientation is the square hole is to the front of the grille. On the right side of the photo is the connection of the cable to the mechanism. If you have a small gap between the hood and the grille you may be able to insert a thin piece of steel, (Metal Ruler) and push the knob back towards the firewall at the appropriate angle. You would have to be right of the secondary latch and angled slightly from left to right to get the proper directional push. The connection between the catch and the wire is slightly recessed with a raised lip around it so you may have to bend the front edge of the flat bar down a bit. This idea only works if there is a bit of room between hood and grille. The second option would be to create an L shaped piece of perhaps 1/4 or 3/8" round stock or ready rod with enough length to reach through the grille and up the hole of the mechanism from below. I am not sure you could get enough purchase on the round stock to push that mechanism back but you never know. Both of these require steady hands and patience, neither of which I have. Best I can come up with and good luck. Dave
-
Last year the weather cooperated and I was able to take a ride on Christmas Eve with no snow and mild temperatures. (-3 Celcius) This year I am not so sure as we have already had a skiff of snow that has thankfully gone and some colder temperatures. I try to run the car right up to snow so will have to keep a close eye on the weather. Today was around 6 degrees with only a light breeze so I headed out to inspect some of the SPOOKTACULAR creations around town. Caught this one as it was being set up so hopefully the halloween weather on Thursday does not include the rain scheduled for 4:30 local time. Happy Halloween everyone.

-
Not sure it will help your situation but there are a couple of videos that may help. One is for old dodge trucks the other for a 41 rebuild. May not have all the answers but might have some. Try https://www.google.com/search?q=1941+dodge+door+window+replacement+p15-D24 for the 41 restoration.
-
On sealing the hood I used the dum dum putty and applied it extra thick where the penetrations are for the tabs on the chrome. I was really careful to put even pressure on the whole length of the chrome so it didn't kink and when you take the chrome off the tabs have a tendancy to slide inside the chrome track so if you can mark where they go, marker dot or something simple, so when you put it back on you know where the holes are. You also need to unbolt the hood ornament to get clearance for the chrome strip to lift up so I used the dum dum putty under it and making a circle of it around those mounting holes so I didn't get the putty on the bolt threads. About a 20 minute project. Have fun with it. Dave

