


'41 Fat Bottom Girl
-
Posts
154 -
Joined
-
Last visited
-
Days Won
2
Recent Profile Visitors


-

Softer shock absorbers (?)
'41 Fat Bottom Girl replied to '41 Fat Bottom Girl's topic in P15-D24 Forum
Yup, and a lot of the late 60's and 70's boats used to "float" pretty good! I remember my dad observing (I think it was some GM cars that had coils in the back?) how some would bounce around and sway. Thanx for the input on the leaf springs, all. Going to relax them, drown them in penetrating oil and disconnect the shocks before doing some serious rear end bouncing. Make the old girl do some serious hip-hop before dousing the leaves again and hooking the shocks back up. Sure, can't hurt. Been running 32 psi all four feet and will try reducing tire pressure a bit too. Not a huge issue, just looking for a bit of improvement. Trust in Rust! -
Now that I have the front suspension rebuilt and things are smooooth and tight up front, I am wondering about the rear. The ride has always seemed a bit stiff with the rear suspension. Too solid. If such a thing is available, I'd like to try softer shocks in the rear. She could use a little bounce. Am I looking at air shocks? Thoughts? Thanx!
-
Thinking of purchasing a front suspension rebuild kit
'41 Fat Bottom Girl replied to D35 Torpedo's topic in P15-D24 Forum
Congrats! Job well done. Had a delay getting mine back together- I hope to enjoy that better ride next week! Thanx for letting us know how it all turned out. Good to know. -
Thinking of purchasing a front suspension rebuild kit
'41 Fat Bottom Girl replied to D35 Torpedo's topic in P15-D24 Forum
I have sleeve bushings both ends, so I don't know how things work with a needle bearing on top. But for what it's worth, here is what I have done so far: The bushings have to be pulled in from the bottom, not installed from the top. I got a big bolt and washers and nut and pulled them into place. I just cleaned up the bores (really well!) with some emery cloth and lubed them with grease before installing the bushings. A couple big wrenches and they pulled in OK. I just made very sure they were flush so there is no interference with shims etc. later (photos). A finished assembly is on the left showing the flush installation. I ordered my adjustable reamer and will ream the bushing I.D.s to fit the new Kingpins. I have about .004" to remove on the bushings to get a slip fit with the Kingpins. I am curious about the needle bearing you are working with on top- is its bore diameter a different diameter than that for your lower sleeve bushing? I was wondering if it was larger on top. I don't know anything about those, I have just done sleeves in my past. Good Luck

-
Thinking of purchasing a front suspension rebuild kit
'41 Fat Bottom Girl replied to D35 Torpedo's topic in P15-D24 Forum
I agree, thanx Andyd, it is indeed SOP. If the Kingpins were same dia. as stock, I could have used my old in-line reamer from my old kit. This go-around I am going to get a new adjustable reamer so I can size the bushing bore to the new pin diameters. I'm not going to worry about the pin hardness, it will be working against the bronze bushing. The new Kingpins are round, T.I.R. is less than .ooo5" so roundness is fine. Torpedo, I wouldn't do anything to the spindle. My aftermarket split bushings pulled in ok, and it took a bit of pressure to install them. The new adjustable reamer should work fine to size them to the new Kingpins. Now that I am this far into it, I think everything is going to be ok using the replacement kit. Hang in there! -
Thinking of purchasing a front suspension rebuild kit
'41 Fat Bottom Girl replied to D35 Torpedo's topic in P15-D24 Forum
Looking at the kit parts from AB now and seeing more differences. The old Kingpins mic at .793 O.D. The new pins mic at .799 O.D. The original Kingpins are hardened, ground steel and the replacement parts are untreated steel, but looked better once I hit it with fine emery cloth, but certainly not ground or as smooth a finish. My old kingpins aren't useable as they have scoring, and I haven't been able to locate an NOS kit. Looking at the dimensions I have with the pin and bushings there is no question that I will have to ream the bushings by .003" to .004" so I may have to get an adjustable reamer so I can control the bore cut. With some care, I think I can make it work. (Reamer-$100- Grrr.) (I did see on my old kingpins that the top bushing area showed wear whereas the bottoms looked good. I suppose on some cars that's why they used needle bearings instead of a top sleeve bushing, longer wear. On my year Mopars, the 7-passenger car had needle bearing on top, all others bushed.) Good Luck! -
The Kingpin retaining Pin- Staked? Peened?
'41 Fat Bottom Girl replied to '41 Fat Bottom Girl's topic in P15-D24 Forum
Hi, Here is my kingpin kit: Kingpins, bushings, thrust bearings and shims, and new pins. So, all sleeve bushings. No needles.
-
The Kingpin retaining Pin- Staked? Peened?
'41 Fat Bottom Girl replied to '41 Fat Bottom Girl's topic in P15-D24 Forum
Plymouthy, A bicycle crank- yes! that's where I have seen that wedge pin before! That did not come to mind. If I recall, the wedge cut on a bike crank pin is a bit more pronounced than on this Kingpin pin. Now I can put that question in my mind to rest. Thanx! -
The Kingpin retaining Pin- Staked? Peened?
'41 Fat Bottom Girl replied to '41 Fat Bottom Girl's topic in P15-D24 Forum
I was able to get the kingpin out by driving it from the top with a drift. It took a bit of positioning in my big vice so it was supported by the mid-section, but after I got that held solid, repeated whack with a hammer broke it free. The next challenge was getting the old bronze bushings out. I may have to have help pressing new ones in; it's an awkward part for my small press to work easily. But to get things apart for cleanup, I used this old trick-carefully did a hacksaw blade cut along the inside of a bushing and through the bushing wall thickness, taking care not to score the casting. and then using a very small cold chisel to collapse it- and out they go. Waiting for my Kingpin kit, then will find out more about pressing in the new bushings. Good Luck -
The Kingpin retaining Pin- Staked? Peened?
'41 Fat Bottom Girl replied to '41 Fat Bottom Girl's topic in P15-D24 Forum
Thanx, fellas- You were right on about driving the pin from opposite the staked side- came apart nicely. Interesting- my original diameter caliper on both ends of the pin suggesting it was not a tapered drive pin ended up being correct. Getting it out, the pin mics the same diameter both ends- the locking taper is provided by a wedge cut along the side of the pin. That's why what appears to be a constant diameter pin but with only one end staked. Ingenious, really- I'd bet putting a wedge cut on the pin side is less cost than a taper pin and avoids the big challenge- or impossibility- of providing tapered hole bores to accept it. Provides a tight lock on the Kingpin with easy dimensional control of the diameters. Nice!
-
The Kingpin retaining Pin- Staked? Peened?
'41 Fat Bottom Girl replied to '41 Fat Bottom Girl's topic in P15-D24 Forum
Thanx, buddy. Not a good idea to be beating on the wrong end of a taper pin. My D series Shop Manual just instructed me to "Remove the pin". I am really glad I asked. Best -
Thinking of purchasing a front suspension rebuild kit
'41 Fat Bottom Girl replied to D35 Torpedo's topic in P15-D24 Forum
I just saw your posts... after I just wrote one about how the heck do you remove the kingpin retaining Pins? Sure would appreciate it if you would find that one and give me your advice. Thanx, Bruce -
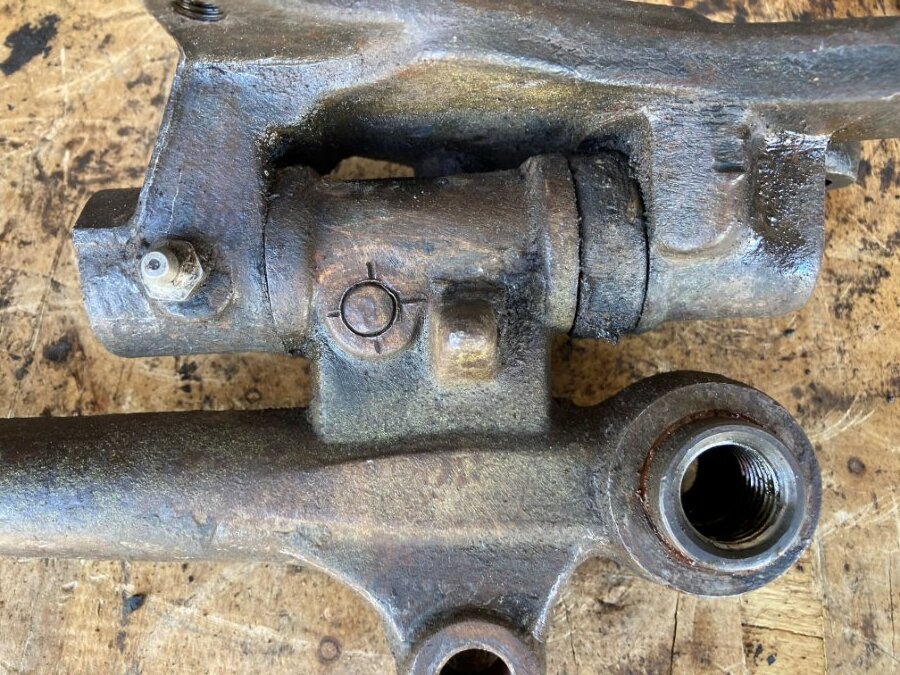
This little journey on my front end rebuild brings a couple questions to mind. Before I start to try removing the retaining Pin for the Kingpin: Curious, the front side looks staked, and both front and backside of the pins top surfaces aren't smooth, as I'd expect with a typical pin end. Almost look peened (?) Photos. I checked (the best I could) the pin diameter with calipers, both sides to see if it might be a taper drive pin, but diameters appear to be the same. I thought I'd best consult with the experts before I went at it blindly and did damage. And- Use a press, or dislodge it with a punch and hammer? Thanx Much.

-
Thanx. Luckily, the rear leaf springs are in great condition, I had them load-checked for equal deflection when I rebuilt the rear end in 2007. Even the outer metal leaf covers were good. New bushings and shackles at the time, so the rears are ok. Sat for 14 years before I got back to it, and only 3,000 miles since on that rear rebuild. Will swap the coils and see the results.
-
Quick update on your webmaster...
'41 Fat Bottom Girl replied to P15-D24's topic in Forum Announcements And Feedback
Replying late, just got back on the site and saw your post. Having had a couple knee replacements I have an idea what you are going through. Hopefully by now the pain is manageable and PT is going well for you. Getting that range of motion back can be tough and a lot of work. Hang in there, and Best Wishes for a complete and speedy recovery. You have been a partner to all of us in keeping our rust on the road, and you are very respected. Thank You!!! Bruce
