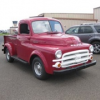
ssdodge51 Posted July 11, 2010 Report Posted July 11, 2010 Here are a few photos of my B3B rebuild. I actually have a 350 and 700R4 installed but don't have photos yet. http://img27.imageshack.us/g/img0247wm.jpg/ Quote
Dave72dt Posted July 11, 2010 Report Posted July 11, 2010 Looks very nice so far, good attention to detail. What did you put on the frame for paint? Quote
ssdodge51 Posted July 12, 2010 Author Report Posted July 12, 2010 Rustoleum, I'm not making a show truck just a good driver. Quote
NiftyFifty Posted July 12, 2010 Report Posted July 12, 2010 Looks like a start...I sorta wish I would have taken the cab off mine, but I couldn't handle any more broken bolts and I'm trying to get this thing ready for my wedding in 4 weeks. DId you paint black or use an undercoating? Quote
dontknowitall Posted July 12, 2010 Report Posted July 12, 2010 always great.. of chassis restoration see my pics..its a long process, specially if you cannot get into the garage for days on end...but then there are days you can and you see progress quick. Quote
ssdodge51 Posted July 12, 2010 Author Report Posted July 12, 2010 I used Black Rustoleum paint, and sprayed it on with my gun. I plan on spraying the bottom of my truck with some type of undercoating. I have replaced the floors from the seat mounting forward due to a few rust problems in the toe boards. I got started on cutting and got carried away and decided to make new floors. A plasma cutter is a dangerous tool:D Quote
HanksB3B Posted July 12, 2010 Report Posted July 12, 2010 (edited) would like to know the specifics of your disc brake conversion. Looks like your boy is enjoying Dad's project. Thanks, Hank Edited October 17, 2010 by HanksB3B Quote
Dan Babb Posted July 12, 2010 Report Posted July 12, 2010 I'd like to see pictures of where & how you mounted the master cylinder since you took out the original transmission & transmission cross-member. Got any pictures of that you can share? Quote
ssdodge51 Posted July 15, 2010 Author Report Posted July 15, 2010 The disc brake conversion was pretty easy, I decided to mount the calipers on the back side of the spindle even though I will have to take the steering loose to remove one of the caliper bolts. That is pretty "low" threat as far as I am concerned because the pads which will last a long time anyway. I also decided to use "streetrod" stainless steel braided front brake lines instead of the ones that were suggested in the kit plans. They look and fit better. I plan on mounting a Chevy truck brake booster and master cylinder on the firewall maybe not pretty but very functional and I will have great brakes, I want to be able to tow and stop my truck and trailer. I also have a 80's Chevy pickup brake pedal that matches the booster/master cylinder I am installing. If anybody is interested, I will post some more photos as I keep the process going. My son is 11 and he is ready to drive it!!!!!! Quote
ssdodge51 Posted July 19, 2010 Author Report Posted July 19, 2010 I have added some additional photos of my project, mostly of the front end and engine install if anybody is interested. The engine is a 350 Chevy, and 700R4 transmission and was really easy to install, plenty of room. Progress has slowed somewhat due to work! Steve http://img27.imageshack.us/g/img0247wm.jpg/ Quote
Dan Babb Posted July 20, 2010 Report Posted July 20, 2010 Did you make that engine mount or buy a 'starter kit' somewhere? Looks nice. I think mine will wind up sitting closer to the front, but won't know for sure until I drop it in there this weekend. Please keep posting up the pics. They really help me out with ideas. Quote
ssdodge51 Posted July 20, 2010 Author Report Posted July 20, 2010 The engine mount came from Summit Racing as well as the transmission mount. With a short style water pump I ended up with almost 2 inches to the original radiator. Quote
ssdodge51 Posted July 31, 2010 Author Report Posted July 31, 2010 I have added some new photos in the following album for your enjoyment or critique as needed. As you can see I am using trailer wiring to go to the rear which will be inside black loom when I get it finished and not visible. I also have my new radiator in my spare mount. http://img251.imageshack.us/g/brakevalve.jpg/ Quote
Dave72dt Posted July 31, 2010 Report Posted July 31, 2010 radiator looks like a custom aluminum. Was it a standard dimension unit with chevy outlets put on? Quote
Dan Babb Posted July 31, 2010 Report Posted July 31, 2010 Do you have some pics of where the transmission mount bolts to your frame? Looking at all that room you have makes me think a small block would have been a whole lot easier than what I'm trying to do. My engine looks like a bbc. Quote
ssdodge51 Posted August 1, 2010 Author Report Posted August 1, 2010 (edited) The radiator was custom made here in Memphis by a shop that builds racing radiators. It is very nice and alot cheaper than what I priced at other places. I took my spare radiator mount and left it with him to build the new one exactly the way I wanted it. I have 5 1/2 inches between the radiator and the water pump pulley. You might notice I have the entire radiator inside the radiator mount. The engine sets low in the frame and I have always planed on using an electric fan. The price was $432 including tax. The transmission mount bolts to the bottom of the frame using a piece of "L" channel I used to weld to the transmission mounting crossmember, it is brain dead simple. You can see the mount and where I attached it to the bottom of the frame on the left side of the attached photo. I have had "0" issues fitting the engine and transmission into the original space. I measured everything about 100 times before I started welding and have put the cab on/off the frame several times making sure everything is OK. The only issue I have is "snaking" the exhaust pipe on the left side around the steering box. I may have a crossover made and solve the problem that way but I plan on putting the frame on my trailer and taking it to the muffler shop next week for some more detailed head scratching and planning. SS Edited August 1, 2010 by ssdodge51 Quote
Dan Babb Posted August 1, 2010 Report Posted August 1, 2010 That radiator looks nice. I'm going to have to do something similar. I'm going to need to move my radiator forward about 4-5 inches. Can you PM me the name of the shop that built yours. I like how you mounted the transmission crossmember. Makes it removeable, so if you have to get it out, it will be a lot easier. Quote
ssdodge51 Posted September 4, 2010 Author Report Posted September 4, 2010 Attached are a few photos of my truck since the last post. I now have the driveshaft completed, all frame wiring, drivetrain installation, and most of the exhaust system complete. Probably will put the cab back on today....hopefully Quote
Dan Babb Posted September 4, 2010 Report Posted September 4, 2010 Looking good. What a/c setup are you running? That's a very nice luxury to have. Looks like you're doing the exhaust similar to how I was thinking about doing it. Run the driver side pipe back under the engine to the passenger side, then to the back. I think I'm going to merge the two into a collector, then just run one pipe to the back though. One suggestion on your setup - the exhaust will have better balance on your setup if you run a pipe between the two before the mufflers to connect them. If you find that in the 2000-2500 rpm range, you have a bit of a drone, doing that will help reduce it. I had that problem with my 68 Camaro and the 'H" pipe made an amazing difference. Quote
ssdodge51 Posted September 4, 2010 Author Report Posted September 4, 2010 The A/C is a Vintage air unit and the Brackets are Alan Grove. I have used Grove brackets on all of my cars, they are strong and easy to install. Quote
Tony_Urwin Posted September 4, 2010 Report Posted September 4, 2010 We like 318, 340, or 360 better than 350 'round here, but that's some real nice work. Please contionue to share your progress with us. Love those photos of your truck! Quote
coW52Dodge Posted September 5, 2010 Report Posted September 5, 2010 Bling - bling!! That looks fantastic! Nice job. I love progress threads. Thanks for posting them. Quote
ssdodge51 Posted September 5, 2010 Author Report Posted September 5, 2010 (edited) Well, all I can say is that I already owned the engine and transmission and a small block chevy will fit in almost anything, very reliable is much cheaper than any other engine combo. The "bling" is left over stuff I bought for other projects that I never used. I didn't want to spend money on stuff that I already owned so I just put it on the engine. I am not really making it into a rod, because most of the chassis is original Dodge just re-built. I like the "look" of the truck setting at the original height and I want a "truck" that I can pull my car trailer and it should do that nicely with modern brakes, automatic and the V-8. You can't see the trans cooler and other towing things I am putting in it to make it a truck, not a show car. My favorite part of the whole deal is figuring out how to make things work, where to put them, etc. As far as non mopar stuff we are talking about parts that don't show unless you open the hood. My experience has been that unless you get around a "motor head" like most of us people don't know the difference anyway. The nice V-8 rumble might give a little indication that everything is not original. With the help of my 11 year old son running the fork lift for me, we got the cab on today, major milestone............. Edited September 5, 2010 by ssdodge51 Quote
ssdodge51 Posted October 17, 2010 Author Report Posted October 17, 2010 Just finished spraying the final coat of "Lizard Skin" inside the cab. The sound deadening stuff is messy and you have to clean the gun almost immediately. The heat coating sprays easier and is not as messy. The difference is significant when it dries, when you tap the body now it has a dull thud sound versus an tinny metal sound. I sprayed it under the dash and cowl and everywhere else I could get the gun into. It is expensive but seems like it will be worth it. Steve Quote

Recommended Posts
Join the conversation
You can post now and register later. If you have an account, sign in now to post with your account.