Search the Community
Showing results for tags 'Speedometer'.
-
Servicing Waltham Speedometers article from Motor Age May 1948 View File Article on servicing Waltham speedometers from Motor Age magazine May 1948. This make may not have been used on Chryslers but the article may contain some useful general information. Submitter JonathanC Submitted 08/02/2022 Category Instructions, Manuals & Templates
-
A while, back there was some discussion on adding a gps to the instruments available. I recently tried a different approach, and just used an old cell phone. My son had several old out-dated android cell phone around. The were the so-called 'smart phones', ie they had a digital touch screen. I took one, charge it up, and after turning it on deleted all his personal data. Then I turned on the internet connection, and it connected with the wireless internet in our home. (you could do this anywhere wireless internet is available. McDonalds, Barnes & Noble, etc). Once connected installed GoogleMaps (it may already be there), and then found some speedometer apps. About a dozen were available for a free download. I just picked one and installed it. Now the phone will display the speed of any vehicle it is in, and you can check your existing speedometer and odometer. It also does not care if you change the tire size or the rear end ratio. It can also be used as a GPS. You can even see how fast you can run!
- 8 replies
-
- speedometer
- odometer
-
(and 2 more)
Tagged with:
-
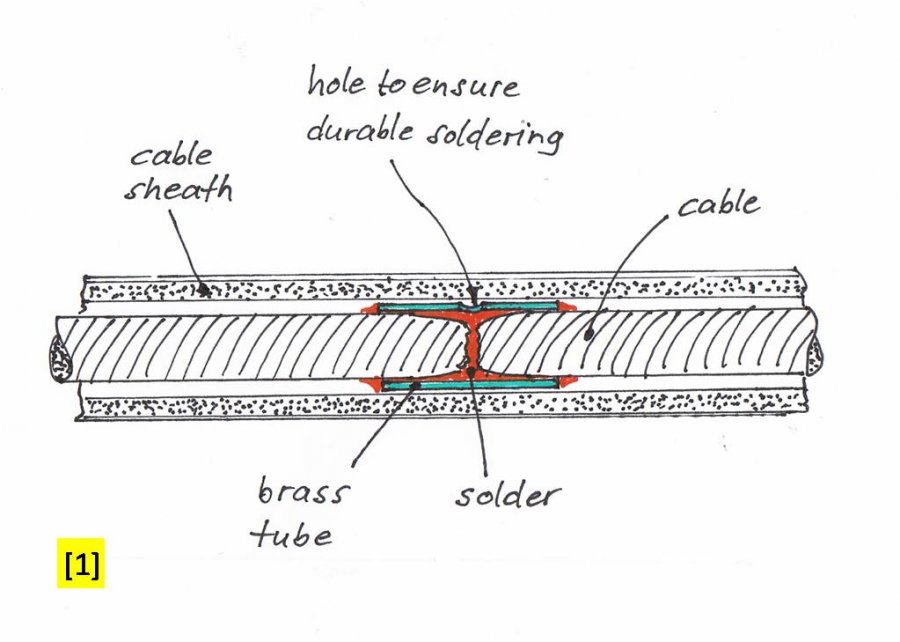
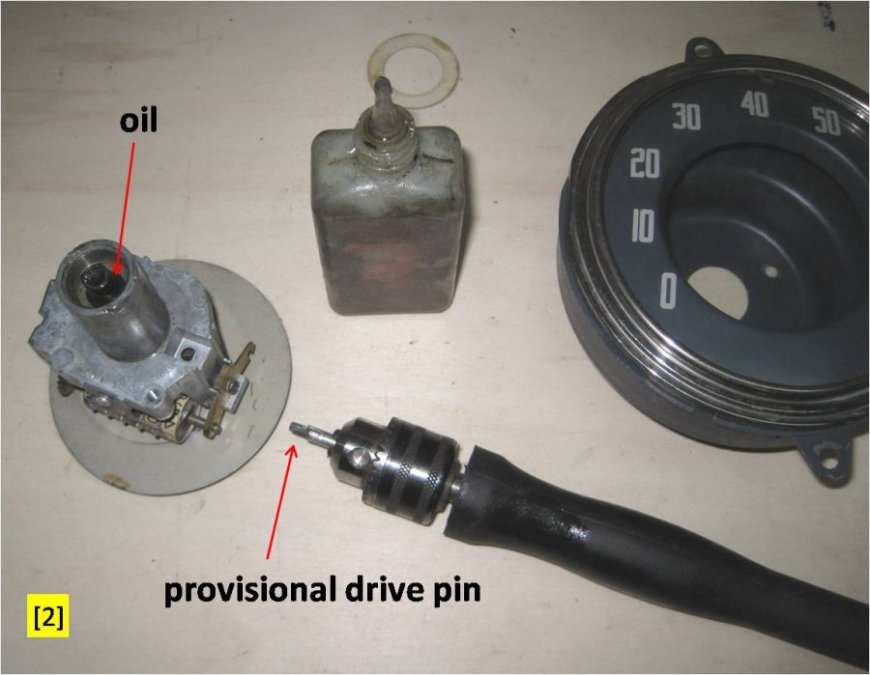
broken speedo cable Just had done a thoroughly maintenance on my truck, did a ride around the block and happy that everything works as it should … what the heck is that ??? The speedo pointer did not a twitch anymore … sh The speedometer cable was broken. Not that big problem if you have a shop with a spare part around. I do not have that and since I was impatient anyway, I checked if the cable can be repaired. Fortunately the inner diameter of the cable sheath is large enough that it is possible to fix the cable with a tube [1]. Installed the cable, did a test. Crack !! ?? Took out the cable, it was broken at the same place. Next attempt, same effect… next attempt, same result. (How many attempts does someone need until the light in the head is on …) Checked then the speedometer mechanism. The drive was completely blocked ! Removed the speedo, let the drive soak with WD40 for some minutes[2]. After that the drive did move already quite passable. Let drip a little precision mechanics oil into the drive (sleeve) and run the speedo with a drilling machine (counterclockwise !) for another 5 minutes [3]. Everything is working well again. Just a recommendation to also check the speedo drive to avoid duplicate (or triple...) effort, or even damage a new cable of which you were glad to get it !
-
I have a 1948 B-1-PW and the speedometer pointer has disconnected from the pointer plate due to shrinkage of the plastic pointer plate. I have a replacement pointer plate and I have removed the existing pointer plate from the speedometer assembly but I can't figure out how to remove the metal center from the pointer plate. Does anyone know how to remove the metal center from the pointer plate? Is it a threaded connection or does it have some type of retainer clip?
-
When I bought the truck it had no speedometer cable, but had speedometer. I have pulled the engine and transmission to clean up and recondition. I cant seem to notice where the speedometer cable bolts into transmission. If anyone can take a picture that would be great.
-
Hello Everybody, I have another riddle on my Dodge. The speedometer seems to show 30% off. If I'm driving 50 mph it only shows 35. Does anybody know if there's a possibility to adjust it? Thank you in advance Kai
- 26 replies
-
- Speedometer
- odometer
-
(and 2 more)
Tagged with:
-
Hello all, as I got here lot's of great tips I maybe have one for you. When I bought my Dodge, the speedometer and clock were really destroyed. The printed surface was deteriorated and also the printed letter of the clock and speedometr face dropped off. When I decide to restore it I tried several ways like screen printing, or find somebody who does this professional but it would all be too complicated or to expancive. As a result I will show the way I did it maybe it helps somebody. At first, I took the old clock face and layed it on the scanner of PC. After scanning I reconstructet the letters in Adobe Illustrator to create vector grafics. I made two layers, one for the white print and one for the black. I gave both files to a printing shop to plot too masking films. Better make two or three of each, you will use them propably. At first pull of release paper and stick foil to the glass. I let the glass cut in a local shop. Markings on the foil help to find the exact position Now pull off transfer foil and paint the letters and stripes. After a few tests I use color for scale models. It adheres better as glass paint, but don't ask me why. Because of the flat surface paint doesn't stick very good to glass, you have to pull of the masking film before color ist completely dry. Sometimes, if the color was too dry or it doesn't stick well to the glass, the edges of some letters are not straight. If you have a second masking film cut out the letters and stick it to the exact position to repaint the edges. If the first color is done, you have to make the black outline. That is even harder because the line is smaller then one Millimeter (sorry for the metric system :-) I found out, that you can't use the complete masking foil to stick over the white because of two reasons. 1. If you pull of the release paper, the masking foil seems to stretch a little bit. It's not much but it's enough that the tin lines won't fit 2. The masking film will rip of the thin white lines. To avoid that I took small pieces of masking film and normal paper and stick it over the thin white lines. Then I took the whole glass and glued it against a window with masking tape. This helps you to position the masking foil for the numbers because when the numbers are still on the transfer foil you really cant't look though it and it's difficult to find the right place. If you're finished, it lookes like that: Now I took black enamel paint for the outlines. Check from the other side if the lines look good and pull off masking foil quick befor color gets too dry. The finished clock face looks pretty nice. On the first look, you can't differ from the original. When I had a closer look to my old one, it wasn't sooooo exact either. Hope this will help others who have the same problem. The background I also made on Illustrator. I printed the pattern on a foil and the golden foil is aluminium foil to make christmas stars from a hobby shop. I layed it on a ripped plastic surface that I found on an old plastic casing and pressed the foil on the plastic with a rubber roll. Then I took glue and sticked it to the foil with the pattern. This really is just a compromise, because the ribbed structure ist not so fine as original and also not so exact, but it's doing it's job. Also the car istn't perfect the clock might ot be perfect too. Here in Germany we have to show Kilometers on speedometer. Normaly you have to glue stickers on the screen. When I was rebuliding the speedometer face I changed the letters into Kilometers :-) I did this to my 42 Dodge an still have the files. If anyone ist interested I could send them the EPS-Files. Hope this helps Kai
- 16 replies
-
- 4
-

-
- clock
- speedometer
- (and 5 more)
-
I took my truck for a short drive yesterday with a chase car to tell me my actual speed. My speedometer was reading 20 mph while I was doing 40. It was reading very slow with the other rear end ratio in my truck too. The needle moves very smooth, with no bouncing or getting caught anywhere. It also appears the odometer is reading ok, but I have not verified that. Anyone have a guess as to why? I wouldn't think it is the cable with how smooth the needle moves.


