


Kai-by-Vecona
-
Posts
130 -
Joined
-
Last visited
-
Days Won
1


-
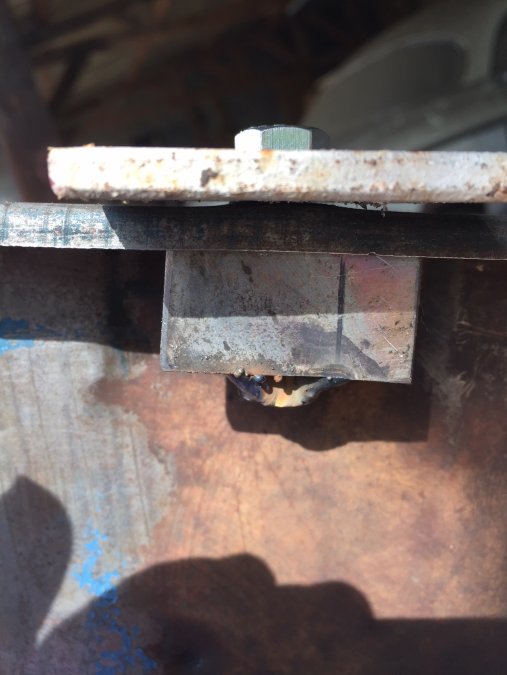
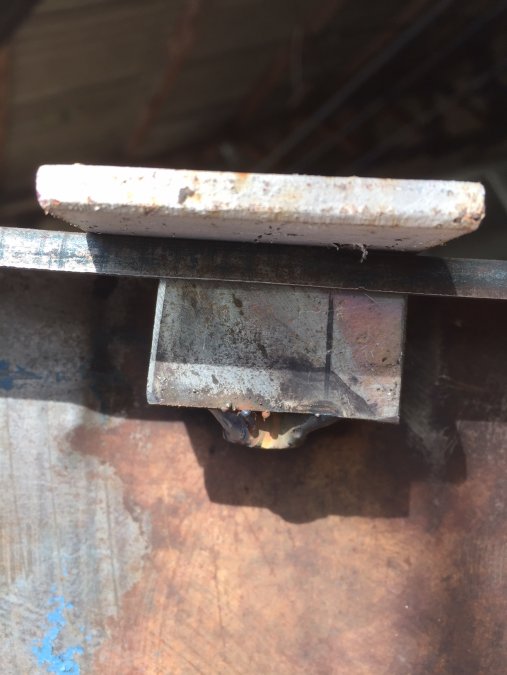
Made me a small tool. Works pretty fine to straighten the pan and not bend the holes in the opposite direction. Installeled the pan with longe allen head screws and it seems not to leak. Thanks for your help Kai
-
Good ideas! Never thought about that before. I'll try !
-
I saw it... have a original shop manual that says not to cut the edges. Thanks for your help and happy easter ? Kai
-
Thanks for sharing your ideas. That was my guess that the pan is overtighten. I try to make it as flat as possble and hope it will seal ... mainly so long until I pass the official inspection ? Thanks and best wishes Kai
-
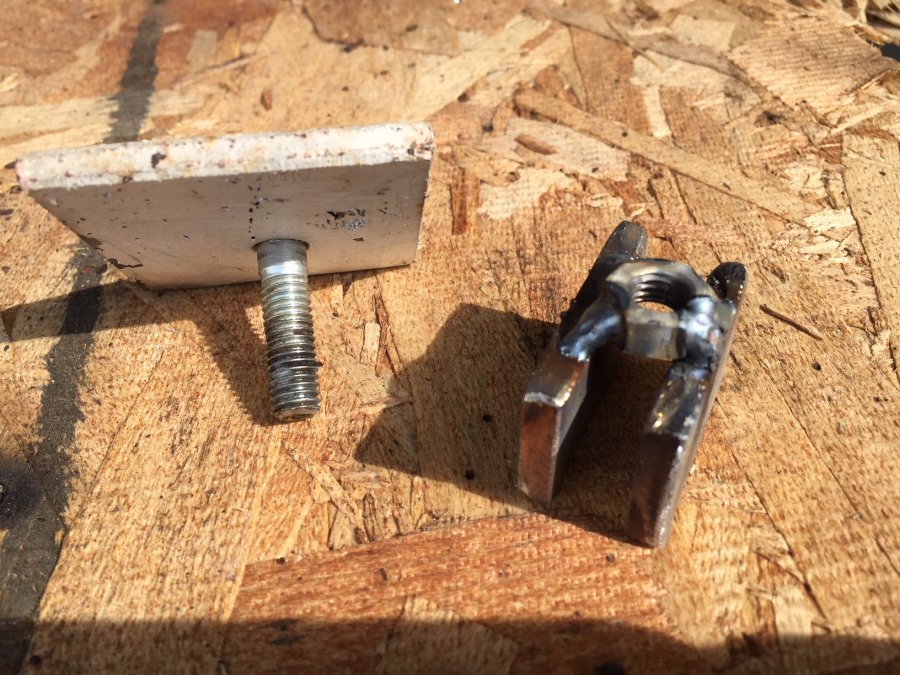
Hi everybody, removed the oil pan of my 42 Coupe last week because it was leaking. Never changed the gasket since I bought the car in 2012 and I guess it was there forever. Normally the surface of the pan should be flat to avoid leaking again but when I put a ruler on it the surface looks like the Rockys. I guess it's pretty unimpossible to find a good new one in Germany so what's your opinion. Should I try to straighten the pan or leave it as it is with enough sealer on the cork gasket? My idea was to built me a U-shaped tool with a thread in the middle to push down the screw holes ... has anybody tried that before or has anybody another idea?
-
The one I used was Made in Germany and it was ok :-) I'm also not a friend of cheap produced parts. There's more worry then fun with them. Before I installed the last gasket I put it on my scanner. I will vectorize it and give it to a friend who ist specialized in laser cutting of paper. Maybe he can make me a hand full of them. I have the feeling, I have to open the carb more often as I wish :-) Kai
-
Ok... Problem solved. I checked the distributor but it was ok so I decided to disassemble the carburator. I did like Jan said and helped with a knife. The gasket is broken but I tried to use it again and there's nothing leaking.... lucky me :-) I changed the gas filter and cut the old one but it doesn't look dirty but when I opend the carburator inside the float chamber was lot's of dirt. I cleaned everything and blow all the holes and valves with air and now it's running fine again. My suspect is the littel piston inside the float chamber for the Fluid Drive. There's no real sealing around it and I guess that there's enough gap that dirt comes into the chamber with the time. Time will show... Hey Jan, good idea with the tetrapack ... I will try that. Was at the Motorworld Classics two weeks ago. If I had knowen that you live in Friedrichshafen we could have met. Maybe next year and thanks to you and everybody for the help Kai
-
Good point!
-
I installed an electronic ignition so this couldn't be the problem
-
Hello Joe hello Lloyd, thanks for your help. I hoped I could avoid opening the carb because it destroys always the main gasket and I didn't find anyone who only sells the main gasket. Always find complet overhaul kits... Or does anybody know anyone? I would buy a 10-pack if I could :-) I let you know if it worked. Try it tomorrow and maybe I'm lucky with the gasket. Thanks again Kai
-
Some days ago I drove a while with the pedal to the floor... so about two minutes. After that, the engine misfires when I go downhill and stalls when I stop. Before that, everything runs fine. I already chekcked the automatic choke but it works properly. Now I think maybe some holes in the carburator maybe stuck with something so the engine gets to much fuel. When I brake with the lieft foot and step a little bit on the gas it also runs fine. Is that a common problem with teh carburator or should I try to dissamble and clean it? Any ideas? Thanks for your help Kai
-

ANSWERED Misfiring because of worn timing chain?
Kai-by-Vecona replied to Kai-by-Vecona's topic in P15-D24 Forum
That was also my idea. I think, this is in my opinion the most obvious reason that the car runs better now. Funny thing is, that I found the bushings at a company providing parts for restoring planes. A pack of ten bushings cost 12 British Pounds :-) So I have still 8 available. If someone wants to have some... just contact me... -
ANSWERED Misfiring because of worn timing chain?
Kai-by-Vecona replied to Kai-by-Vecona's topic in P15-D24 Forum
So....here are the latest results. Made the tune up today and the engine runs pretty well. It was easy to set timing and also the differences in the marker poistions on the damper where nearly nothing. Tested the car on the Autobahn and I run about 15 Miles with steady 75-80 mph. That's far more as before and I think the car never went so fast in it's life. Will have a look how things will go on. Now, the only problem is, that I can't say if it was only the timing chain, because I also installed new bushings in the distributor ( what might not effekt the timing because of the electronic ignition) and installed a NOS vacuum advance (just for fun, because the old was ok) Maybe it was the sum of all the work, .... I don't know. Maybe I just earned some respect of the car and it's running now because it want's to do so :-) But... thanks for all the help. Kai -
ANSWERED Misfiring because of worn timing chain?
Kai-by-Vecona replied to Kai-by-Vecona's topic in P15-D24 Forum
Hello Jeff, when I received the kit it was just the small part. I was wondering myself if this is everything but it worked fine. The grommet is a good idea. I think it's not the best thing when the wires get blank or anything else get's into the distributer. I never thought about the jumper wires. I think you're right that they are not needed when the car has no points anymore. -
ANSWERED Misfiring because of worn timing chain?
Kai-by-Vecona replied to Kai-by-Vecona's topic in P15-D24 Forum
Hi there, had some time yesterday and put everything together. I did it like janan5243 did and the engine is running. Have to tune up engine now because yesterday it was too late but the main thing is that it worked. Enclosed is a picture for Jeff showing the distributor with the electronic ignition element. Will let you know when I did the tune up. Kai
