


JJs 1948
-
Posts
106 -
Joined
-
Last visited
Content Type
Links Directory
Profiles
Articles
Forums
Downloads
Store
Gallery
Blogs
Events
Classifieds
Everything posted by JJs 1948
-
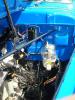
I found the easiest solution for vapor lock was just hold the gas pedal to the floor and push the starter pedal with your left foot. Starts right up everytime after very quick.. I always worried about taking my truck out, even for a casual drive, and now I don't worry about it one bit. So many people make this such a difficult problem when actually it's a simple fix. I do have a heat shield installed on my engine but they don't prevent vapor lock. Try it out. Jeff E.
-
ANSWERED Name That Body Seal!
JJs 1948 replied to Gizzardsniffer's topic in Mopar Flathead Truck Forum
The part you are looking for is called a "cowl seal". I bought some through www.dennis-carpenter.com. The seal he sells is just like the original and really looks and fits well. Go to his website and search for part # 7C-16068. They sell this seal to be used for Ford trucks from 1948-52 but it's also the same material that Dodge used. I hope I can post a picture but having a very hard time with this new forum. Use this part! I have a pair from Roberts that I did not use. Good Luck. -
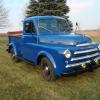
Here is a Jiffy Jet Windshield Washer on my 48 B-1-B. I bought it from Reg Evans. Mostly complete but found everything else needed on eBay. I need to brush up on learning how to post messages and photos again. It's been awhile since my last post. I'll try to put a few more photos of accessoryies that I have on my truck if this post works. Jeff
-
I used the rubber door strip for 48-53 Dodge Truck from clestersauto.com and it worked very well. They do sell just the door strips and not part of another larger kit. No nails, screws, or tacks, just glued it on. Jeff
-
Front Bumper to Frame Attachment
JJs 1948 replied to Barry Maxwell's topic in Mopar Flathead Truck Forum
Barry, The frame is the same from 1948 thru 1951 from everything I have seen here on the forum and the photo of Merle's truck. I'll get the parts out to you next week. I have an out of town wedding to go to this weekend. Once you get the parts you will see how the bumper attaches to the frame. Send a measurement if you want but I should have a pretty good sense of where to cut the pieces off at. I will leave you plenty of metal to work with and keep the shipping cost down too. Should be fine so don't lose anymore sleep. Jeff -
Front Bumper to Frame Attachment
JJs 1948 replied to Barry Maxwell's topic in Mopar Flathead Truck Forum
OK Barry. I'll get the frame parts off next week and shipped to you. Jeff -
Front Bumper to Frame Attachment
JJs 1948 replied to Barry Maxwell's topic in Mopar Flathead Truck Forum
I have a 1948 B-1-B parts truck that I am going to cut up and scrap out. If you want the front frame rails I can send them to you. If you want them, give me the size and they will only cost you the shipping. Jeff -
In Michigan the Ethanol lobby is pushing for a 20% ethanol fuel mixture. This proposal concerns me very much being a Marathon Gas Station owner for the last 19+ years. Much of my fuel dispensing equipment will have to be changed or replaced and the mainenance costs will increase substantially. To sell E-85 fuel takes a complete fuel system to dispence that fuel to the customer.
-
Very nice video Merle. Awhile back I posted a thread on adjusting valves while the engine was running. In my case I was the onlooker while my mechanic friend did the adjustment. Turns out the job is easier than one might expect and is "THE" way to adjust valves on these old flatheads. One of the most important steps to do and which my friend stressed the most was to slow the engine idle speed as slow as possible. I swear with the engine running so slow you could adjust and actually hear the difference in the smoothness of the idle as each valve was adjusted to correct gap. Amazing difference in the overall performance of my engine. I had such an improvement that my truck seemed to get one more gear of top end. I can travel at 55-60 without a problem with a 3.73 rear end. Remember to let the engine warm up completely too. No knuckle burns and we bent the end of our feeler gauge at an angle to avoid the manifold.
-
Hank, Do you still need an oil cap? I have an extra for you no charge. Let me know, Jeff
-
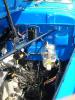
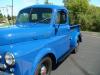
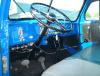
Here are a couple photos of the washer on my truck. Purchased it from Reg. I would be glad to answer any questions. Photo 1 & 2 show the washer jets are in the chrome piece below the windshield divider. Two jets in that piece spray to each side of the windshield. Photo 2 & 3 shows the pump which seemed like the best location that I could figure out but a more experienced member here may know the exact way a dealer would have installed it. One thing I need to do is relocate the foot pump between the clutch and brake pedal as the directions show. See last photo, and I forgot to put the round disc pedal on the foot pump stem in that picture. Hope this helps. Good luck. Jeff

-
Thanks Reg. Which mounting bracket is for the Dodge Trucks? I believe I have the correct smaller horn but would like to see how they were mounted. Thanks again, Jeff Any other photos or factory illustrations would be greatly appreciated from anybody.
-
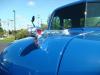
I've seen on the forum dual horns but what was the factory installed set-up as far as size of horns? Merle has a standard horn with the other being about half the lenght. Others have used two standard length horns together. Which one is original to factory specs? I can't find a Dodge factory manuel illustration or photo for the dual horns. I remember seeing on the forum some members truck photos but having trouble finding them. Sure would like to see the official factory pictures. Thanks for any help with this. Jeff
-
What would you make if you could laser cut?
JJs 1948 replied to Olddaddy's topic in Mopar Flathead Truck Forum
Outside mirror brackets so guys don't have to hunt them down forever! -
You have a 4.11 rear carrier?
-
Looks really nice Dave. Gotta like the armrests!! Next summer will be some trips with the truck. Jeff
-
Thanks Jim. I'll give that a try too. Jeff
-
I posted the same question on the car side today and the folks there replied with answers that will work very well to repair a Hull Compass and the types of fluid to use. Check it out. Good luck. Jeff
-
Thanks for the great information guys and the quick response. My google skills need to improve. Nice link Frankie47. This forum search should be a quick answer for all those interested in fixing their compass. Jeff
-
Would someone know what type of fluid was used in the old compasses? I am fixing a Hull Compass and have tried mineral oil but it is too thick. Searched the forum and could not find an answer. Any help would be appreciated. Thank you. Jeff
-
Does anyone know what type of fluid was used in the old car compasses. I am fixing a Hull compass and found that mineral oil is too thick. Do I dilute the mineral oil with something else or what would be another fluid to use? I have searched the forum but didn't find where someone restored a compass. Thanks for any info. Jeff
-
Get some floor-dry (looks like cat litter) from an auto or farm supply store and soak up that gas. Should dry it up in a short time and sweep it out of your shop. If you can push your truck outside or over a floor drain, flush the gas tank out thru the filler pipe with a water hose and dish soap. After your tank is off you can take it in to a radiator repair shop for a good cleaning and leak test or do what you like. I have shipped several gas tanks for repair and this method was recomended to me by the repair shops. Good luck.
-
George, The decals came with the truck but I believe the previous owner bought them from Roberts.
-
Dave, I found the fresh air duct on Ebay last fall. I had enough left over and Charles Furman bought it. I bought it for a good price, if memory serves me correctly, for about $30. The duct was reproduction that was made sometime in the 60-70's. I sent the original box to Charles and he might still have it to get a name from it. What ever I paid I just split the cost for the left over duct. Maybe someone else has some.
-
Adjusting valves with engine running
JJs 1948 replied to JJs 1948's topic in Mopar Flathead Truck Forum
Thanks grey beard. Pulling the inner fender was probably easier for me with my truck having been just put back together with new paint and nuts and bolts. Wish I had a video of the adjusting job and knew how to post it on the forum. One nice tool his father had, which he doesn't have, was a set of feeler gauges that had a set on each end of a long handle. Your hand was away from the hot manifold. This type of feeler gauge was more common for working on the flat head engines during that time.


