


dgrinnan
-
Posts
372 -
Joined
-
Last visited
-
Days Won
4
Everything posted by dgrinnan
-
My goal is to get my current flathead running. I posted the question thinking ahead just in case it has a major issue once I fire it up. Been sitting for 15-20 years.
-
 I am trying to start a truck that has not been started for years. I have installed a new wiring harness, new voltage regulator, new points, new condenser, new coil, new rotor and plugs. I get 6.53 volts to the distributor coming from the distributor to the wiring terminal on the outside of the distributor. With the key turned on if I open the points I get a spark. New gas tank, fuel line and fuel pump. Just from cranking the engine it has pumped gas up to the carburetor. I know I am getting fuel. I have also given it multiple shots of starting fluid. When I try starting the vehicle it acts as if it is not getting any fire. I have seen diagrams from different sources and they show the cylinders number different. They also show the cylinder numbers in the distributor in different positions. The attached picture is from a 1941-1947 Dodge_W_Series Truck Manual. My interpretation is if you are standing on the driver side of the vehicle looking at the engine It shows the number one cylinder at the front of the engine and the number one terminal in the distributor at 8 o'clock progressing to number 6 at the rear of the engine. This is opposite to what I have seen in other sources. It's also a completely different position in the distributor for each of the cylinders than other sources. Can someone confirm this is correct or post a correct diagram showing the correct cylinder location and distributor cylinder location? This giving me a firing order of 1, 5, 3, 6, 2, 4 but I am not sure what is marked as number one on the distributor is accurate. If not, number one is not getting spark when it is suppose to.
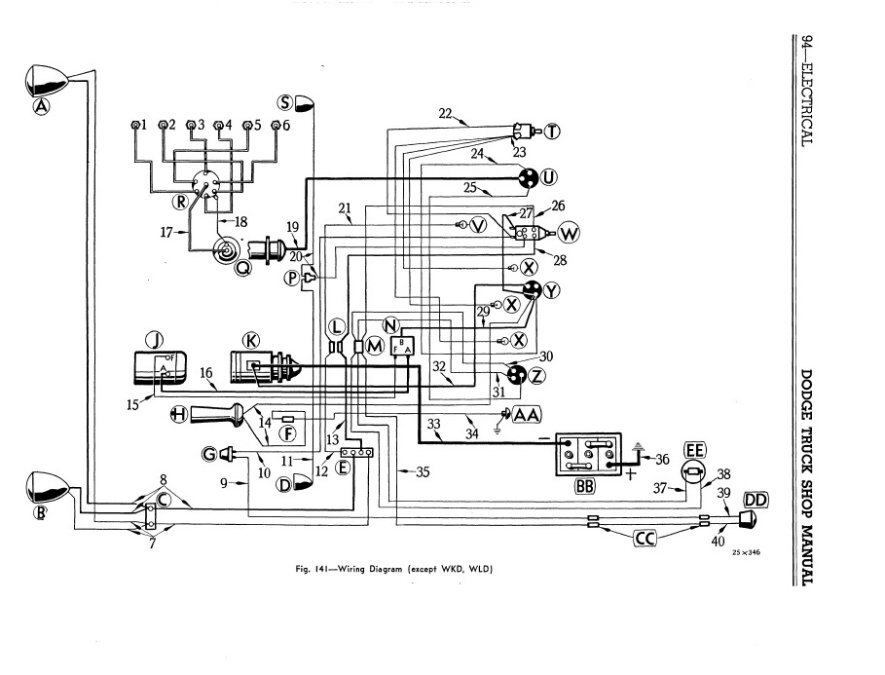
-
Just a follow up. It took some real finger dexterity but I was able to get the cable attached and once it was on it did have clearance from the emergency brake bracket. Close but it clears it.
-
If you have any computer skills, picture software and a printer you can make your own decals. Scan your best speedometer face. Use the image software to clean it up and make it darker. You can print your own decals. Any office supply store sells sticker paper that will work in your at home printer. I printed my own speedometer decal for my 47 WC because I could not find any ready made. They turned out great. I could only find them for later years. It took me 30 minutes and a pack of sticker paper is about $5-$8.
-
Have any of you replaced the flat head six in your 47 WC 1/2 ton? I am not looking for some high horse power conversion, just wonder what engine swaps you might have done. What matching standard shift transmission did you use.
-
Thanks. that is what I needed. I am staying positive ground.
-
Yes, that is the original style coil. I am replacing it with a traditional coil. Not sure what you mean by polarity is what you make it. The new coil is clearly marked with a + and - terminal. Which one should I connect the anti tamper lead to. The + or - terminal on the new coil or does it even make a difference?
-
This should be something I know but I want to confirm. I am replacing the old style through the firewall coil. It has a terminal on the bottom inside the cab and a terminal inside the engine compartment on the top of the coil. the new 6v coil has both terminals on top of the coil. One marked + and the other -. Should the power source coming from the ignition switch that had been attached to the terminal on the bottom of the old coil go to the + or - terminal on the new coil. The whole positive ground thing still throws me off a little bit. Is there a way to test the old coil? Resistance through terminals or ?????
-
I have it routed to the transmission. Now I can't connect the cable. The bracket for the emergency brake is in front of the cable connection. I think if I remove the emergency brake bracket I can connect the cable. It appears there is enough clearance once the cable is connected to reinstall the brake bracket. From the angle in the pic it doesn't look like it but the bracket is in front of the lower portion of the cable connection.
-
I am ready to re-install the speedometer in the dash. What is the path for the cable. Does it go through the firewall and then down under the floor to the trnasmission? What route. Do I cross over the engine along the firewall to get to the passendger side and then drop down or do I drop down the firewall on the driver side and cross over to the pseenger side to connect the cable? Is this the speedometer cable and the correct spot to pass through the firwall?

-
Thanks. I will have to take care of that before I hook things up.
-
Thanks JB. I have a brand new speedometer cable so hopefully the seal is good.
-
Thanks Ed. Boody, thanks for the pic. I probably would of looked at that thing a dozen times before figuring out that was the connection.
-
What would it be for and do you know if they are available aftermarket or do I need to track down an original replacement? Draining coolant?
-
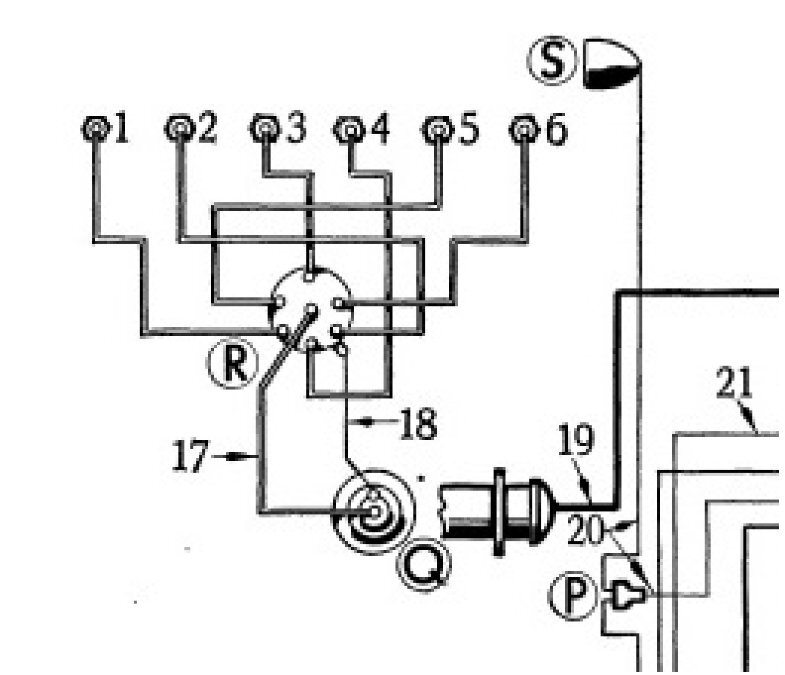
I have what appears to be some sort of fitting sticking out from the drive side of my 47 218 engine. Any ideas what it is?

-
Does anyone know where I am suppose to connect the speedometer cable on my 47 WC 3 speed transmission? I don't see a fitting on either side or the top.

-
I have given up finding the correct fitting. I ordered the McMaster ferrule and will also try David A.'s approach. The McMaster ferrule screwed in about 3/4 of the way before it started to bind because of the difference in thread count. The die I ordered is due to be delivered today. I will know more after it arrives. UPDATE: I just received the 27 thread die and cut the threads on the McMaster fitting. Easy to do and the fitting now threads into the oil gauge with ease. This is a simple fix.
-
I tried an oil pressure line kit from AutoZone. The compression adapter had the same diameter but had the wrong thread. They looked the same but it would not thread into the gauge. I have a flare fitting that is the correct size and thread. I am taking it to a plumbing supply supplier Monday to see if they have something that matches it. If I find a solution I will post for the group.
-
I think the original oil pressure gauge for my 1947 WC is okay but the line from the gauge to the engine is missing. At first I thought it was a flare fitting at the back of the oil guage but when I tried t install a new line I realized the threads only went about half way and it actuall was not a flare connection. Does anyone know what type of connection is at the back of the oil gauge? I was able to adapt a new tempurature gauge from a 47 Chevy truck into the dodge instrument cluster. I was hoping to salvage the oil gauge but now I don't know. No one has an after market replacement and rebuilt ones are hundreds of dollars.
-
1947 Dodge Truck speedometer decals
dgrinnan replied to dgrinnan's topic in Mopar Flathead Truck Forum
Yes, my lens has the numbers and it is in good shape. The background has the tick marks that display between the numbers. That is what I am hoping to find a decal for. I guess I could try scanning the dial and photo shopping the background to darken the color. It is not in horrible shape if I can find something.
-
I ordered the replacement disc from DCM. Here is my problem. How do I get the little center hub loose so I can place it on the new clear disc? It appears to be pressed on.

-
I need to freshen up my speedometer face on my 1947 WC 1/2 ton. DCM sells decals for 48 and later but not for a 47. Options 1) Speedometer face decal 2) Complete decal set for all gauges 3) Pattern for the Speedometer. I can print the decal myself if I had the pattern 4) Suggestions for another solution?
-
Just out of curiosity. I notice the sort of aqua blue paint on the interior of the housing. Both mine and the pictures of ones I have seen for sale. I wonder if that aqua blue has some phosphorescence properties to reflect the back light when the lights are on. Sort of like the old watch dials.
-
That worked. Old disc popped off. I have a replacement along with some other parts in my DCM shopping cart. I just hope it goes back together just as easy.
-
You just pull the disc off the shaft with gentle pressure? I was afraid to try. I am afraid of damaging the delicate mechanism pulling on the shaft.
