Loren
-
Posts
816 -
Joined
-
Last visited
-
Days Won
16
Everything posted by Loren
-

1949 Plymouth 3 passenger Coupe rear window gasket replacement
Loren replied to Loren's topic in P15-D24 Forum
An update: I just finished doing the windshield. That is a two person job even with the suction cup tools. Not hard just takes too many hands. If the car is a Deluxe it goes in from the inside, unlike the Special Deluxe models with the chrome trim. My final thoughts on the matter are the Steele rubber gaskets are very expensive but they work! If you buy a car look at window gaskets very carefully and factor in the cost of replacing 75+ year old window gaskets. You’ll have about $550 in parts solvent & sealer, $80 in tools and $175 in flat glass. If changing gaskets is not in your budget right now you can buy a box of 3M strip caulk to fill and seal any gaps for about $35. Just remember you have to clean any stickum you use now off the window and the body when you change the gasket later. -
The Plymouth club president Russell Nardi, who makes the T-5 adaptor has an axle mounted disc parking brake available now. He has blitzed facebook with ads for it, so I am surprised no one has mentioned it before. While I don’t like the T-5 ( if you have to have one, his adapter is very good ) I do like his E brake set up. I used to have big long arguments with my Dad over “Needs vs Wants”. It was more about philosophy than engineering. He’d say I want this or that on my car and I’d say, “You don’t need that, there’s a better place for your money over here.” He had his dreams but I had the car that ran. I don’t think I won the argument though, because he’d get so angry I had to let him have the last word. In the end one should do what they want. This is a hobby after all and it’s supposed to be fun. Being a cheapskate I hate to see people spend time and money on stuff that won’t do what they want or need.
-
Plymouth Automatic Overdrive R10-G1 It is basically the Plymouth 3 speed transmission with a Borg-Warner Overdrive unit attached. The Overdrive adds an automatic forth gear which lowers engine rpm 30%, thus the higher speed. If the driver seeks to pass, it downshifts automatically and when the driver lifts the gas pedal it upshifts automatically. One of the features is “Freewheeling” which allows the car to coast without putting the transmission in neutral. The Overdrive was conceived as a gas saver. Freewheeling has the added feature of better road holding on slick roads. If you detect a skid you let off the throttle and the car has a much better chance to right itself. Overdrive was offered ( finally ) in May 1952 and can be retrofitted back to 1940 models. The one in the photo has just been gone through with the one year only ( 1940 ) gear set which is the only optional gear ratio for the Plymouth transmission. Since you aren’t changing the rear axle, that is still an option if you upgrade the engine with say a 230 crank and rods. The original Overdrive cars came with 4.1 to 1 final drive ratios which mean they were still 55 mph cars. The standard transmission cars had 3.9 or 3.73 final drive gears, which makes them 65 or 70 mph cars with the addition of the Overdrive. The next optional gear ratio is 3.54 to 1, which was used in the V8 automatic transmission cars up to 1956. Since the Overdrive transmission is a factory produced modification that was available from the dealer the purists ( like me ) appreciate them greatly. Installed correctly they will give the same long service of the standard transmission and use much of the same parts. I think it’s lot of work to change rear axles from other cars or trucks. Changing to an Overdrive is much easier, plus I see nothing wrong with the original axle. The Plymouth axle is a 3rd member type so to change ratios you simply change the 3rd member. Which is much easier to service than the integral type. To check on your current ratio look for the ratio stamped into the housing under the fill plug.
-
Simplify your life, get one of these. Bolts right in, uses the same speedometer gear as your old transmission and it was a factory retrofit. Won't hurt the value of your car. Turns a 55 mph car into a 70 mph car and won't hurt the charm of your car.

-
1949 Plymouth 3 passenger Coupe rear window gasket replacement
Loren posted a topic in P15-D24 Forum
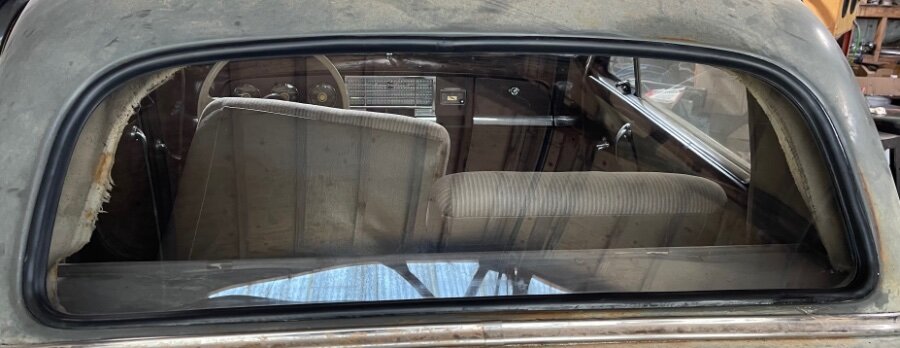
Talk about monkey and football routines! I checked three shop manuals and they don't mention the Business Coupe rear window installation. What had me a little confused is that because the Coupe doesn't have a window surround ( it's part of the gasket ) to hold the headliner, the window and gasket are installed from the inside. On the rest of the cars it goes in from the outside. With an outside install you have gravity on your side and one person can install the easily. Going from the inside is almost impossible. Just too much juggling to do. I suppose two folks can do it but you might not be friends anymore. After considerable thought about the problem I came up with a solution ( beside hiring a glass guy to do it which is a good way to go ). I got an 8 inch vacuum cup with a gauge and pump built in and a set of suction cup with a plastic bridge to hold the window while you get it started. The cheap suction cup/bridge pieces will hold their suction just long enough for you to put two pieces of Gaffer's Tape over them. Gaffer's Tape is used any place you might use Duct Tape but it is so much better. The mastic doesn't make a mess ( it comes off with the tape and holds better ). However they are the key tool. The Vacuum cup gives you a handle to hold the glass and push it if you have too. You should also have a radiator hose removal hook. When I started in auto repair I struggled and almost quit the trade until I found that tool. So it is a "Must Have". The photos should show how it's done without explanation.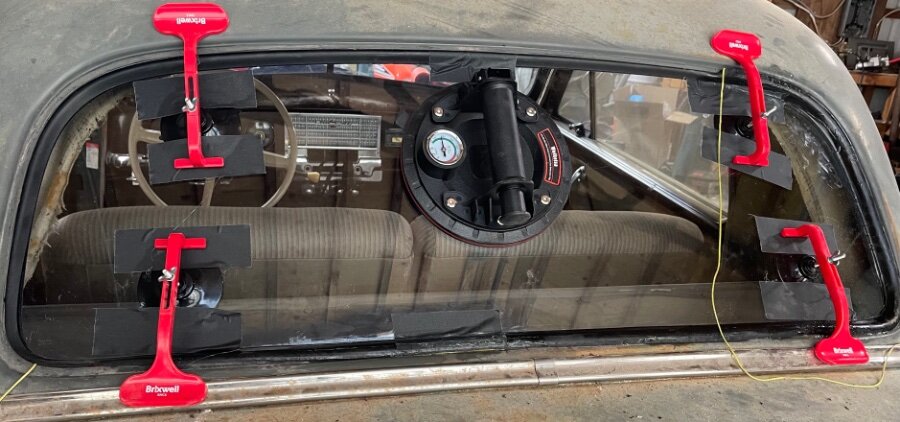
-
The spec is for an obsolete gear lube GL1. You can use a modern lube such as Redline MTL. The latest specs are for LOW Viscosity lube. Low Viscosity lubes run cooler. NO more 90wt! To clean the crud out of your new Overdrive, I would drain it and refill with ATF. Drive it a week then drain and refill with Redline MTL. ATF has additives that remove the crud and make the inside Razor Clean. For my own Overdrive I use Redline D6 ATF all the time but it's really expensive. There's two filler plugs on the side, fill them both, then recheck. NEVER use anything with Extreme Pressure additives ( EP ) or Hypoid additives. The statements you hear about lubes attacking the metals in the Overdrive are just non-sense. The real reason is the Sprag Clutch ( otherwise known as a One-Way Clutch or Freewheel Clutch ) EP or Hypoid additives will make it slip.
-
My 49 has a 6 volt Delta Mark Ten CD ignition and it works perfectly. The way the ignition interrupt works is to ground the spark. Since the spark is going to the ground away your ignition doesn’t notice. The purpose of the ignition interrupt is to take the torque off the gears until the solenoid can retract. It happens so fast you can’t hear it from the engine note or feel it.
-
I have a Delta Mark Ten CD ignition ( 6 volt ) and my Overdrive works fine. If you look at the diagram the ignition is only momentarily interrupted by the solenoid through the throttle switch. In operation you’ll never feel it or hear it. All it does is make sure there’s no torque on the drive train so that the solenoid releases. As for a problem for the ignition, remember the spark is going to ground anyway and if it goes to ground before it gets to the spark plug, the engine misses. Engine miss doesn’t hurt the ignition.
-
If you’re on the left coast, in Reno, NV there’s the shop I use. Nevada Speedometer I am a little fuzzy on the address cause you know Reno must be close to hell, close enough you can see Sparks! A local joke sorry.
-
Any time I can support my local speedometer shop I do. They’re swiftly going the way of shoe repair shops. When I have the dash apart the speedo goes in for lube and calibration. The last time it was off by 5 mph! Since that is just outside of the enforcement limit, I think I saved myself a ticket. Cheap “bulb type” temp gauges were about $30 and I have one for when the stock one is sent out for repair. The cost of repair is really spendy! If I remember it was $300! However the shop replaced everything from the cylinder head to the back of the gauge, so there were no weak spots or unseen cracks. The last one I had done was a while ago so your mileage may vary. It’s hard to compare the cheap replacements with the cost of a repaired original, I know.
-
There are some aftermarket king pin kits with an oversize bushing to replace the upper bearing. It could be this car has 11 or 12 inch brakes. A swap that I have done on my Plymouths ( I’ve only done the 12 Chrysler Windsor brakes so I don’t know about the 11s ). It shouldn’t be a problem changing to the bushings. Honestly the needle bearings I have dealt with were a pain in the neck. Brand new ones in a box ( decades old ) were so stuck they spend a lot of time in the heated ultrasonic cleaner to get them loose. I can imagine what old installed ones could be like. Plymouths are light and really won’t benefit much by using the needle bearings. There’s a reason they aren’t made anymore.
-
I am working on a set of 52 Suburban tails right now. It’s well known the chrome was not very durable during the Korean War because of material shortages. The chrome was all pitted and just plain awful so I bead blasted the remainder off and the pits went from cheese grater depth to just bumpy and rough. Funny thing about blasting chrome, it lights up. I studied how to fill the pits and it ranges from multiple coats of primer, epoxy fillers with aluminum powder in it, to finally a cadmium/tin soldering system from Muggy Weld. The epoxy stuff doesn’t like repeated heat curing cycles and the chrome powder coat is dependent on three separate coatings or more. The Muggy Weld solder can be plated so if powder coating doesn’t work out, I suppose it could be stripped off and plated later. The idea of trying to remove an epoxy repair doesn’t sound like fun. The powder coat cures at 400 degrees but the Muggy Weld melts at 350 yet they say once it cools it can be powder coated. Of course I am thinking lead based solder and not an alloy that takes on the characteristics of the base metal. To get it to work you use a flux and you have to grind out the pits and sand the rest just before soldering, because pot metal oxidizes so fast. Which to my mind means you can only do small spots at one time. It files and sands very nicely and can be used to join two pieces together. In my mad mind this sounds like the right direction to take. More to come
-
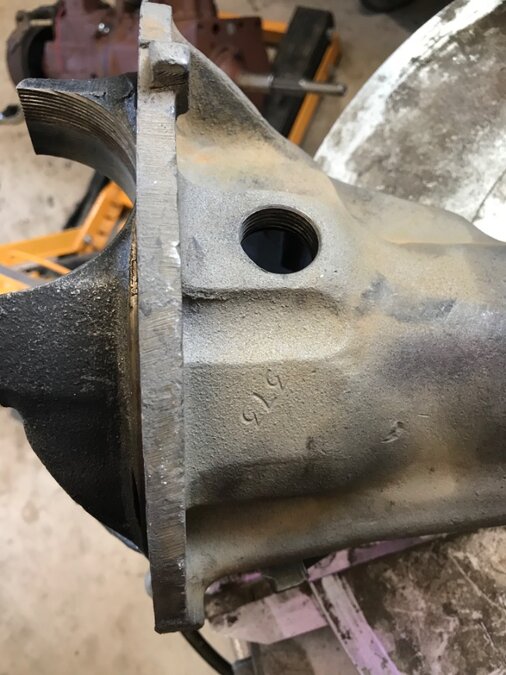
If you look on the side of the differential carrier on the flat under the fill plug you will see a number stamped on it. Your Chrysler probably has the number 3.9 stamped there. That is a 3.90 to 1 ratio. Your modern tire size is probably 225/75r15. Pictured is a 3.73 such as is probably in your 49 Coupe. ( that’s what came in mine )

-
There’s a few things that are subtile. Keys must always be pulled in such a way that there is no side thrust on the key. To illustrate, if you put the key pointing up you must pry at 6 o’clock or 12 o’clock. Never at 9 or 3 o’clock. ( this is for straight shafts. Hubs tapered and keyed but the side thrust rule still applies ) Now any puller you use on hubs must attach with the lug bolts and the heavier the puller the better. If one of the legs is damaged make certain it doesn’t pull against the key, if it does it will bind and you’ll never get it off. If you buy a puller it is best to get a heavy one. The more heft the better. The one in the video above is a Snap-On Blue Point brand. They are good and are only found on eBay used. The one I have is very good too. It usually takes two licks with a 3 1/2 lbs. engineer’s hammer ( aka BFH ). Any puller lighter than those and you’ll be hammering all day. At bottom of the photo is the piece you hammer on to tighten the puller. You can tap on the puller screw to set the puller as well but most of the hammering is on hammer piece. I have heated hubs, I have drenched them in penetrant oils and the one thing I have found that works is the right puller. Get the right puller and the job is a pleasure to do. I’ll never get rid of my tapered and keyed axles because I have the right tool.

-
The Solenoid and the relay are voltage specific. All the switches and governor are the same.
-
I saw an old friend of mine the other day and he told me of a car that another guy had done major surgery to and could not get the low beam head lights to work. Nothing the guy tried would get them on, so he drove with high beams on for a couple years! My buddy borrowed the car and in a short period decided that high beams were not the way to drive at night so he had a look. He discovered that both low beams had burned out. This case reminded me of a lesson I learned 40 years ago to find electrical problems. It's called the split half method and it works like this: DC electric power goes from the battery to the load and then back to the battery. Now there could be many stops along the way like switches and fuses but it always starts and ends at the battery. The split half refer to the quickest way to find the problem. You divide the circuit into two halves. You start at the load, if you have no power to the load then the problem is from the load to the battery. If you don't have power then you divide the circuit again and halfway will likely be the switch. If the switch has continuity when closed but no power then the problem lies between the switch and the battery. Divide the circuit again and that will probably be a fuse. Anyway you get the idea. A shotgun approach is a waste of time. With electrical problems you have to be methodical to be fast! Yes, most electrical issues are bad grounds because "rust never sleeps" and you might think starting at the ground is the quickest way to repair and you'd be right. However if you are going to look at the ground side of things, start at the load and go back to the battery. If our friend had done that he need not have gone any farther because he was right there. Mechanics is not art, it is science. Don't get overwhelmed by what looks like a confusing nest of wires.
-
Your points are well taken. I live on the coast and everything gets coated in briney dew. So all steel gets the worst treatment even in the garage. Ornamental chrome is I think a lost art. When every car had a chrome bumper the repair work was pretty good now days not so much. When I was in the machine shop business we used a lot of hard chrome plating so I am well aware of the problem filling pits and dings. While the local governments have tried to chase the aircraft industry out of the L.A. area there are still a couple of industrial chrome shops I would use there. Ornamental chrome is another matter however. That’s why I was interested in the powder coat process. You can get a set up for a very low price from Harbor Freight and when you start looking at the media prices it’s an eye opener. I guess it follows if spray paint is expensive powder coat media will be too. Realistically speaking you are always better off having professionals do this kind of work, but if you lose your go to guy what are you going to do? I have a powder coat shop within sight of my shop and they have tripled their prices, won’t give quotes and the work quality has gone down…so we don’t use them anymore. In frustration you start considering diy.
-
I was at a friend’s shop and he showed me a BMW motorcycle part he had powder coated in a chrome-like color. He said the steel parts rust too quick when they are chrome plated but this powder coating is cheaper and lasts longer. Polished stainless looks better and real chrome does too but this seams like a real alternative for a driver quality car. If all you have are rusty pitted bumpers on your daily driver this might be a sensible alternative to chrome plating. That said I have to tell you even powder coating will rust in time. It seems there is nothing permanent, except a government program. lol Harbor Freight and Eastwood have powder coating kits for small stuff. A bumper might be too big for the DIY folks.
-
I just re-engineered my kick down switch and when I tested it, I tested the adjustment of the switch not the entire circuit. I used an ohm meter to tell me when one set of contacts broke and the other made a connection. The whole idea of ignition interrupter is to take pressure off the drive train so the solenoid can act and when it does the ignition is restored. In operation you should not feel a thing.
-
I made a minor discovery today. The thread on the lid of the Master Cylinder is the same as the end cap where brake lines screw in. Which means if you want to put a remote reservoir on the firewall say, it’s easily done if you have an old master cylinder rusting away in your junk pile. The end cap has two holes for the front and rear circuits. It will screw right into the top and then you have a ready made adaptor for remote reservoir. When you hook everything up you can use a plug in the extra hole to purge the air from the master’s reservoir. I am putting in my VH44 power brake booster and figured this out because the end cap has two holes and I only need one for the booster signal, I have to plug one of them. I chucked an old rusty cylinder in my vise and removed the end cap with an 1 1/2 inch socket and an impact wrench. Cleaned and took it to my NAPA store for the plugs. ( 3/16 ths double flare is the size ) Once back at the shop I was curious to see if it would thread into the fill cap opening and it does. eBay has a cheap VW remote reservoir for $13 which will work very nicely. So Wednesday I will go back and terrorize the NAPA folks again for more fittings. I love it when a plan comes to gather!
-
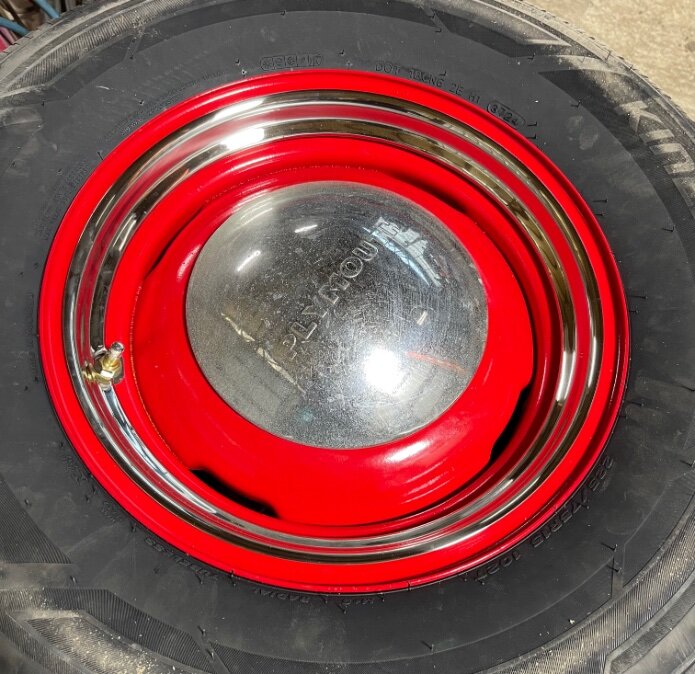
In 1949 red rims and trim rings were the bad boy Mags of the day! I have photos of even foreign cars having red rims and trim rings. Unfortunately I am old enough to remember that.
-
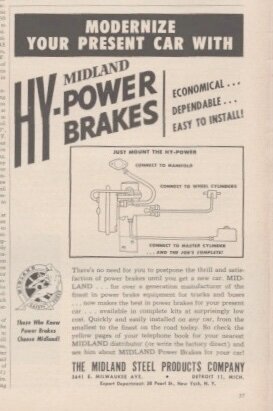
I bought some early 50s car magazines and this ad popped out at me. The plan is to get my parts book out, copy the pages for the Chryslers with this kind of Power Brake unit and see how close I can come. There's a sign on a building near my storage that says a Power Brake Booster rebuild outfit occupies the building. I am thinking I will stop by and get educated on remote PB boosters.
-
WWW.oldmoparts.com = Andy Bernbaum = AB The trim rings I think are pretty nice. They are thin stainless steel so they are easy to put on. $41 each. They sell the clips at a hefty $3 each but they don’t sell the rivets. I got the rivets from my local lumber yard who has two isles of Hillman fasteners which I have seen many places such as True Value, Do it best, Ace and Tractor Supply. The rivets are “4 lbs. Tinner’s rivets” they are just barely big enough in diameter and length. You have to be careful when you set them. I used a big bolt as a buck that happened to be the right size, a long 3/8 diameter punch and a BFH ( about 3 1/2 lbs engineer’s hammer ). I set the wheel on the floor and slid the bolt under the clip and rivet. If the buck is a wee bit longer than the distance between the floor and the rivet it will hold everything in place. The BFH is required because you’ll be pounding and messing up the rivets for hours with a little hammer.
-
These were the caps on the 49 when I got it. “PLYMOUTH” is raised on these while I seen it indented on others.