

.jpg.70ad42aba0cfc865ed90fc3c3f5be0d5.jpg)
harmony
-
Posts
892 -
Joined
-
Last visited
-
Days Won
2
Recent Profile Visitors
9,562 profile views


-
.thumb.jpg.d599d4c13e08899474e0348bd9baed3b.jpg)
rear axle seals and bearing replaced on my '47 Plymouth
harmony replied to sjaakslinger's topic in P15-D24 Forum
I had the same experience with that spring in the seal popping out. I posted a topic on that some time ago on here. I got lucky and just as I was about to slide in the axle I spotted something shinny in the differential tube there that confused me. Sure enough it was that spring. Wow! what a job getting it back in to the seal. On the other side, before driving in the seal, I coated the spring with Lucas Red & Tacky and then in addition I also wrapped tape from the inside of the seal to the outside of the seal in about 4 places to make sure it wouldn't want to pop out. -
Is 1940 powerwagon windshield frame same as Fargo?
harmony replied to harmony's topic in Mopar Flathead Truck Forum
Yes it's amazing stuff isn't it. I also used the 1111 on the steel hull I mentioned. It seems to be the "basic" go to product line of Belzona. But for gaps or fill areas up to 1/4", they seem to recommend the 1311. They have lots of choices, in the 1000 series alone not to mention all the other series that they make as well as other repair type products too. I think the 1111 is the most economical choice if you can even refer to it as economical. I got lucky and ran into a sales rep at a shipyard one day and he was nice enough to come out to my shop and after a little discussion he sold me the 2 part tubs of 1111. It's available on Amazon but I'm guessing it would be more economical somewhere else. But marine Chandleries don't stock it. They have headquarters all around the world. In the US headquarters are in Flordia and in Canada headquarters are in Ontario. Perhaps Acklands Grainger carries the 1000 series. But the store near me sells only wholesale, so I've never called them. It's been well over a decade since I ran into that sales rep, and I've lost his business card. He was out of Vancouver. -
Is 1940 powerwagon windshield frame same as Fargo?
harmony replied to harmony's topic in Mopar Flathead Truck Forum
I'd be hard pressed to find anything better than Belzona for repairing bad or fatigued steel other than replacement. One use for Belzona is in the marine industry where it's used to repair driveshafts, crankshafts and bearing the size of smart cars etc, on ocean freighters and cruise ships. I've used it to fill divits the size of hockey pucks on a steel hull. Once it's set up, and you put a grinding wheel to it, there is no difference in the sparks between it and the good steel. But as I mentioned earlier, don't expect to find it at the dollar store. That truck is no longer available so I won't get a chance to try it on the windshield frame. -
Granted your car is a bit newer than my '48, so I don't know the routing of your brake lines but on my '48 there is a section of the brake line that is hidden, just forward of the master cylinder that feeds the front brakes. If there are hidden sections of brake line on your car it might be possible that there is a pin hole in the brake line due to corrosion in one of your brake lines.
-
Is 1940 powerwagon windshield frame same as Fargo?
harmony replied to harmony's topic in Mopar Flathead Truck Forum
Good point. I had given some thought to rebuilding the frame but both lower corners are worse than swiss cheese and pretty far gone. Belzona 1311 is pretty incredible stuff but just 2 litres of it is $830 Can. ouch!!. So I'd have to rebuild the lower corners, before pulling out the old glass for replacement. If all failed, a guy could make the windshielf fixed. -
Is 1940 powerwagon windshield frame same as Fargo?
harmony replied to harmony's topic in Mopar Flathead Truck Forum
I couldn't figure out what you meant by "tape" but now after reading the discription in the link Veemoney sent me, I get it now. -
Is 1940 powerwagon windshield frame same as Fargo?
harmony replied to harmony's topic in Mopar Flathead Truck Forum
ohhhhh ok so now I know what I'd be looking for. Very interesting,,,, all except the price. Gulp!! Thanks for that link. -
Is 1940 powerwagon windshield frame same as Fargo?
harmony replied to harmony's topic in Mopar Flathead Truck Forum
I'm also curious about the crank assembly or mechanism for controlling the movement of the window. I can't find any pictures or images or illustrations that show it. I also don't see any bracketry on the frame at the bottom in the centre that the mechanism would attach to in any of the frames I've seen on line. There is nothing on the truck (or the worn out frame) I'm thinking of buying and the owner can't remember if he has it somewhere burried in a box. He hasn't touched the truck in 20 years. -
Is 1940 powerwagon windshield frame same as Fargo?
harmony replied to harmony's topic in Mopar Flathead Truck Forum
This is how the listing is titled, " 1939-1947 Dodge Truck Wc Power Wagon Windshield Frame" so I'm thinking it would fit. I just want to be sure. I'm not paying monster prices for one though. This one is cheap compared to DCM's price. -
I'm thinking about buying a 1940 Fargo but it needs a swing out windshield frame. I found one relatively reasonably priced on ebay but it says it's for a same vintage Powerwagon. So my question is, are the frames the same? The pictures shown seem to indicate that the frames are the same.
-
I went to see the truck and yes there is a lot of rot at the bottom of the door post at the lower hinge, both sides. But I think it can be solved with a spool or 2 of mig wire and a bunch of steel. lol! But the concerning thing is the swing out windshield frame. I think it's beyond repair. Massive rot on both bottom corners on the inside. I did find something "economical" ( key word) on ebay for a replacement frame. The pictures look the same but it says it's for a '39-47' powerwagon. Does anyone know for sure if it is the same frame?
-
Thanks Merle, that's awesome. Thanks for the link too. I'm wondering if there is reference somewhere regarding measurements, besides the wheel base, so I can determine the height and overall length? I have seen drawings for various trucks in the past, just not this one.
-
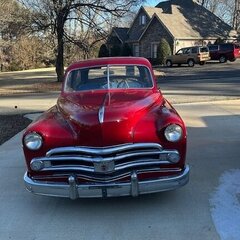
I'm considering purchasing a 1940 Fargo. As the picture indicates, I think the model is FJ1 15. However I haven't been able to find that anywhere in my searching. I believe the FJ1 indicates it's a half ton. But the 15 all by itself confuses me. From my research the 15 indicates it's a long wheelbase (120") maybe. Looks like the serial number is 9554414 maybe. I'm trying to determine how tall it is and how long it is overall. My shop size limits me. I'm guessing the engine is the 201" and I'm curious what the transmission would be. 3 or 4 speed? Synchromesh? It's a bit of a distance away and there is no sense traveling to see it, if it won't fit in my shop. The owner is a little reluctant to grab his tape measure.

-
I agree, very unique. I have no idea that what I read was fact or fiction but they did say that it included a lighter. I believe that the bulk of it was to hold at least a pick of cigarettes lying on their side in an enclosed box that loaded from the top. At the front of it was a small bar that you would push down on it. Then a half cylindrical section would pop down and then one of the cigarettes would roll out on to that half cylindrical portion. All ready to fill the drivers lungs with cancer. 🤪
-
I'm curious if anyone has any information about the post war Chrysler cigarette holder/dispenser/lighter. I understand that they came stock on the Traveler. I read that the Traveler didn't have an options, because Chrysler included every Chrysler option available from the factory. Is that fact or fiction? I did see a picture of one when viewing pictures of a '48 traveler online. But the picture was from a distance and it appears to be mounted on the steering column. Was it basically just a holder/dispenser, or did it also have a lighting feature on it? I'd love to see some close up pictures of it.
