

NickPick'sCrew
-
Posts
135 -
Joined
-
Last visited
-
Days Won
4
Everything posted by NickPick'sCrew
-
My First Car -- P15 1947 Plymouth Deluxe
NickPick'sCrew replied to NickPickToo's topic in P15-D24 Forum
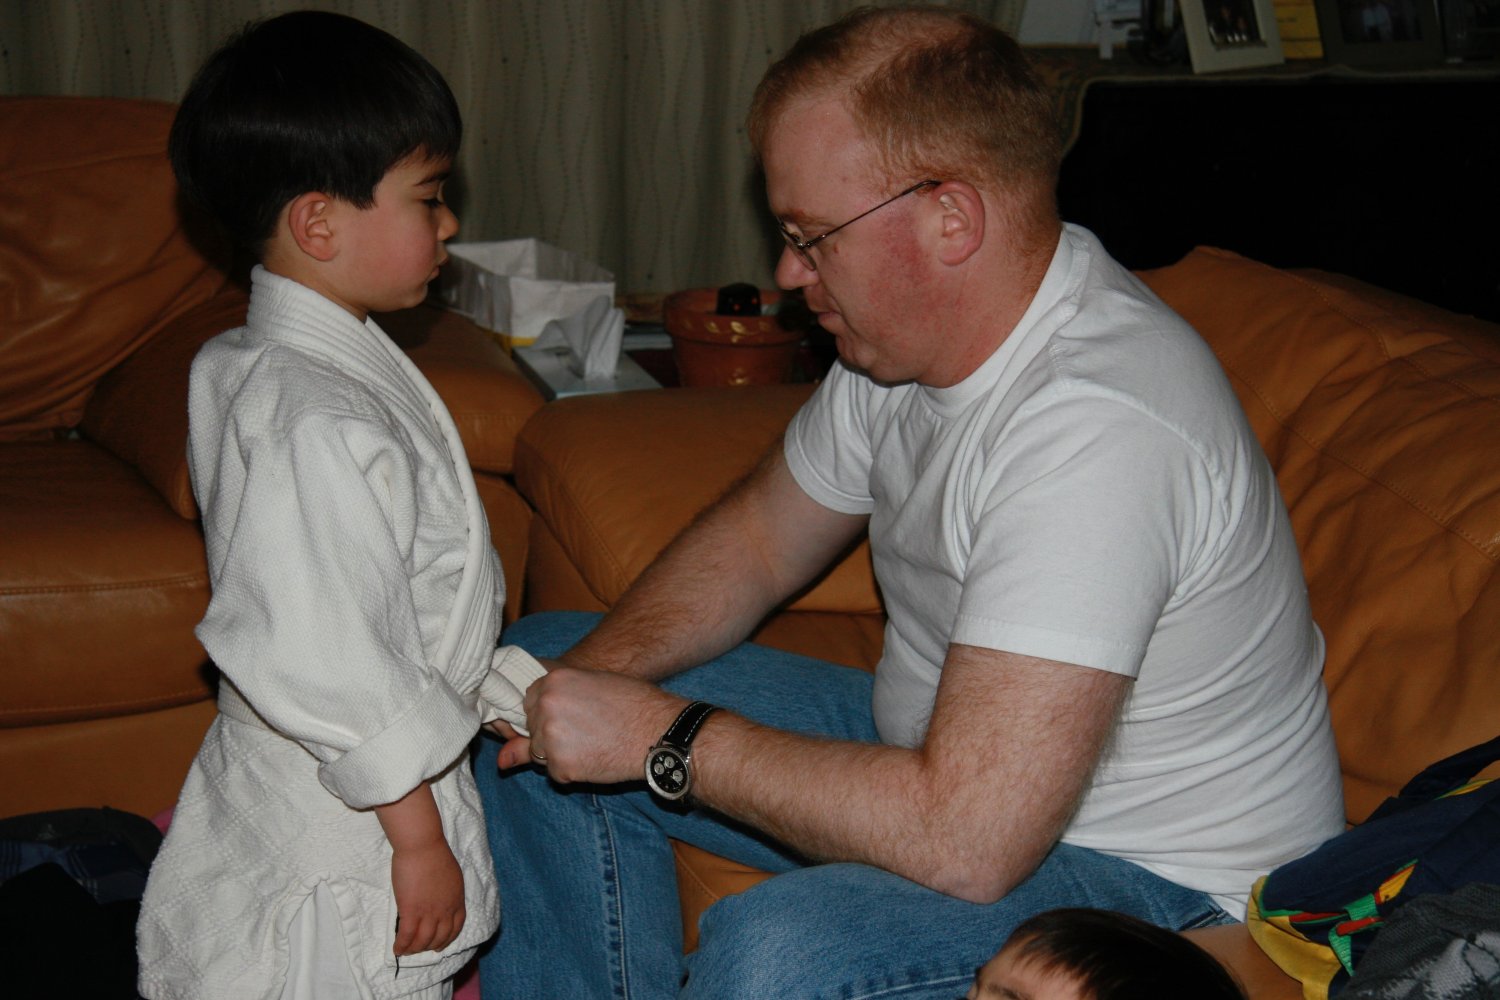
He ended up not using the hammer at all. Had it on hand to tap the drum if needed, but no need. Eneto, He followed your advice last nigh on the second drum and the release was well controlled, although the snap still startled him a bit. I still had him stand to the side for this. I snapped this photo this morning. The puller we picked up did not come with a bone, and the longer breaker bar he used was sufficient with just some sustained even pressure and about five or so quarter turns once the puller was in place and aligned. I have seen enough evidence to believe that this car had some work done on it in the mid to late 2000's and suspect he may have had a much harder time with this had it been a longer interval. Pads are not worn much at all, but the seals are bad and the inside of the drums including the pads are covered in grease. Of course he's got some sand in the drums as well and as he gets further into the axle we will know how far the sand penetrated.
-
Steering Box Tear-down and Rebuild
NickPick'sCrew replied to NickPick'sCrew's topic in Technical Archives
Thank you sir! You would happen to know how to source the bushing that is at the top of the jacket assembly (19-14-3 on the exploded view) and the bearing for the tree shifter (19-46-6 on the exploded view)? -
My First Car -- P15 1947 Plymouth Deluxe
NickPick'sCrew replied to NickPickToo's topic in P15-D24 Forum
Sorry but I'm amending Nicholas's post. You're keeping one of the 4 ply's as a spare. If you have issues with a front tire, move a rear tire forward. -
My First Car -- P15 1947 Plymouth Deluxe
NickPick'sCrew replied to NickPickToo's topic in P15-D24 Forum
Most definitively unintended. It's that spelling gene that's missing from my family line -
My First Car -- P15 1947 Plymouth Deluxe
NickPick'sCrew replied to NickPickToo's topic in P15-D24 Forum
Hi Bobby, If it is, could you post a few more pictures of how it's set up. And if you kept the three on the tree...? -
My First Car -- P15 1947 Plymouth Deluxe
NickPick'sCrew replied to NickPickToo's topic in P15-D24 Forum
Always had issues with spelling. As a freshman in HS I started showing up early in the morning to join in spelling drills with the spelling bee team. I never competed beyond those morning sessions, but my recollection was that the teacher took pitty on me for putting in the effort and let me pass anyway. Now and then I get a little sloppy and forget to double check those illiteracies. I also seem to have passed the affliction on to my boys. That said, Nicholas's older brother is in college now and seems to be getting past it. He uses Gramerly. Marc. Thank you for taking pitty too. We enjoy the forum. -
My First Car -- P15 1947 Plymouth Deluxe
NickPick'sCrew replied to NickPickToo's topic in P15-D24 Forum
Hi Ken, not sure if your setup is similar to Nicholas's, but there is a good bit of space between the frame and the MC as it comes off the bracket he received from ECI. Thinking about mounting it to the frame next to the MC rather than hanging it below. Running the lines from the MC to the Valve would be less elegant that way, but it would keep the assembly above the frame line. I'll have Nicholas post of picture of what ever we come up with. Now I'm remembering ECI told us they were holding the bracket out and not charging us for it for this reason. Bobby it would be great to see what your solution was. -
My First Car -- P15 1947 Plymouth Deluxe
NickPick'sCrew replied to NickPickToo's topic in P15-D24 Forum
Thanks, You can see by the other conversations I just worry a lot...Probably be less concerned if it were mine, but Its my son. I was thinking those other items are less critical to stopping the vehicle once in motion. May have Nicholas fashion a brace and rock shield to help protect that assembly. -
My First Car -- P15 1947 Plymouth Deluxe
NickPick'sCrew replied to NickPickToo's topic in P15-D24 Forum
No bushings called for at those joints. The threaded portion of the tie rod and the nut are smaller on the replacement ends than on the stock ends but the tapered section seems to fit well. However, this keeps the nuts from getting a good seat on the control arms. Nicholas added a washer to compensate, but I think the compression on the dust cover is tighter than designed for, and it caused one to split. Assume more will in operation. Kanter's ends (we have a pair) are the same diameter at the thread and nut as stock and the dust cover looks more sturdy, so I'll have him switch it out to see if it makes a difference. Nothing against AB, we've gotten a lot of great parts from them at a reasonable price, just not to excited about the tie rod ends. -
My First Car -- P15 1947 Plymouth Deluxe
NickPick'sCrew replied to NickPickToo's topic in P15-D24 Forum
I hear you both. To be honest I didn't even think about it until my next door neighbor (retired engineer with several automotive related patents to his name. He's a wonderful nutty professor type) brought it up. Then once you get the wheel and column tube off and your looking down that shaft...if he were just going to be driving it to shows and in parades...also, three points are a given not a compromise, they were purchased week one and sitting in his closet. Break related question: Nicholas's system has a proportioning valve and most set-ups we've seen hang that valve just under the master cylinder. It results in a very clean and simple look once the lines are in place . In Nicholas's application that placement would be dipping down just a little below the frame line putting it at risk if he accidentally bottoms out over a bump or dip. Has anyone else seen an alternative placement or should we be worried about hanging an inch or two below the frame line here? -
Steering Box Tear-down and Rebuild
NickPick'sCrew replied to NickPick'sCrew's topic in Technical Archives
A little intel about our efforts to source parts. I've attached the group diagram below. Bottom Oil Seal (19-19-35). Easy to find both NOS and Newer Replacement. Wide variance in price depending on who you call or where you look. Cage Assembly (19-15-80) These are the bearings. Easy to find as a rebuild kit that also includes the two cups (19-15-63), two bushings (19-19-16) and the bottom oil seal (above). We didn't need the cups or the bushings as ours had no pitting and the cross shaft and gear fit well with no excess play. We finally found the bearings alone for much less than buying the whole kit. Gasket (19-19-28) and shim set (19-04-13). We finally found too. We could not find the smaller seals (19-13-4) and (19-14-68) and we were eventually told that most rebuilders don't bother with those anymore. Said they simply leave out the lower seal (19-13-4) and substitute a felt ring for (19-14-68). Said there's not enough pressure build up in this box to bother with those two seals which are hard to find anyway. Thoughts from the more experienced members? We are fortunate. We didn't remove 19-13-4 from the bottom of the warm assembly yet and it looks to be in good shape in general. We did remove 19-14-68 when we were in tear down mode but we kept it for reference. It seems to be in good shape and we may just reuse it. We owe a load of gratitude to Justin at Straight Line Steering (CA) for helping us find most of what we were looking for at what seems to be a reasonable price, although I am not sure he would appreciate getting a tone of calls for parts as they mostly focus on rebuilding. We called a number of rebuilders before finding SLS for advice but the others we reached just wanted us to send in the box and pay a ridiculous amount for the rebuild.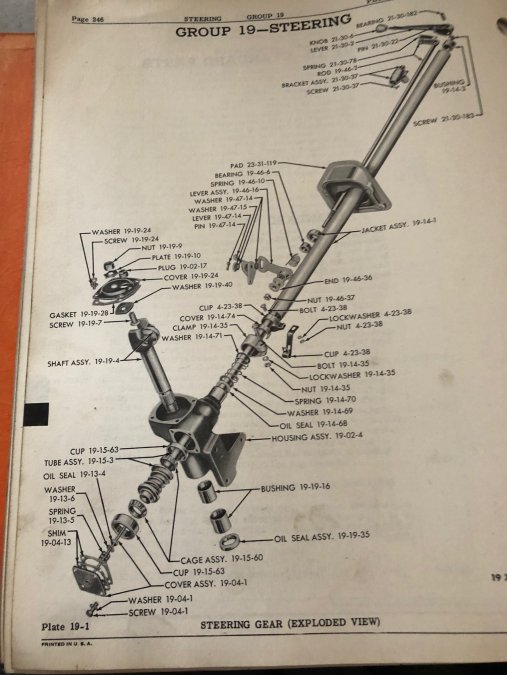
-
My First Car -- P15 1947 Plymouth Deluxe
NickPick'sCrew replied to NickPickToo's topic in P15-D24 Forum
AD, that's a nice look. Just enough difference to notice but not so much to through off the total look. Could you tell us the total diameter of the front and the the back wheels (top of wheel to ground) and then the width of the front and back whitewalls? We would like to get a feel for the differences between the front and back to get that look. -
-
My First Car -- P15 1947 Plymouth Deluxe
NickPick'sCrew replied to NickPickToo's topic in P15-D24 Forum
Question: We only purchased one of the rim / tire combinations above (215/70R16 2"WW) to test fit before unloading a lot on all four. Nicholas asked me about a big / small combination last night. He's looking at 205/55R16 1.5"WW as the small in this combination. What's the opinion of experience on big small in general and this combination specifically? I see limited ability to rotate tires so higher maintenance cost but told him we could put the question to the forum Thanks -
Steering Box Tear-down and Rebuild
NickPick'sCrew replied to NickPick'sCrew's topic in Technical Archives
Nicholas was hoping we'd have to let this one go and that he'd have a shot at power steering. I showed him to the power steering conversion kit in the basement...
-
Steering Box Tear-down and Rebuild
NickPick'sCrew replied to NickPick'sCrew's topic in Technical Archives
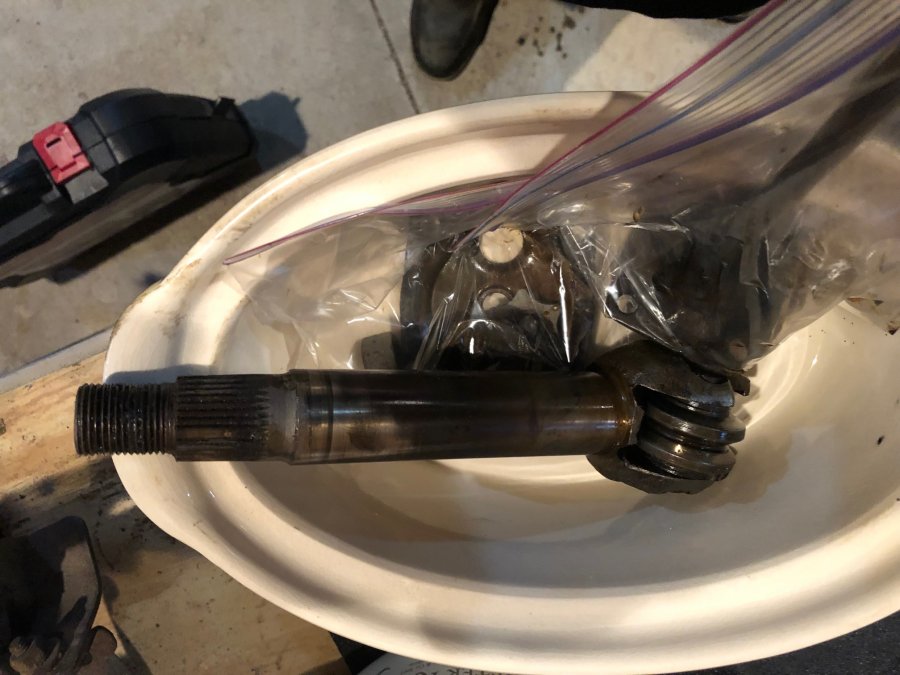
Thanks dodgeb4ya. It does come straight out but it takes some force and care. Tried a rubber mallet first and then like you suggested block of wood and a heavier hammer. It wasn't budging. finally got it off with a slide hammer and some special prep: Placed two short 2x4s (solid, hard wood, no pine) on the shop floor. Placed the gear box on the 2x4s so that the cap and gearing assembly hole is facing down and that there is a clear passage for the cap and bottom bearing to come out towards the floor between the 2x4. The tube end that attaches to the steering wheel will be facing up to the sky. Placed a thick piece of material over the top of the tube (I had some heavy felt) and tape it in place. Took a five pound slide hammer -- if you don't have an attachment that will slide over the tube as a guide you can do what i did -- used a large socket from a 3/4" set. Place a piece of cloth - dubbed up in the socket and place the end that typically attaches to the ratchet over the taped tube end Place the slide hammer into the socket, center everything up and then take a few good solid slides. Came right out after two hits - first hit was a bit tentative as to ensure the alignment up and down was solid. I'm going to let Nicholas clean out the box and parts and put it back together once the rebuild parts get in.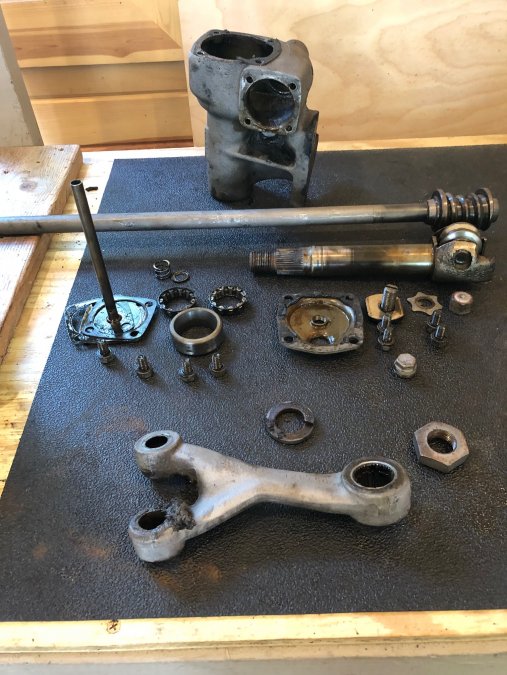
-
Nicholas and I are working on the steering box right now and could sure use some technical advice. We have the covers off and have removed the cross shaft (the shaft to which the pitman arm attaches) and now we need to remove the actual steering gear assembly (also referred to as the tube and worm assembly in the service manual -- the tube is also known as the dreaded spear). Presently, this gear is not turning in the housing. I am assuming that there is sand in the assembly (we sandblasted before taking it off) and so it's not budging. Left or right, in or out. I'm also not ready to hand Nicholas the three pound hammer just yet. The version of the manual we have reads: "Remove the cross shaft from the housing. remove the lower cover and shims and then remove the worm and tube assembly and bearings." From our reading we get the idea that this assembly should come right out. Attached are some pictures of where we are. You can see the edge of the cup and bottom cage (bearing). I suspect we are missing something...is there a trick to removing the cup and bearing or a specific tool to be used here? Any help at all is greatly appriciated.


-
My First Car -- P15 1947 Plymouth Deluxe
NickPick'sCrew replied to NickPickToo's topic in P15-D24 Forum
Today was not his best race, but considering he lost a tire (look at left foot) about 800 meters into the 5K, 18:20 will have to do this week. This has me thinking that I need to go recheck his suspension work on the '47
-
We modified the same spring compressor for Nicholas's build in a slightly different way. We took out the snap ring and added a pipe fitting I had in a spare parts bin to take out the slack from the newer, longer tool. Note that In use, we put the pipe fitting in-between the two washers.

-
My First Car -- P15 1947 Plymouth Deluxe
NickPick'sCrew replied to NickPickToo's topic in P15-D24 Forum
Gents, Nicholas and crew are still here. You're correct. School is back in session and he also attended a two weeks at a running camp just prior to school starting with his cross country team. Good news is that he has become a competitive runner for his Cross Country team and rumor is that their top seven may be competitive for State's this year. The down side is he's spent most days after practice. He's also still playing trombone in the marching and Jazz bands. It's a pace I couldn't keep up when I was 16. Kicking ourselves over missing the dream cruz this year, but more confident now for next year. We'll keep the project moving, but Nicholas will likely be a little slower on the updates through the cross country season. As a proud dad, I'll update his run times periodically as well ☺️. Nicholas was referring to North Manistique Lake. The locals refer to it as round lake. It was surreal when my Aunt pulled out that photo and started describing Grandma's Plymouth. -
My First Car -- P15 1947 Plymouth Deluxe
NickPick'sCrew replied to NickPickToo's topic in P15-D24 Forum
He also ran a 10:49 two mile this weekend (his personal best so far). So quite the weekend for Nicholas ? -
"... when I'm laid beneath that mossy ground, there'll be more friends around than leaves upon the ground." Thank you for your service gentlemen.
-
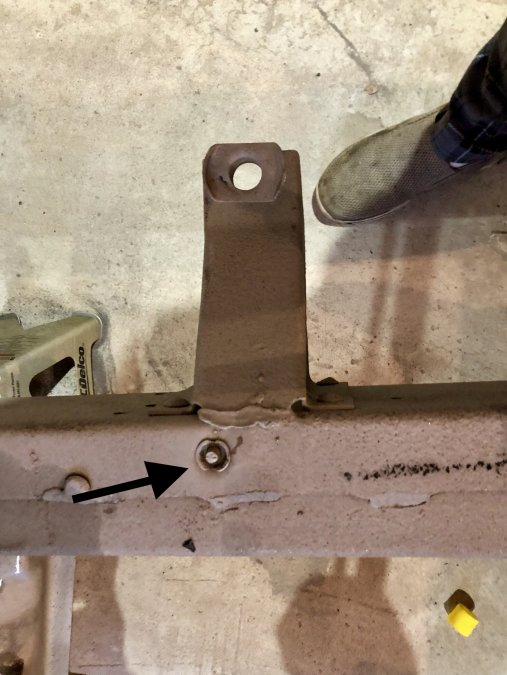
NPT has a stubborn broken bolt that won't come out (tried everything short of cutting in out with a torch) including heating up and cooling down etc. Its an attachment point for the body to the frame, directly into the frame (picture below). It looks to be fastened into a jack nut (or another type of nutsert). Couple of questions: 1. innovative ideas for removing the bolt or nutsert altogether? 2. We are also considering just cutting the bolt flat to the frame and re-tapping the frame a few inches back with a new nutsert. Replacing that area of the floor pan anyway so we can just relocate the hole in the process. Advice on where to source a sufficiently large and strong jack nut etc.?

-
These pictures shows a broken bolt just next to the second body to frame attachment bracket from the front. We found this bolt (and another just like it on the other side of the frame -- so one on the left and the right) hidden under a plate that was used to patch the floor. However, we can not find this attachment point (body straight to frame) anywhere in our technical manuals and it has us wondering. Are these aftermarket modifications made by a resto shop to make the body more secure to the frame given that the body mount brackets were so rusted out? Has anyone else seen these and if so have you found reference to them in the manuals?

-
My First Car -- P15 1947 Plymouth Deluxe
NickPick'sCrew replied to NickPickToo's topic in P15-D24 Forum
These pictures shows a broken bolt just next to the second body to frame attachment bracket from the front. We found this bolt (and another just like it on the other side of the frame -- so one on the left and the right) hidden under a plate that was used to patch the floor (we shared pictures earlier where we had to cut into the floor to remove the body. Nicholas had to cut off the heads of these two bolts to get them off and now we are about to extract the rest. However, we can not find this attachment point (body straight to frame) anywhere in our technical manuals and it has us wondering. Are these aftermarket modifications made by a resto shop to make the body more secure to the frame given that the body mount brackets were so rusted out? Has anyone else seen these and if so have you found reference to them in the manuals?


until