Apittslife
-
Posts
140 -
Joined
-
Last visited
Content Type
Links Directory
Profiles
Articles
Forums
Downloads
Store
Gallery
Blogs
Events
Everything posted by Apittslife
-
How Does Your Truck Compare To Chevy Or Ford
Apittslife replied to Bob_Koch's topic in Mopar Flathead Truck Forum
Thankyou for the tyme you took to do this, I enjoyed watching them! -
I would make sure that the rear shoes are properly adjusted. If they are, then rebleed the master cylinder. If niether work, then I would use a an adjustable proporioning valve for the rear, as the one you are using isn't keeping enoung residual pressure for the wheel cylinders that you are using.( Large bore VS Small bore ) the larger the Wheelcylinder bore the more fluid it takes to move the pistons, & actuate the rear brakes. The best way to remove air from a Hydrolic system is to reverse bleed it as air always wants to rise. Like removing air from a Hypodermic Needle before getting a shot.
-
Beautifully done!
-
Apears to be a good foundation, Hope the rebuild goes well.
-
Tater- My 49 Dodge Truck Build
Apittslife replied to TexasPilothouse's topic in Mopar Flathead Truck Forum
Congrats on the truck. Like others said : Looks like a solid vehical to start out with. -
1948 Dodge Pilot House / Dakota frame swap
Apittslife replied to Apittslife's topic in Mopar Flathead Truck Forum
No, That is why I had to cut the cross member, I had no desire to recess the Dakota fire wall. I am going to have to cut a recess for the down pipe coming off the turbo thou. -
1948 Dodge Pilot House / Dakota frame swap
Apittslife replied to Apittslife's topic in Mopar Flathead Truck Forum
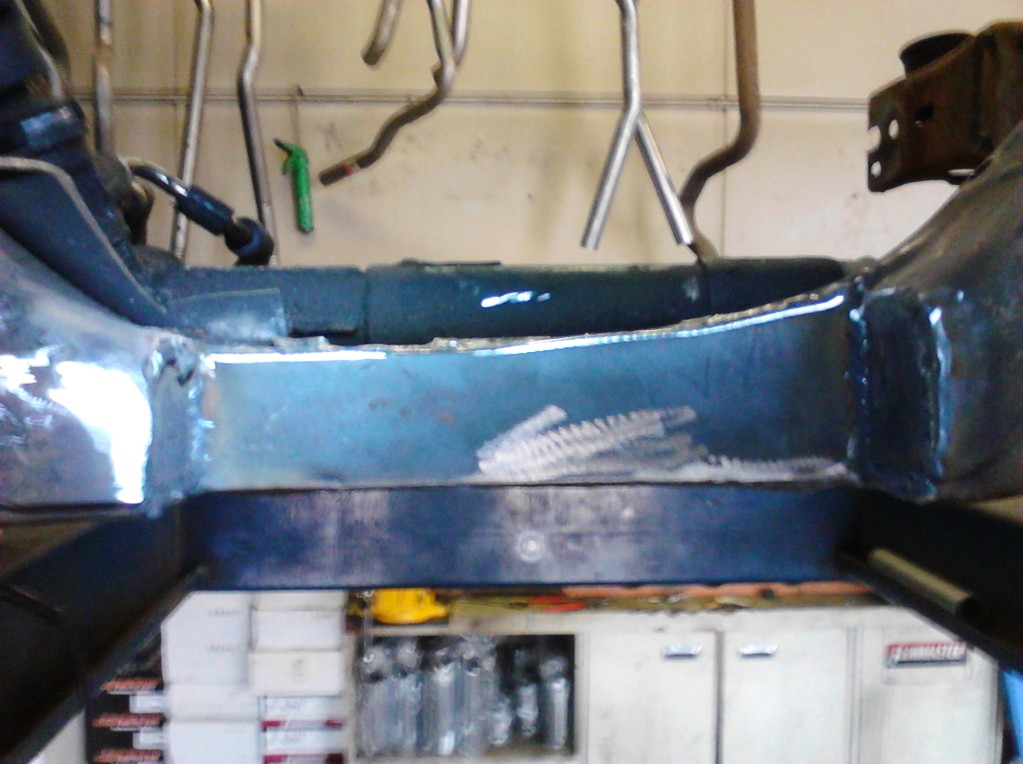
Yes, I had to remove that much to clear the rear sump, I have one inch of clearance between everything. Even the front sump would not have worked, because of the rack & pinion. If I was installing a 6-BT I wouldn't have to do that hard of a cut, because you have to cut into the firewall to set the engine back for radiator clearance. Today I flipped the motor mounts so they face forward, & I have the motor mount cross member about 1/2 fabbed, hopefully I will have it finished on sunday. Going to the Sprint cup race saturday, @ the Kentucky speed way. -
1948 Dodge Pilot House / Dakota frame swap
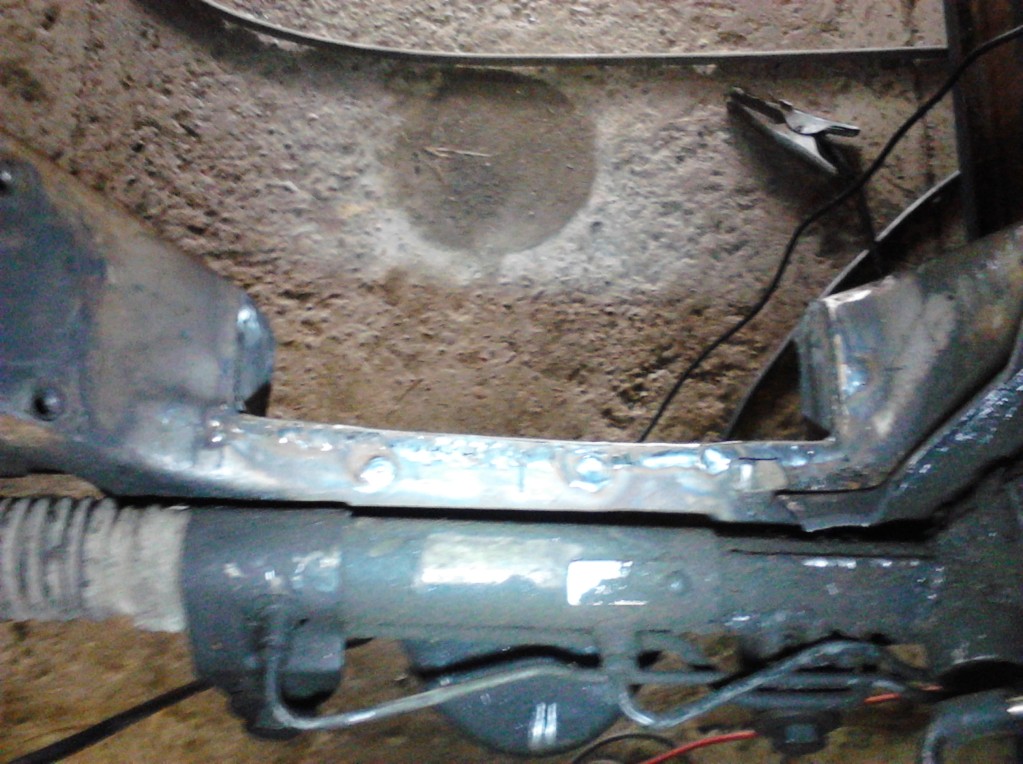
Apittslife replied to Apittslife's topic in Mopar Flathead Truck Forum
I cut 3 inches out of it. Yes it is a large cut, But the cross-member actually runs under the rack & pinion, so I will say I removed half of it. I used 1/4 inch plate to fill in what I cutout. When I re-install the engine I am hoping to be able to add some metal to the bottom area. I am not worried, & It will be safe! -
1948 Dodge Pilot House / Dakota frame swap
Apittslife replied to Apittslife's topic in Mopar Flathead Truck Forum
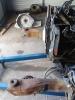
Well did some work on the frame today. I notched out the cross-member for Oil pan clearance. Just as I was ready to set the engine in place so I can fab the motor mounts, It starts raining! Motor is in another building.

-
Congrats! New build or just a parts truck?
-
I wasn't saying he shouldn't take up the offer. Just wanted him to see that if you have the desire & some skill, you can do it, & Laid-Out's work is a Great Example!
-
Check this build thread out, His Metal Skills are SICK! He hand fabricated the front floor & toe boards. http://www.jalopyjournal.com/forum/showthread.php?t=520334
-
Very Kewl Truck, Bunch of money spent there.
-
45' One Ton- Decisions, Decisions...
Apittslife replied to 41/53dodges's topic in Mopar Flathead Truck Forum
Now days, $1000.00 is cheap, & since you have a Title, & have access to replacement parts that are currently missing, & is something you want, go for it, if you can afford to. I paid the same price for my pilothouse, & then blew it apart to streetrod it. I tend to dought I will recoop my money should I have to sell it, but I am building it for myself with no desire to sell it! -
A stabilizer like you will see on some 4x4's. With the leaf spring style suspension, it will help firm up the steering feel
-
Bad tie rods will make for a scary ride, & Unbalanced tyres in the rear will NOT affect ride quality. You must realize that what you have is a TRUCK, & a sustained 50+ MPH is not what these vehicals were designed for back in the day. I would suggest a steering stabilizer shock for the front end, Make sure that there is little play in the steering box, & replace the bad tie rod ends.
-
1948 Dodge Pilot House / Dakota frame swap
Apittslife replied to Apittslife's topic in Mopar Flathead Truck Forum
Today, it will not. I am going to have to replace the coil springs with a set that will handle the weight, which is something I need to work on next week. The rest of the suspension will be able to handle the weight. I purchased a set of hydrolic motor mounts, & the transmission mount today. -
1948 Dodge Pilot House / Dakota frame swap
Apittslife replied to Apittslife's topic in Mopar Flathead Truck Forum
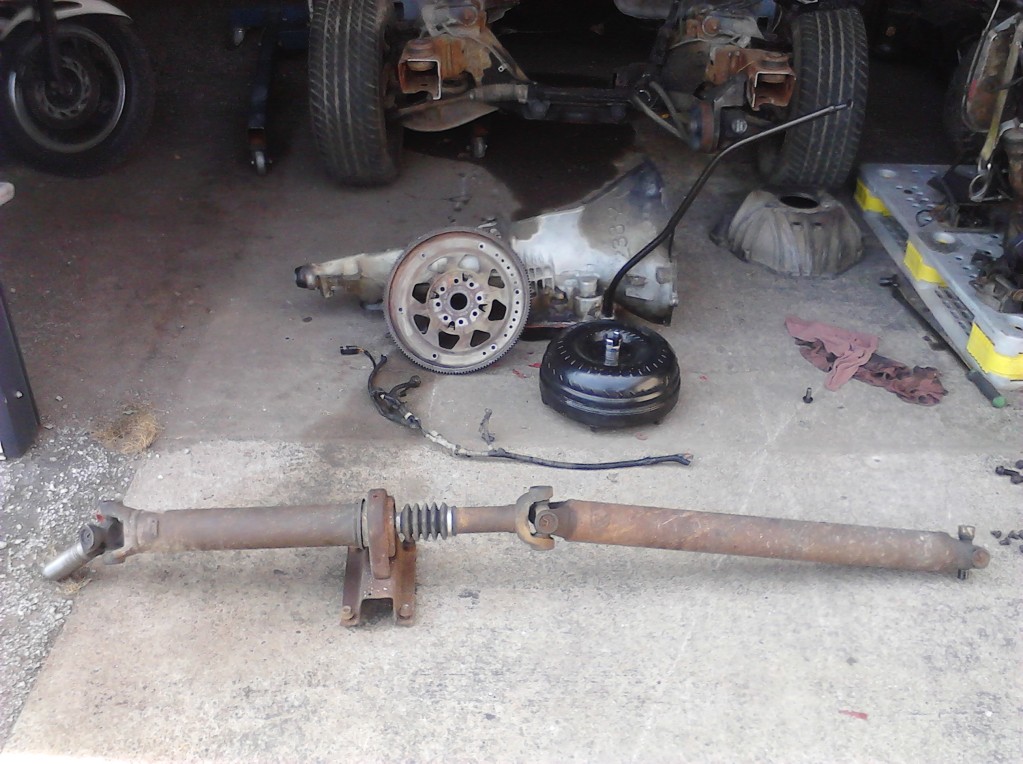
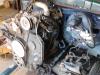
Test fit the engine today, Tried to do so with the transmission bolted to the engine, & that was a no go. Only way to install it them is separately. I will need to cut out some of the rear section of the cross-member, so I can move the engine forward about 2 inches.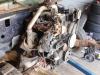
-
1948 Dodge Pilot House / Dakota frame swap
Apittslife replied to Apittslife's topic in Mopar Flathead Truck Forum
Ok, I am a bit ignorant with what is or isn't an electronic transmission. Mine does NOT have the 8 pin connector, It has two 3 pin connectors. -
1948 Dodge Pilot House / Dakota frame swap
Apittslife replied to Apittslife's topic in Mopar Flathead Truck Forum
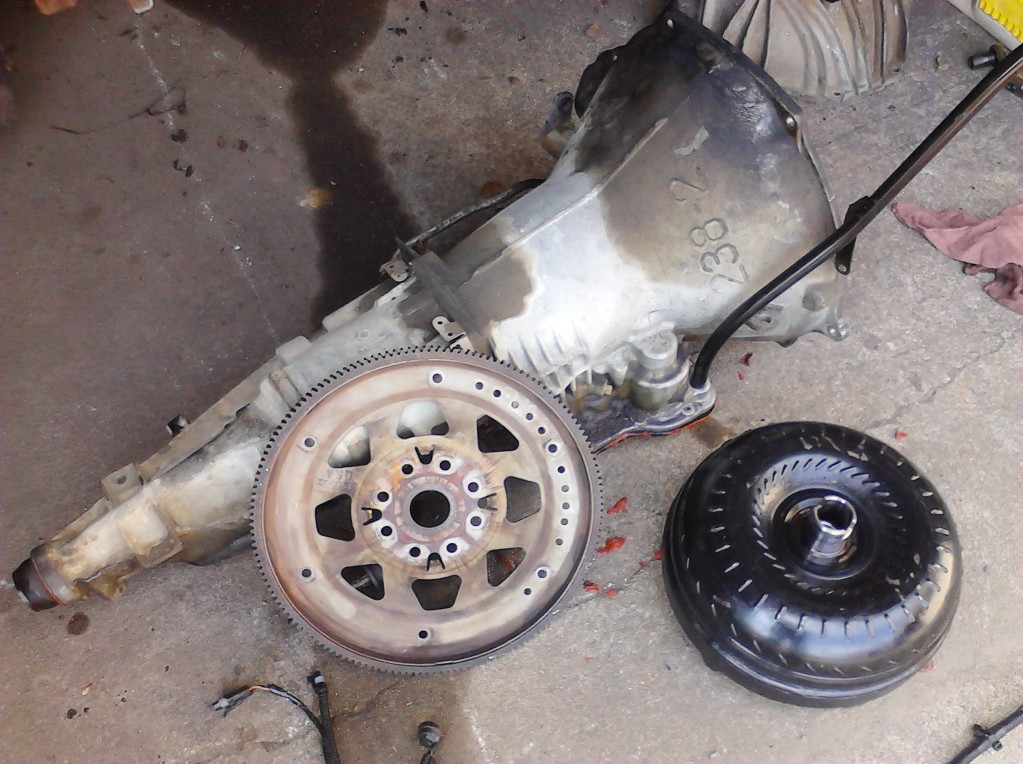
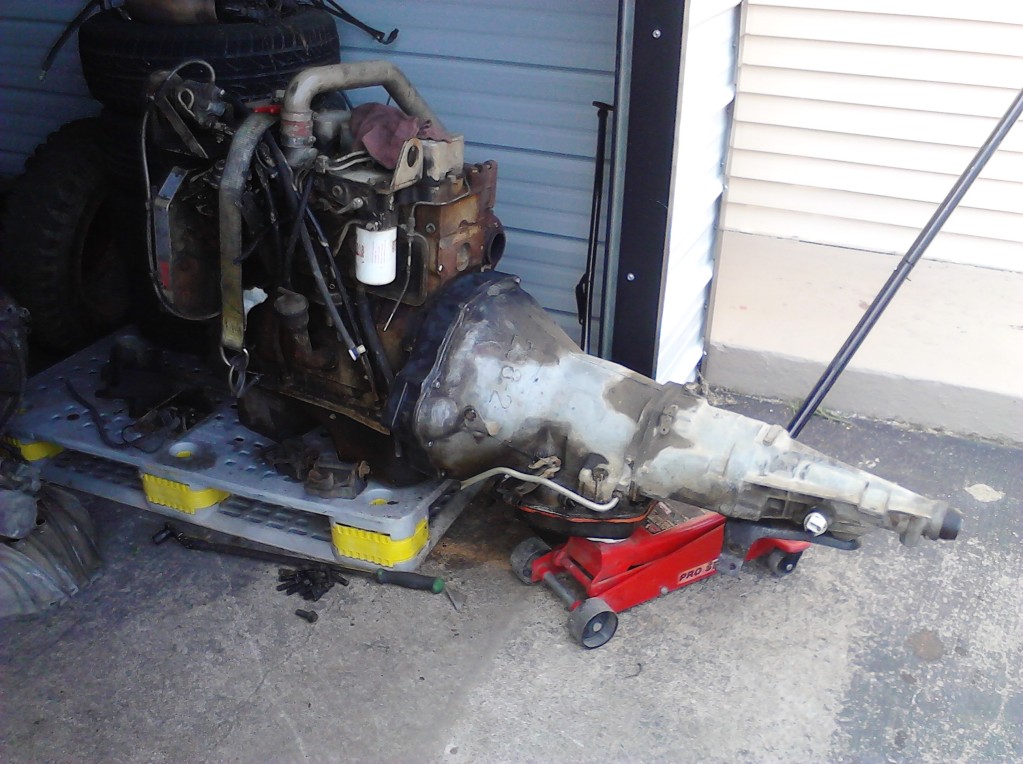
This is what my money got me yesterday, Adapter Plate was included but I mounted it to the engine prior to remembering to take pics. Close up of the trans, converter & Flex plate Pic of the Adapter plate mounted to the Engine Pic of transmission dry fit to Enigine to make sure it fit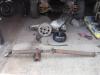
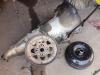
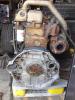

-
1948 Dodge Pilot House / Dakota frame swap
Apittslife replied to Apittslife's topic in Mopar Flathead Truck Forum
No, It is controlled by pressure switches. Some people use switches to manually engage & or disengage as well. -
1948 Dodge Pilot House / Dakota frame swap
Apittslife replied to Apittslife's topic in Mopar Flathead Truck Forum
From the bit of reading I have just done, It is Electronic. But it is easily modified to work with out the PCM http://www.dieseltruckresource.com/dev/showthread.php?t=156988 http://www.dieseltruckresource.com/dev/94-trans-93-t114702p2.html -
1948 Dodge Pilot House / Dakota frame swap
Apittslife replied to Apittslife's topic in Mopar Flathead Truck Forum
Last tyme I tried to post a picture, All I got was the URL to the photos I will be taking more pics over the next few days & weeks. -
1948 Dodge Pilot House / Dakota frame swap
Apittslife replied to Apittslife's topic in Mopar Flathead Truck Forum
Thanks Chris, I am Hoping it will. I will have to do the pressure switch mods for the Lock-out & Over-drive, But they seem to be pretty straight forward. So I will be able to keep things simple under the hood. The trans is from a '95 Ram 2500. the Owner/Seller says that it was rebuilt about a yr ago, & he drove it for about 3 months before pulling the engine for his swap. So far I have been doing good keeping the costs down, & hope to keep doing so. -
1948 Dodge Pilot House / Dakota frame swap
Apittslife replied to Apittslife's topic in Mopar Flathead Truck Forum
Was cruising Craigs List yesterday afternoon, & came across an add for a Chrysler Diesel Transmission (47RH) for sale, He is doing a Cummins/Ford swap so Along with the Transmission I am also getting the Trans adapter & Drive shaft. He needs to remove them from the truck so I will be going to get them later this week.