


Veemoney
-
Posts
458 -
Joined
-
Last visited
-
Days Won
2
Content Type
Links Directory
Profiles
Articles
Forums
Downloads
Store
Gallery
Blogs
Events
Classifieds
Posts posted by Veemoney
-
-
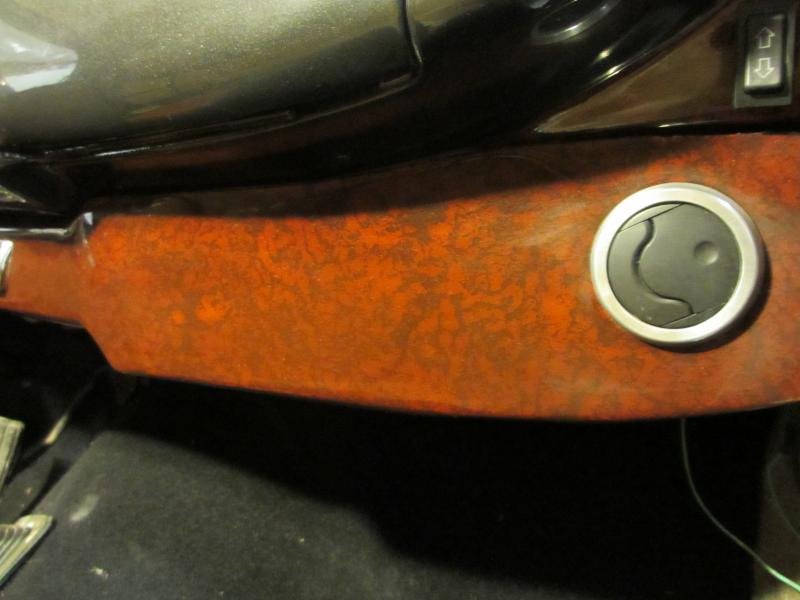
I used a paint brush to load the sponge so as not be gob it on to thick to start, then a flat piece of sheet metal to unload and test then just dob it on. You don't need much on the sponge. The flash of the camera on the close-up doesn't do the color justice.
-
Silver, your gray looks very good and is similar for some factory finishes I have seen once clear coated. I attached a factory woodgrain finish from a console I have as an example and then the close-up you requested. last picture is the sponge for the pattern and the product I used. If I did it again I would use a darker base color than the gold to start with. I did not practice but on the part if you don't like it you wipe it off and start again. I used 3-4 coats of clear and I mixed in some stain in the clear so with each coat it becomes deeper and more subtle. Hope this helps. Also it is smooth after the first coat of clear from what I recall.


-
 1
1
-
-
I have small 6V Bosch motors on my 47 WC that I rebuilt picture 1. While I was looking around for parts I found new replacement wiper motors in 6 or 12 volt. 2nd picture that were similar in size and style. Not sure what your motors look like or if these would work for you.
![s-l1600[1].jpg](https://p15-d24.com/uploads/monthly_2017_09/59c48aed8368a_s-l16001.jpg.44226a8178db6007c7f711e2e927080b.jpg)
![$_58[1].jpg](https://p15-d24.com/uploads/monthly_2017_09/59c48c1fc85b0__581.jpg.9df5eb4bbc86d524bee10097ce6c1686.jpg)
-
I used a gold metallic as my base coat that I had from a car I had painted. Used a sponge and minwax stain to get my pattern. let it dry for a few days and cleared it with polyurethane

-
1
-
-
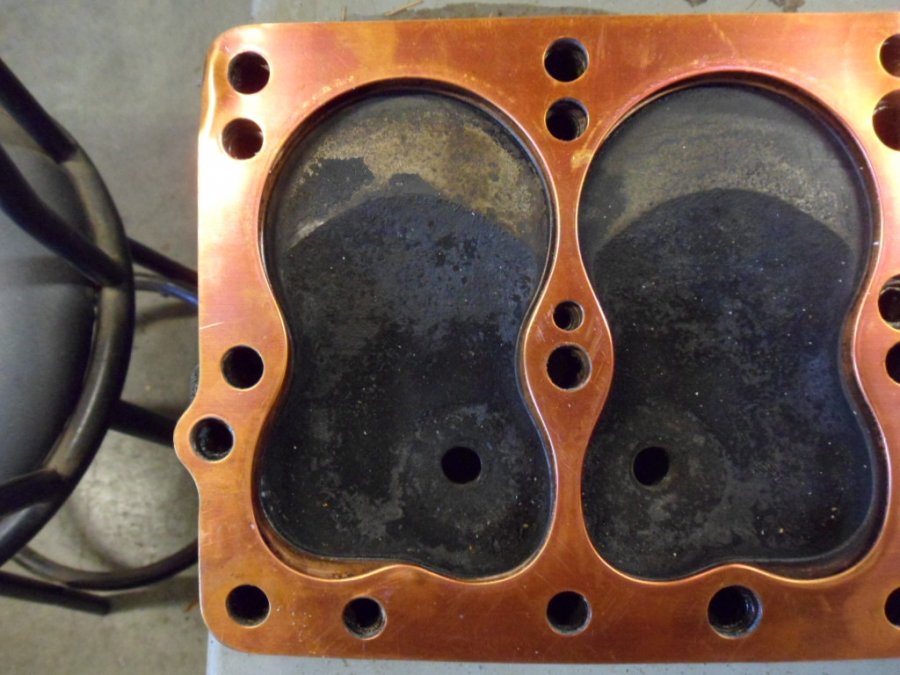
I have not seen the head but a little corrosion on the head is not unusual. Couple suggestions:
- Inspect the gasket to determine where the leaking occurred. the narrow sections fail sometimes
- Check the head that was pulled off to see if it is flat.
- Milling the head to clean up some of the corrosion can be done and will raise the compression giving you some added power. Most automotive machine shops can do it. Some threads on here to measure the thickness of your head to determine any milling previously done.
-
Way to pass it forward.Good job
-
If the clutch pedal is rubbing on the way down you may also have wear on the bore of the pedal casting. Some wear more on the drivers side of the bore because the pedal is offset and the leverage when applying the clutch pushes in that direction over the long length. I was able to add shim washers to the shaft and that held the pedal perpendicular to the pivot shaft . That eliminated the problem for me till I can put a bushing in the pedal.
-
These old cars don't always have the original motor in them. If you have not done it yet, I would suggest to have the seller send the stamped motor number to confirm what it is and then you will know what it came out off. You would still need to verify the stroke using the #6 plug method mentioned earlier as it may have started life as a 218 and someone replaced the crank to make it a 230. I have seen Plymouth motors in dodge trucks for example.
-
I have 2 of the NAPA 6 volt batteries that I would swap out and they give you what you would expect for performance. If you have the room step the group number up and get more Cold Cranking AMP (CCA). It makes a big difference
Also have to say an overlooked aspect is the battery is only as good as your cables and ground so when performance is getting low I do a check and clean of the cables and posts, also do a full charge on the bench charger overnight to top the battery off. .
If you really want a great battery that spins the motor over fast go for the Optima red top in 6 Volt I was surprised at how much difference it made. Now I just run the red top in my old truck
-
2
-
-
I run Goodyear Wrangler ST P225/75R16 on my 4.5" stock rims for a few years now. No problems accept for a nail in the tire tread that I was able to plug and keep going. Below is a comparison of the 16s I am running to the 15" you show mounted. You will note the difference on sidewall height of the two tires with the same aspect ratio (75%) and tire diameter. The 225 is the taller of the 2 tires. If you are choosing rims you might consider rim diameter to optimize your fit and gearing. Just a thought.
235/75-15
225/75-16
Difference
Diameter inches (mm)
28.88 (733.5)
29.29 (743.9)
0.41 (10.4) 1.4%
Width inches (mm)
9.25 (235)
8.86 (225)
-0.39 (-10) -4.3%
Circum. inches (mm)
90.72 (2304.36)
92.01 (2337.03)
1.29 (32.67) 1.4%
Sidewall Height inches (mm)
6.94 (176.25)
6.64 (168.75)
-0.3 (-7.5) -4.3%
Revolutions per mile (km)
698.39 (433.96)
688.63 (427.89)
-9.76 (-6.07) -1.4%
-
Nice truck. It has some add-ons but looks like it is not to far from stock and they are pretty kool stock.
You may find you will enjoy it more and not need the IFS if you include a set of radial tires in your plans, It improves the ride immensely. Tune it up and get used to shifting the trans and I bet you will be happy. another thing to plan is to check your compression and vacuum once you get it home and then you can decide what to do if anything to the motor.
I have a 47 WC, Good Luck
-
1
-
-
In the pictures I see your motor has what looks like a rebuilders tag under by the serial number stamp. It is a good idea when you are cleaning the tops of the piston to note if the pistons are stamped oversized for example say .030" might be on the top of the piston and if it agrees with the rebuilder tag. Good to know for future reference just to make a note of it somewhere. You could also mic the cylinder bore to figure out what kind of wear you have if you wanted to take it a step further as long as you have it open.
-
Chasing down the numbers provided above helped me to locate the head gasket number with the smaller configuration that better fit my head. For those interested you can find the gasket using:
- Fel-Pro 7547
- Fel-Pro 7547C
- Victor 1066S
- Wizard R6057
These numbers are applicable for 1949-59 motors based on what I found
-
1
-
Just a thought if you are not the original owner and have not validated the motor numbers.
You should confirm the year of the motor. My 47 truck has a 53 car block with a 57 head on it from what I can tell. I did make a hand crank to turn the motor from the front through the hole access in grill. Not sure if your car has access to the front hub to allow this but if so it works slick.
-
1
-
-
Thanks to all for the responses so far. SSER2 you are correct the new gasket is the Fel-Pro 7564C (universal). My head is casting 1676337-1 which I understood was a decent compression head from 57-59 based on other posts and I had shaved it .070 back a few years ago. With the old gasket it was running 135 psi which is lower than I would have thought. Thanks for the info now I have some numbers to chase down.
-
I noticed the replacement gasket from Fel-Pro is larger than the existing gasket on my 230 engine. You can see this in the picture where I have the new gasket on top of the old gasket and head. The area by the exhaust is better covered by the old gasket and I was hoping someone may know the brand/number of the older gasket that best fits my head. Did not want to give up any compression
Woodgrain Thoughts
in P15-D24 Forum
Posted
That is perfection.