


Matt Wilson
-
Posts
635 -
Joined
-
Last visited
-
Days Won
1
Content Type
Links Directory
Profiles
Articles
Forums
Downloads
Store
Gallery
Blogs
Events
Classifieds
Posts posted by Matt Wilson
-
-
On 10/28/2017 at 6:31 PM, thebeebe5 said:
Today's progress report:
Spent the morning adjusting my old Ford's carburetor on the wide band O2 sensor so I could get it past emissions. That left the afternoon to wrap up the valve job. Got all the exhaust seats done and lapped to show about a 0.070" contact patch. Glad they are done. Those inserts were tough on the grinding stones....
Hi Jim,
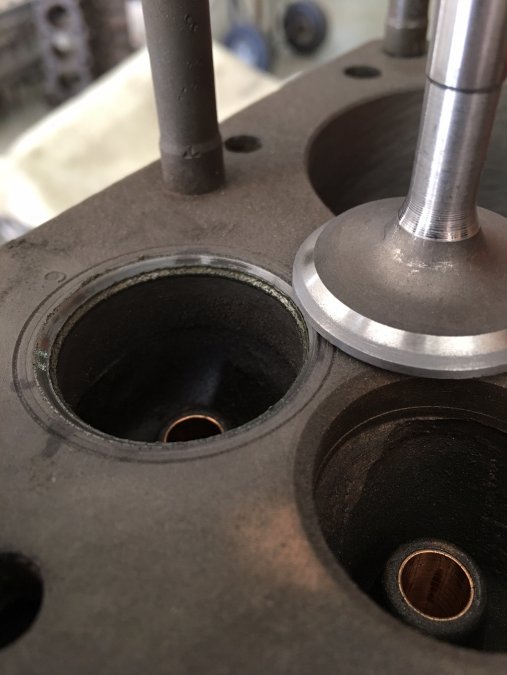
Looking at the photos of your exhaust valves (and I think your intakes were similar), I'm wondering if there was any concern over the small distance from the seat OD to the valve head OD? This photo shows only a very tiny sliver of shiny metal running along the outer circumference of the valve face, just outside the dull ring that indicates the contact band between the valve and the seat. I've run across a few articles or sets of instructions online that indicate this sliver of shiny metal should be larger than this appears to be, for durability/longevity purposes. One set of instructions by GM says it should be at least 0.020" wide, while others say at least 1/64" (~0.016"), while still another says it should be at least 1/32" (~0.031") wide. But then I find forums where guys who do this type of machining for a living say they only leave 0.005 - 0.015" width, or in the case of intake valves, sometimes none at all.
The reason I ask is because the contact patterns on my valves (both intake and exhaust) look very much like those on yours, and they measure no more than 0.015" on the exhaust valves no more than 0.010" on the intakes) and before I install them in my engine, I want to find out if there could be any durability issues. If so, then I might be able to order slightly larger OD valves that will work in my application (265 cid flathead six) to hedge my bets. But I'd like to find out what your experience has been with these valves, and what the gurus at your shop say about this sort of thing.
I'll note that my engine will be hopped up a little, with 8:1 compression, a moderately modified cam, dual carb intake, dual exhaust, and re-curved distributor with electronic ignition. Also, when driving at highway speeds, the engine will be at 3000 - 3200 rpm continuously.
I will also note that the seat widths (contact patches as seen on my valve faces) are in line with the requirements (about 1/16" or so), so at least that's a plus.
Anyone else who may have input on this, your advice is appreciated too.
Thanks!
-
Merry Christmas and Happy Holidays to everyone!
-
 1
1
-
-
Just wondering if anyone here has heard from Knuckleharley (I think his real first name is Arthur). He used to post pretty regularly and frequently, but I haven't noticed any posts by him lately and it appears that his last visit to the site was in early August. He posted more than once about having cancer, saying that things weren't going so well, so I kind of fear the worst. I don't know him personally, and I'm not sure what made me think of him, but it occurred to me that I hadn't seen any activity from him lately, so I figured I would ask.
His profile indicates he lives in North Carolina. Not sure if anyone out in that direction knows him well enough to know his current status.
-
On 11/23/2022 at 5:07 PM, Mertz said:
Turns out that the Valvoline is GL-4 and GL-5. With my non synchronized transmission is it ok the have the 5. Masterpro makes a straight 140 that is GL-4. I can order it from oreillys in a gallon for $22. I don’t know anything about this oil brand.
If I recall correctly, even the non-synchronized transmission may have some yellow metal in it (brass or bronze). I seem to remember that when I rebuilt the 4-speed non-synchro transmission on my '49 Power Wagon, about 20 years ago, the reverse gear had a bronze bushing inside it. I suspect the trans in yours would be similar. I honestly don't recall what gear oil I used in mine, and I don't know that the yellow metal concern was a consideration for me at the time (not on my radar). The truck had that oil in it for close to a decade before I pulled the transmission and engine to do engine work, and that's the way it sits now, so I don't have an update for you, but I just wanted to mention the likelihood of the presence of some yellow metal in your transmission, despite the absence of synchros.
Going forward, I will be looking for gear oil that is compatible with yellow metal whenever I get my truck back together.
-
A brief mention was made of this above, but I'll repeat the idea of using a resonator. However, I have say that I don't have any personal experience with resonators. I only mention it because Tom Langdon recommended that I use one when I spoke to him once about exhaust systems. He said that inline sixes tend to produce an increased volume at around 2500 rpm, give or take a few hundred rpm, which can be annoying for many people. He said the way to quiet it down is with a resonator. I haven't gotten to that stage in my project yet, so I can't comment personally about it yet.
-
2 hours ago, Dodgeb4ya said:
Thank you China manufacturing.
Actually, you might be surprised to find that these faulty pumps were made here in the US. If you look at the photos taken by Freewheeling Tony Smith (shared in JBNeal's post above), you'll see a couple of photos showing "made in USA." One is on the box and one is on the pump cover. Sad but true.
-
1 hour ago, Marcel Backs said:
I'd rater wait it out and get NOS parts. No more fattening the pockets of purveyors of BIG RED GARBAGE DRAGON parts! Way too bad Japan is not reproducing them and too bad north America is not producing too much anymore. We all need to cut off our dependence on such a poor global citizen like COMMUNIST china since they treat people as bad as the crap they pawn off on our continent. M
My understanding is that these faulty pumps are made here in the USA. Some of our manufacturing has really gone downhill.
-
On 7/24/2022 at 1:55 PM, Marcel Backs said:
update on oil pump seizure: I took off the oil pan and had a look up at the camshaft which looks unscathed with healthy teeth. I am trying to source a NOS oil pump from a auto parts store which has been around since 1925. I got lucky getting the proper 6v coil for my car there, so I may be lucky a 2nd time. It is fortunate that the oil pump gear was made with cheap scrap like the rest of the assembly and the missing bits found in the oil pan. WHEW!!!!!!
I'm glad you didn't have any damaged teeth on the camshaft itself. It might be true (or might not be true) that the oil pump gear is made of something inferior to the camshaft gear, but that's no guarantee that the camshaft teeth will be spared in the event of an oil pump seizure. I read about one guy who found a couple of camshaft teeth that were missing some chunks after his pump seized. I believe he spent some time dressing the edges of the damaged teeth and I believe he was able to continue using the camshaft. Fortunately, luck was with you on this one, so you don't have to do that.
It's just so extraordinarily aggravating that the companies making some of these aftermarket parts are cutting corners so terribly that these types of things are happening. Across the various forums that I belong to, there have been NUMEROUS accounts of oil pump failures, due to shaft seizures. When confronted with this, the manufacturer simply replies that it was the installer's fault, saying they must not have soaked the pump in oil thoroughly enough prior to installation, per the included instructions). That's despite virtually all of these installers (usually the vehicle owners) swearing that they did the proper soak. The folks who own these vehicles are usually very conscientious about their vehicle maintenance and repair practices, and I have no doubt that most (probably all) of them used the proper procedure. The fact that there's been a rash of these failures, which I think were previously unheard of, indicates pretty strongly that there's something up with the pumps themselves in recent years.
The good thing is that the failure of the pump teeth and/or camshaft teeth will result in loss of distributor drive, so the engine will stop running and no damage will be caused by loss of oil pressure.
-
 1
1
-
-
5 hours ago, Sniper said:
Where are you shipping it to?
Sarasota, Florida.
-
6 hours ago, kencombs said:
Good choice IMO. On the Fastenal question, they suspended the service I think in the earlier days of the pandemic. The biggest issue is their two zone system. They have an East and West zone and only ship within those zones. Shipments are never sent inter-zone. So your destination must be in your sending zone.
Lots of guys have posted on other sites about using Greyhound. Seems to work but can be slow as it is a space available service with no transit time warranty. And limited coverage for damage.
Ok, all good information, Ken. I get the impression that the buyer is in kind of a hurry to get the crankshaft, so Greyhound might not work, but I'll still check in with them.
-
Thanks for all the responses, everyone. When I talked about using spray foam, I meant that I would wrap the crankshaft in plastic first. Yes, the spray foam would otherwise stick to the crankshaft. I think I'm going to go the route of the spray foam without the internal supports at the main journals. Those would add a fair amount of weight and I'm not sure they would enhance the protection much and might actually add risk of damage if the box gets dropped and that shock transmits into the shaft through those supports.
-
On 10/31/2022 at 9:40 PM, vintage6t said:
Fastenal also does third party shipping via thier logistics operation. I've shipped engines and other very large items through them in the past. Last time was 3 or 4 years ago and the price was still reasonable then. Drop off at your nearest branch and pickup at the nearest destination branch.
Thanks, I'll check with them. I've also used them, but last I remember, I thought I heard that they were no longer doing this. Or maybe I'm confused by the fact that my nearby Fastenal no longer sells fasteners to the public. Maybe I'm confusing the product sales side with the shipping side. Or maybe it's just the local Fastenal that doesn't do it anymore.
-
On 10/31/2022 at 9:04 PM, JBNeal said:
Maybe verify with the recipient what shipping method is acceptable...I have shipped bulky items by Greyhound and by FedEx Freight to the nearest town, then I had to go pick them up, which was kindofa hassle as neither station was enthusiastic about letting me get my stuff out of their cages cuz they both had reps with a case of the don't-wanna-try. I have since become acquainted with several ppl at FedEx Freight so I can call them directly instead of dealing with the automated operator round'n'round.
Good point. I'll contact the buyer and see what he says. Thanks.
-
On 10/31/2022 at 3:19 PM, desoto1939 said:
you could also ship via Grayhound Bus. I did that for some chrome molding for a 1942 Desoto.
Rich Hartung
Hmmm, interesting thought. I may look into this. Thanks.
-
On 10/31/2022 at 2:27 AM, Go Fleiter said:
I got my redone crankshaft back in the trunk of a Taxi car. 25 mls were enough to distort the shaft: 0,0004 inches off center.
I brought it back to the shop on the back seat of my car and one of the old mechanics was able to get it aligned perfectly with a dozen hits on strategic points with his leather protected chisel and hammer.
So, You must find a way to send it excluding the risc of getting it back out of alignment.
The machine shops should have tried out safe methods!
Greetings from Düsseldorf!
Go
That's interesting that you had a crankshaft warp due to transport in the trunk of a car. I also had a freshly ground crankshaft that was transported by the grinder in his trunk to a central meeting location where we moved it to my trunk and I brought it home. Total "trunk time" was about 2 hours. But I didn't experience any warpage. I measured every main journal very carefully and they were all within 0.0001 or 0.0002" TIR (total indicated reading). This was for a 265 flathead crankshaft.
As for the 251 crankshaft that I'm preparing to ship, it is used and in need of regrinding, so any damage that is incurred during shipping, so long as it is relatively minor, can be corrected by grinding. Thanks!
-
Hi all,
I'm preparing to ship a 251 crankshaft and trying to figure out the best, most secure but least expensive way. I've never shipped something so heavy and odd-shaped.
I started constructing a wooden crate this afternoon, with the idea of making supports for each main journal, but I read a post on another forum, where someone said not to make things so rigid that the box will transfer the shock of being dropped to the crankshaft. Another post on that thread suggested making a crate, placing the crankshaft in it and surrounding it with spray foam.
I'm leaning toward the foam idea, without the supports at each journal. That's also something a friend of mine suggested. I just hope the spray foam is durable enough to stand up to rough handling, up to and including being dropped, without breaking down or squishing to where the crank will end up being loose and less protected.
Any comments or ideas?
Any idea how much shipping this thing would cost?
Should I use one of the standard shippers like UPS or FedEx, or is there another shipper that's better for this type of thing?
Thanks!
-
1 hour ago, wallytoo said:
the wilson starter had the same issue as far as the distance the pinion gear protrudes and travel distance. i hedged my bets by adding a thin washer between the bellhousing and each of the starter mount ears to shim it out just a touch. it is working without grinding; it releases from engagement (no run-on). is it possible i didn't need to shim it? of course. but i looked at the same thing you noted and decided i only wanted to install it once.
re: the cork gasket - yes. there are two used on the filter boss. one for the inlet, one for the outlet. they are relatively small diameter, and perhaps could have been a smidge thicker (which would have prevented the leaks), as it is just a compression fit between the boss and the filter housing. it's also possible they are paper, not cork - i installed them back when i put the engine back in the truck 2 years ago, when i didn't realize the starter was going to interfere with the placement of the filter. so, those gaskets have been there and i don't specifically recall what they were made out of...
Ok, that makes me feel a lot better. I was also already thinking about whether I might need to shim out the starter by using some washers or something, but didn't know if that would work. Sounds like a pretty good chance it will work, based on your experience, though. I'm a little more hopeful again. Thanks!
-
A lot of good info, Wally. You're right about needing to open up the starters if I'm going to swap the levers, and that should have occurred to me before. I'd much rather not have to do that, so I will probably try bending the lever on the one I just bought. The clocking of the two starters (bolt pattern location relative to lever) is not identical, but there's not a huge difference, so hopefully I can make it fit.
I also took a closer look at the new (to me) starter and noticed that when fully retracted, the pinion gear protrudes from the housing farther than the gear in my original starter. The gear is also a little longer and its travel is less. All of those things make me wonder once again if it will work out not. It will be several months (at least) before I will know. At least the nose is the same length (3") on both starters.
Anyway, I'm happy yours seems to be working out. Also glad you got the oil leak fixed. When you talk about a cork gasket, are you referring to the gasket between the filter and the engine block? I guess I figured that would take a paper gasket of some sort.
-
I'm sorry that you're having such issues, Paul, but it sounds like there is a little flicker of improvement, which sounds encouraging. I'm 52 years old, and I have some days in the garage when I only get in three hours before I'm tired. The crucial threshold is whether you make progress at all, even if it's not more than three hours a day, or not even everyday. I wish the best for you, and I look forward to seeing your upcoming posts.
-
On 7/3/2022 at 2:08 PM, wallytoo said:
matt, i went ahead and ordered the 1821 (mch6106) from the filter pro site today. it was free shipping, and the total with core charge is $265.10
i got tired of looking for a decent used short-body starter, so i am willing to pay for new. this should allow me to install the full-flow oil filter - the original topic on this thread......
Ok, good to hear you went ahead and pulled the trigger on that. Let us know when you try to fit it, along with the filter. It'll be good to hear if it does actually fit properly.
I ended up lucking out (one of the few times on this truck project, it seems), by purchasing an MCH6103 starter that was rebuilt by a guy who has been rebuilding starters for 60 years. He goes by pammiesuesguy on ebay. Seems like a really nice guy, answered all my questions patiently. I was the only bidder, so it means I got it for the starting bid that he had placed on the starter. I actually bid higher than that, as a way of showing my appreciation for his patience in answering my questions, but apparently eBay defaults to the starting bid if you win the auction as the only bidder.
The starter arrived and looks basically new. I haven't tried to fit it to the truck yet, since the engine is on a stand for rebuilding, but based on the measurements and some careful eyeballing, I'm sure it will fit. Plus, it's one of the numbers recommended by Dodgeb4ya.
I will probably have to swap the input lever from my old starter to this rebuilt one, or perhaps slightly modify the lever on this rebuilt one, but that should be simple, I think (I hope).
-
Just FYI - when I've tried using Evaporust on cast iron, including my engine block, it has left the metal black, and I had a very hard time getting it off, and in fact, haven't been able to get it all off. I've decided that for the most part, I'm not going to use it on cast iron.
Hopefully your experience will be different, but I just thought I'd mention it.
-
1
-
-
Resurrecting this old thread. I was doing some searches for info on this site and found something of interest posted by James Curl, so I sent him a PM. Didn't hear anything for a few days, so I looked at his profile to see when the last time was that he had gotten on the forum, and it was some time in 2016. So then I did a Google obituary search and I found an obit for someone by that name, shortly after the last time he logged onto this site, and it was a Texas obit, and in one or two of his posts, he had said he lived in Texas. So I'm pretty sure that was him. Another sad loss.... Just figured it was appropriate to recognize him and to let you all know, if you didn't already know.
-
18 hours ago, Bryan said:
Thanks. I have the bottom to do and then I'll deburr the block and clean the ports up. One thing with the gun brushes, it leaves tiny brass bristles. I'll have to pressure wash it again at one point, but would have to anyway after the grinding. I looked at the water jacket areas. They are all around the ports and the valve areas. Can't take too much off in the ports, just gasket matching and cleaning off edges.
If you're finding remnants of the brass bristles, you might consider buying a brush kit made specifically for engine cleaning. I bought one made by Moroso (I think) and bought it off Amazon (I think). I seem to recall it was about $40, and it had quite a variety of brush diameters and lengths and they are all very stiff, scratchy brushes made for scraping off crud. I haven't cleaned my block yet, but I've cleaned quite a few other parts and haven't noticed any bristles coming off.
As for solvents to use, I bought a couple of gallons of mineral spirits, which I will use to clean my block, and I also have used a LOT of brake parts cleaner on a variety of engine parts and other parts. I like the CRC Brakleen, as it is not flammable and doesn't evaporate as quickly as others, which means I don't have to continually spray it onto/into whatever I'm cleaning to make up for what's evaporating, and it makes it less prone to chilling the parts and producing condensation, which can cause flash rust. I believe they even sell the stuff in large buckets that are more economical and keep you from having to buy it as often.
-
1
-
-
The ones I've seen and used were pre-molded into an L shape, but you might be able to buy a length of heater hose or flexible house and get it to make the bend without causing it to kink.
Brake Questions
in Mopar Flathead Truck Forum
Posted · Edited by Matt Wilson
Hello all,
I'm planning the dual master cylinder upgrade for my '49 Power Wagon, and after doing a LOT of reading, I've learned a lot, but still have a few questions.
First, a little background info. I plan to use the factory drum setup at all four wheels (at least for now), and I plan to install a Toyota master cylinder (for a 1992 - 94 Camry), which has the common three-bolt mounting pattern used on many Toyotas, which is very similar to the original Power Wagon mount pattern. In other words, the new master cylinder will be in the same location as the original, which is down low (not high, like the firewall-mounted types going on later vehicles).
1) I've read a number of sources, including the forums on this website, that say four-wheel drum setups on other vehicles do not require proportioning valves. Mostly, no explanation for this is offered, but in a few instances, the explanation is that the wheel cylinders were sized from the factory so that the rear brakes would produce less braking force than the front brakes (i.e., smaller wheel cylinder bores in the rear than in the front), thereby eliminating the risk of rear wheel lockup doing hard stops. In the case of the Power Wagon, however, the wheel cylinders are the same in the rear and on the front, so do you all agree that a proportioning valve is appropriate?
2) Based on what I've read, it seems it would be best to use residual pressure valves, and as I understand it, the factory master cylinder had such a valve. Use of valves rated for 10 psi seems to be the general consensus for drum brakes, at least as a starting point. When I look into the two outlet ports of the new master, I see conical brass pieces. Are these the residual pressure valves? If so, I suspect I should remove at least one of them, if not both, before installing my own, but how do I do this? The Camry of that era has disc brakes at least in the front, and some have discs in the rear too, but they all seem to use the same master cylinder (it appears that the only time a different master is needed is when the car is equipped with four wheel ABS). With all this on mind, I know I'll need a higher pressure residual valve at least in the front (disc) outlet port, since valves for discs are set up for only about 2 psi, and I might possibly need one at the other port too (if it's set up for discs). If I can't determine whether the new master has residual pressure valves, or if I can't remove them, is there any issue with going ahead and adding my valves anyway?
3) I can't tell which port of the new master goes to the front brakes and which one goes to the rears. I would normally assume that the front outlet goes to the front and the rear to the rear, but the guy at O'Reilly said something about the ports being the opposite of this. I don't know if he was right or not, but I figured I should find out. How do I tell? Does it really matter, if both use the same bore size and I'm going to install my own residual pressure valves anyway?
4) The bore of the new master is 1", whereas the factory master cylinder bore is 1-1/4". This means braking will require less pedal effort for a given amount of braking force at the wheels, but will it also mean more pedal travel than the original? It seems that it shouldn't, since there are now two pistons pushing fluid out to the wheels, instead of just one, even though they are each smaller pistons that the original one. In other words, the two 1" pistons are each supplying two wheels, rather than the single 1-1/4" piston supplying all four wheels.
5) I've read that some vehicles have split the brake circuits not into front and rear, but into LH-FWD/RH-AFT and RH-FWD/LH-AFT. Is this something I should consider doing, since I have the opportunity? I can see some advantages, meaning you'd always have at least one front brake working, but there must be some reason most manufacturers don't do that.
Any info and insight is appreciated. Thanks in advance!