


bkahler
-
Posts
2,018 -
Joined
-
Last visited
-
Days Won
42
Content Type
Links Directory
Profiles
Articles
Forums
Downloads
Store
Gallery
Blogs
Events
Everything posted by bkahler
-
Do some research on the Mopar 833 transmission, also known as the NP-440 transmission. I think they came or could be configured with an overdrive.
-
Typically the final output ratio of a transmission is 1:1. Overdrive transmissions have a ratio that is less than 1 where the transmission output shaft is turning faster than the engine crankshaft. Two ways to improve your MPH. One is an Overdrive transmission and the other is changing the differential ratio to less than 4:1 such as 3.73:1 or lower. My 51 has a 3.73 and the few times I've had it on a 55 MPH highway it has been pretty decent. I'm still working out all the bugs so highway driving has been minimal. Brad
-
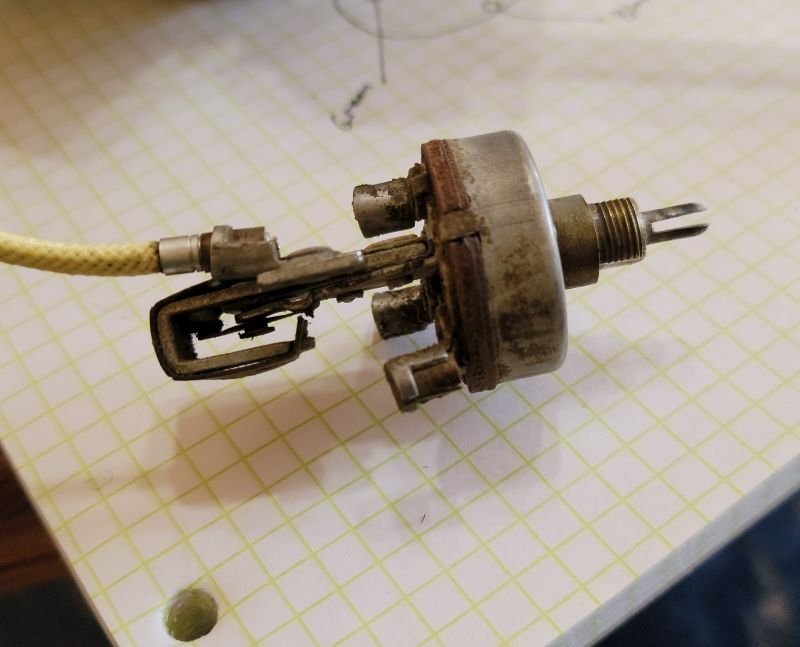
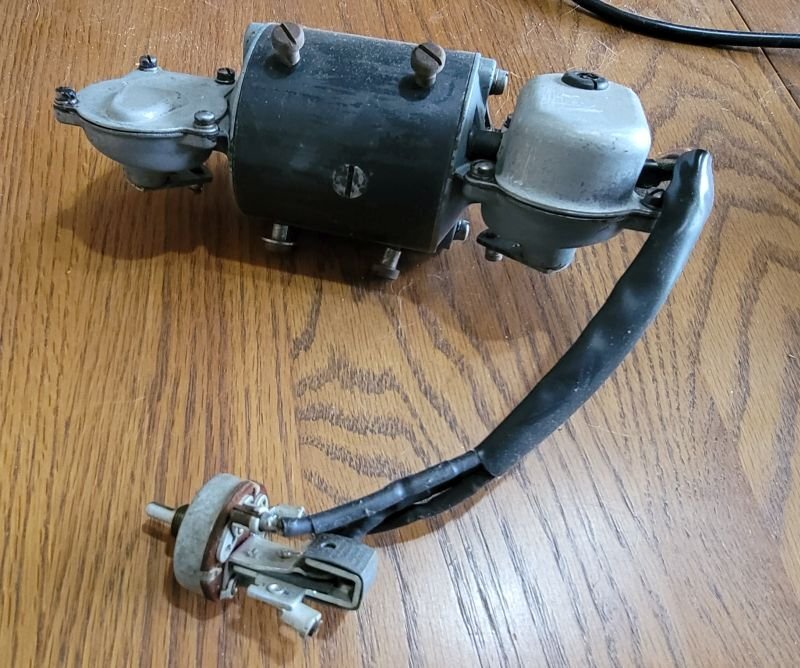
This is the original wiper motor switch for my 51 B3B. It has a power feed wire connection and three wire connections that go to the motor. My guess is the switch you have is not a wiper motor switch. Just about every switch on my truck had screw connectors or push-in connectors as shown on my wiper switch.

-
Pitman Arm Attachment to the Steering Gearbox
bkahler replied to bkahler's topic in Mopar Flathead Truck Forum
At a minimum, to use one of the other three positions it would require a pretty radical drag link 😄 -
Pitman Arm Attachment to the Steering Gearbox
bkahler replied to bkahler's topic in Mopar Flathead Truck Forum
...with only one of the positions being correct 😁 -
Pitman Arm Attachment to the Steering Gearbox
bkahler replied to bkahler's topic in Mopar Flathead Truck Forum
That's what I thought I remembered, but without out photos to back that up I wanted to make sure. Thanks! -
Brakes just slow you down.... 🤣 I doubt there is anyone on this forum that hasn't driven their truck without brakes or other bits and pieces properly fastened down. I know I certainly have.
-
Traffic jams certainly aren't a recent phenomenon are they
-
I have a quick question on the Pitman arm attachment to the steering gearbox. Can the arm be fitted in any position or is it keyed to the gearbox shaft so that it only fits one way? It's been long enough since I worked on the gearbox that I don't remember which is correct. Thanks!
-
To bad about the locksmith. My local locksmith charges about $10 to generate a key if no key exists, at least for the older locks. He's done several for me and over the years.
-
51 B3B build thread - after all these years
bkahler replied to bkahler's topic in Mopar Flathead Truck Forum
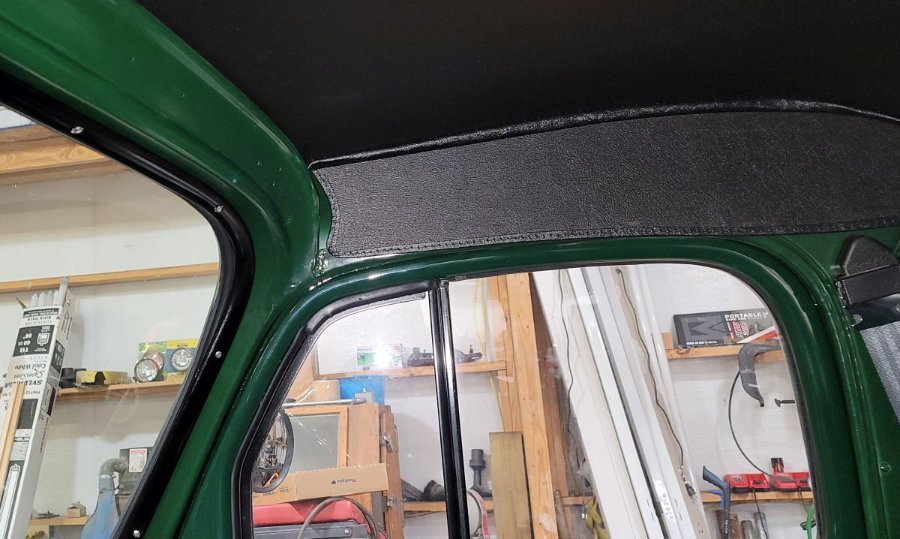
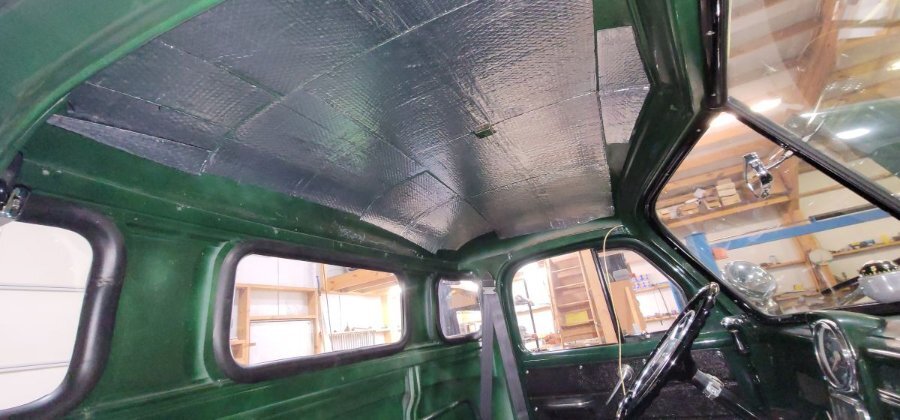
The problem is the right side upper panel is hitting the front of the cab, not allowing the side panel to move forward. The only option I see is to remove the headliner, trim the front edge and try again. I'm fairly certain if I try that I will screw it up big time. I will wait for a while as you suggested to see if it doesn't conform a little more but I'm not holding my breath -
51 B3B build thread - after all these years
bkahler replied to bkahler's topic in Mopar Flathead Truck Forum
It won't move once I put the push-pins in that hold it in place. -
51 B3B build thread - after all these years
bkahler replied to bkahler's topic in Mopar Flathead Truck Forum
Do they sell it in black......? -
51 B3B build thread - after all these years
bkahler replied to bkahler's topic in Mopar Flathead Truck Forum
That's most likely what I'm going to do The only way I can see to close the gap is to remove the panel, trim some material off and try again. I'm not to keen on doing that. Getting lazy in my old age! -
51 B3B build thread - after all these years
bkahler replied to bkahler's topic in Mopar Flathead Truck Forum
Yesterday I added the insulation or sound deadener to the cab ceiling and this morning I had a friend stop by to help me set the ABS headliner in place. The installation itself was surprisingly easy, however there is an issue of fitment above the passenger side door at the front. The drivers side fits nice and tight, where on the passenger side there is about 1/4" to 3/8" gap. No matter how much tugging and pushing that I do I can't get the gap to close up. Any suggestions on how to correct this, or do I just live with it?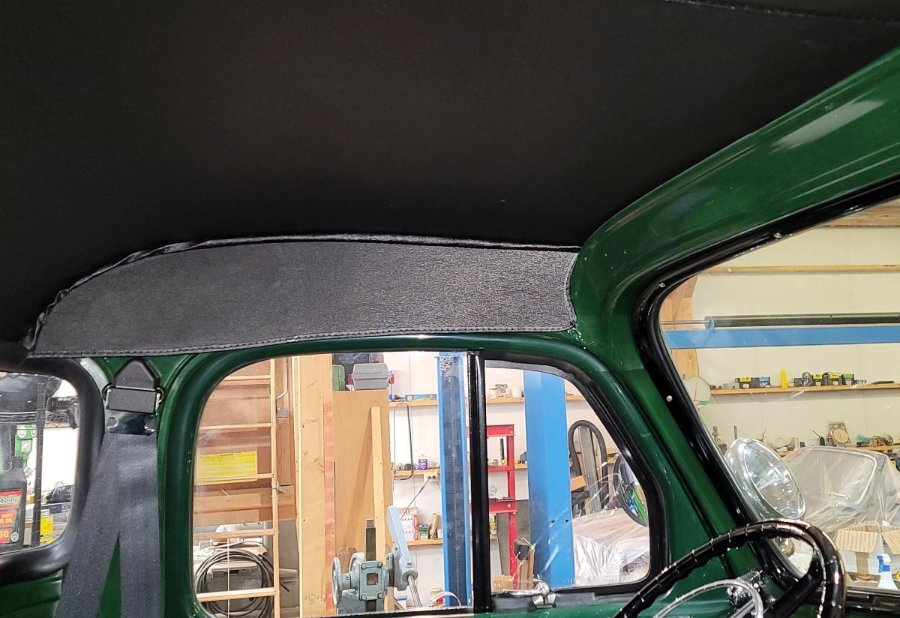
-
I did a quick check of a spare generator I have on the shelf and the resistance reading between the brush holder and the frame and it was infinite resistance. Hopefully the Mica insulation sheet will solve my problem.
-
Some new evidence has come to light. The test I described in my initial post that I indicated was successful on my generator, I decided to re-test it on the work bench. According to the information I had it appeared to pass the test again so I decided to look for youtube videos showing the same test being performed. What I found was in the videos the generators being tested ran a lot faster than mine did, by quite a margin. When I originally installed the generator it charged properly, and since I thought it passed the running test that my problem was elsewhere. After seeing it run so slow compared to the videos I decided to take the bearing plate off on the brush end of generator. What I found was the oil I had used to oil the sleeve bearing had seeped in between the brush holder frame and the generator frame. There is a piece of cardboard of sort used as insulation to isolate the brush frame from the main casing. This insulation was oil soaked. Using an ohm meter I did a resistance check and it was reading about 25 meg-ohm. That's a high resistance but I believe there should really be infinite resistance. I spent some time searching for Mica sheets and finally found some on ebay in the size I was looking for. If the USPS can manage to make the delivery I should have the Mica by the weekend or early next week. I'm not sure why there was so much oil inside the housing, possibly I didn't install it correctly during the rebuild. I'll be looking at that while waiting for the Mica. I'll let you know how it works out.
-
How Many Pilot House Trucks Have Survived?
bkahler replied to Bradley S.'s topic in Mopar Flathead Truck Forum
Show up at midnight at 4740 Co Rd E16 in California and you can have a set of stainless bars 😄 -
51 B3B build thread - after all these years
bkahler replied to bkahler's topic in Mopar Flathead Truck Forum
Los, I rebuilt the generator. I used a rebuilt armature, new brushes, bearings, etc. I just talked to a generator repair shop and I told him about the running test where you connect B+ voltage to the armature and the generator runs. The next test is to short the F terminal to ground and it should slow down and it does. The shop said the generator should be good if it does that and mine does. That leaves the wiring or the regulator. I swapped out the electronic regulator for a NOS regulator and no change. I have one more NOS regulator that I will try to day, hoping for it to work! -
JB, what you're describing would imply that there is zero voltage at the B connection on the voltage regulator. Looking at the wiring diagram the ammeter gets voltage from the starter/battery connection. If the ammeter wasn't functioning then no voltage should be present at the B connection. On mine, I have a solid 12volts at the B connection. Am I missing something?
-
51 B3B build thread - after all these years
bkahler replied to bkahler's topic in Mopar Flathead Truck Forum
Freshly rebuilt 12v generator. I have a couple of NOS regulators and a voltage regulator that I had someone convert to solid state. What baffles me is the NOS regulator gave the exact same results as the solid state regulator. Zero volts on the Field terminal and the Armature terminal. I'm going to look closer at the grounding to see if it's ok. That's the way of the modern world we live in.... -
While I was driving to get tires on my truck the generator stopped charging the battery. My first thought was maybe the solid state voltage regulator that I have installed had failed. So the first thing I did was to disconnect the regulator and perform a test on the generator itself to make sure it was ok. I performed the following test on the generator and it passed the test. To test a generator remove the belt and unhook the F terminal on the generator. Using a heavy wire run battery positive to the A terminal on the generator. It should spin fast like a motor. While motoring, ground the F terminal. It should slow down but continue to motor. if these tests pass, time to test the wires. Next I replaced the electronic voltage regulator with a New Old stock Rebuilt Replacement unit. I got the same results, no charging. There is zero voltage on the Armature and the Field connections. I did perform the polarization of both regulators before starting the vehicle so it shouldn't be a polarization issue. I have one more NOS voltage regulator that I'm going to install. If that doesn't resolve the issue, any suggestions on where to look next?
-
51 B3B build thread - after all these years
bkahler replied to bkahler's topic in Mopar Flathead Truck Forum
Kinda like my skin The ride was definitely better with the new tires. For some reason during the drive my generator decided to stop charging the battery so now I need to resolve that issue before I can drive it again -
51 B3B build thread - after all these years
bkahler replied to bkahler's topic in Mopar Flathead Truck Forum
Merle, as a matter of fact I have the Rusty Hope conversion. Thank you for that little tidbit of info. I'm guessing it is the width of the plates that were added to hold the calipers. Guess what I'm doing this week... -
Ignition diagnostics - symptoms of a bad condenser
bkahler replied to bkahler's topic in Off Topic (OT)
The two on the right are correct and likely the original plugs, because service bulletins eventually changed them to a BPR6EY. The one on the left, who knows what went through the head of the guy who installed it, probably not much....

