bamfordsgarage
-
Posts
932 -
Joined
-
Last visited
-
Days Won
15
Content Type
Links Directory
Profiles
Articles
Forums
Downloads
Store
Gallery
Blogs
Events
Everything posted by bamfordsgarage
-

Did ya see the ebay ad for the diesel 40 Plymouth coupe?
bamfordsgarage replied to BobT-47P15's topic in P15-D24 Forum
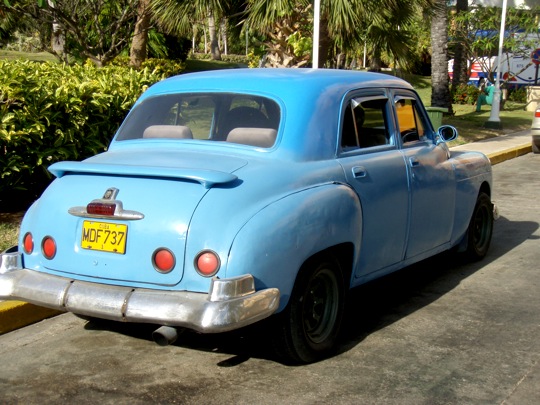
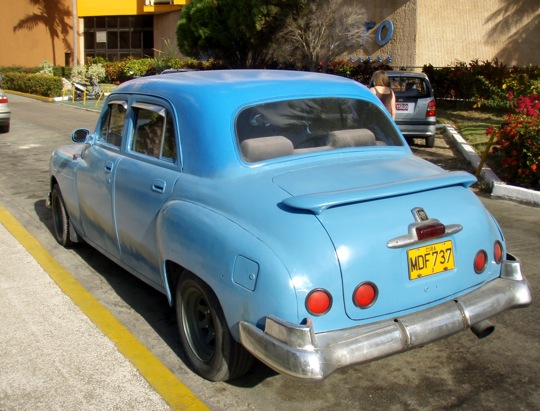
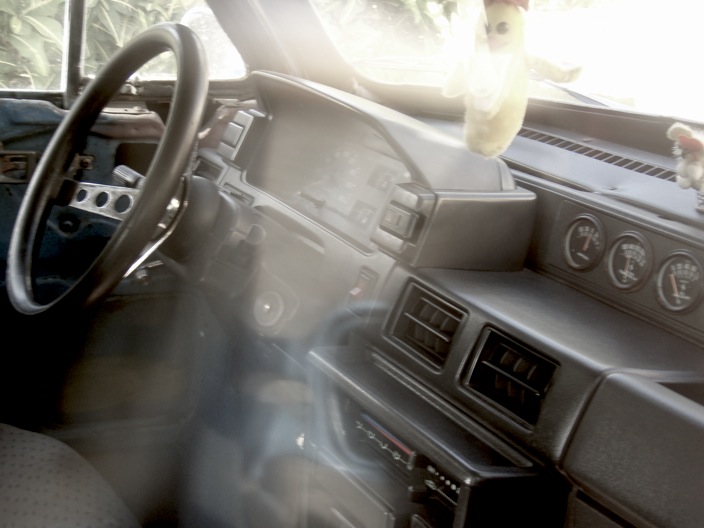
Here is an old Plymouth we saw in Cuba a couple years ago with a Land Rover diesel engine and (I think) dashboard. I've got plenty more CubaCar pix if folks are interested. It was fascinating to what they did to keep some of those heaps on the road.


-
Good on ya, Mate! And I notice that your post today also marks the auspicious occasion of your 100th post to the forum — a nice start to the year of no excuses.
-
I'm running the original (rebuilt) 6-volt generator on my 1947 D25 Canadian Dodge. The car is driven a lot — never ran short of electricity even with auxiliary lighting, heater, radio, etc. Six-volt system performance is very sensitive to poor connections, grounds, corrosion, etc.
-
Indeed. That was supposed to be posted to the Generators/Alternators thread. Oops.
-
I'm running the original (rebuilt) 6-volt generator on my 1947 D25 Canadian Dodge. The car is driven a lot — never ran short of electricity even with auxiliary lighting, heater, radio, etc. Six-volt system performance is very sensitive to poor connections, grounds, corrosion, etc.
-
From the GM Heritage Center website at http://history.gmheritagecenter.com "Fisher Body developed the industry’s first one-piece all-steel roof, called the Turret Top, and introduced it on all GM cars built in the U.S., beginning with the 1935 model year Chevrolet lineup. Previously, car roofs had been built around a wooden frame covered with canvas, limiting both the vehicle’s structural integrity and its design potential. The second photo is a unique testimony to the turret top’s strength." I had a 1935 Chevrolet Master Deluxe Sport Coupe (3-window) many many years ago. Although the roof was one-piece all steel, there was plenty of structural wood elsewhere in the body.


-
Blueskies: "...I don't think there is any way to know if you "got it right" unless you drive the car for a time and then take the drums back off to look at the wear pattern on the shoes. The only thing you can tell by adjusting them "by feel" is if a shoe is dragging inside the drum. You can not tell if it is the heel or the toe, or the the edge of the shoe, or the whole shoe, because when the drum is in place you can't see the shoes...." I'd like to think its possible to adjust new brakes reasonably well without the tool. Last summer we did a major overhaul of my D25 brakes, including new cylinders, shoes and a number of lines. If there was a tool available, we certainly would have used it. But FWIW, here's what we did instead: 1. Sat down in front of the backing plate with the repair manual and a large coffee. Spent the better part of an hour looking at the book and all the parts, following the procedure in the manual and making sure I understood the process exactly how it was done, why, and the desired result. 2. Rough adjustment by eyeball and feel. 3. Fine adjustment with masking tape (see photo). This was a quick and easy way to see exactly where the shoes are touching the drum. Put tape on the shoes, put the drums on and rotate, pull the drum and look at the tape. Contact area will be an obvious mark on the tape. We found we could "read" the tape to determine if the contact was heavy or light. 4. Make an adjustment, remove the tape and put on a new piece, check the tape, repeat, repeat, repeat as necessary. The tape is only a few thou thick (can't remember exactly), so once the brakes are adjusted and the tape is removed, there is just enough clearance to prevent drag. The first wheel took a long time. By the time we adjusted the fourth wheel, the process was reasonably quick. Our first test drive and the longer one to Hershey showed no tendency for side pulling or other mis-adjustment indicators. When finished, the contact area was not anywhere near 100% but was reasonably well distributed on the shoes. I assume the spotty contact area was at least partially due to the shoes not being ground to the exact diameter of the drums (which we did not have turned as there appeared to be little need). In any event, we figured the shoe adjustment and size was close enough and would wear in fairly soon. In fairness, we have not pulled the drums to check wear patterns. I'll do that when we get back home in the spring.

-
Hi Greg, we have a pretty good idea of the itinerary now. Before we leave the DC area, there'll be a little get together for tire-kicking and a meal with the local P15-D24 folks (Jim, Joe, Chet, Rodney and maybe a few more if anyone's interested) then we head for North Carolina. Our travels will take us to Hillsborough NC, Sumter SC, Lyons GA, Tallahassee FL, Mobile AL, Stennis MS, Nawlins and Shreveport LA, Brownsboro Dallas and Arlington TX, Route 66 from OK City to Tulsa, Manhattan KS, Pikes Peak Berthoud and Loveland CO, Laramie WY, Bozeman Deer Lodge and Helena MT, and Lethbridge AB.
-
So I was chatting yesterday with our local Model T parts vendor when he said "Hey Chris, that was a nice article I saw on your Dodge in Old Autos last month". Huh? I get this Canadian bi-monthly paper, but don't always read through every issue. Dug out the Nov 15/10 issue, section two, and there it was... four photos and a nice little write up about our run to Hershey in October. Such a treat, and what a surprise. Of course you can't always believe everything you read — they've got us driving to Virginia after Hershey, which is correct, but then have us storing the car in Vancouver for the winter before heading home via the southern US! (Virginia to Vancouver BC and back would be a 5,800 mile round trip, just to put the car in storage for the winter.) I'm not exactly sure who this Gary Porter is who wrote the piece, but from the story details, he is likely a forum member. We talked with a lot of people at Hershey including a number of Canadians but I'm afraid I can't quite place this fellow. Maybe it was my friend Jerry who spoke with him. Anyway, thank you Gary, whoever you are! About our return trip — we had planned to fly back to DC from Edmonton to pick up the car in March, but that has changed. I need to be home in March, so we are expecting to arrive at Jim Yergin's place on Sat Feb 05 to wake the beast from slumber and head on south from there. ETA Edmonton is Feb 23, and 4,800 miles later. And about Hemmings Classic Car — several forum members were lobbying for HCC to publish an account of our road trip to Hershey, and I've been in touch with Editor Richard L about that. They are interested, but it makes sense to wait until after the run home so as to do a complete story start to finish. 47D Old Autos4.pdf
-
Need tips on shipping radiator and drive shaft
bamfordsgarage replied to TJM70's_48's topic in P15-D24 Forum
Further to Roadking's suggestion for shipping the driveshaft in a plastic tube... One can usually find plastic tubes, free, from companies in the window film business, in lengths of 18", 20", 24" 36", 48", 60" and 72". Whatever you do, like he says, make sure things don't flop around. That's just inviting trouble. Another good source for cardboard tubes, although generally not as heavy as those from carpet stores, are drapery/window covering retailers... they often receive custom made product, special rods, etc. in long sturdy cardboard packages. -
winter has officially arrived here in the big city.
bamfordsgarage replied to michael.warshaw's topic in P15-D24 Forum
Thanks '40P, that's a nice look for the car. TodF, I got those chains from under the back seat — this was a mostly original car when I bought it at auction in Sept '06, and the chains, some miscellaneous tools, and the original side curtains (completely shot) and irons were under the seats. -
1949 Dodge Woody Wagon for sale on AACA forum... $1,600
bamfordsgarage replied to bamfordsgarage's topic in P15-D24 Forum
Corrected link... http://forums.aaca.org/f119/1949-dodge-woody-wagon-294287.html -
Thanks Frankie, this seems to work better... http://forums.aaca.org/f119/1941-48-dodge-chrysler-desoto-rear-294302.html
-
www.forums.aaca.org/f119/1949-dodge-woody-wagon-294287.html Price is not a misprint. But it's rough...
-
www.forums.aaca.org/f119/1941-48-dodge-chrysler-desoto-rear-294302.html
-
winter has officially arrived here in the big city.
bamfordsgarage replied to michael.warshaw's topic in P15-D24 Forum
We have very little salt on the road here for the past few years, and yes, I usually wait until it is colder and avoid the slushy roads. I really enjoy driving my cars, but unfortunately they get a little used up that way compared to most collector cars. -
winter has officially arrived here in the big city.
bamfordsgarage replied to michael.warshaw's topic in P15-D24 Forum
They were forecasting snow today and tomorrow, so I chained up in keen anticipation — only a skiff so far, but here's hoping for a big dump soon! My cheerful copilot is here from Nicaragua on an exchange and likes riding in the old car but would happily do without the winter weather (-14C/+7F this afternoon). There's not heat in the '26 T but I do have one floorboard out and that allows a bit of engine warmth into the front seat.
-
In my experience, the folks who do brake relining need to bake the relined shoes to set the adhesive. Check with a relining shop, you may be able to get the adhesive from them, and advice about how best to bake the completed shoe. If you are happily married (and wish to stay that way) the kitchen oven would be a poor choice for this operation. I recall the process wasn't particularly expensive — this may be one of those tasks it is more practical to hire out than DIY.
-
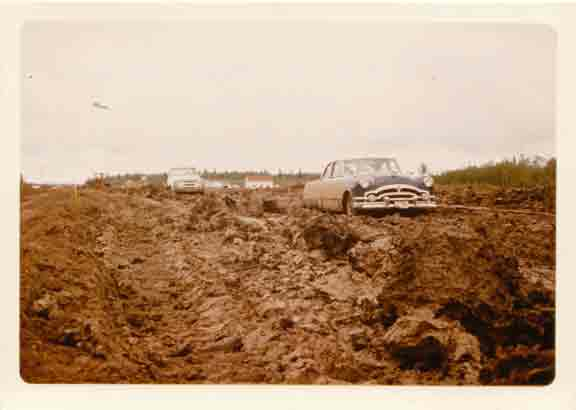
Great thread — I love these old pictures. Here is our 1954 Packard Cavalier... For summer vacation in 1959, we drove from Edmonton AB to Hay River NWT and back (roughly 1,500 miles return). I was only four at the time, and my main memories are horseflies, a ferry and plenty of mud.

-
You could also make the nut very slightly shorter... lay some aggressive metal-grade sandpaper on a sheet of glass or other hard flat surface and carefully sand the non-castle face of the nut. Take care to ensure the face remains 90° deg off the bore. It helps to rotate the nut a bit, say six times, as you are sanding. It is safer to do this by hand, as a belt sander will quickly get you off perpendicular if you are not careful. Taking off a little bit from the face will allow the nut to go on just a bit further and into the ideal position for the cotter pin. The strength of the nut is not materially affected. I have done this successfully on a number of applications, including rear axle nuts which I believe must be fully tightened and never backed off for a cotter pin.
-
Joe, how much too long do those seal ends appear to be? My experience with main bearing seals (on Model Ts, mind you) is that they are left long and squished tight when the halves are bolted together. Same holds true for the felt seals between the Model T transmission cover and the rear of the block. I suspect if the Mopar seals were meant to be shortened before installation, they would have been made shorter in the first place and saved the manufacturer some material cost. Suggest you try to locate a printed reference one way or another before committing yourself to pre-trimming or not.
-
Test with photo imbedded in post text: Both images uploaded to and downloaded from imageshack.com as suggested by Greg G. Thanks Greg!
-
The Mac uses a one-click or two-click sequence instead of the PC's right or left click operation, and there is a little 4-way scroll button that is handy to the index finger. And of course there are accessory Mac mice on the market that have left and right buttons for those who prefer that setup.
-
My mistake... the original picture posted, as download from the forum was 122K, as shown on the Manage Attachments screen, not 220K as I reported earlier. The second item posted downloaded at 128K, basically the same as shown on the Manage Attachments screen. From this I deduce the Manage Attachments screen will perform at least limited downsizing of JPEG images to suit Forum requirements. That should save some time in the future. Tim: sorry, I cannot Right Click, as these Mac mice have only one button. But when I click on the opened thumbnails, it opens the image in a new screen within my (Safari) browser. The first one opened a little larger, the second opened up same size.
-
Thanks Tim, while it could be that pix posted from one's computer (as opposed to an on-line hosting service, which I have never used) invariably show up as thumbnails, in my recent experience, photos posted from one's computer are not particularly limited to file size... The photo in my first post on this thread was from the desktop at 456K, and I have just attached a 792K file from the desktop to this post. This one shows up on the Manage Attachment screen as 127.6K