Yes I'm A Girl..... Interior Post
This is my attempt on a run down of the work done so far on the interior.
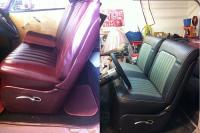
1. The seats were reupholstered from a maroon-color vinyl to a black/grey leather-like vinyl. The back seat was out of a 1980 something blazer. Perfect fit and with new fabric looks perfect! Also notice the maroon carpet trim. I used VHT black plastic/vinyl spray paint. Saved the expense of resewing the trim :-D
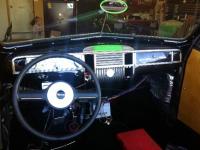
2. If I would have been on top of my game I would have taken before pictures of the gauges. They were Dakota digital and green. Not a good combo for a convertible. The sun is most always on top or behind you, so it was always a guess as to how fast I was driving. I chose Autometer gauges and an aluminum dash insert. The dash was disassembled and removed. My husband and I debated on painting it with an automotive glossy black. A few months later we decided powder coating was far more durable and not too expensive. The local company we use gently sandblasted the dash, glovebox and windshield frame then powder coated. They look great and will not scratch as easily as paint!
3. The steering wheel was a task. I originally chose a Grant three-spoke wheel that the company rep said would work with my steering column (1970 Imperial with tilt and telescoping). SHE was incorrect. In my 13+ years dealing with the automotive industry I have learned that just because a girl can answer the phone or stand at the parts counter does not mean she knows her **** (pardon the language). So, the grant kit does not accommodate telescoping steering and there is no way to "rig" it to work. The husband did some research and found the Lecarra company. They made an adapter kit for my steering column and carried lovely steering wheels. I chose one that looked more retro and decided not to paint in because I'm going for a more "ratrod" look.
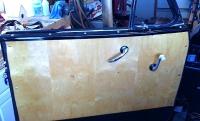
4. My biggest achievement was the driver's side door trim. There was not one on the door and none to be found anywhere. I contacted a few local metal workers until I found one that had experience in fabricating parts on older cars. Luckily, the passenger door had the trim and the guy said he could make one to fit the driver's side. $200 later I have NEW door trim that looks original and fits. Hazah!
Stay tuned for my next update on the exterior (we put in the engine/tranny today!)





7 Comments
Recommended Comments