Jeff.P_46 Posted September 6, 2007 Report Posted September 6, 2007 I'm trying to get "Betty" into paint before winter closes in so I can spend the winter doing the mechanicals. So far I have done the major rust repair and pounded out some dents to the point were I can put some primer on her. I have primed and seam sealed the bottom of the floor (and the rest of the body) and will be spraying it black. I will then remount the body on the power coated frame (I spent 3 nights trying to wire wheel the rust/paint/rust when I said f!@# this and dropped the front end and rear end off and just sand blasted it and took it over to a power coater I know). After the body is back on the frame I will align all the body gaps and then put a skim coat of bondo over everything to level it out, then sand, prime, seal and take the fenders and doors off to put the final coat of paint on. I tried the brushable seam seal but was amazed that it immediately peeled the 2 coats of Zero Rust off so I stripped the sections off that peeled and put 2 coats of PPG74 red epoxy primer over it but that peeled right off too. So a word to the wise, only use brushable sealer on bare metal (it's brushable because it has so much solvent in it to let it flow). I used the regular caulking tube seam seal and had no problems. Jeff Quote
Normspeed Posted September 6, 2007 Report Posted September 6, 2007 Wow, you're doing it right! The powder coat looks good. Quote
mackster Posted September 6, 2007 Report Posted September 6, 2007 Wow, you're doing it right! The powder coat looks good. I second that! It looks NICE! Quote
PatS.... Posted September 6, 2007 Report Posted September 6, 2007 I second that! It looks NICE! Motion passed...that looks great!!!! Keep the updates coming! How about some info on that rotisserie? Quote
Jeff.P_46 Posted September 6, 2007 Author Report Posted September 6, 2007 Hi Pat, I made the rotisserie after looking at some of the ones that could be found on the web. It certainly is great to have, makes welding and working on a car so much easier. Jeff Quote
1949P17BC Posted September 7, 2007 Report Posted September 7, 2007 Jeff, you made my night, I have had plenty of those F!@% it moments and dropped it for someone else to deal with it Quote
wldavis3 Posted September 7, 2007 Report Posted September 7, 2007 Very nice work, indeed! Keep the photos coming. Quote
Jeff.P_46 Posted September 15, 2007 Author Report Posted September 15, 2007 Here's some pics of the rotisserie I made. It's made out of 3.5", 3", 2.5" and 2" tubing. As usual, I built it heavier then it needed to be. Jeff Quote
DAVE KNOXX TENN Posted September 15, 2007 Report Posted September 15, 2007 I'm trying to get "Betty" into paint before winter closes in so I can spend the winter doing the mechanicals. So far I have done the major rust repair and pounded out some dents to the point were I can put some primer on her. I have primed and seam sealed the bottom of the floor (and the rest of the body) and will be spraying it black. I will then remount the body on the power coated frame (I spent 3 nights trying to wire wheel the rust/paint/rust when I said f!@# this and dropped the front end and rear end off and just sand blasted it and took it over to a power coater I know). After the body is back on the frame I will align all the body gaps and then put a skim coat of bondo over everything to level it out, then sand, prime, seal and take the fenders and doors off to put the final coat of paint on. I tried the brushable seam seal but was amazed that it immediately peeled the 2 coats of Zero Rust off so I stripped the sections off that peeled and put 2 coats of PPG74 red epoxy primer over it but that peeled right off too. So a word to the wise, only use brushable sealer on bare metal (it's brushable because it has so much solvent in it to let it flow). I used the regular caulking tube seam seal and had no problems.Jeff Looks like Get er done is a big understatement!!!!!!!THAT IS A BUEATIFULL JOBB!!!!!!!!.THANKS FOR THE UPDATE AND THE PICTS Quote
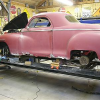
Jeff.P_46 Posted September 22, 2007 Author Report Posted September 22, 2007 More progress, I got the bottom side of the floor painted black and now the body is bolted back on the frame. I also have the fenders and trunk lid back on to check fit. It's starting to look like a car again. I have to perform some surgery on the rear passenger fender. There is a pretty big gap (to big for fender welting unless they make it with a 1" bead) so I will have to splice in a piece of metal to move it closer and narrow the gap. I also need to work on the trunk lid, it's sprung out on the bottom and sticks out 3/4". The person who did the body work on it some years ago just plastered the rear portion with bondo instead of fixing the problem. I am going to bolt a bracket to the latch assembly bolt holes (inside) and attach a come-along to that and see if I can spring the bottom section back. I also need to make a bigger battery box area on the inner splash guard for my Optima battery and then I will bolt those in and set the hood back on. If I don't have to any more metal work I will skim coat the body to smooth out the rough parts and get some more primer on it, hopefully before it starts turning cold. Jeff Quote
PatS.... Posted September 22, 2007 Report Posted September 22, 2007 Lookin good, Jeff. Love those big butts (on cars!) Thanks for the pics of the rotisserie. One of the best I have seen...simple and strong. Keep us all posted on your progress. You might not get alot of replies but progress reports sure help keep folks motivated and they are valuable for those who aren't quite sure what can go in to bringing an old car back to life. Quote
Normspeed Posted September 22, 2007 Report Posted September 22, 2007 Jeff, in your profile photo, I see you have quite a nice garage setup. Are you able to use it year-round in your climate? Quote
mackster Posted September 22, 2007 Report Posted September 22, 2007 that car is just beautiful! man it's a motivator to see how you are putting it together. . . big butts are a must for me! Quote
John Mulders Posted September 23, 2007 Report Posted September 23, 2007 Betty must love all the attention ! Great work indeed. John Quote
Jeff.P_46 Posted September 23, 2007 Author Report Posted September 23, 2007 Hi Norm, In winter the temperature is just over freezing and goes below at night pretty much thru March. I have a wood stove but it takes a couple of hours to bring up the the temperature to comfortable levels so I wait until the weekends to work on my projects so it slows my progress. I'm hoping to get the metal work done in the next 2 weeks then move on to the bondo work followed by paint. If I can get this done by the end of October I can spend the winter on less temperature sensitive tasks. Jeff Quote
Jeff.P_46 Posted September 25, 2007 Author Report Posted September 25, 2007 Closed up the gap on the rear passenger fender. I made a cut near the edge and spread open the front piece so the gap was more or less the same as the rest of the fender. I then cut a sliver of metal from my scrap pile to fill the gap and welded it in and sanded it smooth. I also was able to pull in the rear deck lid (with a come-along) to bring in the rear portion of the trunk lid. It will still require some filler to even out everything but it will be less then 3/16" instead of the 3/4" that was on it. Now on to the battery box mods for my Optima battery. Jeff Quote
Jim Yergin Posted September 25, 2007 Report Posted September 25, 2007 Nice work Jeff. Jim Yergin Quote
Jeff.P_46 Posted October 2, 2007 Author Report Posted October 2, 2007 I wanted to enlarge the battery box area to hold my Optima battery so I cut a area out of the inner splash and made up a 2" deep extension. The battery box really should have been on the opposite splash panel since I'm going to run a SBC but the original needed some repair work and already had the battery support underneath. With this done I can now prime the splash panels and bolt them up to the fenders and check the hood fit-up. I had planned on leaving the original trunk latch, emblem, light etc... on the trunk but have decide to shave it all off, including the rear tail lights which will be replaced with something I will French in. This means I will also shave all the front emblems and will French in the head lights as well (something I have aways wanted to do to a car) Jeff Quote

Recommended Posts
Join the conversation
You can post now and register later. If you have an account, sign in now to post with your account.