mm289
-
Posts
83 -
Joined
-
Last visited
Content Type
Links Directory
Profiles
Articles
Forums
Downloads
Store
Gallery
Blogs
Events
Classifieds
Everything posted by mm289
-
Unpicked all the rest of the rotten areas to get back to as near clean metal as I can. Included cutting out the front of the panel that supports the floor and the section that goes forward from the rocker to support the fender. Made up replacement panels and trial fitted. Treated the inside of all the sections with rust inhibitor then welded the repair panels in place and cleaned up. Now I have these reference points in place I can now start making up the rocker repair panels. If anyone has any thoughts on my questions above or pictures of how the middle body mount bolts up to the floor that would be great. Thanks, Paul,
-
Questions as above Don, looking for a bit of help with the fixing of the new middle body mount I have made up, 1. How does the mount fix to the inner rocker? I assume it just spot welds on to the inner, but on the other opposite side of the car side it looks like there is an additional strengthening plate sandwiched between the cross member and the rocker, but the other side is non original so I don't know if this is correct. 2.And maybe a bit of a dumb one , but what does the body mount bolt fix too? On this side it was thin air! As the outrigger/body mount is spot welded to the longitudinal brace that the seat mounts too I can't see how the bolt would attach to anything that would allow the body to seperate from the mount. Thanks, Paul.
-
Thanks fstfish gonna make up the inner rocker panel this weekend hopefully so need to figure out how that body mount bolts up, think I will post a seperate question so it doesn't get lost in here Cheers, Paul.
-
OK, got a chance to work on the Dodge today, it’s a holiday weekend over here so spent Friday and Saturday overhauling and installing a shaper I bought about a year ago. Got onto the Dodge at lunchtime and main job was to fabricate the replacement middle body mount on the passenger side. It's quite a complex shape and too difficult to make in one part (especially when you are hammering out 12 gauge tin, so made it up in 3 sections. First up roughed out the shape and cut where I knew I wanted to fold to make the flanges. Folded over the edges and used a flexi disc to get the rough shape (comparison to original) Repeated the process for the other side, Then clamped together and ground both sides so they were near enough identical. Then cut another strip of 12 gauge and shaped it to fit the profile of the sides, here it is clamped together ready for spot welds. Seam welded the whole unit for strength, filled the gaps, ground down and it looks like this. Here it is mocked up in situ. It is deliberately a bit long at the moment as I will trim it to length when I have made up the new inner rocker that it fixes too. Couple of questions for you experts : 1.I assume it just spot welds on to the inner, on the other side it looks like there is an additional strengthening plate sandwiched between the cross member and the rocker, but the other side is non original so I don't know if this is correct. 2.And maybe a bit of a dumb one , but what does the body mount bolt fix too? On this side it was thin air! As the outrigger/body mount is spot welded to the longitudinal brace that the seat mounts too I can't see how the bolt would attach? Cheers, Paul.
-
That looks gorgeous, great find. I actualy like the green paint as well Paul.
-
Good luck with yours Casper - being the wrong side of the pond parts cars are non existent over here so I have to go the long route and fabricate most of the parts myself, thats why it was important to get as solid a base as possible to start with. Having said which, I am coming Stateside to Chicago at the beginning of May so am hoping to fill my suitcase with some of the lightweight parts I need like window seals, body mounts and an ash tray! Cheers, Paul.
-
Why is it when you start repair work the holes you cut out only ever get bigger! Stripped back the rocker and floor, but as I exposed it the mid body mount condition looked worse and worse. So am going to need to fabricate a replacement for the end of the outrigger/body mount. For the benefit of anyone following this process/looking to do it themselves, there are 3 layers to unpick to get at the body mount. 1.The floor comes off first 2. Then there is a strengthening rib that runs front to back and holds the captive nuts for the seat 3. Then there is the body mount that runs laterally across the shell These are all sandwiched together with 8 spots welds which I have marked up in the pic below for reference With the spots welds removed I then cut back the body mount to good metal just outside of the main chassis rail. I will now fabricate a new mount and drop it in. Worth noting the original mount is made from pretty heavy steel, probably 10 or 11 gauge (2.25mm-2.5mm) so making up a replacement from flat sheet isn't easy, I have some cut off's of 12 gauge so we will see how it goes! Cleaned a load of the underseal off the chassis and looks like it has been restored/painted at some point which is good Cheers, Paul.
-
Cool, thanks for the info Harold. How difficult is it to remove the fender completely? I am thinking about doing that to make the footwell repair easier. Cut back some more of the floor at the weekend to expose the body mount under the middle of the door. Need to fab up a new section of mount and weld it in, will post up some picks when I am on a better network connection. Cheers, Paul.
-
Great thanks DJ. Looking more closely it looks like the rocker has been replaced at some stage so it may not be original. The mounting points have all been pushed in and filled with bondo and your right it does look bent in a couple of places. Plan is to get the slide hammer on it and try to get it flatter so I can cut right down on the bondo needed. Looking at the fender it is a bit behind the door lip halfway up so I am hoping by pushing it up a bit it will adjust the gap to the rocker and also make the trailing edge bow out a bit more in the middle. For shut lines I guess I will start at the roof and work down as I am not too sure what is orginal and what is replacement! Cheers, Paul.
-
Any thoughts on the above question, seems a bit quiet round here Paul.
-
Quick question. Where the rocker meets the front fender, the fender is proud by about 1/4". Is this normal? Would the rocker chrome trim cover this or can you pull the wing in? Cheers, Paul.
-
Overall 33ft by 18ft but it has to accomodate 3 working bays, so no its not big enough mind you i dont think any workshop is as you just acquire more projects to fill it cheers, Payl
-
OK, so started work on repairing the passenger side rocker panel this weekend. Removed the front seat and the inner fender to get better access. May have to remove the wing but that looks like a lot of work so have left in place for the moment. Floor looks like this: So then removed the patch panels that had been tacked in place and cleaned it all up to start to expose the extent of the rot. You can see where the floor has gone over the front outrigger and also at the front of the footwell where it meets the inner fender area. I was just going to cut out and replace along the rocker but there was also some small holes in the rest of the floor and experience has told me it takes longer to try and fill all these than it does to make a new panel. So out with the plasma and air saw and we then have a big hole! The bulk of the outrigger is in really good shape except where it meets the rocker (which is pretty much the same story on all of them) There is also some repair needed in the box where the rocker meets the inner fender area and back along the top and inside of the rocker itself. The plan at the moment is to rebuild the rocker panel in 2 or more pieces (top and inner) and slide this in behind where the outrigger joins. Then make good the end of the outrigger and drop in the replacement floor panel. Fair bit of metal shaping to be done to get that all to fit but that’s the plan anyway! The rest of the outer rocker is pretty solid apart from a few lumps of bondo where the locating holes for the trim have been filled. Also there has been some work done on the lower panel behind the door and this has been "blended" in with a load of bondo as well. The sides on this will probably be smooth rather than refit the original trim so I will do a bit of panel beating/pulling and lead work to get the metal straight again so it only needs a very thin skim of filler before paint. OK, so started work on repairing the passenger side rocker panel this weekend. Removed the front seat and the inner fender to get better access. May have to remove the wing but that looks like a lot of work so have left in place for the moment. You can just about see from this pic how the panel has been gathering rust under the bondo (as its porous) so in the fullness of time the whole thing will need bare metalling, but that can wait till I have time to do a full frame of resto! That’s all for this weekend! Cheers,
-
thanks, next job is to start stripping back the whole area so as you say will get a better view then. Will be making up my own repair panels as getting them shipped over the the UK is impractical usually and they end up bent anyway! Cheers, Paul.
-
Hi all, need a bit of advice on a rocker panel repair. Have posted up some pics on my build thread http://p15-d24.com/topic/37817-restoring-a-dodge-49-business-coupe-sloooooowly/ Example below. Basically need to repair the inner panel but the outer is in decent condition. Is it practical to do this from above/behind the panel rather than cutting out the whole rocker panel - I don't want to just weld patches into the inner, thinking a more substantial repair. Thanks, Paul.
-
Hi Mike, I think its a bit worse than the pics show Will clean it up first to see but i prefer to replace rather than patch, unless i'm pleasantly surprised. Only way i can see to get access to the inner rocker is from above, but will go investigate some more Cheers, Paul.
-
Any suggestions guys, can I repair the inner rocker without removing the outer rocker? Thanks, Paul.
-
Inside the cabin the floor has been plated at the front: And the top of the rocker has been filled: Although the back doesn’t look to bad: So here is my question: Given the outer rocker doesn’t look that bad I am not keen on cutting the whole rocker panel out. Is it possible to repair the inner rocker with the outer in place by cutting back the floor and working from the top/inside, or am I in dreamland? Cheers, Paul.
-
OK, so having cleared some space and got most of the machine shop/store sorted I can now start looking at the Dodge. First action is to get it roadworthy and that means sorting out the rocker panels. Gonna start with the passenger side and I am after a bit of advice here. The pics below will speak for themselves but basically the outside of the rocker doesn't look to bad. Feels solid although the whole car has had a healthy skim of filler at some point including in the dents! The inner rocker panel is another story though, heavily corroded around the body mounts and where the rocker attaches to the footwell. Front: Middle: Rear:
-
Thanks for the comments Andy/Kented/Bob/Don - definately focussed on getting this on the road first even if it isn't perfect - would be nice to do a few shows as a before and after sort of thing. Its different enough over here that it will attract a lot of attention anyway. Lol, agree on the air filter, it's even smaller than the one on my 1600cc Buggy! That will get sorted when I tidy up the engine bay generally - full service, carb rebuild, etc. etc. I have a few contacts who are into US military vehicles over here, a lot of which have the Dodge engine so I might be able to dig around and come up with some service parts and engine ideas from there as well. Also tend to visit the States on business once or twice a year so will start compiling a parts list so I can fill my suitcaes on the way back - who needs clothes anyway Cheers, Paul.
-
"IF your 6 is currently in good order and such..suggest that you tune it and drive it as it is and get a feel for the car..you can always reevaluate the car at a later date...often the only push on any schedule is we the owner...give it a fair shake...then decide..." Yep, I hear you. That’s kinda where I am at, get it roadworthy and run it for a summer then decide. When I get a chance I will compression and leak down check the engine to give me a feel for what it is like internally then get on with tidying the electrics, carbs, ancillaries etc. Next is brakes and driveline, then gotta decide how much to patch on the body/rockers to see me over till I do a full frame off. Problem is I KNOW if I take the frame off now to do the patching I will end up doing a full resto and it will be off the road for a couple of years! Got to many other vehicles in that situation already Cheers, Paul.
-
Problem 2 was pretty easy to solve in comparison. The rad was in reasonable condition but had split where the header tank meets the core. It had had what looked bondo put in to seal it which hadn't worked . Took it to our local radiator specialist who has fitted a modern 3 core insert. That cost me about £280 which wasn't too bad I thought. Fitted the rad at the weekend and fired her up. Actually seems to run quite nice although needs a really good tidy up. Wiring is shot to pieces and carb has seen better days! The sump and fluid drive look like they have fresh blue paint on so I am guessing it could have been a reconditioned/rebuilt unit. Also the head has new bolts fitted which would back this up. Once it was warmed up and running sweet I could move it into the workshop, although it’s a bit of a tight fit! Of course it ran out of petrol half way in and there was any way I was pushing it so had to chuck some more gas in, cranking it over flattened the battery so then had to jump start it of my truck etc. etc. Still, finally got it onto my ramps and hoisted into the air so I could have a proper look over. Think it is the first time it has been inside in the dry for a couple of years so should do it a bit of good! As said earlier, overall pretty impressed with the condition. Will load up some pics of the underside when I get a chance to go back in the workshop but had to do some proper work earning money today! Cheers, Paul.
-
Only 2 problems with getting it in the workshop. The workshop is full of "stuff" The rad is leaking like a sieve Problem 1 has been a bit more long term The roof on my "shed" where I kept my wood working, gardening stuff etc. went last winter so the shed became a useless lump of mouldy timber. My summer project was to move all the "stuff" out of the shed into my spare bay in the workshop, whilst moving one of my camper vans I was restoring into an temporary storage shelter next door (tent!) This then allowed me to start rebuilding the "shed" into a machine shop/store/wood shop. It is only partly finished but it is water tight and meant over Christmas I could move my gear out of the workshop and create a spare bay (Yippee ) Shed restoration goes a bit like this.... Had too split the post cause of the limit on the number of images.........
-
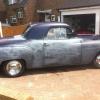
So, over the next few years I plan to restore the '49 Dodge Business Coupe I picked up last year. No rush really, might get it road worthy and run it as it is for the summer then have a proper frame of resto next winter. Haven't quite decided what the outcome will be yet, depends on how I feel as it goes along. Could leave it pretty much standard or do a mild kustom and a few period style speed parts. Trying to resist the V8 route as the flathead 6 is a bit different over here in the UK, but following some of Tim's and others posts about fitting flatheads out of later trucks with interest. Spec as it stands now is as follows: 1949 Dodge 2 door/3 passenger Business Coupe Serial number is 37000238 which makes it number 137 off the D29/D30 production line in that year and one of the 9,342 bus coupes built that year (thanks Shel_ny ) Body code is TPC1148, possibly 148th Three Passenger Coupe body? Engine code is D30-23840 which is a 1949 23" 230 cu in flathead 6 and the correct engine for the car Transmission is a Fluid Drive with 3 on the tree Options identified so far include Model 100 Heater, Mopar 803 Radio This is the car as it looked when I bought it. At some stage it has been lowered, partly shaved and some of the body prepped for paint, but that was a while ago so a lot of work will need doing again. Condition on most of the exterior panels is really good and the main chassis members are rock solid. There is corrosion around most of the body mountings where they meet the sills/rockers. Also the inner rocker panel on the passenger side has just had a sheet of tin tacked over it to hide the corrosion. Likewise the floor panels where they meet the inner fenders are rotten and have had tin screwed/tacked into place Will post up some pics as I get under it proper but actually it is more solid than some of my VW projects that are half its age Next job is to get it into the workshop. Cheers, Paul
-
So boys, looks like Pendine should be the target for getting mine on the road and ready, what do you reckon, room for a 49 Dodge alongside those Plymouths? That would nearly make it a set, '46 '47 '48 '49 Cheers, Paul (Kent, England)