Daniel Jones
-
Posts
39 -
Joined
-
Last visited
-
Days Won
4
Content Type
Links Directory
Profiles
Articles
Forums
Downloads
Store
Gallery
Blogs
Events
Everything posted by Daniel Jones
-
Interesting discussion. On a related note, a friend who restores (and paints) automobiles professionally, has offered to ceramic coat some of my exhaust manifolds and headers if I buy the coating. Does anyone have any recommendations on ceramic coating brands? I figure I'd try it first on some Buick 300 exhaust manifolds I have but I'd also like to do a couple of Chrysler straight 8 and Nash OHV 6 exhaust (and intake) manifolds which I don't want to screw up.
-
I'm afraid I don't. One engine came without an exhaust manifold and another had a cracked one. I'm looking for one myself, along with another harmonic balancer.
-
Keith, my 1938 Chrysler Shop Manual states the final drive ratios for C18 Royals were: 4.3:1 with overdrive (all) 4.1:1 without overdrive (sedans) 3.9:1 without overdrive (coupes) For the 1938 C19 Imperial and C20 Imperial Custom, the ratios were: 4.3:1 C19 with overdrive 3.91:1 C19 without overdrive 4.55:1 C20 with standard overdrive Oddly the T86 with R6 overdrive lubricant capacity is different in each application. The C18 is 3 1/4 pints, the C19 is 4 1/2 pints and the C20 is 6 1/4 pints. I can verify my C19 needed over 4 pints after I drained it.
-
Keith, I watched your overdrive video and have a quick question. When your overdrive engages, do you feel it or does it engage smoothly? I was expecting a bit of a clunk but mine seems to engage very smoothly. Oddly, mine seems to engage overdrive when the knob is pulled out, not pushed in. I don't have a tachometer in the car but, with the knob in, RPM seems higher when on the highway and I feel more engine braking. With the knob out, I don't feel the overdrive kick in but I do notice the car coasts more easily and the engine RPM seems lower. What I do notice when the overdrive is engaged is that, if I get off and back on the throttle quickly, there will be a bit of a mechanical lag. Does your overdrive do that? Also, while the car was in motion (well above 35 MPH), I depressed the clutch and tried to push the knob in but it didn't want to move. When I attempted to force it, I heard a bit of gear clashing and quickly backed off. The owner's manual states that "pulling this button out to the limit of its causes the overdrive unit to be inoperative. Do not pull this button out when going more than 35 MPH. However it may be pushed in at any speed while the clutch is disengaged." I need to get back under the car and see if maybe the control lever was flipped so that it's 180 degrees out from where it would have been originally.
-
Syncromesh fluid in T-86 with R6 overdrive?
Daniel Jones replied to Daniel Jones's topic in P15-D24 Forum
A quick follow up. Shifting is much improved with a fresh fill of Syncromesh fluid. I no longer have to pause for a second between shifts which makes keeping up with traffic much easier. Also, I think the overdrive may be working but not the way the owner's manual says it should. The owner's manual states that "pulling this button out to the limit of its causes the overdrive unit to be inoperative. Do not pull this button out when going more than 35 MPH. However it may be pushed in at any speed while the clutch is disengaged." Mine seems to engage overdrive when the knob is pulled out, not pushed in. Also, while the car was in motion (well above 35 MPH), I depressed the clutch and tried to push the knob in but it didn't want to move. When I attempted to force it, I heard a bit of gear clashing and quickly backed off. I need to get back under the car and see if maybe the control lever was flipped so that it's 180 degrees out from where it would have been originally. -
Syncromesh fluid in T-86 with R6 overdrive?
Daniel Jones replied to Daniel Jones's topic in P15-D24 Forum
Thanks for the reply. I don't think I've ever seen a SAAB 96 in the wild though I have seen a Sonett III. I did an oil change last night (6 quarts of 15W-40 Motorcraft Super Duty Diesel oil, has 1000+ PPM phosphorus in the form of ZDDP). While I had it on the stands, I also drained and refilled the fluid in the T-86 transmission and R6 overdrive. I didn't think about flushing it first with ATF but I let it drain for several hours. I filled it with 4 /4 pints of Pennzoil Synchromesh fluid and checked the lubricant level in the differential which was topped off. I drove it to work today. I'll need more seat time but the synchronizers didn't have any issues shifting into second. I forgot to order water pump lubricant but did that today. -
I'm getting ready to change the transmission and overdrive fluid in my 1938 Imperial with Borg Warner T-86 3 speed and R6 overdrive. The 1938 factory service manual recommends the use of SAE 70W aircraft engine oil in the summer and 50W in the winter. There's a warning against using lubricants with extreme pressure lubricants that contain lead soap as they can centrifuge out. There's another statement that says other types of EP lubricants are okay. Searching the net (and this site), there's a warning against gear oils with EP additives (which may attack brass/bronze/copper parts) unless they pass the ASTM D130 Copper Strip Corrosion Test and some are running the Ford tractor 90W all mineral gear oil from Tractor Supply. I'm thinking about trying the GM/Pennzoil Syncromesh fluid. I run Syncromesh in my TR8's LT77 5 speed transmission and it is recommended by the TR8 Car Club of America's. Before I switched to Syncromesh, I polled the TR7/TR8 list for what people used. Lots of different lubes were tried: Types G and F ATF, Dexron II and III ATF (with and without home brew additives for yellow metals), Redline MTL, Syncromesh, etc. Synchromesh was universally recommended. Some had used ATF with no ill effects but some of the racers had had problems. Also, my Tremec manual specifies GM Synchromesh for 3550 and TKO transmissions and a number of autocrossers run it in their T5 5-speeds as well. Syncromesh contains additives for protection and performance of the synchronizers and any yellow metals in the transmission and has the proper viscosity for low temperature operation and protection of the small plastic gears in the LT77 transmission oil pump. When Pennzoil introduced their version of Synchromesh, I saved the press release: "Pennzoil has designed a new transmission fluid, Pennzoil Synchromesh, that is specially formulated to meet the demanding needs of manual transmissions used in certain General Motors vehicles. These vehicles require GM part number 12345349 (Spec. No. 9985648) Synchromesh Transmission Fluid. Pennzoil Synchromesh Fluid is formulated with high quality paraffinic base stocks, a fluidity modifier and a multifunctional performance additive. It also has corrosion inhibitors, a foam suppressor, and shear stable viscosity index improver additives. Pennzoil Synchromesh provides excellent oxidation stability and low temperature performance. Plus, it's compatible with yellow metals, such as the bronze, brass and copper components found in manual transaxles and transmissions. This fluid will effectively lubricate General Motors manual transmissions and transaxles from -40 degrees C to 150 degrees C." One of the TR8 owners sent in a sample of the GM Synchromesh fluid (GM p/n 12345349) and it came back is a mineral as a paraffinic base stock with additives and viscosity enhancers improvers and appears to essentially be a kind of motor oil adapted for transmission use. Similarly, a post on the message board at www.oilanalysis.com found Synchromesh to consist of a 5W30 non-detergent oil with a friction modifer and an EP (extreme pressure) additive. It is made under contract for General Motors by Pennzoil (APC 3378) or by Texaco (Code 1874 MTX Fluid). According to Don Johnson: "Synchromesh fluid was developed for use in the New Venture manual transmission used by Chrysler and General Motors. Specifically, Synchromesh is formulated for transmissions that require GM Part No. 12345349 (Specification No. 9985648), GM Part No. 12345577, or Chrysler Part No. 4874464 (Specification MS-9224). Owners of Diamond Star Motors (DSM) Eclipse, Talon, and Laser cars with MMC (Mitsubishi Motor Corporation) transaxles have reported positive experiences using Synchromesh. The same can be said for owners of the Mitsubishi 3000GT and Dodge Stealth cars with the Getrag-manufactured AWD transaxles. The main benefit to DSM and 3/S owners seems to be excellent synchronizer performance, with reduced grinding and easier shifting compared to using some other gear oils. Pennzoil Synchromesh Fluid can be purchased as that brand or as the equivalent products: Quaker State Synchromesh (Quaker State is part of Pennzoil), Texaco Synchromesh, GM Synchromesh, or AC Delco Synchromesh (part number 89021808)." I have to granny shift 2nd gear on my T-86 to keep it from clashing and the overdrive is not engaging. I've got a rebuilt T-86 with R6 OD ready to swap in but I figure it's safer to experiment on the transmission currently in the car. Any reason why this could be a bad idea? Loren, how did your 10W-30 synthetic motor oil work out?
-
Bike is a 27" frame and 27" wheels. I didn't want to do a roof rack which wouldn't clear the garage door nor some of the trees I need to prune over my driveway. No Countach wannabe wing on this Pantera. Those are cosmetic as the flow separates at the trailing edge of the roof and doesn't reattach before the wings location.
-
Here's a picture of my 1983 Fuji. I've got it apart updating it with a 22 speed group set (50-34 compact double using the vintage Sugino AT crankset with 180mm arms, 11 speed Shimano 105rear cluster and brifters) and plan on repainting it in a dark blue. In the picture, I'm mocking up a custom trailer hitch for a bike rack on my 1974 DeTomaso Pantera. The car is low (roof is below my belt line) and I had to mount the bike rack high enough to clear the mufflers so the bike ends up towering over the car.

-
A couple of weeks before I moved that block, I decided to start weight training again after 20 years. I'm nursing elbow damage from lifting heavy weights and doing martial arts punching drills when I was younger. Your story is more reason for me to be extra careful as things don't heal like they used.
-
Would any of those parts be for sale? I'll be building two straight 8s, one for myself and one for a friend. I could use a post-WWII 2 barrel intake manifold and a side cover.
-
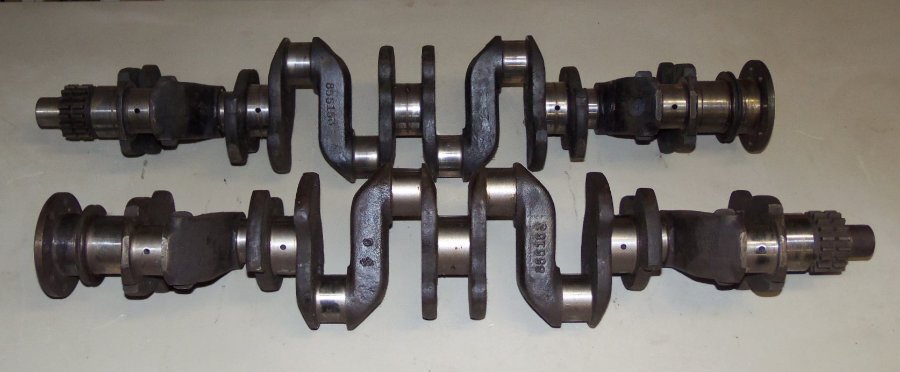
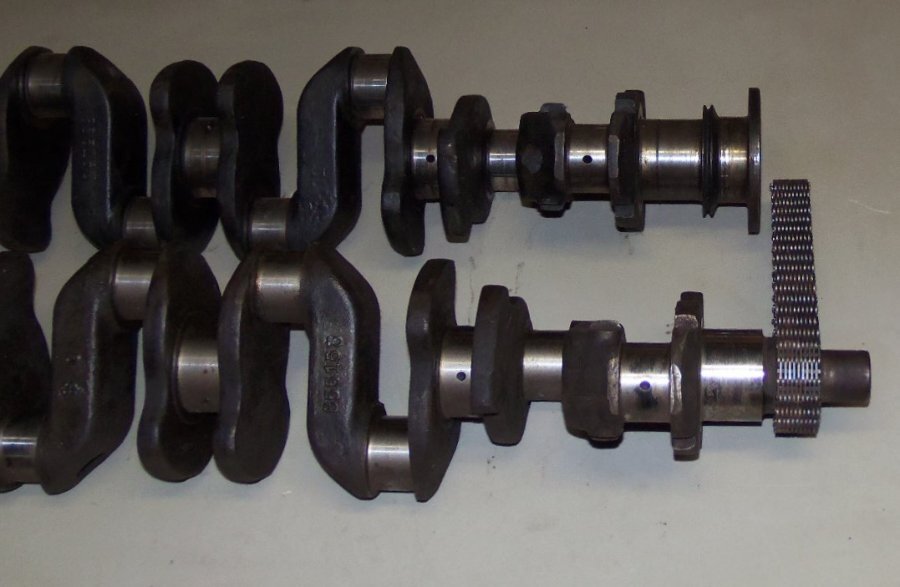
The two crankshafts pictured both carry part number 855153 (there are also $G, $I and V 48 A markings). These are 4 7/8" stroke crankshafts from post-WWII 324 cubic inch engines and weighed in at 98 pounds. The flanges are tapped for 8 bolts and with a bolt circle approximately 4 1/4" in diameter and a pilot diameter of ~0.9". The parts book lists part number 855151 as 1939 to 1942 crankshafts (C23 with Fluid Drive, 1940 C26 and C27, 1941 C30 and C33, 1942 C36 and C37). 1946-1950 crankshafts are listed as 1115281. In the pre-WWII parts book, 618623 is listed as a C19 and C23 without Fluid Drive crankshaft.
-
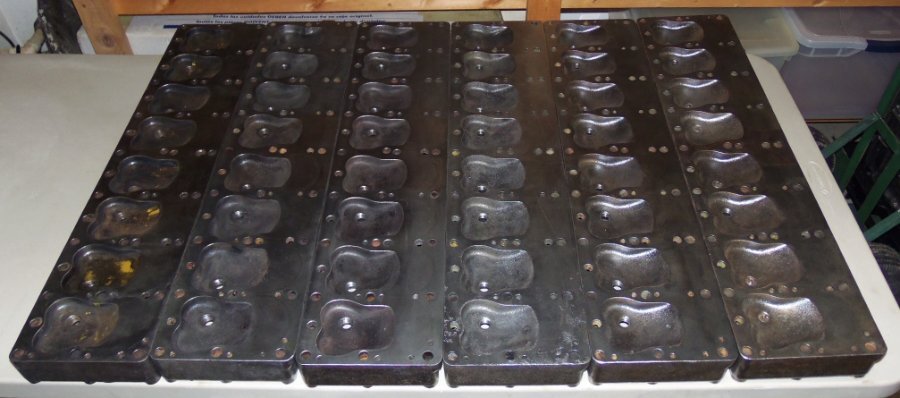
A straight 8 cylinder heads weighs in at 47 pounds on my bathroom scale. Of the six cylinder heads pictured: Four have the casting number 1314574-1 with date codes of 1-4, 4-26, 6-9 and 7-1 One has the casting number 121447-1 with a 10-11 date code One has the casting number 870146 with a date code 3-23 870146 is from a 1937 274 cubic inch and is the one on the left hand side. The yellow residue is left over Magnaflux powder. I believe the rest are from 324 cubic inch engines. If you look closely at 870146, compared to the post-WWII heads, the inboard row of holes opposite the combustion chamber are larger and 4 small holes near the far end chamber are missing. That accounts for the differences in the pre and post-WWII headgaskets. I still need to remove the remnants of the spark plugs and extract one of the thermostat housing bolts on the one with the 6-9 date code. An eBay ad from Vintage Mopar Direct claims that casting numbers 121446 and 121447 are 1946-1948 heads. One of the 1314574 heads is from the 1950 engine I'm rebuilding. I need to check the 1938 head to see what casting number it carries.

-
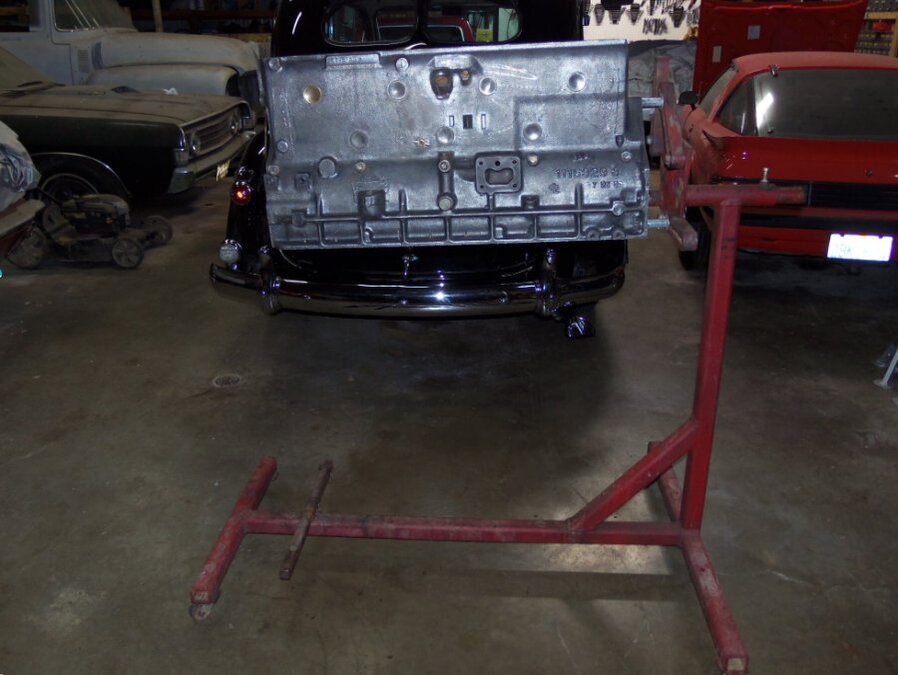
I moved the Chrysler straight 8 block that I had cleaned from the shop to the basement. The ground was frozen and it's uphill and I knew I should zip tie it to the 2 wheel dolly but was pressed for time. As I crested the top of the hill, a layer sheared off the permafrost. I remained on my feet but the cart pulled me down the hill and dumped the block in the soil. I rounded up a big zip tie and attempted the hill a second time. This time, I took a couple of steps and then pulled the dolly towards me in a rowing motion. That worked but I had to lift the dolly and block into the house as it wasn't going to roll up the step. I cleaned the dirt off, snipped off the zip tie and lifted it onto my bathroom scale. It may be hard to see in the photo but the bare block with main caps and bolts comes in at 288 lbs, about what one of my assembled Buick aluminum V8s weigh.

-
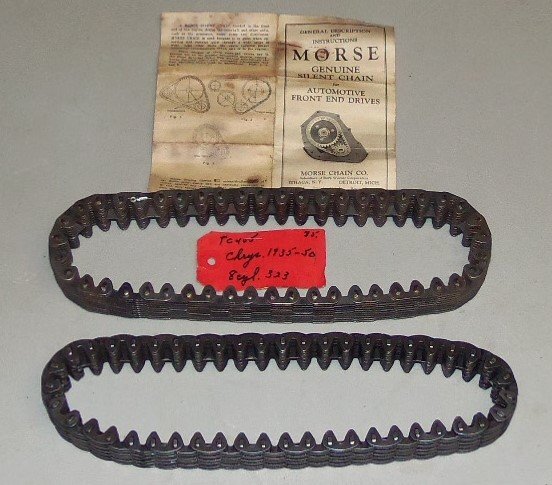
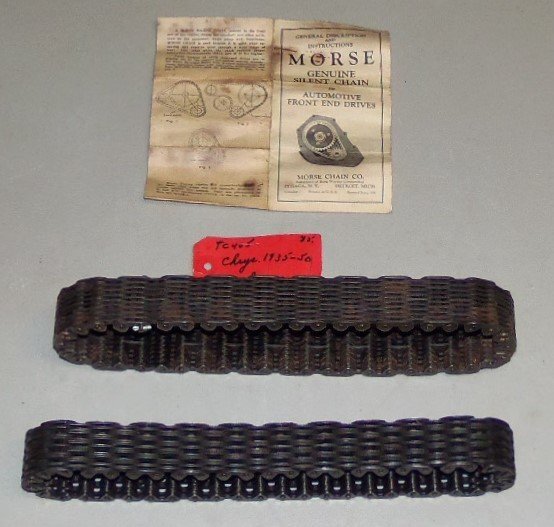
I ordered a paper copy of the "Chrysler Passenger Car Condensed Master Parts List - 1935 through 1942, Issued July 1947" and a digital copy of the 1949-1950 Chrysler Factory OEM Shop Manual. The latter came with a PDF of the 1946 to 1950 Mopar Parts Catalog ("MoPar 1954 and prior models Passenger Car Parts List"). I spent a few weeks scouring the parts entries and checking them against the casting numbers on my straight 8 parts then my hard drive failed and I lost all the data I had entered ? I found many of my pre-WWII casting numbers referenced in the early parts book but could find few of the post-WWII casting numbers in the 1946-1950 book. For instance, the camshaft timing gear part number does not appear, nor does any of the post WWII cylinder heads. > There are two types of chains and gears. Morse and Whitney. It appears that only the Morse style chain is available ($352.47 for just the chain): https://egge.com/product/timing-chain-124/ Specs say Morse type 40-106 with 0.5" pitch, 1.25" width and 47 links. A new-old-stock Morse 40-106 chain for Chrysler straight 8s was advertised on Ebay for $60 so I grabbed it. I'm not sure if my gears are Morse or Whitney and the old chain has no markings. The Morse chain is of a different construction with more but thinner links though it seems to fit the sprocket fine.

-
1938 Chrysler Imperial floating power motor mount R&R
Daniel Jones replied to Daniel Jones's topic in P15-D24 Forum
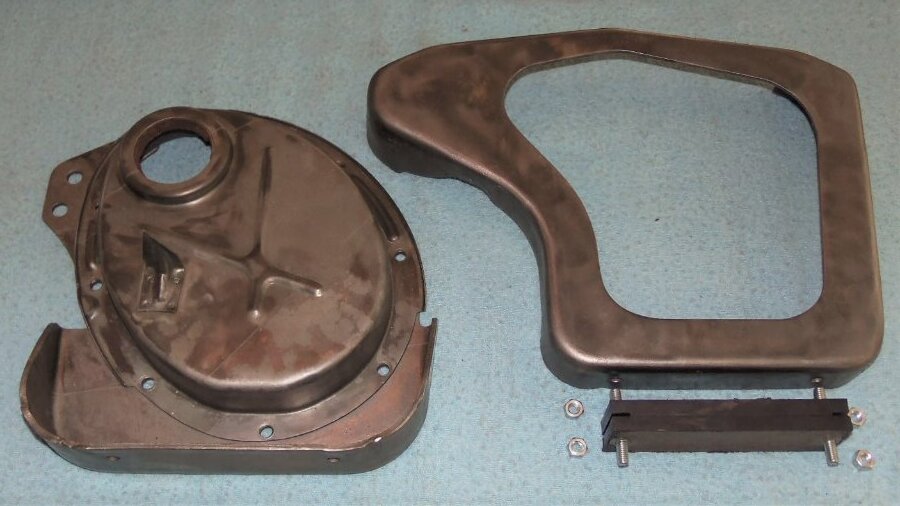
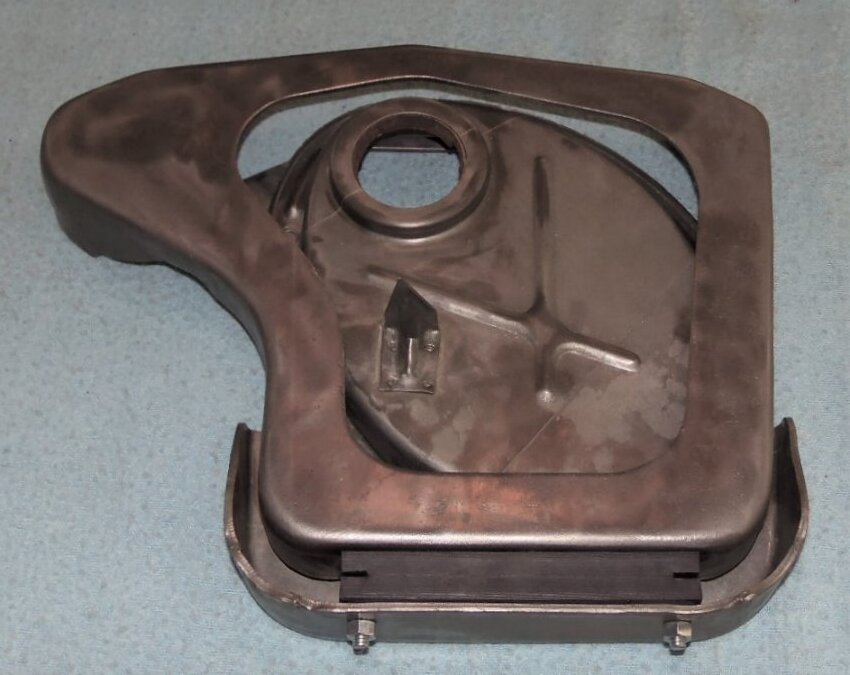
Not sure why the mount pictures are upside down but this is the way it's installed in the car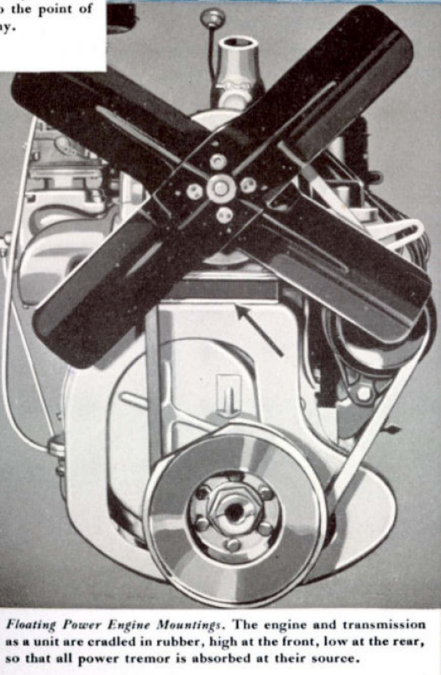
- 1 reply
-
- 1
-

-
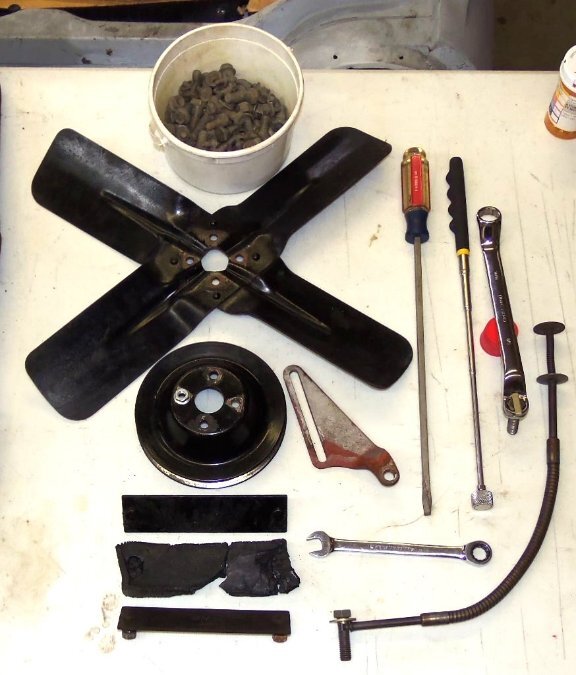
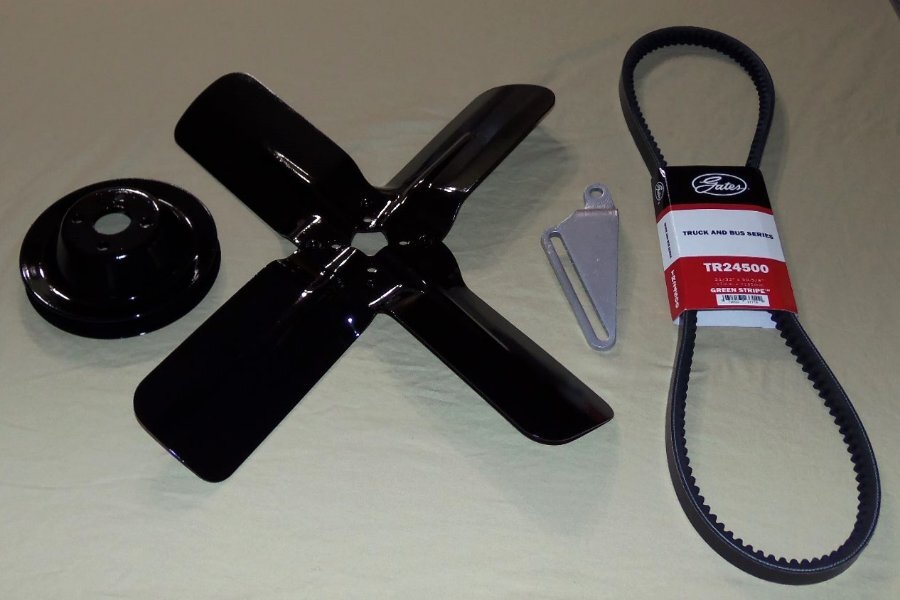
I removed and replaced the "floating power" motor mount on my 1938 Chrysler Imperial recently. With a few design changes, it could have been an easy task but the generator is in the way on one side and the combination mechanical fuel and vacuum pump (for the windshield wipers) is in the way on the other. Engine bay splash shields all around further limit access and the bottom motor mount studs are not accessible with the shroud in place. As it is, it took the better part of the day and my left arm is cut and bruised so par for the course. I first removed the two nuts and split type lock washers from the top studs. A ratcheting box end wrench worked well here as there isn't much room to swing the wrench. I then jacked the engine up so the backing plate cleared the top studs and removed the top plate which was no longer bonded to the rubber isolator pad. The bottom plate was not bonded either so the mount came out in two pieces. Dry-rotted and compressed, it was well and truly perished. To jack the engine up, I used a long floor jack with a wide board on the saddle and a piece of rubber anti-fatigue mat in between the board and the oil pan to prevent damage to the pan. On the right side, I could barely see the frame hole, much less get a hand near it. On the left side, the hole is hidden under the generator but I was able to get an offset box end wrench on the bolt head. I mistakenly thought the bolts threaded into rectangular bosses underneath the frame and spent several minutes trying to unthread the bolt before I realized it was just spinning an 11/16" nut on the bottom. BTW, the nuts underneath the car are accessed through holes in the lower control arms. A long wobble extension and ratchet works from below but, in order to break the nut free, I needed a way to get a wrench to stay on the bolt head up top to keep it from spinning. I used a neodymium bar magnet placed across the 5/8" end of a long offset box wrench. Though small, the magnet is strong enough to hold the wrench in place. Once loose, there isn't enough room on the right hand side to pull the bolt out with the box wrench in place so I levered the wrench and magnet off and grabbed the bolt with a telescoping magnetic pick up tool. With the bolts out and the engine jacked up, the shroud was free to move forward (limited by the proximity of the radiator, the harmonic balancer and crank pulley) but I had to remove the mechanical cooling fan, upper pulley and fan belt to have room to rotate the shroud to the left side to get access to the nuts on the bottom studs. Removing the belt requires the upper generator bracket be loosened but I removed it for paint, along with the fan and pulley. Putting the shroud frame bolts back in proved trickier than getting them out. The clearance is such that, while I could get the bolt to the hole, it needed to be rotated well past vertical to align with the hole. I used a flexible spring-loaded 2 claw grabber tool. That placed the bolt at the hole with the correct angle, then I used a long slender screwdriver to pry the bolt into the hole. Before attempting that, I aligned the shroud and frame holes using a tapered rod. From below, it was a dexterity test as I had to force my hand into the access hole while holding a large flat washer, split lock washer and nut. Working against gravity, the washers need to be held in place while simultaneously threading the nut on. The magnet could have helped with that but I didn't think of that until after I was finished and putting away the tools. Once started, it was easy enough to wedge the bolt to the side to keep it from turning but I still had to put the box end wrench back in place up top to torque the nut tight. As expected, the top studs needed to be shortened to have a chance of sliding the new rubber mount into place. I used a small brass hammer to tap it into place over the timing cover and used nyloc nuts up top, instead of lock washers and nuts. Though the fan belt sawed through the rubber mount, the belt wasn't in that bad of shape. There's a bit of wear on the leading edge but that's it. Still, I ordered a new belt and will keep the old belt in the trunk as a spare. I measured the original non-cogged V-belt at a bit less than 51" around the outside and 11/16" wide. It's marked with "Gates 650T Truck and Bus Belt". Searching on that part number didn't get any hits but RockAuto lists a similar Gates Green Stripe Truck and Bus V-belt for a 1938 Imperial under part number TR24500 which measures 50 5/8" by 21/32" and a V angle of 36 degrees. The product description says: Gates Green Stripe Truck and Bus Series V-Belts are specifically designed for heavy-duty truck, bus and off-road equipment applications. Absorbs normal shock loads without damage to the belt. Molded notches reduce bending stress, especially on small diameter pulleys, while dissipating heat High modulus, high strength tensile cord Oil and heat-resistant construction throughout Meets SAE J636b and SAE J637 specifications Meets RMA oil and heat resistant standards and static conductivity requirements Notched, TA Cross Sectional Design EPDM Rubber Belt Material Polyester Cord Material Lifetime Warranty They also list an AC Delco T24500 but it's not in stock and NAPA carries a Gold Stripe NBH 2524500 Truck and Bus belt which is likely made by Gates. The belt took a few days to arrive so I took the opportunity to repaint the pulley, bracket and cooling fan. I stripped the pulley and generator bracket to bare metal but only scuffed the fan before repainting. I first tried brushing on some leftover black Rustloeum paint but it had thickened and didn't flow well so I sanded it off and made a hardware store run for the same paint in an aerosol can. That worked much better. I also stripped a couple more of the pulleys and found another fan that will get primed and painted with Imron for the 324 build though I think that engine may have come with a 5 blade fan. I let the paint dry for a week or so before reassembling. Space from the water pump flange to the radiator is tight and you need to install the upper pulley and fan over the studs while trying to not nick the radiator or scratch the paint. The fan didn't want to slide onto the hub, presumably due to the extra thickness of the new paint. Also, near each stud hole, there's a small dome that limits the wrench throw so I used a ratcheting box wrench to pull a pair of the nuts down evenly, then threaded the third by hand. The final nut refused to thread on. When I removed the fan, one of the nuts was missing. I assumed it had just loosened and fell off but now I think the threads are bad and it was never installed. I dropped and lost a couple of nuts trying to get one started without success. I found a nylock nut that had more of a chamfer on the back side that I was able to get started. It threaded on with difficulty but not all the way. Once it was flush with the stud end, it didn't seem to thread on any farther so it might have started turning the stud farther into the water pump flange. I stopped there and made a note to myself to run a die over the threads next time I'm there which may be sooner than later as the radiator shows some signs of leakage at the very bottom. Getting the new fan belt on was also tricky. With the painted generator bracket loosely bolted in place, the 51" belt is too short to clear the pulley. Removing the bracket bolt and rotating the generator until it contacts the block provides just enough room to force the belt onto the pulley but it took several tries. Another one of those things where a third had would have come in handy. Once the belt was on, there wasn't room for a ratchet with a deep socket but I have an offset box wrench that has the same angle as the bracket that I used to do the final tightening. I used anti-seize on all the threads so I had to clean up the mess to finish the job. A few days later I drove the Imperial to work and the shuddering when the clutch is engaged is gone and the car seems smoother to drive, though it was already pretty smooth. Given the condition of the motor mount, I thought it might also need transmission mounts but those look good. I thought aboout ordering spares just-in-case but the vendor (Andy Bernbaum) I got the motor mount from didn't have a listing for them. Also, I topped off the radiator with coolant because it's seeping out at the bottom. I need to check the 1937 radiator but I don't think it is the same as they changed the hood design.
- 1 reply
-
- 1
-
-
Thanks! Your reply forced me to root around and find the original chain and gears and I just ordered a new-old-stock Morse TC405 chain which appears to match the one that came off the 1950 engine. I'll verify that when it arrives. The part number on the crank gear appears to be DO7382. The other gear is still on the crankshaft. I have a vague memory of removing that balancer years ago when my brother inherited the 1937 Imperial, though I don't recall which engine it came from. I cleaned and had the fasteners replated including the damper hub bolt. The flat damper bolt and thin damper is the one I took off yesterday. That leaves a spare damper bolt (identical to the plated one) and crankshaft but I can't find the damper that would go with it. I'm not certain I ever had it but I'll keep searching. I found a photograph of someone else's an assembled 1936 Imperial 323.5 straight 8 with the one year only integral case overdrive transmission and it shows a thick balancer. Do you know if the 323 pre and post-WWII crankshafts are the same part number? Good to know. This is beginning to feel like equal parts archeology and engine rebuilding.
-
Cleaned up a spare set of main caps and bolts. I need to make sure they don't get mixed up with the ones off the engine I'm rebuilding.
-
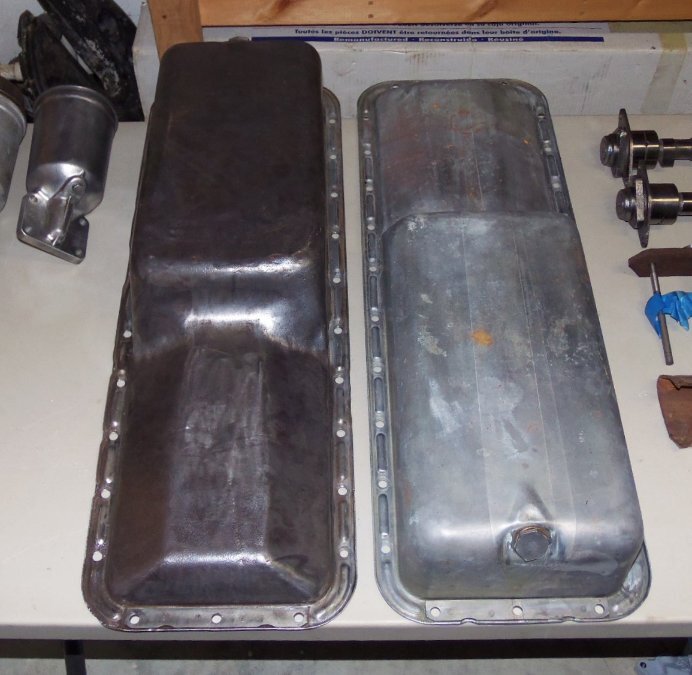
Oil pans all appear to be of the same design. The one on the right was in really nice shape with no rust. The one on the left had some rust scale which I've removed but still needs to be wiped down with phosphoric acid and Prep Sol. It's serviceable but I think I've got three still on engines that are in better shape.
-
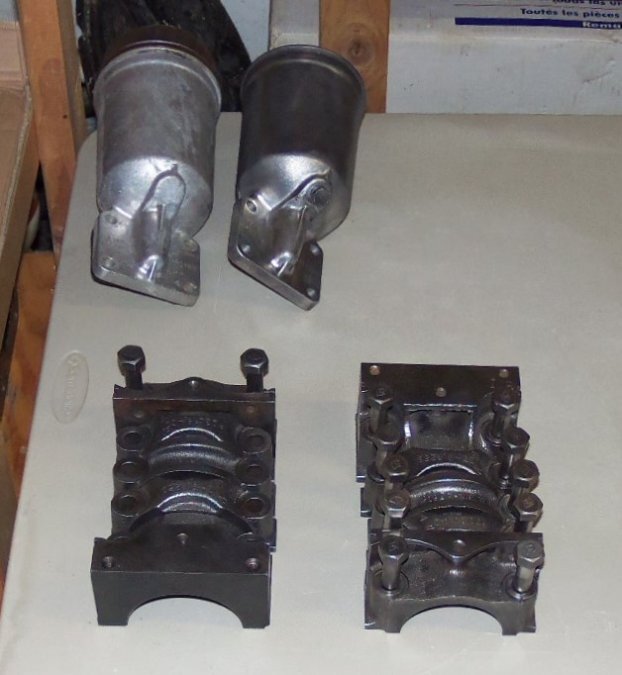
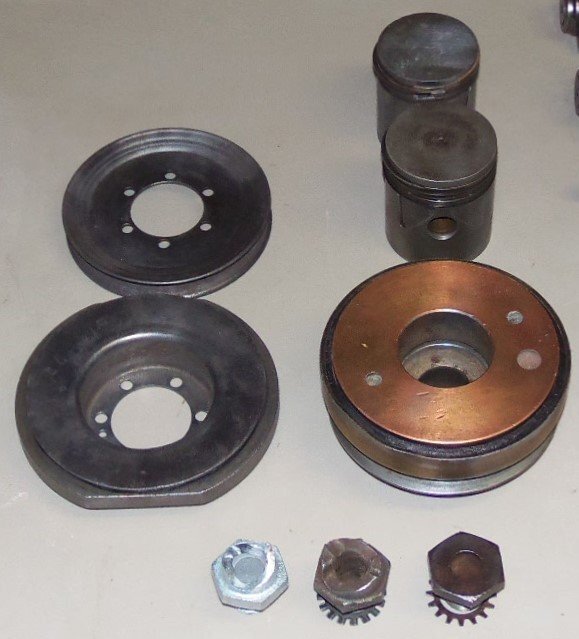
I also cleaned up another balancer. The thinner one on the left is from a C39 (1946 to 1948) and has two flat portions on the perimeter but is symmetric so is still neutrally balanced. The thicker one has what appears to be a bronze hub but is magnetic. There are no part numbers on either balancer but I believe it is from the 1950 C49 hydraulic lifter engine. However, there are 3 damper bolts that I removed from engines so I may have another damper hiding somewhere. The balancer that is still on the 1937 C14 is thinner than the bronze one but I've not checked it yet to see if it matches the one from the C39. I also need to check what style the 1938 C23 has. I plan to get two of them rebuilt. The damper bolts take a 1 13/16" socket. There are two bolt designs with the later one having a flat face. The earlier ones look like they may have a provision for a hand crank?
-
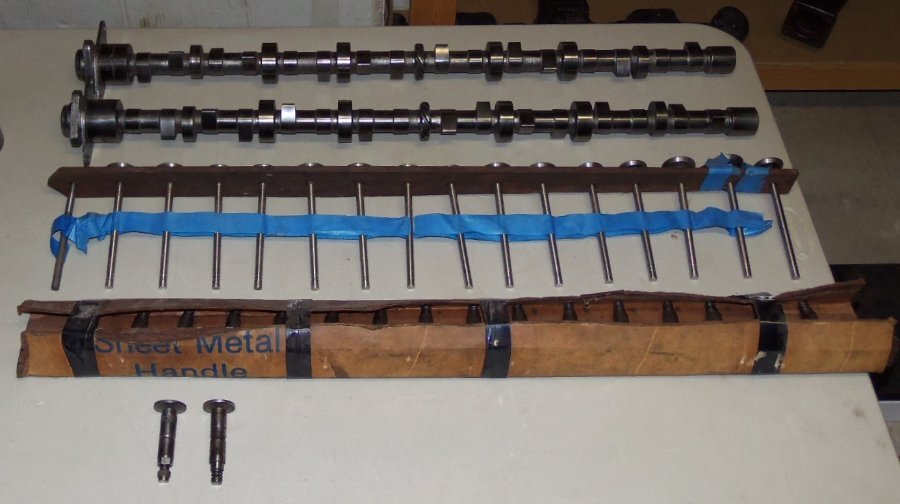
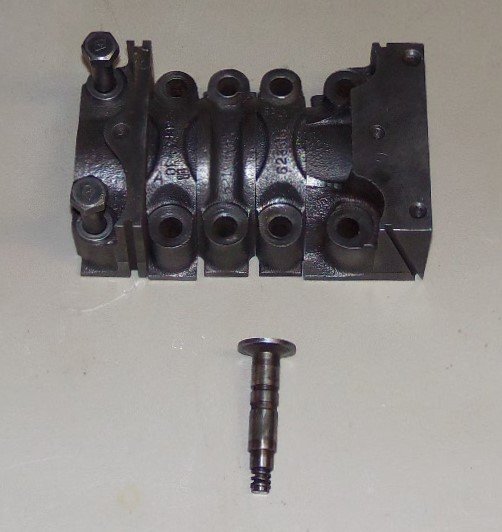
I cleaned up the camshafts. One (the one at the back of the picture below) has a very faint 4 digits which start and end with ones followed by 228 so that matches the 1311228 for the hydraulic camshaft. The other one carries 695424 not 1067202 but may be from an earlier Chrysler straight 8. I measured the base circle and peak lift to be the same on both camshafts. I'll have my machinist put them on the cam doctor to check the lobe shapes. I'd expect the 695424 solid lifter camshaft to have clearance ramps. The Wilcox-Rich lifters do have a crown so aren't worn flat. The interesting thing is the two cams are clocked differently relative to the timing gear mounting bracket so I'll need to make sure not mix up the gears. I think only the timing chains are available so you have to reuse the crank and cam gears.
-
Thanks for the lifter information. It's much appreciated. I don't see either of those numbers on the 2 cams that I have. One cam has 695424 and the other has a number that ends in 228 (can't yet read the first three digits). I'll clean them up and see if there are any other numbers.
-
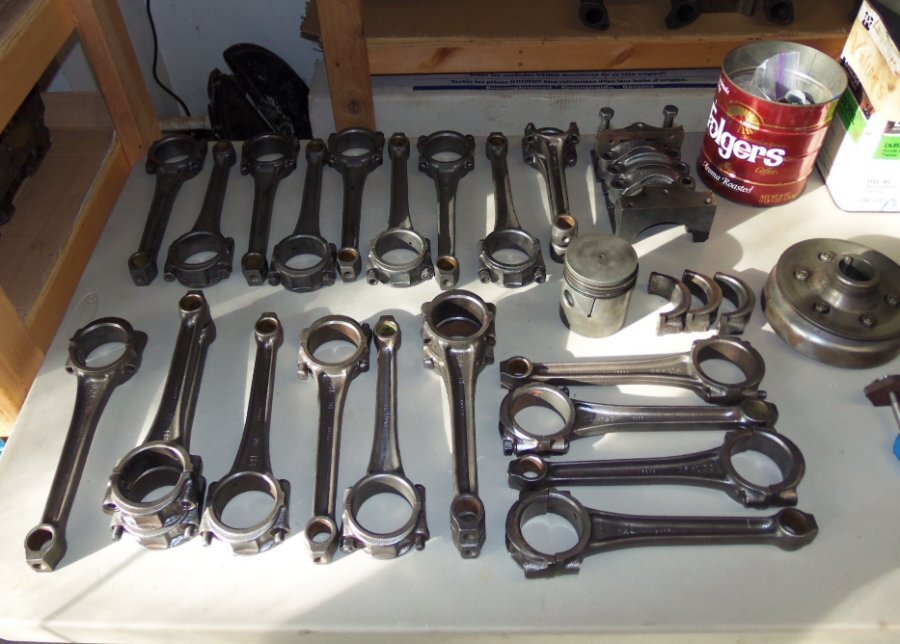
The number stamped into this particular block is C49-21267 and the cast-in number is 11153293. C49 indicates the engine is from 1950, the last year that Chrysler installed straight 8s in automobiles. They continued into the 1960s for marine and industrial applications. 1950 is also the only version that got hydraulic lifters, specifically Wilcox-Rich zero lash lifters, along with a matching camshaft. As I understand it, the Chrysler Wilcox-Rich lifters have not been available for a long time and don't interchange with Wilcox-Rich lifters used in other engines of the era (e.g. Packard, Cadillac). Also, they were individually hand-selected for fit so need to be kept in order. I've got a full set and they've been kept in order, along with the (re-ground) valves. I still need to figure out which of the camshafts is the matching one and study the oiling system differences (compared to the solid lifter blocks). Given the straight weight, non-detergent, oils of the day, I'd imagine early hydraulic lifters were problematic if you didn't do regular oil changes. That reminds me, last winter, my machinist picked up one of Crane's cam grinders that had been sitting neglected since 2009. It's a Van Norman but uses the same masters and some of the Berco machines. Apparently, the Berco is an Italian copy of the Van Norman and many parts interchange. My machinist thinks it was working perfectly when parked but he went through it from end-to-end, including changing out the rocker table bearings. Harvey Crane made a big deal about keeping those fresh. Dave said his needed changing mostly from sitting around being covered in old coolant for 14 years. I'll have him check my cam and lifters over. If practical, I'd like to have the cam re-ground for a bit more performance. It appears that all 274, 299 and 324 Chrysler straight 8s used the 9" long connecting rods and 2" compression height flat top pistons. The difference in displacement is from the crankshaft stroke. If that's correct, each of the blocks would have a different deck height. I've still got a few more rods to disassemble and clean up but 4 or 5 of the rods are shorter and lighter duty than the others. They have the CDDP (Chrysler-Dodge-DeSoto-Plymouth) logo and were fitted with smaller diameter pistons (3.125") which appear to be unique to the 1931 Chrysler CD. The 9" rods carry the same part number (954429) and carry a series of what I assume are batch numbers (DF-111, 112, 113, 114, 119, 120, 124). The caps all carry the same part number (595087). Some of the rods carry a M3308B while the majority have M3308. I know that some Chrysler parts with A or B after a part number indicated a different tolerance range but these are cast-in, not stamped. I need to measure them to see if they are under or over-sized. I've got the set that came out of the C49 324 plus enough for another set, some spares and extra caps. I've got a bunch of head and manifold studs/bolts ready to go in the vibratory polisher but I think I'll clean the main cap bolts by hand since they aren't corroded. I've been wanting to get an ultrasonic cleaner for cleaning carburetor parts so I'll look into getting one of those and use it for the rod bolts and nuts.
-
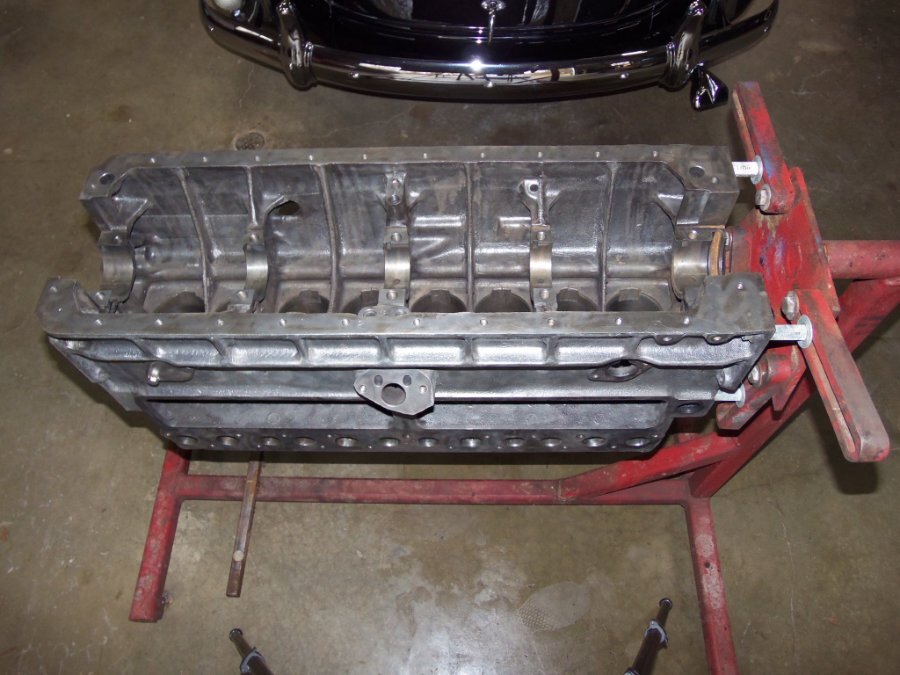
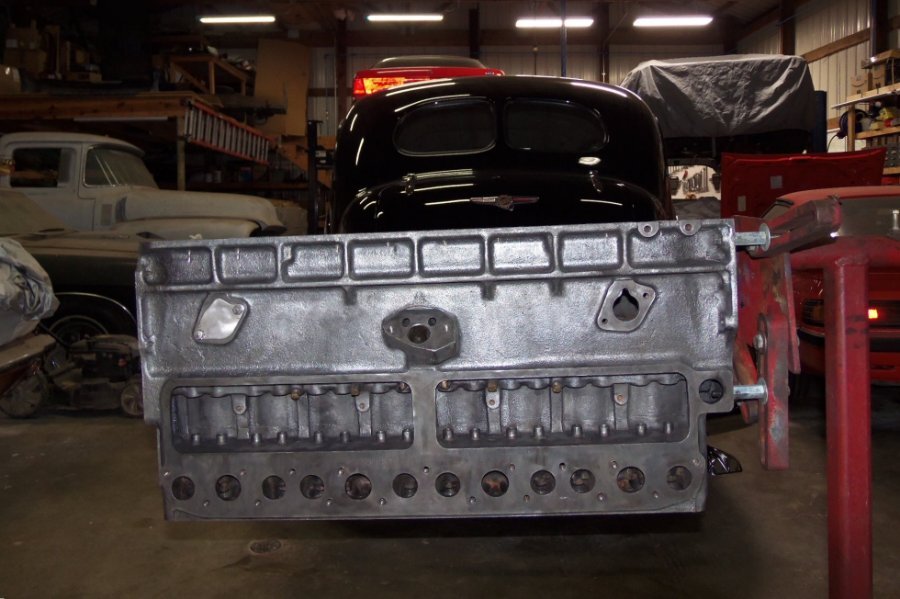
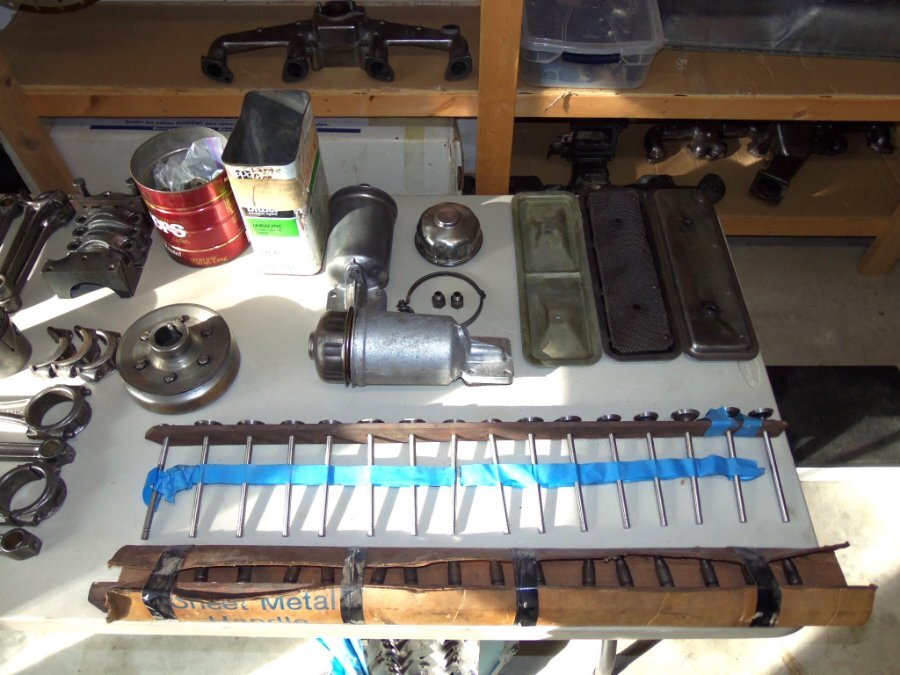
Before the first snow of the season fell, we got a day that was warm enough to use the air tools and power washer outside so I spent some time cleaning Chrysler straight 8 parts. I soaked the 324 cubic inch block with oven cleaner. After soaking for 20 or 30 minutes, I hit it with the power washer, gave it a blow dry, and then went after it with wire brush wheels on various air tools. I still need to chase all the threads, run the brushes through the oil passages and put the bore scope down the water distribution tube to see if it needs to be replaced. Looks like the distribution tubes are available: https://www.moparmall.com/MoPar-PN-1115296-1115302-Water-Dist-Tube-p/310-196.htm At this point, the block is clean enough to the machine shop to be magnafluxed, measured for pistons, bored, honed and have the cam bearings installed. The crankshaft will get machined, rods re-sized and the reciprocating assembly balanced at the same time. I still need to send out the harmonic balancer(s) to be rebuilt. Since it's neutral balance, I don't think my machinist will need the flywheel or damper for balancing but I'll ask him to be sure. I'll replace the core plugs once it's back from machining. Unlike other engines I've worked on, the convex core plugs go in flush with the block instead of recessed. The block will get another power washing with soap and water before it gets painted gloss silver Imron. I'll likely do one of the heads in gold paint like the current engine. I'm developing a strong dislike for non-detergent motor oils. I spent about 6 hours on a pair of oil pans and a couple of other parts. Scraped the majority of sludge out then gave them the oven cleaner, power washer and rotary wire brush treatment followed by a wipe down with phosphoric acid and more wiring brushing. Getting to the gunk under the baffles was the trickiest part. Of the 6 straight 8 oil pans I have here, these are the two worst so I won't even be using them though I'll likely paint them at the same time the rest of the parts get painted just to keep them from rusting. I may let the machine shop clean the next block. It's just too much work the way I do it. I also need to find a cheaper alternative to Evaporust so I can fill a container large enough to immerse big parts like the straight 8 cylinder heads and exhaust manifolds. Looks like people have used molasses, citric acid, apple cider vinegar, phosphoric acid and oxalic acid. Among those solutions, oxalic acid might give the best bang for the buck. Electrolysis also sounds like a good option. I need a container that will handle the width of an FE big block Ford block and the length and height of the Chrysler straight 8. Something that size would let me do a bunch of cylinder heads or manifolds at the same time.